5.如何使用安全功能
Android 中有多种安全功能,如加密、数字签名和权限等。如果这些安全功能未得到正确使用,安全功能就无法高效工作,从而导致恶意用户有可能趁虚而入。本章将说明如何正确地使用安全功能。
5.1.创建密码输入屏幕
5.1.1.示例代码 
本节介绍了在创建密码输入屏幕时,在安全性方面需要考虑的一些要点。此处仅介绍与密码输入相关的内容。在将来的版本中,我们计划发布其他文章,说明保存密码的方法。
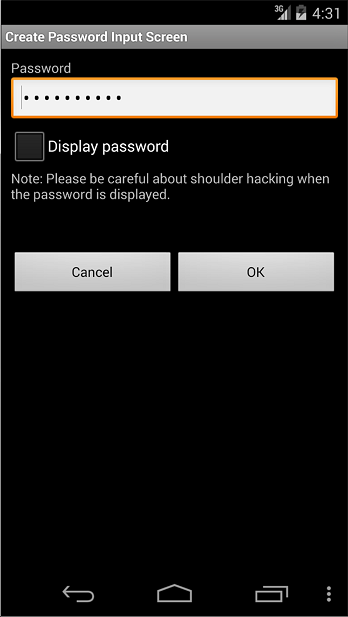
图 5.1.1 密码输入屏幕
要点:
- 应以掩码形式显示输入密码(显示为 *)
- 提供用于以纯文本格式显示密码的选项。
- 提醒用户:以纯文本显示密码存在风险。
要点:处理上次输入的密码时,除了上述要点之外,还应注意以下几点。
- 如果在初始显示中有上次输入的密码,应将固定位数的黑点显示为虚拟值,以免用户猜测出上次输入的密码位数。
- 在显示虚拟密码且用户按下“Show password”(显示密码)按钮后,清除上次输入的密码并提供输入新密码的状态。
- 如果上次输入的密码显示为虚拟密码,用户尝试输入密码时,系统会清除上次输入的密码并将新用户输入视为新密码。
password_activity.xml
<?xml version="1.0" encoding="utf-8"?>
<LinearLayout xmlns:android="http://schemas.android.com/apk/res/android"
    android:layout_width="fill_parent"
    android:layout_height="fill_parent"
    android:orientation="vertical"
    android:padding="10dp" >

    <!-- Label for password item -->
    <TextView
        android:layout_width="fill_parent"
        android:layout_height="wrap_content"
        android:text="@string/password" />

    <!-- Label for password item -->
    <!-- *** POINT 1 *** The input password must be masked (Display with black dot) -->
    <EditText
        android:id="@+id/password_edit"
        android:layout_width="fill_parent"
        android:layout_height="wrap_content"
        android:hint="@string/hint_password"
        android:inputType="textPassword" />

    <!-- *** POINT 2 *** Provide the option to display the password in a plain text -->
    <CheckBox
        android:id="@+id/password_display_check"
        android:layout_width="fill_parent"
        android:layout_height="wrap_content"
        android:text="@string/display_password" />

    <!-- *** POINT 3 *** Alert a user that displaying password in a plain text has a risk.-->
    <TextView
        android:layout_width="fill_parent"
        android:layout_height="wrap_content"
        android:text="@string/alert_password" />

    <!-- Cancel/OK button -->
    <LinearLayout
        android:layout_width="fill_parent"
        android:layout_height="wrap_content"
        android:layout_marginTop="50dp"
        android:gravity="center"
        android:orientation="horizontal" >

        <Button
            android:layout_width="0dp"
            android:layout_height="wrap_content"
            android:layout_weight="1"
            android:onClick="onClickCancelButton"
            android:text="@android:string/cancel" />

        <Button
            android:layout_width="0dp"
            android:layout_height="wrap_content"
            android:layout_weight="1"
            android:onClick="onClickOkButton"
            android:text="@android:string/ok" />
    </LinearLayout>
</LinearLayout>
应根据目的调整 3 种方法(位于 PasswordActivity.java 底部)的实现。
- private String getPreviousPassword()
- private void onClickCancelButton(View view)
- private void onClickOkButton(View view)
PasswordActivity.java
package org.jssec.android.password.passwordinputui;

import android.app.Activity;
import android.os.Bundle;
import android.text.Editable;
import android.text.InputType;
import android.text.TextWatcher;
import android.view.View;
import android.view.WindowManager;
import android.widget.CheckBox;
import android.widget.CompoundButton;
import android.widget.CompoundButton.OnCheckedChangeListener;
import android.widget.EditText;
import android.widget.Toast;

public class PasswordActivity extends Activity {

    // Key to save the state
    private static final String KEY_DUMMY_PASSWORD = "KEY_DUMMY_PASSWORD";

    // View inside Activity
    private EditText mPasswordEdit;
    private CheckBox mPasswordDisplayCheck;

    // Flag to show whether password is dummy display or not
    private boolean mIsDummyPassword;

    @Override
    public void onCreate(Bundle savedInstanceState) {
        super.onCreate(savedInstanceState);
        setContentView(R.layout.password_activity);
        // Set Disabling Screen Capture
        getWindow().addFlags(WindowManager.LayoutParams.FLAG_SECURE);

        // Get View
        mPasswordEdit = (EditText) findViewById(R.id.password_edit);
        mPasswordDisplayCheck = (CheckBox) findViewById(R.id.password_display_check);

        // Whether last Input password exist or not.
        if (getPreviousPassword() != null) {
            // *** POINT 4 *** In the case there is the last input password in an initial display,
            // display the fixed digit numbers of black dot as dummy in order not that the digits number of last password is guessed.

            // Display should be dummy password.
            mPasswordEdit.setText("**********");
            // To clear the dummy password when inputting password, set text change listener.
            mPasswordEdit.addTextChangedListener(new PasswordEditTextWatcher());
            // Set dummy password flag
            mIsDummyPassword = true;
        }

        // Set a listner to change check state of password display option.
        mPasswordDisplayCheck
                .setOnCheckedChangeListener(new OnPasswordDisplayCheckedChangeListener());
    }

    @Override
    public void onSaveInstanceState(Bundle outState) {
        super.onSaveInstanceState(outState);

        // Unnecessary when specifying not to regenerate Activity by the change in screen aspect ratio.
        // Save Activity state
        outState.putBoolean(KEY_DUMMY_PASSWORD, mIsDummyPassword);
    }

    @Override
    public void onRestoreInstanceState(Bundle savedInstanceState) {
        super.onRestoreInstanceState(savedInstanceState);

        // Unnecessary when specifying not to regenerate Activity by the change in screen aspect ratio.
        // Restore Activity state
        mIsDummyPassword = savedInstanceState.getBoolean(KEY_DUMMY_PASSWORD);
    }

    /**
     * Process in case password is input
     */
    private class PasswordEditTextWatcher implements TextWatcher {

        public void beforeTextChanged(CharSequence s, int start, int count,
                int after) {
            // Not used
        }

        public void onTextChanged(CharSequence s, int start, int before,
                int count) {
            // *** POINT 6 *** When last Input password is displayed as dummy, in the case an user tries to input password,
            // Clear the last Input password, and treat new user input as new password.
            if (mIsDummyPassword) {
                // Set dummy password flag
                mIsDummyPassword = false;
                // Trim space
                CharSequence work = s.subSequence(start, start + count);
                mPasswordEdit.setText(work);
                // Cursor position goes back the beginning, so bring it at the end.
                mPasswordEdit.setSelection(work.length());
            }
        }

        public void afterTextChanged(Editable s) {
            // Not used
        }

    }

    /**
     * Process when check of password display option is changed.
     */
    private class OnPasswordDisplayCheckedChangeListener implements
            OnCheckedChangeListener {

        public void onCheckedChanged(CompoundButton buttonView,
                boolean isChecked) {
            // *** POINT 5 ***  When the dummy password is displayed and the "Show password" button is pressed,
            // clear the last input password and provide the state for new password input.
            if (mIsDummyPassword && isChecked) {
                // Set dummy password flag
                mIsDummyPassword = false;
                // Set password empty
                mPasswordEdit.setText(null);
            }

            // Cursor position goes back the beginning, so memorize the current cursor position.
            int pos = mPasswordEdit.getSelectionStart();

            // *** POINT 2 *** Provide the option to display the password in a plain text
            // Create InputType
            int type = InputType.TYPE_CLASS_TEXT;
            if (isChecked) {
                // Plain display when check is ON.
                type |= InputType.TYPE_TEXT_VARIATION_VISIBLE_PASSWORD;
            } else {
                // Masked display when check is OFF.
                type |= InputType.TYPE_TEXT_VARIATION_PASSWORD;
            }

            // Set InputType to password EditText
            mPasswordEdit.setInputType(type);

            // Set cursor position
            mPasswordEdit.setSelection(pos);
        }

    }

    // Implement the following method depends on application

    /**
     * Get the last Input password
     *
     * @return Last Input password
     */
    private String getPreviousPassword() {
        // When need to restore the saved password, return password character string
        // For the case password is not saved, return null
        return "hirake5ma";
    }

    /**
     * Process when cancel button is clicked
     *
     * @param view
     */
    public void onClickCancelButton(View view) {
        // Close Activity
        finish();
    }

    /**
     * Process when OK button is clicked
     *
     * @param view
     */
    public void onClickOkButton(View view) {
        // Execute necessary processes like saving password or using for authentication

        String password = null;

        if (mIsDummyPassword) {
            // When dummy password is displayed till the final moment, grant last iInput password as fixed password.
            password = getPreviousPassword();
        } else {
            // In case of not dummy password display, grant the user input password as fixed password.
            password = mPasswordEdit.getText().toString();
        }

        // Display password by Toast
        Toast.makeText(this, "password is \"" + password + "\"",
                Toast.LENGTH_SHORT).show();

        // Close Activity
        finish();
    }
}
5.1.2.规则手册
创建密码输入屏幕时,请遵循以下规则。
5.1.2.1.输入密码时提供掩码显示功能(必需)
智能手机的使用环境通常是火车或公交车等拥挤的场所,在这类场所中,密码存在存在可能被他人所窥视的风险。因此,作为一项应用程序规范,有必要采用以掩码形式显示密码的功能。
可以通过两种方法将 EditText 显示为密码:在布局 XML 中静态指定,或通过从程序切换显示来动态指定。前者通过为 android:inputType 属性指定“textPassword”或使用 android:password 属性实现。后者的实现方法则是:使用 EditText 类的 setInputType() 方法将 InputType.TYPE_TEXT_VARIATION_PASSWORD 添加至其输入类型。
下面显示了每种方法的示例代码。
在布局 XML 中以掩码形式显示密码。
password_activity.xml
    <!-- Password input item -->
    <!-- Set true for the android:password attribute -->
    <EditText
        android:id="@+id/password_edit"
        android:layout_width="fill_parent"
        android:layout_height="wrap_content"
        android:hint="@string/hint_password"
        android:inputType="textPassword" />
在 Activity 中以掩码形式显示密码。
PasswordActivity.java
    // Set password display type
    // Set TYPE_TEXT_VARIATION_PASSWORD for InputType.
    EditText passwordEdit = (EditText) findViewById(R.id.password_edit);
    int type = InputType.TYPE_CLASS_TEXT
            | InputType.TYPE_TEXT_VARIATION_PASSWORD;
    passwordEdit.setInputType(type);
5.1.2.2.提供用于以纯文本显示密码的选项(必需)
智能手机中的密码输入通过触摸屏输入完成,因此,与 PC 中的键盘输入相比,可能很容易发生误输入的情况。由于输入不便,用户可能会使用简单的密码,这会带来更大的危险。此外,如果存在密码输入失败数次后锁定帐户之类的策略,必须尽可能避免误输入。为了解决这些问题,可以准备一个以纯文本形式显示密码的选项,便于用户使用安全密码。
但是,在以纯文本显示密码时,密码可能会被嗅探,因此在使用此选项时,必须提醒用户谨防嗅探。此外,如果实现了纯文本显示选项,还需要在系统中作好相应准备,以自动取消纯文本显示,如设置纯文本显示的时间。在将来的版本中,我们计划发布其他文章,说明密码纯文本显示的限制。因此,本文的示例代码中不涉及到密码纯文本显示的限制。
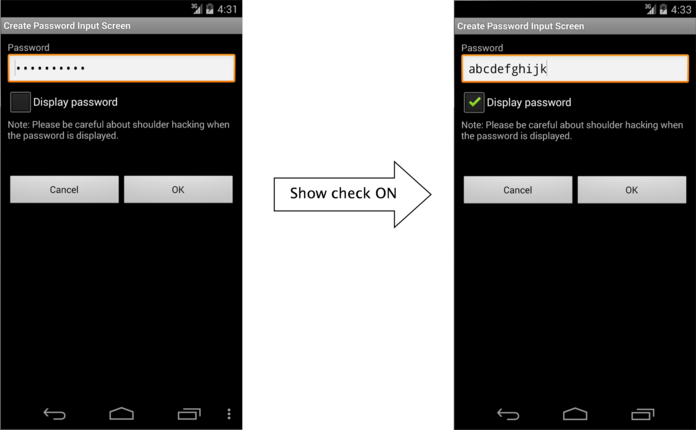
图 5.1.2以纯文本形式显示密码
通过指定 EditText 的 inputType,可以在掩码与纯文本显示形式之间切换。
PasswordActivity.java
    /**
     * Process when check of password display option is changed.
     */
    private class OnPasswordDisplayCheckedChangeListener implements
            OnCheckedChangeListener {

        public void onCheckedChanged(CompoundButton buttonView,
                boolean isChecked) {
            // *** POINT 5 *** When the dummy password is displayed and the "Show password" button is pressed,
            // Clear the last input password and provide the state for new password input.
            if (mIsDummyPassword && isChecked) {
                // Set dummy password flag
                mIsDummyPassword = false;
                // Set password empty
                mPasswordEdit.setText(null);
            }

            // Cursor position goes back the beginning, so memorize the current cursor position.
            int pos = mPasswordEdit.getSelectionStart();

            // *** POINT 2 *** Provide the option to display the password in a plain text
            // Create InputType
            int type = InputType.TYPE_CLASS_TEXT;
            if (isChecked) {
                // Plain display when check is ON.
                type |= InputType.TYPE_TEXT_VARIATION_VISIBLE_PASSWORD;
            } else {
                // Masked display when check is OFF.
                type |= InputType.TYPE_TEXT_VARIATION_PASSWORD;
            }

            // Set InputType to password EditText
            mPasswordEdit.setInputType(type);

            // Set cursor position
            mPasswordEdit.setSelection(pos);
        }

    }
5.1.2.3.启动活动时对密码进行掩码处理(必需)
为防止密码泄露,应在启动 Activity 时将密码显示选项的默认值设置为“OFF”(关)。基本上,定义默认值时,应始终使用较为安全的设置。
5.1.2.4.显示上次输入的密码时,必须显示虚拟密码(必需)
指定上次输入的密码时,不要给第三方提供任何关于密码的提示,密码应显示为虚拟密码,即固定位数的掩码字符(* 等)。此外,如果在显示虚拟密码时,用户按下了“Show password”(显示密码),则应清除密码并切换到纯文本显示模式。即便设备在被盗等情况下落入第三方手中,这也有助于杜绝上次输入的密码被嗅探的风险。请注意,在显示虚拟密码的状态下,如果用户尝试输入密码,应取消虚拟密码显示,还需要转换为正常输入状态。
显示上次输入的密码时,显示虚拟密码。
PasswordActivity.java
    @Override
    public void onCreate(Bundle savedInstanceState) {

        super.onCreate(savedInstanceState);
        setContentView(R.layout.password_activity);

        // Get View
        mPasswordEdit = (EditText) findViewById(R.id.password_edit);

        mPasswordDisplayCheck = (CheckBox);
        findViewById(R.id.password_display_check);

        // Whether last Input password exist or not.
        if (getPreviousPassword() != null) {
            // *** POINT 4 *** In the case there is the last input password in an initial display,
            // display the fixed digit numbers of black dot as dummy in order not that the digits number of last password is guessed.
            // Display should be dummy password.
            mPasswordEdit.setText("**********");
            // To clear the dummy password when inputting password, set text change listener.
            mPasswordEdit.addTextChangedListener(new PasswordEditTextWatcher());
            // Set dummy password flag
            mIsDummyPassword = true;
        }

        [...]

    }

    /**
     * Get the last input password.
     *
     * @return the last input password
     */
    private String getPreviousPassword() {
        // To restore the saved password, return the password character string.
        // For the case password is not saved, return null.
        return "hirake5ma";
    }
显示虚拟密码时,如果密码显示选项设置为“ON”(开启),则清除显示的内容。
PasswordActivity.java
    /**
     * Process when check of password display option is changed.
     */
    private class OnPasswordDisplayCheckedChangeListener implements
            OnCheckedChangeListener {

        public void onCheckedChanged(CompoundButton buttonView,
                boolean isChecked) {
            // *** POINT 5 *** When the dummy password is displayed and the "Show password" button is pressed,
            // Clear the last input password and provide the state for new password input.
            if (mIsDummyPassword && isChecked) {
                // Set dummy password flag
                mIsDummyPassword = false;
                // Set password empty
                mPasswordEdit.setText(null);
            }

            [...]

        }

    }
在显示虚拟密码的情况下,如果用户尝试输入密码,则清除虚拟密码显示。
PasswordActivity.java
    // Key to save the state
    private static final String KEY_DUMMY_PASSWORD = "KEY_DUMMY_PASSWORD";

    [...]

    // Flag to show whether password is dummy display or not.
    private boolean mIsDummyPassword;

    @Override
    public void onCreate(Bundle savedInstanceState) {

        [...]

        // Whether last Input password exist or not.
        if (getPreviousPassword() != null) {
            // *** POINT 4 *** In the case there is the last input password in an initial display,
            // display the fixed digit numbers of black dot as dummy in order not that the digits number of last password is guessed.

            // Display should be dummy password.
            mPasswordEdit.setText("**********");
            // To clear the dummy password when inputting password, set text change listener.
            mPasswordEdit.addTextChangedListener(new PasswordEditTextWatcher());
            // Set dummy password flag
            mIsDummyPassword = true;
        }

        [...]

    }

    @Override
    public void onSaveInstanceState(Bundle outState) {
        super.onSaveInstanceState(outState);

        // Unnecessary when specifying not to regenerate Activity by the change in screen aspect ratio.
        // Save Activity state
        outState.putBoolean(KEY_DUMMY_PASSWORD, mIsDummyPassword);
    }

    @Override
    public void onRestoreInstanceState(Bundle savedInstanceState) {
        super.onRestoreInstanceState(savedInstanceState);

        // Unnecessary when specifying not to regenerate Activity by the change in screen aspect ratio.
        // Restore Activity state
        mIsDummyPassword = savedInstanceState.getBoolean(KEY_DUMMY_PASSWORD);
    }

    /**
     * Process when inputting password.
     */
    private class PasswordEditTextWatcher implements TextWatcher {

        public void beforeTextChanged(CharSequence s, int start, int count,
                int after) {
            // Not used
        }

        public void onTextChanged(CharSequence s, int start, int before,
                int count) {
            // *** POINT 6 *** When last Input password is displayed as dummy, in the case an user tries to input password,
            // Clear the last Input password, and treat new user input as new password.
            if (mIsDummyPassword) {
                // Set dummy password flag
                mIsDummyPassword = false;
                // Trim space
                CharSequence work = s.subSequence(start, start + count);
                mPasswordEdit.setText(work);
                // Cursor position goes back the beginning, so bring it at the end.
                mPasswordEdit.setSelection(work.length());
            }
        }

        public void afterTextChanged(Editable s) {
            // Not used
        }

    }
5.1.3.高级主题
5.1.3.1.登录流程
登录流程是需要密码输入的一个代表性示例。以下是在登录流程中需要注意的一些要点。
登录失败时的错误消息
在登录流程中,需要输入两项信息,即 ID(帐户)和密码。如果登录失败,存在两种情况。一是 ID 不存在。另一个是 ID 存在,但密码不正确。如果系统辨别出这两种情况中的任何一种,并在登录失败消息中相应显示,则攻击者可以猜测出指定 ID 是否存在。为防范这种类型的猜测,不应在登录失败消息中指定这两种情况,并且此消息应按如下方式显示。
消息示例:“Login ID or password is incorrect”(登录 ID 或密码不正确)。
自动登录功能
在成功完成一次登录过程后,可采用一种功能,通过在下次及后续免去输入登录 ID/密码的过程来执行自动登录。自动登录功能可以免去复杂的输入过程。因此,这将增加便利性,但另一方面,如果智能手机被盗,第三方恶意使用的风险也将随之而来。
只有在恶意第三方造成的损失在某种程度上可以接受,或者只有在采取了足够的安全措施的情况下,才可以使用自动登录功能。例如,对于网上银行应用程序,设备由第三方操作时,可能会导致经济损失。因此,在这种情况下,必须在采用自动登录功能的同时采取安全措施。可以采取一些应对措施,例如[在发生支付流程等财务流程之前要求重新输入密码]、[设置自动登录时,引起用户足够的注意并提示用户使用安全设备锁]等。使用自动登录时,务必审慎考虑便利性和风险以及拟定的对策。
5.1.3.2.更改密码
更改以前设置的密码时,应在屏幕上准备以下输入项目。
- 当前密码
- 新密码
- 新密码(确认)
采用自动登录功能后,可能会遇到第三方使用应用程序的情况。在这种情况下,为了避免意外更改密码,必须要求输入当前密码。此外,为了降低由于未输入新密码而进入不可用状态的风险,必须输入新密码 2 次。
5.1.3.3.关于“Make passwords visible”(使密码可见)设置
Android 的设置菜单中有一项设置,称为“Make passwords visible”(使密码可见)。对于 Android 5.0,其显示方式如下。
Setting(设置) > Security(安全) > Make passwords visible(使密码可见)
Android 的设置菜单中有一项设置,称为“Make passwords visible”(使密码可见)。对于 Android 5.0,其显示方式如下。

图 5.1.3 Security(安全)- Make Passwords visible(使密码可见)
打开“Make passwords visible”(使密码可见)设置时,最后输入的字符将以纯文本显示。特定时间(约 2 秒)后或输入下一个字符后,以纯文本形式显示的字符将通过掩码加以屏蔽处理。关闭此设置后,该字符会在输入后立即以掩码屏蔽处理。此设置会影响整个系统,并应用于使用 EditText 的密码显示功能的所有应用程序。
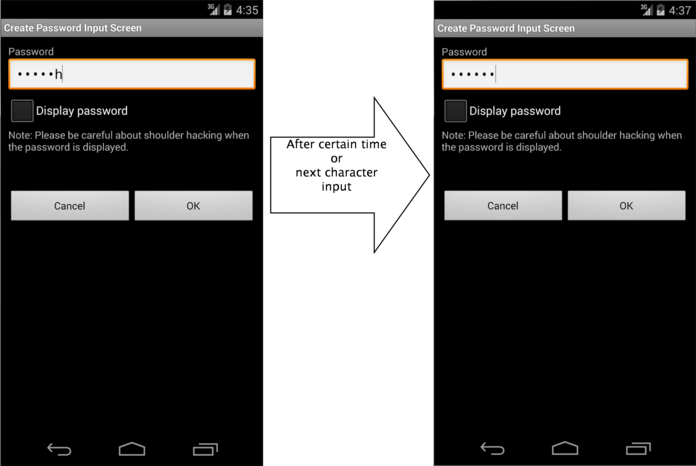
图 5.1.4 显示密码
5.1.3.4.禁用屏幕截图
在密码输入屏幕中,密码可能会清晰地显示在屏幕上。在处理个人信息的此类屏幕中,如果屏幕截图功能在默认情况下保持启用,则个人信息可能会从存储在外部存储器上的屏幕截图文件中泄露。因此,建议在密码输入屏幕等屏幕上禁用屏幕截图功能。可通过使用 addFlag 在 WindowManager 中设置 FLAG_SECURE 来禁用屏幕截图。
5.2.权限和保护级别
权限中有四种类型的保护级别,分别是正常、危险、签名和 signatureOrSystem。根据保护级别,权限分别称为正常权限、危险权限、签名权限或 signatureOrSystem 权限。在以下章节中,将使用这些名称。
5.2.1.示例代码 
5.2.1.1.如何使用 Android OS 的系统权限
Android OS 有一种称为“权限”的安全机制,可防止联系人和 GPS 功能等用户资产受到恶意软件的攻击。应用程序要求访问 Android OS 下受保护的此类信息和/或功能时,应用程序需要显式声明权限才能访问它们。如果安装了某个已声明需要用户同意才能使用的权限的应用程序,系统将显示以下确认屏幕 [1]。
| [1] | 在 Android 6.0(API 级别 23)及更高版本中,用户权限的授予或拒绝并非发生在应用程序安装时,而是发生在运行时应用程序请求权限时。有关详情,请参阅“5.2.1.4.章节 —在 Android 6.0 及更高版本中使用危险权限的方法”和“5.2.3.6. 章节 — Android 6.0 及更高版本中权限模型规范的修改”。 |
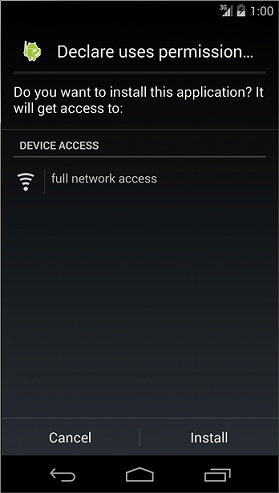
图 5.2.1 声明使用权限
在此确认屏幕中,用户可以知道应用程序正在尝试访问哪些类型的功能和/或信息。如果应用程序的运行情况表现出其正在访问明显不必要的功能和/或信息,则此应用程序很可能是恶意软件。因此,为了保证您的应用程序不会被系统怀疑成恶意软件,应该尽可能减少权限声明的使用。
要点:
- 使用 uses-permission 声明应用程序中使用的权限。
- 请勿使用 uses-permission 声明任何不必要的权限。
AndroidManifest.xml
<?xml version="1.0" encoding="utf-8"?>
<manifest xmlns:android="http://schemas.android.com/apk/res/android"
    package="org.jssec.android.permission.usespermission" >

    <!-- *** POINT 1 *** Declare a permission used in an application with uses-permission -->
    <!-- Permission to access Internet -->
    <uses-permission android:name="android.permission.INTERNET"/>

    <!-- *** POINT 2 *** Do not declare any unnecessary permissions with uses-permission -->
    <!-- If declaring to use Permission that is unnecessary for application behaviors, it gives users a sense of distrust.-->

    <application
        android:allowBackup="false"
        android:icon="@drawable/ic_launcher"
        android:label="@string/app_name" >
        <activity
            android:name=".MainActivity"
            android:label="@string/app_name"
            android:exported="true" >
            <intent-filter>
                <action android:name="android.intent.action.MAIN" />
                <category android:name="android.intent.category.LAUNCHER" />
            </intent-filter>
        </activity>
    </application>

</manifest>
5.2.1.2.如何使用内部定义的签名权限在内部应用程序之间通信
除 Android OS 定义的系统权限外,应用程序也可以定义自己的权限。如果使用内部定义的权限(更精确地讲,是内部定义的签名权限),则可以构建一种只允许内部应用程序之间通信的机制。通过提供基于多个内部应用程序的应用程序间通信的复合功能,应用程序将更具吸引力,让您的企业可以将其作为系列销售,从而增加盈利。这是利用内部定义的签名权限的实例之一。
示例应用程序“内部定义的签名权限 (UserApp)”使用 Context.startActivity() 方法启动示例应用程序“内部定义的签名权限 (ProtectedApp)”。两个应用程序都需要使用相同的开发人员密钥进行签名。如果用于签署它们的密钥不同,则 UserApp 不会向 ProtectedApp 发送 Intent,并且 ProtectedApp 不会处理从 UserApp 收到的 Intent。此外,它还可以防止恶意软件利用与安装顺序相关的途径,绕过您自己的签名权限,如“高级主题”章节所述。
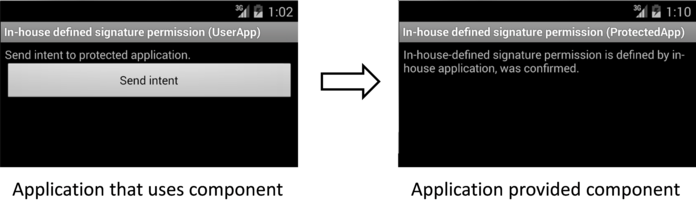
图 5.2.2 使用内部定义的签名权限在内部应用程序之间通信
要点:提供组件的应用程序
- 使用 protectionLevel=”signature” 定义权限。
- 对于组件,使用其权限属性强制实施权限。
- 如果组件属于 Activity,则不得定义 intent-filter。
- 在运行时,检查签名权限本身是否由程序代码定义。
- 导出 APK 时,请使用与使用该组件的应用程序所用的相同开发人员密钥签署 APK。
AndroidManifest.xml
<?xml version="1.0" encoding="utf-8"?>
<manifest xmlns:android="http://schemas.android.com/apk/res/android"
    package="org.jssec.android.permission.protectedapp" >

    <!-- *** POINT 1 *** Define a permission with protectionLevel="signature" -->
    <permission
        android:name="org.jssec.android.permission.protectedapp.MY_PERMISSION"
        android:protectionLevel="signature" />

    <application
        android:allowBackup="false"
        android:icon="@drawable/ic_launcher"
        android:label="@string/app_name" >

        <!-- *** POINT 2 *** For a component, enforce the permission with its permission attribute -->
        <activity
            android:name=".ProtectedActivity"
            android:exported="true"
            android:label="@string/app_name"
            android:permission="org.jssec.android.permission.protectedapp.MY_PERMISSION" >

            <!-- *** POINT 3 *** If the component is an activity, you must define no intent-filter -->
        </activity>
    </application>
</manifest>
ProtectedActivity.java
package org.jssec.android.permission.protectedapp;

import org.jssec.android.shared.SigPerm;
import org.jssec.android.shared.Utils;

import android.app.Activity;
import android.content.Context;
import android.os.Bundle;
import android.widget.TextView;

public class ProtectedActivity extends Activity {

    // In-house Signature Permission
    private static final String MY_PERMISSION = "org.jssec.android.permission.protectedapp.MY_PERMISSION";

    // Hash value of in-house certificate
    private static String sMyCertHash = null;
    private static String myCertHash(Context context) {
        if (sMyCertHash == null) {
            if (Utils.isDebuggable(context)) {
                // Certificate hash value of "androiddebugkey" of debug.keystore
                sMyCertHash = "0EFB7236 328348A9 89718BAD DF57F544 D5CCB4AE B9DB34BC 1E29DD26 F77C8255";
            } else {
                // Certificate hash value of "my company key" of keystore
                sMyCertHash = "D397D343 A5CBC10F 4EDDEB7C A10062DE 5690984F 1FB9E88B D7B3A7C2 42E142CA";
            }
        }
        return sMyCertHash;
    }

    private TextView mMessageView;

    @Override
    public void onCreate(Bundle savedInstanceState) {
        super.onCreate(savedInstanceState);
        setContentView(R.layout.main);
        mMessageView = (TextView) findViewById(R.id.messageView);

        // *** POINT 4 *** At run time, verify if the signature permission is defined by itself on the program code
        if (!SigPerm.test(this, MY_PERMISSION, myCertHash(this))) {
            mMessageView.setText("In-house defined signature permission is not defined by in-house application.");
            return;
        }

        // *** POINT 4 *** Continue processing only when the certificate matches
        mMessageView.setText("In-house-defined signature permission is defined by in-house application, was confirmed.");
    }
}
SigPerm.java
package org.jssec.android.shared;

import android.content.Context;
import android.content.pm.PackageManager;
import android.content.pm.PackageManager.NameNotFoundException;
import android.content.pm.PermissionInfo;
import android.os.Build;

import static android.content.pm.PackageManager.CERT_INPUT_SHA256;

public class SigPerm {

    public static boolean test(Context ctx, String sigPermName, String correctHash) {
        if (correctHash == null) return false;
        correctHash = correctHash.replaceAll(" ", "");
        try{
	    // Get the package name of the application which declares a permission named sigPermName.
            PackageManager pm = ctx.getPackageManager();
            PermissionInfo pi = pm.getPermissionInfo(sigPermName, PackageManager.GET_META_DATA);
            String pkgname = pi.packageName;
	    // Fail if the permission named sigPermName is not a Signature Permission
            if (pi.protectionLevel != PermissionInfo.PROTECTION_SIGNATURE) return false;
	    // compare hash values of pkgname and expected preset value
            if (Build.VERSION.SDK_INT >= 28) {
                // * if API Level >= 28, we can validate directly by an API of Package Manager
                return pm.hasSigningCertificate(pkgname, Utils.hex2Bytes(correctHash), CERT_INPUT_SHA256);
            } else {
		// else(API Level < 28), by using a facility of PkgCert, get the hash value and compare
                return correctHash.equals(PkgCert.hash(ctx, pkgname));
            }
        } catch (NameNotFoundException e){
            return false;
        }
    }
}
PkgCert.java
package org.jssec.android.shared;

import java.security.MessageDigest;
import java.security.NoSuchAlgorithmException;

import android.content.Context;
import android.content.pm.PackageInfo;
import android.content.pm.PackageManager;
import android.content.pm.PackageManager.NameNotFoundException;
import android.content.pm.Signature;

public class PkgCert {

    public static boolean test(Context ctx, String pkgname, String correctHash) {
        if (correctHash == null) return false;
        correctHash = correctHash.replaceAll(" ", "");
        return correctHash.equals(hash(ctx, pkgname));
    }

    public static String hash(Context ctx, String pkgname) {
        if (pkgname == null) return null;
        try {
            PackageManager pm = ctx.getPackageManager();
            PackageInfo pkginfo = pm.getPackageInfo(pkgname, PackageManager.GET_SIGNATURES);
            if (pkginfo.signatures.length != 1) return null;    // Will not handle multiple signatures.
            Signature sig = pkginfo.signatures[0];
            byte[] cert = sig.toByteArray();
            byte[] sha256 = computeSha256(cert);
            return byte2hex(sha256);
        } catch (NameNotFoundException e) {
            return null;
        }
    }

    private static byte[] computeSha256(byte[] data) {
        try {
            return MessageDigest.getInstance("SHA-256").digest(data);
        } catch (NoSuchAlgorithmException e) {
            return null;
        }
    }

    private static String byte2hex(byte[] data) {
        if (data == null) return null;
        final StringBuilder hexadecimal = new StringBuilder();
        for (final byte b : data) {
            hexadecimal.append(String.format("%02X", b));
        }
        return hexadecimal.toString();
    }
}
***要点 5*** 导出 APK 时,请使用与使用该组件的应用程序所用的相同开发人员密钥签署 APK。
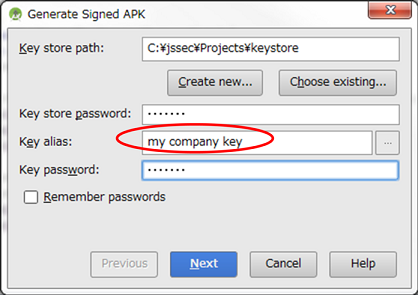
图 5.2.3 使用与使用该组件的应用程序所用的相同开发人员密钥签署 APK
要点:使用组件的应用程序
- 不得定义应用程序所用的相同签名权限。
- 使用 uses-permission 标记声明内部权限。
- 验证内部签名权限是否由提供组件的应用程序在程序代码中定义。
- 验证目标应用程序是否为内部应用程序。
- 当目标组件属于 Activity 时,使用显式 Intent。
- 导出 APK 时,使用目标应用程序所用的相同开发人员密钥签署 APK。
AndroidManifest.xml
<?xml version="1.0" encoding="utf-8"?>
<manifest xmlns:android="http://schemas.android.com/apk/res/android"
    package="org.jssec.android.permission.userapp" >

    <!-- *** POINT 6 *** The same signature permission that the application uses must not be defined -->

    <!-- *** POINT 7 *** Declare the in-house permission with uses-permission tag -->
    <uses-permission
        android:name="org.jssec.android.permission.protectedapp.MY_PERMISSION" />

    <application
        android:allowBackup="false"
        android:icon="@drawable/ic_launcher"
        android:label="@string/app_name" >
        <activity
            android:name=".UserActivity"
            android:label="@string/app_name"
            android:exported="true" >
            <intent-filter>
                <action android:name="android.intent.action.MAIN" />
                <category android:name="android.intent.category.LAUNCHER" />
            </intent-filter>
        </activity>
    </application>
</manifest>
UserActivity.java
package org.jssec.android.permission.userapp;

import org.jssec.android.shared.PkgCert;
import org.jssec.android.shared.SigPerm;
import org.jssec.android.shared.Utils;

import android.app.Activity;
import android.content.Context;
import android.content.Intent;
import android.os.Bundle;
import android.view.View;
import android.widget.Toast;

public class UserActivity extends Activity {

    // Requested (Destination) application's Activity information
    private static final String TARGET_PACKAGE  = "org.jssec.android.permission.protectedapp";
    private static final String TARGET_ACTIVITY = "org.jssec.android.permission.protectedapp.ProtectedActivity";

    // In-house Signature Permission
    private static final String MY_PERMISSION = "org.jssec.android.permission.protectedapp.MY_PERMISSION";

    // Hash value of in-house certificate
    private static String sMyCertHash = null;
    private static String myCertHash(Context context) {
        if (sMyCertHash == null) {
            if (Utils.isDebuggable(context)) {
                // Certificate hash value of "androiddebugkey" of debug.keystore.
                sMyCertHash = "0EFB7236 328348A9 89718BAD DF57F544 D5CCB4AE B9DB34BC 1E29DD26 F77C8255";
            } else {
                // Certificate hash value of "my company key" of keystore.
                sMyCertHash = "D397D343 A5CBC10F 4EDDEB7C A10062DE 5690984F 1FB9E88B D7B3A7C2 42E142CA";
            }
        }
        return sMyCertHash;
    }

    @Override
    public void onCreate(Bundle savedInstanceState) {
        super.onCreate(savedInstanceState);
        setContentView(R.layout.main);
    }

    public void onSendButtonClicked(View view) {

        // *** POINT 8 *** Verify if the in-house signature permission is defined by the application that provides the component on the program code.

        if (!SigPerm.test(this, MY_PERMISSION, myCertHash(this))) {
            Toast.makeText(this, "In-house-defined signature permission is not defined by In house application.", Toast.LENGTH_LONG).show();
            return;
        }

        // *** POINT 9 *** Verify if the destination application is an in-house application.
        if (!PkgCert.test(this, TARGET_PACKAGE, myCertHash(this))) {
            Toast.makeText(this, "Requested (Destination) application is not in-house application.", Toast.LENGTH_LONG).show();
            return;
        }

        // *** POINT 10 *** Use an explicit intent when the destination component is an activity.
        try {
            Intent intent = new Intent();
            intent.setClassName(TARGET_PACKAGE, TARGET_ACTIVITY);
            startActivity(intent);
        } catch(Exception e) {
            Toast.makeText(this,
                    String.format("Exception occurs:%s", e.getMessage()),
                    Toast.LENGTH_LONG).show();
        }
    }
}
PkgCertWhitelists.java
package org.jssec.android.shared;

import java.util.HashMap;
import java.util.Map;
import android.content.Context;
import android.os.Build;

import static android.content.pm.PackageManager.CERT_INPUT_SHA256;

public class PkgCertWhitelists {
    private Map<String, String> mWhitelists = new HashMap<String, String>();

    public boolean add(String pkgname, String sha256) {
        if (pkgname == null) return false;
        if (sha256 == null) return false;

        sha256 = sha256.replaceAll(" ", "");
        if (sha256.length() != 64) return false;    // SHA-256 -> 32 bytes -> 64 chars
        sha256 = sha256.toUpperCase();
        if (sha256.replaceAll("[0-9A-F]+", "").length() != 0) return false; // found non hex char

        mWhitelists.put(pkgname, sha256);
        return true;
    }

    public boolean test(Context ctx, String pkgname) {
        // Get the correct hash value which corresponds to pkgname.
        String correctHash = mWhitelists.get(pkgname);

        // Compare the actual hash value of pkgname with the correct hash value.
        if (Build.VERSION.SDK_INT >= 28) {
            // ** if API Level >= 28, it is possible to validate directly by new API of PackageManager
            PackageManager pm = ctx.getPackageManager();
            return pm.hasSigningCertificate(pkgname, hex2Bytes(correctHash), CERT_INPUT_SHA256);
        } else {
            // else (API Level < 28) use a facility of PkgCert
            return PkgCert.test(ctx, pkgname, correctHash);
	}
    }

    private byte[] hex2Bytes(String s) {
        int len = s.length();
        byte[] data = new byte[len / 2];
        for (int i = 0; i < len; i += 2) {
            data[i / 2] = (byte) ((Character.digit(s.charAt(i), 16) << 4)
                    + Character.digit(s.charAt(i+1), 16));
        }
        return data;
    }
}
PkgCert.java
package org.jssec.android.shared;

import java.security.MessageDigest;
import java.security.NoSuchAlgorithmException;

import android.content.Context;
import android.content.pm.PackageInfo;
import android.content.pm.PackageManager;
import android.content.pm.PackageManager.NameNotFoundException;
import android.content.pm.Signature;

public class PkgCert {

    public static boolean test(Context ctx, String pkgname, String correctHash) {
        if (correctHash == null) return false;
        correctHash = correctHash.replaceAll(" ", "");
        return correctHash.equals(hash(ctx, pkgname));
    }

    public static String hash(Context ctx, String pkgname) {
        if (pkgname == null) return null;
        try {
            PackageManager pm = ctx.getPackageManager();
            PackageInfo pkginfo = pm.getPackageInfo(pkgname, PackageManager.GET_SIGNATURES);
            if (pkginfo.signatures.length != 1) return null;    // Will not handle multiple signatures.
            Signature sig = pkginfo.signatures[0];
            byte[] cert = sig.toByteArray();
            byte[] sha256 = computeSha256(cert);
            return byte2hex(sha256);
        } catch (NameNotFoundException e) {
            return null;
        }
    }

    private static byte[] computeSha256(byte[] data) {
        try {
            return MessageDigest.getInstance("SHA-256").digest(data);
        } catch (NoSuchAlgorithmException e) {
            return null;
        }
    }

    private static String byte2hex(byte[] data) {
        if (data == null) return null;
        final StringBuilder hexadecimal = new StringBuilder();
        for (final byte b : data) {
            hexadecimal.append(String.format("%02X", b));
        }
        return hexadecimal.toString();
    }
}
***要点 11*** 通过[Build(构建)] -> [Generate Signed APK(生成签名的 APK)]生成 APK 时,使用目标应用程序所用的相同开发人员密钥签署 APK。
图 5.2.4 使用目标应用程序所用的相同开发人员密钥签署 APK
Android 9.0(API 级别 28)和更高级别中的签名验证
Android 9.0(API 级别 28)中引入了 APK 签名方案 V3,用于启用签名密钥轮转。同时,软件包签名相关 API 也已得到更新 [2]。从应用程序签名验证的角度检查更改时,PackageManager 类中的新方法 hasSigningCertificate() 现在可用于验证。具体而言,这可以取代相关流程,例如从验证目标包中获取了用于签名的证书、执行了本指南的示例代码 PkgCert 类并计算了哈希值的流程。这适用于上述示例代码中的 SigPerm 和 pkgCertWhiteLists,API 级别 28 和更高级别将使用这种新的 hasSigningCertificate() 方法。签名方案的差异和多个签名而导致的验证差异均已整合到 hasSigningCertificate() 中,因此,如果以 API 级别 28 和更高级别为目标,建议使用此项 [3]。
| [2] | 有关特定更改,请参阅 Android 开发人员网站 (https://developer.android.com/reference/android/content/pm/PackageManager)。 |
| [3] | 截至本文撰写之时,尚无可用的 Android Support Library 与 Android 9.0(API 级别 28)的 android.content.pm.PackageManager 兼容。 |
5.2.1.3.如何验证应用程序证书的哈希值
我们将介绍如何验证在本指南的不同要点处出现的应用程序证书的哈希值。严格来说,哈希值是指“用于签署 APK 的开发人员密钥的公钥证书的 SHA256 哈希值。”
如何使用 Keytool 进行验证
借助与 JDK 捆绑在一起的称为 keytool 的程序,您可以获取开发人员密钥的公钥证书的哈希值(也称为证书指纹)。由于哈希算法的差异,存在多种哈希方法,例如 MD5、SHA1 和 SHA256。但是,考虑到加密位长度的安全强度,本指南建议使用 SHA256。遗憾的是,Android SDK 中所用的与 JDK6 捆绑的 keytool 不支持通过 SHA256 来计算哈希值。因此,必须使用与 JDK7 或更高版本捆绑的 keytool。
通过 keytool 输出 Android 调试证书内容的示例
> keytool -list -v -keystore <KeystoreFile> -storepass <Password>

Type of keystore: JKS
Keystore provider: SUN

One entry is included in a keystore

Other name: androiddebugkey
Date of creation: 2012/01/11
Entry type: PrivateKeyEntry
Length of certificate chain: 1
Certificate[1]:
Owner: CN=Android Debug, O=Android, C=US
Issuer: CN=Android Debug, O=Android, C=US
Serial number: 4f0cef98
Start date of validity period: Wed Jan 11 11:10:32 JST 2012 End date: Fri Jan 03 11:10:32 JST 2042
Certificate fingerprint:
         MD5:  9E:89:53:18:06:B2:E3:AC:B4:24:CD:6A:56:BF:1E:A1
         SHA1: A8:1E:5D:E5:68:24:FD:F6:F1:ED:2F:C3:6E:0F:09:A3:07:F8:5C:0C
         SHA256: FB:75:E9:B9:2E:9E:6B:4D:AB:3F:94:B2:EC:A1:F0:33:09:74:D8:7A:CF:42:58:22:A2:56:85:1B:0F:85:C6:35
         Signatrue algorithm name: SHA1withRSA
         Version: 3


*******************************************
*******************************************
如何使用 JSSEC Certificate Hash Value Checker 进行验证
在不安装 JDK7 或更新版本的前提下,借助 JSSEC Certificate Hash Value Checker 也可以轻松验证证书哈希值。
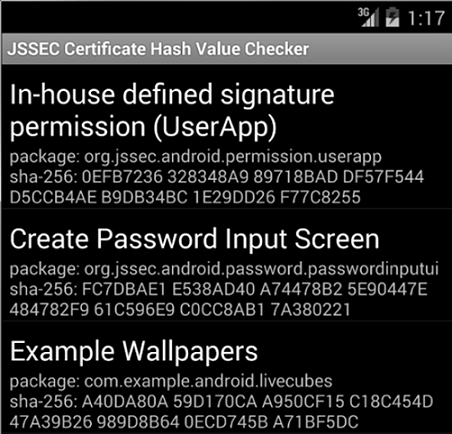
图 5.2.5 JSSEC Certificate Hash Value Checker
这是一个 Android 应用程序,可显示设备中所安装应用程序的证书哈希值列表。在上图中,“sha-256”右侧显示的 64 个字符的十六进制形式字符串是证书哈希值。本指南附带的示例代码文件夹“JSSEC CertHash Checker”中包含一组源代码。如果需要,您可以编译并使用这些代码。
5.2.1.4.在 Android 6.0 及更高版本中使用危险权限的方法
Android 6.0(API 级别 23)采用了与应用程序实现相关(具体而言,是与应用程序获得许可的时间相关)的修订版规范。
在 Android 5.1(API 级别 22)和更早版本的权限模型下(请参阅“5.2.3.6 章节 —Android 6.0 及更高版本中权限模型规范的修改”),系统会在安装一个应用程序时,授予该应用程序声明的所有权限。但是,在 Android 6.0 及更高版本中,应用程序开发人员必须显式实现应用程序,以保证对于危险权限,应用程序会在适当的时间请求权限。当应用程序请求权限时,系统会向 Android OS 用户显示如下所示的确认窗口,请用户决定是否授予相关权限。如果用户允许使用权限,则应用程序可以执行需要该权限的任何操作。
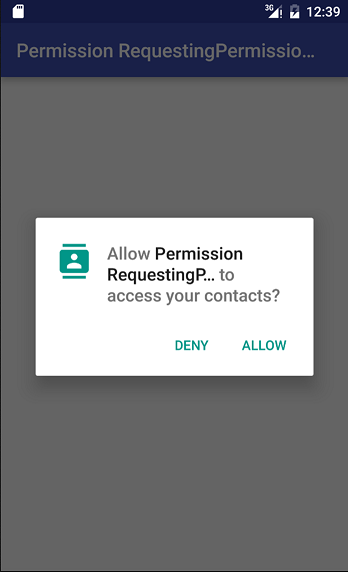
图 5.2.6 危险权限确认窗口
此外,有关授予权限的单位的规范也发生了更改。以前,所有权限均同时授予;在 Android 6.0(API 级别 23)和更高级别中,权限则按权限组授予。在 Android 8.0(API 级别 26)和更高版本中,将单独授予权限。除了此修改,现在对于每个权限,都会向用户显示单个确认窗口,使其可以在授予或拒绝权限方面作出更灵活的决定。应用程序开发人员必须重新审视其应用程序的规范和设计,并充分考虑权限被拒的可能性。
有关 Android 6.0 及更高版本中的权限模型的详细信息,请参阅“5.2.3.6 章节 —Android 6.0 及更高版本中权限模型规范的修改”。
要点:
- 应用程序声明其将使用的权限
- 不要声明不必要权限的使用
- 检查是否已向应用程序授予权限
- 请求权限(打开一个对话框以向用户请求权限)
- 在权限使用被拒的情况下,实现适当的行为
AndroidManifest.xml
<?xml version="1.0" encoding="utf-8"?>
<manifest xmlns:android="http://schemas.android.com/apk/res/android"
    package="org.jssec.android.permission.permissionrequestingpermissionatruntime" >

    <!-- *** POINT 1 *** Apps declare the Permissions they will use -->
    <!-- Permission to read information on contacts (Protection Level: dangerous) -->
    <uses-permission android:name="android.permission.READ_CONTACTS" />

    <!-- *** POINT 2 *** Do not declare the use of unnecessary Permissions -->

    <application
        android:allowBackup="true"
        android:icon="@mipmap/ic_launcher"
        android:label="@string/app_name"
        android:supportsRtl="true"
        android:theme="@style/AppTheme" >
        <activity
            android:name=".MainActivity"
            android:exported="true">
            <intent-filter>
                <action android:name="android.intent.action.MAIN" />

                <category android:name="android.intent.category.LAUNCHER" />
            </intent-filter>
        </activity>
        <activity
            android:name=".ContactListActivity"
            android:exported="false">
        </activity>
    </application>

</manifest>
MainActivity.java
package org.jssec.android.permission.permissionrequestingpermissionatruntime;

import android.Manifest;
import android.content.Intent;
import android.content.pm.PackageManager;
import android.os.Bundle;
import android.support.v4.app.ActivityCompat;
import android.support.v4.content.ContextCompat;
import android.support.v7.app.AppCompatActivity;
import android.view.View;
import android.widget.Button;
import android.widget.Toast;

public class MainActivity extends AppCompatActivity implements View.OnClickListener {
    private static final int REQUEST_CODE_READ_CONTACTS = 0;

    @Override
    protected void onCreate(Bundle savedInstanceState) {
        super.onCreate(savedInstanceState);
        setContentView(R.layout.activity_main);

        Button button = (Button)findViewById(R.id.button);
        button.setOnClickListener(this);
    }

    @Override
    public void onClick(View v) {
        readContacts();
    }

    private void readContacts() {
        // *** POINT 3 *** Check whether or not Permissions have been granted to the app
        if (ContextCompat.checkSelfPermission(getApplicationContext(), Manifest.permission.READ_CONTACTS) != PackageManager.PERMISSION_GRANTED) {
            // Permission was not granted
            // *** POINT 4 *** Request Permissions (open a dialog to request permission from users)
            ActivityCompat.requestPermissions(this, new String[]{Manifest.permission.READ_CONTACTS}, REQUEST_CODE_READ_CONTACTS);
        } else {
            // Permission was previously granted
            showContactList();
        }
    }

    // A callback method that receives the result of the user's selection
    @Override
    public void onRequestPermissionsResult(int requestCode, String[] permissions, int[] grantResults) {
        switch (requestCode) {
            case REQUEST_CODE_READ_CONTACTS:
                if (grantResults.length > 0 && grantResults[0] == PackageManager.PERMISSION_GRANTED) {
                    // Permissions were granted; we may execute operations that use contact information
                    showContactList();
                } else {
                    // Because the Permission was denied, we may not execute operations that use contact information
                    // *** POINT 5 *** Implement appropriate behavior for cases in which the use of a Permission is refused
                    Toast.makeText(this, String.format("Use of contact is not allowed."), Toast.LENGTH_LONG).show();
                }
                return;
        }
    }

    // Show contact list
    private void showContactList() {
        // Launch ContactListActivity
        Intent intent = new Intent();
        intent.setClass(getApplicationContext(), ContactListActivity.class);
        startActivity(intent);
    }
}
5.2.2.规则手册
使用内部权限时,务必遵守以下规则。
- Android OS 的系统危险权限只能用于保护用户资产(必需)
- 禁止使用您自己的危险权限(必需)
- 您自己的签名权限只能在提供程序端应用程序中定义(必需)
- 验证内部定义的签名权限是否由内部应用程序定义(必需)
- 不应使用您自己的正常权限(推荐)
- 您自己的权限名称字符串应该包含应用程序包名称(推荐)
5.2.2.1.Android OS 的系统危险权限只能用于保护用户资产(必需)
由于不建议使用您自己的危险权限(请参阅“ 5.2.2.2. —禁止使用您自己的危险权限(必需)”),因此,我们将在使用 Android OS 的系统危险权限的前提下继续操作。
与其它三种类型的权限不同,危险权限具有一项要求用户同意向应用程序授予权限的功能。在设备上安装已声明使用危险权限的应用程序时,将显示以下屏幕。随后,用户可以了解应用程序尝试使用哪个权限级别(危险权限和正常权限)。用户点击“install”(安装)后,应用程序将被授予相关权限,然后系统会安装此应用程序。
图 5.2.7 Android OS 的系统危险权限确认窗口
应用程序可以处理开发人员要保护的用户资产和资产。我们必须注意到,危险权限只能保护用户资产,因为用户只是受委托授予权限的人员。另一方面,开发人员要保护的资产不能通过上述方法进行保护。
例如,假设某个应用程序具有一个仅与内部应用程序通信的组件,不允许其他公司的任何应用程序访问该组件,并且通过受危险权限保护的方式加以实现。在用户根据判断向其他公司的应用程序授予权限时,需要保护的内部资产可能会被获得授权的应用程序所利用。为了在这种情况下为内部资产提供保护,我们建议使用内部定义的签名权限。
5.2.2.2.禁止使用您自己的危险权限(必需)
即使使用内部定义的危险权限,在某些情况下,系统也不会显示屏幕提示信息“Asking for the Allowance of Permission from User”(请求用户允许权限)。这意味着,有些时候,危险权限的这种根据用户判断请求权限的特色功能不起作用。因此,本指南将规定“不得使用内部定义的危险许可”。
为了解释这一点,我们假定有两种类型的应用程序。第一种应用程序定义内部危险权限,并且会公开受此权限保护的组件。我们称之为 ProtectedApp。另一种类型的应用程序称为 AttackerApp,此类应用程序尝试利用 ProtectedApp 的组件。此外,我们假定 AttackerApp 不仅声明了使用应用程序的权限,还定义了相同的权限。
在以下情况下,AttackerApp 可以在未经用户同意的情况下使用 ProtectedApp 的组件:
- 当用户安装 AttackerApp 时,安装将在不显示请求用户向应用程序授予危险权限的屏幕提示的情况下完成。
- 类似地,当用户安装 ProtectedApp 时,安装也会在不显示任何特殊警告的情况下完成。
- 当用户随后启动 AttackerApp 时,AttackerApp 可以在不被用户检测到的情况下访问 ProtectedApp 的组件,而这可能会导致损失。
导致此情况发生的原因如下所述。用户尝试首先安装 AttackerApp 时,尚未在特定设备上定义已通过 uses-permission 声明使用的权限。而由于未发现任何错误,Android OS 将继续安装。由于仅在安装时才需要用户同意危险权限,因此,已安装的应用程序将被视为已被授予权限。因此,如果以后安装的应用程序的组件受到相同名称的危险权限的保护,则之前在没有用户权限的情况下安装的应用程序将能够利用该组件。
此外,在安装应用程序时保证存在 Android OS 定义的系统危险权限,因此,每次安装具有 uses-permission 的应用程序时,都会显示用户验证提示。只有在使用自定义的危险权限时,才会出现此问题。
撰写本文时,尚未开发出可在此类情况下保护组件访问的可行方法。因此,务必保证不要使用您自己的危险权限。
5.2.2.3.您自己的签名权限只能在提供程序端应用程序中定义(必需)
如第“5.2.1.2.部分 —如何使用内部定义的签名权限在内部应用程序之间通信”中所述,通过在内部应用程序之间执行通信时检查签名权限,即可确保安全性。使用此机制时,保护级别为签名的权限的定义必须写入具有组件的提供程序端应用程序的 AndroidManifest.xml 中,但用户端应用程序不能定义签名权限。
此规则也适用于 signatureOrSystem 权限。
原因如下所示。
我们假定在提供程序端应用程序安装之前,已经安装了多个用户端应用程序,并且每个用户端应用程序不仅需要提供程序端应用程序定义的签名权限,而且还定义了相同的权限。在此类情况下,所有用户端应用程序都将能够在安装提供程序端应用程序后立即访问提供程序端应用程序。随后,当首先安装的用户端应用程序被卸载时,权限的定义也会被删除,然后此权限将变为未定义。因此,其余的用户端应用程序将无法访问提供程序端应用程序。
这样,在用户端应用程序定义自定义权限时,它可能会意外地将权限转变为未定义。因此,只有提供需要保护的组件的提供程序端应用程序才应定义权限,并且必须避免在用户端定义权限。
通过执行上述操作,Android OS 将在安装提供程序端应用程序时应用自定义权限,并且此权限将在卸载应用程序时变为未定义。因此,权限定义的存在始终与提供程序端应用程序的定义相对应,可以据此提供适当的组件并对其进行保护。请注意,此论据成立的前提是:对于内部定义的签名权限,无论彼此通信的应用程序的安装顺序如何,始终会向用户端应用程序授予此权限 [4]。
| [4] | 使用正常/危险权限时,如果在提供程序端应用程序之前安装了用户端应用程序,则不会向用户端应用程序授予权限,该权限将保持未定义状态。因此,即使在安装了提供程序端应用程序之后,也无法访问组件。 |
5.2.2.4.验证内部定义的签名权限是否由内部应用程序定义(必需)
实际上,仅通过 AnroidManifest.xml 声明签名权限并使用权限保护组件,还不能称得上足够安全。有关此问题的详细信息,请参阅“高级主题”部分中的“5.2.3.1. —避免自定义签名权限的 Android OS 的特点及其应对措施”。
下面列出了安全而正确地使用内部定义的签名权限的步骤。
首先,在 AndroidManifest.xml 中编写如下代码:
- 在提供程序端应用程序的 AndroidManifest.xml 中定义内部签名权限。(权限定义)
示例:<permission android:name=”xxx” android:protectionLevel=”signature” /> - 使用要在提供程序端应用程序的 AndroidManifest.xml 中保护的组件的权限属性执行权限。(权限执行)
示例:<activity android:permission=”xxx” ...>...</activity> - 使用每个用户端应用程序的 AndroidManifest.xml 中的 uses-permission 标记,声明内部定义的签名权限,以访问要保护的组件。(使用权限声明)
示例:<uses-permission android:name=”xxx” />
接下来,在源代码中执行以下操作。
- 在处理对组件的请求之前,首先验证内部定义的签名权限是否已由内部应用程序定义。若未定义,则忽略该请求。(提供程序端组件中的保护)
- 在访问组件之前,首先验证内部定义的签名权限是否已由内部应用程序定义。若未定义,请勿访问组件(用户端组件中的保护)。
最后,使用 Android Studio 的签名功能执行以下操作。
- 使用相同的开发人员密钥对所有相互通信的应用程序的 APK 进行签名。
有关如何实施“验证内部定义的签名权限是否已由内部应用程序定义”的具体说明,请参阅“5.2.1.2. —如何使用内部定义的签名权限在内部应用程序之间通信”。
此规则也适用于 signatureOrSystem 权限。
5.2.2.5.不应使用您自己的正常权限(推荐)
应用程序只需使用 AndroidManifest.xml 中的 uses-permission 进行声明,即可使用正常权限。因此,您不能将正常权限用于防止组件受到已安装恶意软件的攻击。
此外,如果使用自定义正常权限进行应用程序间通信,是否可向应用程序授予权限取决于安装顺序。例如,您在具有已定义正常权限的组件的另一个应用程序(提供程序端)之前先安装已声明使用此正常权限的应用程序(用户端),此用户端应用程序将无法访问受此权限保护的相关组件,即便稍后安装提供程序端应用程序也是如此。
为了防止因安装顺序而导致应用程序间的通信丢失,您可以考虑在通信的每个应用程序中定义权限。这样,即使在提供程序端应用程序之前已经安装用户端应用程序,所有用户端应用程序也能够访问提供程序端应用程序。但是,如果首先安装的用户端应用程序被卸载,则会导致权限变为未定义状态。因此,即使存在其它用户端应用程序,它们也无法访问提供程序端应用程序。
如上所述,由于存在破坏应用程序可用性的问题,所以,不应使用您自己的正常权限。
5.2.2.6.您自己的权限名称字符串应该包含应用程序包名称(推荐)
多个应用程序以相同名称定义权限时,将应用由首先安装的应用程序定义的保护级别。如果首先安装的应用程序定义正常权限,而随后安装的应用程序以相同名称定义签名权限,则签名权限的保护机制将不可用。即使没有恶意意图,多个应用程序之间的权限名称冲突也可能导致任何应用程序的行为成为意外的保护级别。为防止此类意外发生,建议权限名称包含(在开头处使用)定义权限的应用程序包的名称,如下所示。
(package name).permission.(identifying string)
例如,在为 org.jssec.android.sample 软件包定义 READ 访问权限时,最好使用以下名称。
org.jssec.android.sample.permission.READ
5.2.3.高级主题
5.2.3.1.避免自定义签名权限的 Android OS 的特点及其应对措施
自定义签名权限是指在通过相同开发人员密钥签署的应用程序之间实现应用程序间通信的权限。开发人员密钥属于私钥,不得公开,因此,只有在内部应用程序相互通信时,才会倾向于使用签名权限进行保护。
首先,我们将介绍“Android 开发人员指南”(https://developer.android.com/guide/topics/security/security.html) 中讲解的自定义签名权限的基本用法。但是,正如下文介绍的那样,这里存在规避权限方面的问题。因此,有必要采取本指南中描述的应对措施。
下面介绍自定义签名权限的基本使用方法。
- 在提供程序端应用程序的 AndroidManifest.xml 中定义自定义签名权限。(权限定义)
示例:<permission android:name=”xxx” android:protectionLevel=”signature” /> - 使用要在提供程序端应用程序的 AndroidManifest.xml 中保护的组件的权限属性执行权限。(权限执行)
示例:<activity android:permission=”xxx” ...>...</activity> - 使用每个用户端应用程序的 AndroidManifest.xml 中的 uses-permission 标记,声明自定义的签名权限,以访问要保护的组件。(使用权限声明)
示例:<uses-permission android:name=”xxx” /> - 使用相同的开发人员密钥对所有相互通信的应用程序的 APK 进行签名。
实际上,如果满足以下条件,此方法会形成规避签名权限执行的漏洞。
为便于说明,我们将受自定义签名权限保护的应用程序称为 ProtectedApp,将通过由不同于 ProtectedApp 的开发人员密钥签名的应用程序称为 AttackerApp。规避签名权限执行的漏洞意味着,尽管 AttackerApp 的签名不匹配,但仍可以访问 ProtectedApp 的组件。
- AttackerApp 还定义了与 ProtectedApp 定义的签名权限同名的正常权限(严格来说,签名权限也可接受)。
示例:<permission android:name=” xxx” android:protectionLevel=”normal” /> - AttackerApp 使用 uses-permission 声明自定义正常权限。
示例:<uses-permission android:name=”xxx” /> - AttackerApp 已于 ProtectedApp 之前安装在设备上。
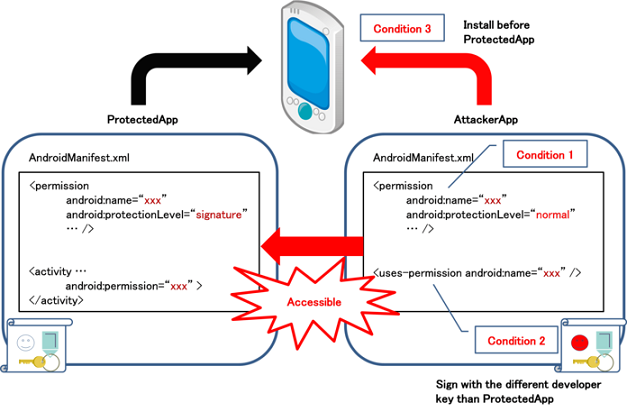
图 5.2.8 规避签名权限的漏洞
攻击者通过 APK 文件中的 AndroidManifest.xml,可以很轻松地了解满足条件 1 和条件 2 必需的权限名称。攻击者还可以在经过一定的努力后满足条件 3(例如欺骗用户)。
如果仅采用基本用法,则存在规避自定义签名权限保护的风险,需要采取应对措施来防止此类漏洞。具体来说,您可以通过采用“5.2.2.4. —验证内部定义的签名权限是否由内部应用程序定义(必需)”中的方法,了解如何解决上述问题。
5.2.3.2.用户伪造 AndroidManifest.xml
我们已经提到了自定义权限的保护级别可能会被意外更改的情况。为了防止此类情况导致功能失常,需要在 Java 的源代码端实施某种应对措施。从 AndroidManifest.xml 伪造的观点出发,我们将讨论要在源代码端采取的应对措施。我们将演示一个可以检测伪造的简单安装的示例。但是,请注意,这些应对措施对有犯罪企图的专业黑客不起作用。
本章节涉及应用程序伪造和恶意用户。尽管这部分内容最初并不在本指南的讨论范围内,但由于这与权限相关且已有众多用于此类伪造的工具作为 Android 应用程序公开提供,因此,我们决定将其称为“针对业余黑客的简单应对措施”。
切记,能从市场安装的应用程序可在用户不具备 root 权限的情况下被伪造。原因是:目前已有一些公开分发的应用程序可以使用经过篡改的 AndroidManifest.xml 重建和签署 APK 文件。利用这些应用程序,任何人都可以删除他们已安装的应用程序中的任何权限。
例如,通过使用不同签名篡改 AndroidManifest.xml,在移除 INTERNET 权限后重建 APK,使应用程序中附加的广告模块毫无用处。有些用户因篡改后的应用程序不会再泄露个人信息而称赞此类工具。应用程序中附加的这些广告停止运行,因此,此类操作会给依赖广告收入的开发人员带来资金损失。相信大多数用户都不会为此而愧疚。
在以下代码中,我们显示了这样一个实现实例:已使用 uses-permission 声明 INTERNET 权限的应用程序在运行时执行验证,确认其自身的 AndroidManifest.xml 中是否描述了 INTERNET 权限。
public class CheckPermissionActivity extends Activity {

    @Override
    public void onCreate(Bundle savedInstanceState) {
        super.onCreate(savedInstanceState);
        setContentView(R.layout.main);

        // Acquire Permission defined in AndroidManifest.xml
        List<String> list = getDefinedPermissionList();

        // Detect falsification
        if( checkPermissions(list) ){
            // OK
            Log.d("dbg", "OK.");
        }else{
            Log.d("dbg", "manifest file is stale.");
            finish();
        }
    }

    /**
     * Acquire Permission through list that was defined in AndroidManifest.xml
     * @return
     */
    private List<String> getDefinedPermissionList(){
        List<String> list = new ArrayList<String>();
        list.add("android.permission.INTERNET");
        return list;
    }

    /**
     * Verify that Permission has not been changed Permission
     * @param permissionList
     * @return
     */
    private boolean checkPermissions(List<String> permissionList){
        try {
            PackageInfo packageInfo = getPackageManager().getPackageInfo(
                    getPackageName(), PackageManager.GET_PERMISSIONS);
            String[] permissionArray = packageInfo.requestedPermissions;
            if (permissionArray != null) {
                for (String permission : permissionArray) {
                    if(! permissionList.remove(permission)){
                        // Unintended Permission has been added
                        return false;
                    }
                }
            }

            if(permissionList.size() == 0){
                // OK
                return true;
            }

        } catch (NameNotFoundException e) {
        }

        return false;
    }
}
5.2.3.3.检测 APK 伪造
我们在“5.2.3.2. —用户伪造 AndroidManifest.xml”中介绍了检测用户进行权限伪造的相关内容。但是,对于应用程序的伪造并不仅限于权限,在许多其它情况下,应用程序也会在没有任何源代码更改的情况下被挪作他用。例如,恶意用户只需将资源更换为自己的资源,就能在市场中分发其他开发人员的应用程序(伪造的版本)。在这里,我们将展示一种用于检测 APK 文件伪造的更为通用的方法。
要伪造 APK 文件,需要将 APK 文件解码到文件夹和文件中,修改其内容,然后将其重建到新 APK 文件中。由于伪造者没有原始开发人员的密钥,因此,其必须使用自己的密钥签署新的 APK 文件。APK 的伪造必然会引起签名(证书)发生变化,因此,可以通过将 APK 中的证书与源代码中嵌入的开发人员证书比较,在运行时检测 APK 是否被伪造,如下文源代码所示。
以下是示例代码。此外,如果按原样使用此实现示例,专业黑客即可轻松规避伪造检测。请注意,这是一个简单的实现示例,可以将此示例代码应用于您的应用程序。
要点:
- 在开始重要处理之前,请先验证应用程序的证书是否属于开发人员。
SignatureCheckActivity.java
package org.jssec.android.permission.signcheckactivity;

import org.jssec.android.shared.PkgCert;
import org.jssec.android.shared.Utils;

import android.app.Activity;
import android.content.Context;
import android.os.Bundle;
import android.widget.Toast;

public class SignatureCheckActivity extends Activity {
    // Self signed certificate hash value
    private static String sMyCertHash = null;
    private static String myCertHash(Context context) {
        if (sMyCertHash == null) {
            if (Utils.isDebuggable(context)) {
                // Certificate hash value of "androiddebugkey" of debug.
                sMyCertHash = "0EFB7236 328348A9 89718BAD DF57F544 D5CCB4AE B9DB34BC 1E29DD26 F77C8255";
            } else {
                // Certificate hash value of "my company key" of keystore
                sMyCertHash = "D397D343 A5CBC10F 4EDDEB7C A10062DE 5690984F 1FB9E88B D7B3A7C2 42E142CA";
            }
        }
        return sMyCertHash;
    }

    @Override
    public void onCreate(Bundle savedInstanceState) {
        super.onCreate(savedInstanceState);
        setContentView(R.layout.main);

        // *** POINT 1 *** Verify that an application's certificate belongs to the developer before major processing is started
        if (!PkgCert.test(this, this.getPackageName(), myCertHash(this))) {
            Toast.makeText(this, "Self-sign match  NG", Toast.LENGTH_LONG).show();
            finish();
            return;
        }
        Toast.makeText(this, "Self-sign match  OK", Toast.LENGTH_LONG).show();
    }
}
PkgCert.java
package org.jssec.android.shared;

import java.security.MessageDigest;
import java.security.NoSuchAlgorithmException;

import android.content.Context;
import android.content.pm.PackageInfo;
import android.content.pm.PackageManager;
import android.content.pm.PackageManager.NameNotFoundException;
import android.content.pm.Signature;

public class PkgCert {

    public static boolean test(Context ctx, String pkgname, String correctHash) {
        if (correctHash == null) return false;
        correctHash = correctHash.replaceAll(" ", "");
        return correctHash.equals(hash(ctx, pkgname));
    }

    public static String hash(Context ctx, String pkgname) {
        if (pkgname == null) return null;
        try {
            PackageManager pm = ctx.getPackageManager();
            PackageInfo pkginfo = pm.getPackageInfo(pkgname, PackageManager.GET_SIGNATURES);
            if (pkginfo.signatures.length != 1) return null;    // Will not handle multiple signatures.
            Signature sig = pkginfo.signatures[0];
            byte[] cert = sig.toByteArray();
            byte[] sha256 = computeSha256(cert);
            return byte2hex(sha256);
        } catch (NameNotFoundException e) {
            return null;
        }
    }

    private static byte[] computeSha256(byte[] data) {
        try {
            return MessageDigest.getInstance("SHA-256").digest(data);
        } catch (NoSuchAlgorithmException e) {
            return null;
        }
    }

    private static String byte2hex(byte[] data) {
        if (data == null) return null;
        final StringBuilder hexadecimal = new StringBuilder();
        for (final byte b : data) {
            hexadecimal.append(String.format("%02X", b));
        }
        return hexadecimal.toString();
    }
}
5.2.3.4.权限重新委派问题
访问信息和功能受 Android OS 保护的联系人或 GPS 时,应用程序必须声明使用权限。授予所需权限后,该权限将被授权给应用程序,应用程序将能够访问受该权限保护的信息和功能。
根据程序的设计方式,被委派(授予)权限的应用程序能够获取受此权限保护的数据。此外,该应用程序可以向另一个应用程序提供受保护的数据,而无需强制使用相同的权限。这相当于无权限应用程序可以访问受权限保护的数据。这与重新委派权限基本上是相同的,称为“权限重新委派问题”。因此,Android 的权限机制规范只能管理从应用程序对受保护数据的直接访问权限。
具体示例请见图 5.2.9。中央的应用程序显示已声明 android.permission.READ_CONTACTS 的应用程序使用该权限来读取联系人,然后将此信息存储到自己的数据库中。当存储的信息通过 Content Provider 被提供给另一个应用程序而没有任何限制时,就会出现权限重新委派问题。
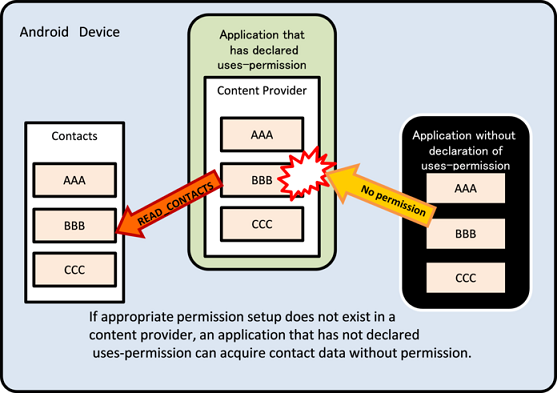
图 5.2.9 没有权限的应用程序获取联系人
与此类似,已声明 android.permission.CALL_PHONE 以使用它的应用程序从尚未声明相同权限的其它应用程序接收电话号码(可能是由用户输入的)。如果在不验证用户的情况下呼叫该号码,也会出现权限重新委派问题。
在某些情况下,需要对另一个应用程序进行辅助配置,提供通过相应权限获得的几乎完好的信息资产或功能资产。在此类情况下,提供程序端应用程序必须对此配置要求相同的权限,才能保持原始保护级别。此外,如果只以辅助方式提供部分信息资产和功能资产,则必须根据此部分信息或功能资产遭到利用时所造成的损失程度提供适当的保护。我们可以使用保护措施,例如要求权限类似于以前的权限、验证用户的同意意见,以及设置目标应用程序的限制(请参阅“4.1.1.1. —创建/使用私有活动”或“4.1.1.4. —创建/使用内部活动”等)
此类权限重新委派问题不仅限于 Android 权限问题。对于 Android 应用程序,应用程序通常从不同的应用程序、网络和存储媒体获取必要的信息/功能。许多情况下,需要某些权限和限制才能访问它们。例如,如果提供程序源是 Android 应用程序,则为权限;如果提供程序源是网络,则为登录信息;如果提供程序源是存储媒体,则是访问限制。因此,当相关信息/功能的使用方式未违反用户的意图时,需要在仔细考虑后方可为应用程序实施此类措施。在以辅助方式向另一个应用程序提供获取的信息/功能或者向网络或存储媒体传输信息时,这一点尤为重要。根据需要,您必须强制实施权限或限制使用,如 Android 权限。征求用户同意是解决方案的一部分。
在以下代码中,我们演示了这样的案例:使用 READ_CONTACTS 权限从联系人数据库获取列表的应用程序对信息目标源强制实施相同的 READ_CONTACTS 权限。
要点
- 强制实施与提供程序相同的权限。
AndroidManifest.xml
<?xml version="1.0" encoding="utf-8"?>
<manifest xmlns:android="http://schemas.android.com/apk/res/android"
    package="org.jssec.android.permission.transferpermission" >

    <uses-permission android:name="android.permission.READ_CONTACTS"/>

    <application
        android:allowBackup="false"
        android:icon="@drawable/ic_launcher"
        android:label="@string/app_name"
        android:theme="@style/AppTheme" >
        <activity
            android:name=".TransferPermissionActivity"
            android:label="@string/title_activity_transfer_permission" >
            <intent-filter>
                <action android:name="android.intent.action.MAIN" />
                <category android:name="android.intent.category.LAUNCHER" />
            </intent-filter>
        </activity>

        <!-- *** Point1 *** Enforce the same permission that the rovider does.-->
        <provider
            android:name=".TransferPermissionContentProvider"
            android:authorities="org.jssec.android.permission.transferpermission"
            android:enabled="true"
            android:exported="true"
            android:readPermission="android.permission.READ_CONTACTS" >
        </provider>
    </application>

</manifest>
在应用程序强制实施多个权限时,以上方法无法解决此问题。通过使用源代码中的 Context#checkCallingPermission() 或 PackageManager#checkPermission(),验证调用方应用程序是否已在 Manifest 中使用 uses-permission 声明所有权限。
对于 Activity
public void onCreate(Bundle savedInstanceState) {
    [...]
    if (checkCallingPermission("android.permission.READ_CONTACTS") == PackageManager.PERMISSION_GRANTED
     && checkCallingPermission("android.permission.WRITE_CONTACTS") == PackageManager.PERMISSION_GRANTED) {
        // Processing during the time when an invoker is correctly declaring to use
        return;
    }
    finish();
}
5.2.3.5.自定义权限的签名检查机制(Android 5.0 和更高版本)
在 Android 5.0(API 级别 21)及更高级别中,如果满足以下条件,则无法安装定义其自定义权限的应用程序。
- 设备上已装有使用相同名称定义自身权限的另一个应用程序。
- 应用程序使用不同的密钥进行签名
如果具有受保护功能(组件)的应用程序和使用此功能的应用程序使用相同名称定义自己的权限,并通过相同的密钥签名,则上述机制将会防止安装使用相同名称定义自身自定义权限的其他公司的应用程序。但是,正如“5.2.2.3. —您自己的签名权限只能在提供程序端应用程序中定义(必需)”中所述,该机制不能很好地检查您的公司是否定义了自定义权限,因为当多个应用程序定义相同权限时,卸载应用程序将会使权限异常变为未定义状态。
总结起来,在 Android 5.0(API 级别 21)和更高级别中,当应用程序定义您自己的签名权限时,您必须遵守两个规则:“5.2.2.3. —您自己的签名权限只能在提供程序端应用程序中定义(必需)”和“5.2.2.4. —验证内部定义的签名权限是否由内部应用程序定义(必需)”。
5.2.3.6.Android 6.0 及更高版本中权限模型规范的修改
Android 6.0(API 级别 23)引入了权限模型的修改规范,影响到应用程序的设计和规范。在此章节中,我们将概述 Android 6.0 及更高版本中的权限模型。还会介绍 Android 8.0 和更高版本中的修改。
权限授予和拒绝的时间
如果应用程序声明使用需要用户确认的权限(危险权限)[请参阅“5.2.2.1. 章节 —Android OS 的系统危险权限只能用于保护用户资产(必需)”],Android 5.1(API 级别 22)和更早版本的规范要求此类权限的列表在安装应用程序时显示,用户必须授予所有权限才能继续安装。此时,应用程序声明的所有权限(包括危险权限以外的权限)都被授予给该应用程序;这些权限被授予给该应用程序后,它们将一直有效,直至该应用程序被从终端卸载。
但是,在 Android 6.0 和更高版本的规范中,权限的授予在执行应用程序时进行。安装应用程序时,不会授予权限、用户也不会确认权限。当应用程序执行需要危险权限的程序时,必须检查是否已提前向应用程序授予这些权限;如果未授予,必须在 Android OS 中显示确认窗口,请求用户授予权限[5]。如果用户通过确认窗口授予权限,权限将被授予给应用程序。但是,用户授予给应用程序的权限(危险权限)可能随时通过“Settings”(设置)菜单撤销(图 5.2.10)。因此,必须实施适当的程序,以确保应用程序即使在因未被授予权限而无法访问所需信息或功能的情况下,也不会导致不合规行为。
| [5] | Android OS 自动授予“正常权限”和“签名权限”,因此无需获得用户对这些权限的确认。 |
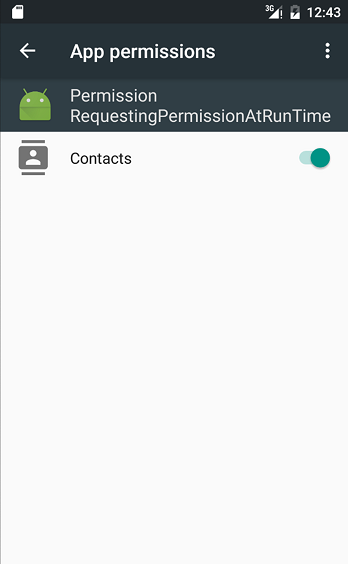
图 5.2.10 应用程序权限窗口
权限授予和拒绝的单位
根据相关功能和信息类型,可以将多个权限分组到一个权限组。例如,读取日历信息所需的权限 android.permission.READ_CALENDAR 和写入日历信息所需的权限 android.permission.WRITE_CALENDAR 都属于名为 android.permission-group.CALENDAR 的权限组。
在 Android 6.0(API 级别 23)及更高级别的权限模型中,权限按照权限组的块单位级别授予或拒绝,如本文所示。但是,开发人员必须注意,块单位可能会因操作系统和 SDK 的组合而异(请参阅下文)。
- 对于运行 Android 6.0(API 级别 23)或更高级别和应用程序 targetSdkVersion 的终端:23~25
如果 Manifest 中列出了 android.permission.READ_CALENDAR 和 android.permission.WRITE_CALENDAR,当应用程序启动时,将发出针对 android.permission.READ_CALENDAR 的请求;如果用户授予此权限,Android OS 将确定已经获得使用 android.permission.READ_CALENDAR 和 android.permission.WRITE_CALENDAR 的许可,因此授予此权限。
- 对于运行 Android 8.0(API 级别 26)或更高级别和应用程序 targetSdkVersion 26 及更高版本的终端:
仅授予所请求的权限。因此,即使 android.permission.READ_CALENDAR 和 android.permission.WRITE_CALENDAR 均已列出,如果仅请求了 android.permission.READ_CALENDAR 权限并获得了用户授权,那么只会授予 android.permission.READ_CALENDAR 权限。此后,如果请求 android.permission.WRITE_CALENDAR,该权限将被立即授予,并且不会向用户显示任何对话框[6]。
| [6] | 在这种情况下,应用程序还必须声明使用 android.permission.READ_CALENDAR 和 android.permission.WRITE_CALENDAR。 |
此外,与权限授予相比,在 Android 8.0 或更高版本中,权限的取消是以权限组的块单位级别通过“settings”(设置)菜单执行的。
有关权限组分类的更多信息,请参阅“开发人员参考”(https://developer.android.com/intl/ja/guide/topics/security/permissions.html#perm-groups)。
修订版规范的影响范围
应用程序在运行时需要请求权限的情况仅限于终端运行 Android 6.0 或更高版本且应用程序的 targetSDKVersion 为 23 或更高级别的情况。如果终端运行 Android 5.1 或更早版本,或者如果应用程序的 targetSDKVersion 为 23 或更低级别,则会在安装时请求并同时授予权限,就像使用传统方法时一样。但是,如果终端运行的是 Android 6.0 或更高版本,即使应用程序的 targetSDKVersion 低于 23,用户在安装时授予的权限也可能随时被用户撤销。这可能导致应用程序意外终止。开发人员必须即时遵守修改后的规范,或者将其应用程序的 maxSDKVersion 设置为 22 或更早级别,以确保应用程序无法安装在运行 Android 6.0(API 级别 23)或更高级别的终端上。
| 终端 Android OS 版本 | 应用程序 targetSDKVersion | 向应用程序授予权限的时间 | 用户是否可控制权限? |
| >=8.0 | >=26 | 应用程序执行(单独授予) | 是 |
| <26 | 应用程序执行(按权限组授予) | 是 | |
| <23 | 应用程序安装 | 是(需要快速响应) | |
| >=6.0 | >=23 | 应用程序执行(按权限组授予) | 是 |
| <23 | 应用程序安装 | 是(需要快速响应) | |
| <=5.1 | >=23 | 应用程序安装 | 否 |
| <23 | 应用程序安装 | 否 |
但是,应注意,maxSdkVersion 的影响是有限的。当 maxSdkVersion 的值设置为 22 或更低级别时,Android 6.0(API 级别 23)及更高级别的设备不再作为 Google Play 中目标应用程序的可安装设备列出。另一方面,由于在 Google Play 意外的市场中不会检查 maxSdkVersion 的值,因此,或许可以在 Android 6.0(API 级别 23)或更高级别中安装目标应用程序。
由于 maxSdkVersion 的影响有限,而且 Google 不建议使用 maxSdkVersion,因此,建议开发人员立即遵守修改后的规范。
在 Android 6.0 及更高版本中,以下网络通信权限的保护级别已从“危险”更改为“正常”。因此,即使应用程序声明使用这些权限,也不需要从用户处获得显式权限,所以在这种情况下,修改后的规范没有任何影响。
- android.permission.BLUETOOTH
- android.permission.BLUETOOTH_ADMIN
- android.permission.CHANGE_WIFI_MULTICAST_STATE
- android.permission.CHANGE_WIFI_STATE
- android.permission.CHANGE_WIMAX_STATE
- android.permission.DISABLE_KEYGUARD
- android.permission.INTERNET
- android.permission.NFC
5.3.将内部帐户添加到 Account Manager
Account Manager 是 Android OS 内的一种系统,负责集中管理应用程序访问在线服务必需的帐户信息(帐户名称、密码)和身份验证令牌[7]。用户需要提前向 Account Manager 注册帐户信息,当应用程序尝试访问在线服务时,Account Manager 将在获得用户的权限后自动提供应用程序身份验证令牌。Account Manager 的优势在于,应用程序无需处理极其敏感的信息:密码。
| [7] | Account Manager 提供与在线服务同步的机制,但是,本章节不涉及相关内容。 |
使用 Account Manager 的帐户管理功能的结构如下面的图 5.3.1 所示。“请求方应用程序”是指通过获取身份验证令牌来访问在线服务的应用程序,上述应用程序就属于此类型。另一方面,“Authenticator 应用程序”是 Account Manager 的功能扩展,通过为 Account Manager 提供称为 Authenticator 的对象,Account Manager 即可集中管理在线服务的帐户信息和身份验证令牌。请求方应用程序和 Authenticator 应用程序不必是单独的应用程序,可以将两者作为同一个应用程序加以实现。
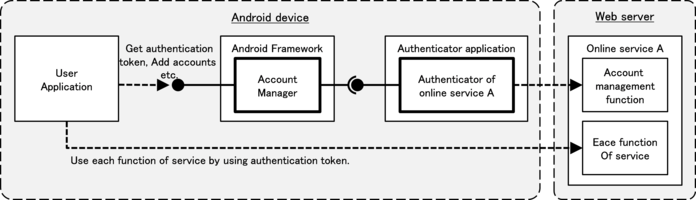
图 5.3.1 使用 Account Manager 的帐户管理功能的配置
最初,开发人员的用户应用程序(请求方应用程序)和 Authenticator 应用程序签名密钥可以不同。但是,仅在 Android 4.0.x 设备中,存在 Android Framework bug,在用户应用程序和 Authenticator 应用程序的签名密钥不同时,用户应用程序中会出现异常,并且无法使用内部帐户。以下示例代码未针对此缺陷实施任何解决方法。请参阅“5.3.3.2. —在 Android 4.0.x 中,当用户应用程序和 Authenticator 应用程序的签名密钥不同时出现异常”了解详细信息。
5.3.1.示例代码 
“5.3.1.1. —创建内部帐户”提供了 Authenticator 应用程序的示例,“5.3.1.2. —使用内部帐户”则提供了请求方应用程序的示例。在 JSSEC 网站中发布的示例代码集中,两者分别对应于 AccountManager Authenticator 和 AccountManager User。
5.3.1.1.创建内部帐户 
这是允许 Account Manager 使用内部帐户的 Authenticator 应用程序的示例代码。没有可从此应用程序中的主屏幕启动的 Activity。请注意,其通过 Account Manager 间接调用自另一段示例代码(请参见“5.3.1.2. —使用内部帐户”)
要点:
- 提供 Authenticator 的服务必须是私有的。
- 登录屏幕活动必须在 Authenticator 应用程序中实现。
- 登录屏幕活动必须作为公共活动执行。
- 指定登录屏幕活动的类名称的显式意图必须设置为 KEY_INTENT。
- 不能将敏感信息(如帐户信息或身份验证令牌)输出到日志。
- 密码不应保存在 Account Manager 中。
- HTTPS 应用于 Authenticator 与在线服务之间的通信。
向 Account Manager 提供 Authenticator Ibinder 的服务在 AndroidManifest.xml 中定义。指定 Authenticator 通过元数据写入的资源 XML 文件。
AccountManager Authenticator/AndroidManifest.xml
<manifest xmlns:android="http://schemas.android.com/apk/res/android"
    package="org.jssec.android.accountmanager.authenticator"
    xmlns:tools="http://schemas.android.com/tools">

    <!-- Necessary Permission to implement Authenticator -->
    <uses-permission android:name="android.permission.GET_ACCOUNTS" />
    <uses-permission android:name="android.permission.AUTHENTICATE_ACCOUNTS" />

    <application
        android:allowBackup="false"
        android:icon="@drawable/ic_launcher"
        android:label="@string/app_name" >

        <!-- Service which gives IBinder of Authenticator to AccountManager -->
        <!-- *** POINT 1 *** The service that provides an authenticator must be private.-->
        <service
            android:name=".AuthenticationService"
            android:exported="false" >
            <!-- intent-filter and meta-data are usual pattern.-->
            <intent-filter>
                <action android:name="android.accounts.AccountAuthenticator" />
            </intent-filter>
            <meta-data
                android:name="android.accounts.AccountAuthenticator"
                android:resource="@xml/authenticator" />
        </service>

        <!-- Activity for for login screen which is displayed when adding an account -->
        <!-- *** POINT 2 *** The login screen activity must be implemented in an authenticator application.-->
        <!-- *** POINT 3 *** The login screen activity must be made as a public activity.-->
        <activity
            android:name=".LoginActivity"
            android:exported="true"
            android:label="@string/login_activity_title"
            android:theme="@android:style/Theme.Dialog"
            tools:ignore="ExportedActivity" />
    </application>

</manifest>
通过 XML 文件定义 Authenticator。指定内部帐户的帐户类型等。
res/xml/authenticator.xml
<account-authenticator xmlns:android="http://schemas.android.com/apk/res/android"
    android:accountType="org.jssec.android.accountmanager"
    android:icon="@drawable/ic_launcher"
    android:label="@string/label"
    android:smallIcon="@drawable/ic_launcher"
    android:customTokens="true" />
将 Authenticator 实例提供给 AccountManager 的服务。返回 JssecAuthenticator 类实例的简单实现(在此示例中,是由 onBind() 实施的 Authenticator)便足以满足需求。
AuthenticationService.java
package org.jssec.android.accountmanager.authenticator;

import android.app.Service;
import android.content.Intent;
import android.os.IBinder;

public class AuthenticationService extends Service {

    private JssecAuthenticator mAuthenticator;

    @Override
    public void onCreate() {
        mAuthenticator = new JssecAuthenticator(this);
    }

    @Override
    public IBinder onBind(Intent intent) {
        return mAuthenticator.getIBinder();
    }
}
JssecAuthenticator 是在此示例中实现的 Authenticator。它继承了 AbstractAccountAuthenticator,并且所有抽象方法均已实现。这些方法由 Account Manager 调用。在 AddAccount() 和 getAuthToken() 中,启动 LoginActivity 以从在线服务获取身份认证令牌的意图将被返回到 Account Manager。
JssecAuthenticator.java
package org.jssec.android.accountmanager.authenticator;

import android.accounts.AbstractAccountAuthenticator;
import android.accounts.Account;
import android.accounts.AccountAuthenticatorResponse;
import android.accounts.AccountManager;
import android.accounts.NetworkErrorException;
import android.content.Context;
import android.content.Intent;
import android.os.Bundle;

public class JssecAuthenticator extends AbstractAccountAuthenticator {

    public static final String JSSEC_ACCOUNT_TYPE = "org.jssec.android.accountmanager";
    public static final String JSSEC_AUTHTOKEN_TYPE = "webservice";
    public static final String JSSEC_AUTHTOKEN_LABEL = "JSSEC Web Service";
    public static final String RE_AUTH_NAME = "reauth_name";

    protected final Context mContext;

    public JssecAuthenticator(Context context) {
        super(context);
        mContext = context;
    }

    @Override
    public Bundle addAccount(AccountAuthenticatorResponse response, String accountType,
            String authTokenType, String[] requiredFeatures, Bundle options)
            throws NetworkErrorException {

        AccountManager am = AccountManager.get(mContext);
        Account[] accounts = am.getAccountsByType(JSSEC_ACCOUNT_TYPE);
        Bundle bundle = new Bundle();
        if (accounts.length > 0) {
            // In this sample code, when an account already exists, consider it as an error.
            bundle.putString(AccountManager.KEY_ERROR_CODE, String.valueOf(-1));
            bundle.putString(AccountManager.KEY_ERROR_MESSAGE,
                    mContext.getString(R.string.error_account_exists));
        } else {
            // *** POINT 2 *** The login screen activity must be implemented in an authenticator application.
            // *** POINT 4 *** The explicit intent which the class name of the login screen activity is specified must be set to KEY_INTENT.
            Intent intent = new Intent(mContext, LoginActivity.class);
            intent.putExtra(AccountManager.KEY_ACCOUNT_AUTHENTICATOR_RESPONSE, response);

            bundle.putParcelable(AccountManager.KEY_INTENT, intent);
        }
        return bundle;
    }

    @Override
    public Bundle getAuthToken(AccountAuthenticatorResponse response, Account account,
            String authTokenType, Bundle options) throws NetworkErrorException {

        Bundle bundle = new Bundle();
        if (accountExist(account)) {
            // *** POINT 4 *** KEY_INTENT must be given an explicit intent that is specified the class name of the login screen activity.
            Intent intent = new Intent(mContext, LoginActivity.class);
            intent.putExtra(RE_AUTH_NAME, account.name);
            intent.putExtra(AccountManager.KEY_ACCOUNT_AUTHENTICATOR_RESPONSE, response);
            bundle.putParcelable(AccountManager.KEY_INTENT, intent);
        } else {
            // When the specified account doesn't exist, consider it as an error.
            bundle.putString(AccountManager.KEY_ERROR_CODE, String.valueOf(-2));
            bundle.putString(AccountManager.KEY_ERROR_MESSAGE,
                    mContext.getString(R.string.error_account_not_exists));
        }
        return bundle;
    }

    @Override
    public String getAuthTokenLabel(String authTokenType) {
        return JSSEC_AUTHTOKEN_LABEL;
    }

    @Override
    public Bundle confirmCredentials(AccountAuthenticatorResponse response, Account account,
            Bundle options) throws NetworkErrorException {
        return null;
    }

    @Override
    public Bundle editProperties(AccountAuthenticatorResponse response, String accountType) {
        return null;
    }

    @Override
    public Bundle updateCredentials(AccountAuthenticatorResponse response, Account account,
            String authTokenType, Bundle options) throws NetworkErrorException {
        return null;
    }

    @Override
    public Bundle hasFeatures(AccountAuthenticatorResponse response, Account account,
            String[] features) throws NetworkErrorException {
        Bundle result = new Bundle();
        result.putBoolean(AccountManager.KEY_BOOLEAN_RESULT, false);
        return result;
    }

    private boolean accountExist(Account account) {
        AccountManager am = AccountManager.get(mContext);
        Account[] accounts = am.getAccountsByType(JSSEC_ACCOUNT_TYPE);
        for (Account ac : accounts) {
            if (ac.equals(account)) {
                return true;
            }
        }
        return false;
    }
}
这是登录活动,它将帐户名称和密码发送到在线服务,并执行登录身份验证,从而获取身份验证令牌。在添加新帐户或再次获取身份验证令牌时,就会显示此消息。假设对在线服务的实际访问在 WebService 类中实现。
LoginActivity.java
package org.jssec.android.accountmanager.authenticator;

import org.jssec.android.accountmanager.webservice.WebService;

import android.accounts.Account;
import android.accounts.AccountAuthenticatorActivity;
import android.accounts.AccountManager;
import android.content.Intent;
import android.os.Bundle;
import android.text.InputType;
import android.text.TextUtils;
import android.util.Log;
import android.view.View;
import android.view.Window;
import android.widget.EditText;

public class LoginActivity extends AccountAuthenticatorActivity {
    private static final String TAG = AccountAuthenticatorActivity.class.getSimpleName();
    private String mReAuthName = null;
    private EditText mNameEdit = null;
    private EditText mPassEdit = null;

    @Override
    public void onCreate(Bundle icicle) {
        super.onCreate(icicle);

        // Display alert icon
        requestWindowFeature(Window.FEATURE_LEFT_ICON);
        setContentView(R.layout.login_activity);
        getWindow().setFeatureDrawableResource(Window.FEATURE_LEFT_ICON,
                android.R.drawable.ic_dialog_alert);

        // Find a widget in advance
        mNameEdit = (EditText) findViewById(R.id.username_edit);
        mPassEdit = (EditText) findViewById(R.id.password_edit);

        // *** POINT 3 *** The login screen activity must be made as a public activity, and suppose the attack access from other application.
        // Regarding external input, only RE_AUTH_NAME which is String type of Intent#extras, are handled.
        // This external input String is passed toextEdit#setText(), WebService#login(),new Account(),
        // as a parameter,it's verified that there's no problem if any character string is passed.
        mReAuthName = getIntent().getStringExtra(JssecAuthenticator.RE_AUTH_NAME);
        if (mReAuthName != null) {
            // Since LoginActivity is called with the specified user name, user name should not be editable.
            mNameEdit.setText(mReAuthName);
            mNameEdit.setInputType(InputType.TYPE_NULL);
            mNameEdit.setFocusable(false);
            mNameEdit.setEnabled(false);
        }
    }

    // It's executed when login button is pressed.
    public void handleLogin(View view) {
        String name = mNameEdit.getText().toString();
        String pass = mPassEdit.getText().toString();

        if (TextUtils.isEmpty(name) || TextUtils.isEmpty(pass)) {
            // Process when the inputed value is incorrect
            setResult(RESULT_CANCELED);
            finish();
        }

        // Login to online service based on the inpputted account information.
        WebService web = new WebService();
        String authToken = web.login(name, pass);
        if (TextUtils.isEmpty(authToken)) {
            // Process when authentication failed
            setResult(RESULT_CANCELED);
            finish();
        }

        // Process when login was successful, is as per below.

        // *** POINT 5 *** Sensitive information (like account information or authentication token) must not be output to the log.
        Log.i(TAG, "WebService login succeeded");


        if (mReAuthName == null) {
            // Register accounts which logged in successfully, to aAccountManager
            // *** POINT 6 *** Password should not be saved in Account Manager.
            AccountManager am = AccountManager.get(this);
            Account account = new Account(name, JssecAuthenticator.JSSEC_ACCOUNT_TYPE);
            am.addAccountExplicitly(account, null, null);
            am.setAuthToken(account, JssecAuthenticator.JSSEC_AUTHTOKEN_TYPE, authToken);
            Intent intent = new Intent();
            intent.putExtra(AccountManager.KEY_ACCOUNT_NAME, name);
            intent.putExtra(AccountManager.KEY_ACCOUNT_TYPE,
                    JssecAuthenticator.JSSEC_ACCOUNT_TYPE);
            setAccountAuthenticatorResult(intent.getExtras());
            setResult(RESULT_OK, intent);
        } else {
            // Return authentication token
            Bundle bundle = new Bundle();
            bundle.putString(AccountManager.KEY_ACCOUNT_NAME, name);
            bundle.putString(AccountManager.KEY_ACCOUNT_TYPE,
                    JssecAuthenticator.JSSEC_ACCOUNT_TYPE);
            bundle.putString(AccountManager.KEY_AUTHTOKEN, authToken);
            setAccountAuthenticatorResult(bundle);
            setResult(RESULT_OK);
        }
        finish();
    }
}
实际上,WebService 类是此处的虚拟实现,这是一个假设身份验证始终成功的示例实现,并将固定字符串作为身份验证令牌返回。
WebService.java
package org.jssec.android.accountmanager.webservice;

public class WebService {

    /**
     * Suppose to access to account managemnet function of online service.
     *
     * @param username Account name character string
     * @param password password character string
     * @return Return authentication token
     */
    public String login(String username, String password) {
        // *** POINT 7 *** HTTPS should be used for communication between an authenticator and the online services.
        // Actually, communication process with servers is implemented here, but Omit here, since this is a sample.
        return getAuthToken(username, password);
    }

    private String getAuthToken(String username, String password) {
        // In fact, get the value which uniqueness and impossibility of speculation are guaranteed by the server,
        // but the fixed value is returned without communication here, since this is sample.
        return "c2f981bda5f34f90c0419e171f60f45c";
    }
}
5.3.1.2.使用内部帐户
这是添加内部帐户并获取身份验证令牌的应用程序的示例代码。另一个示例应用程序(“5.3.1.1. —创建内部帐户”)安装在设备中时,可以添加内部帐户或获取身份验证令牌。仅当两个应用程序的签名密钥不同时,才会显示“Access request”(访问请求)屏幕。
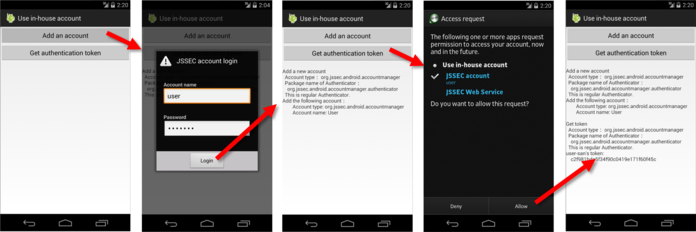
图 5.3.2 示例应用程序 AccountManager User 的行为屏幕
要点:
- 在验证 Authenticator 是否为常规 Authenticator 之后执行帐户流程。
AccountManager user 应用程序的 AndroidManifest.xml。通过声明使用必要的权限。请参阅“5.3.3.1. —Account Manager 和权限的使用”以了解必要的权限。
AccountManager User/AndroidManifest.xml
<manifest xmlns:android="http://schemas.android.com/apk/res/android"
    package="org.jssec.android.accountmanager.user" >

    <uses-permission android:name="android.permission.GET_ACCOUNTS" />
    <uses-permission android:name="android.permission.MANAGE_ACCOUNTS" />
    <uses-permission android:name="android.permission.USE_CREDENTIALS" />

    <application
        android:allowBackup="false"
        android:icon="@drawable/ic_launcher"
        android:label="@string/app_name"
        android:theme="@style/AppTheme" >
        <activity
            android:name=".UserActivity"
            android:label="@string/app_name"
            android:exported="true" >
            <intent-filter>
                <action android:name="android.intent.action.MAIN" />
                <category android:name="android.intent.category.LAUNCHER" />
            </intent-filter>
        </activity>
    </application>
</manifest>
用户应用程序的活动。点击屏幕上的按钮时,将执行 addAccount() 或 getAuthToken()。在某些情况下,与特定帐户类型相对应的 Authenticator 可能是伪造的,因此请注意,帐户流程会在验证 Authenticator 是否为常规 Authenticator 之后启动。
UserActivity.java
package org.jssec.android.accountmanager.user;

import java.io.IOException;

import org.jssec.android.shared.PkgCert;
import org.jssec.android.shared.Utils;

import android.accounts.Account;
import android.accounts.AccountManager;
import android.accounts.AccountManagerCallback;
import android.accounts.AccountManagerFuture;
import android.accounts.AuthenticatorDescription;
import android.accounts.AuthenticatorException;
import android.accounts.OperationCanceledException;
import android.app.Activity;
import android.content.Context;
import android.os.Bundle;
import android.view.View;
import android.widget.TextView;

public class UserActivity extends Activity {

    // Information of the Authenticator to be used
    private static final String JSSEC_ACCOUNT_TYPE = "org.jssec.android.accountmanager";
    private static final String JSSEC_TOKEN_TYPE = "webservice";
    private TextView mLogView;

    @Override
    public void onCreate(Bundle savedInstanceState) {
        super.onCreate(savedInstanceState);
        setContentView(R.layout.user_activity);

        mLogView = (TextView)findViewById(R.id.logview);
    }

    public void addAccount(View view) {
        logLine();
        logLine("Add a new account");

        // *** POINT 1 *** Execute the account process after verifying if the authenticator is regular one.
        if (!checkAuthenticator()) return;

        AccountManager am = AccountManager.get(this);
        am.addAccount(JSSEC_ACCOUNT_TYPE, JSSEC_TOKEN_TYPE, null, null, this,
                new AccountManagerCallback<Bundle>() {
                    @Override
                    public void run(AccountManagerFuture<Bundle> future) {
                        try {
                            Bundle result = future.getResult();
                            String type = result.getString(AccountManager.KEY_ACCOUNT_TYPE);
                            String name = result.getString(AccountManager.KEY_ACCOUNT_NAME);
                            if (type != null && name != null) {
                                logLine("Add the following accounts:");
                                logLine("  Account type: %s", type);
                                logLine("  Account name: %s", name);
                            } else {
                                String code = result.getString(AccountManager.KEY_ERROR_CODE);
                                String msg = result.getString(AccountManager.KEY_ERROR_MESSAGE);
                                logLine("The account cannot be added");
                                logLine("  Error code %s: %s", code, msg);
                            }
                        } catch (OperationCanceledException e) {
                        } catch (AuthenticatorException e) {
                        } catch (IOException e) {
                        }
                    }
                },
                null);
    }

    public void getAuthToken(View view) {
        logLine();
        logLine("Get token");

        // *** POINT 1 *** After checking that the Authenticator is the regular one, execute account process.
        if (!checkAuthenticator()) return;

        AccountManager am = AccountManager.get(this);
        Account[] accounts = am.getAccountsByType(JSSEC_ACCOUNT_TYPE);
        if (accounts.length > 0) {
            Account account = accounts[0];
            am.getAuthToken(account, JSSEC_TOKEN_TYPE, null, this,
                    new AccountManagerCallback<Bundle>() {
                        @Override
                        public void run(AccountManagerFuture<Bundle> future) {
                            try {
                                Bundle result = future.getResult();
                                String name = result.getString(AccountManager.KEY_ACCOUNT_NAME);
                                String authtoken = result.getString(AccountManager.KEY_AUTHTOKEN);
                                logLine("%s-san's token:", name);
                                if (authtoken != null) {
                                    logLine("    %s", authtoken);
                                } else {
                                    logLine("    Couldn't get");
                                }
                            } catch (OperationCanceledException e) {
                                logLine("  Exception: %s",e.getClass().getName());
                            } catch (AuthenticatorException e) {
                                logLine("  Exception: %s",e.getClass().getName());
                            } catch (IOException e) {
                                logLine("  Exception: %s",e.getClass().getName());
                            }
                        }
                    }, null);
        } else {
            logLine("Account is not registered.");
        }
    }

    // *** POINT 1 *** Verify that Authenticator is regular one.
    private boolean checkAuthenticator() {
        AccountManager am = AccountManager.get(this);
        String pkgname = null;
        for (AuthenticatorDescription ad : am.getAuthenticatorTypes()) {
            if (JSSEC_ACCOUNT_TYPE.equals(ad.type)) {
                pkgname = ad.packageName;
                break;
            }
        }

        if (pkgname == null) {
            logLine("Authenticator cannot be found.");
            return false;
        }

        logLine("  Account type: %s", JSSEC_ACCOUNT_TYPE);
        logLine("  Package name of Authenticator: ");
        logLine("    %s", pkgname);

        if (!PkgCert.test(this, pkgname, getTrustedCertificateHash(this))) {
            logLine("  It's not regular Authenticator(certificate is not matched.)");
            return false;
        }

        logLine("  This is regular Authenticator.");
        return true;
    }

    // Certificate hash value of regular Authenticator application
    // Certificate hash value can be checked in sample applciation JSSEC CertHash Checker
    private String getTrustedCertificateHash(Context context) {
        if (Utils.isDebuggable(context)) {
            // Certificate hash value of  debug.keystore "androiddebugkey"
            return "0EFB7236 328348A9 89718BAD DF57F544 D5CCB4AE B9DB34BC 1E29DD26 F77C8255";
        } else {
            // Certificate hash value of  keystore "my company key"
            return "D397D343 A5CBC10F 4EDDEB7C A10062DE 5690984F 1FB9E88B D7B3A7C2 42E142CA";
        }
    }

    private void log(String str) {
        mLogView.append(str);
    }

    private void logLine(String line) {
        log(line + "\n");
    }

    private void logLine(String fmt, Object...args) {
        logLine(String.format(fmt, args));
    }

    private void logLine() {
        log("\n");
    }
}
PkgCert.java
package org.jssec.android.shared;

import java.security.MessageDigest;
import java.security.NoSuchAlgorithmException;

import android.content.Context;
import android.content.pm.PackageInfo;
import android.content.pm.PackageManager;
import android.content.pm.PackageManager.NameNotFoundException;
import android.content.pm.Signature;

public class PkgCert {

    public static boolean test(Context ctx, String pkgname, String correctHash) {
        if (correctHash == null) return false;
        correctHash = correctHash.replaceAll(" ", "");
        return correctHash.equals(hash(ctx, pkgname));
    }

    public static String hash(Context ctx, String pkgname) {
        if (pkgname == null) return null;
        try {
            PackageManager pm = ctx.getPackageManager();
            PackageInfo pkginfo = pm.getPackageInfo(pkgname, PackageManager.GET_SIGNATURES);
            if (pkginfo.signatures.length != 1) return null;    // Will not handle multiple signatures.
            Signature sig = pkginfo.signatures[0];
            byte[] cert = sig.toByteArray();
            byte[] sha256 = computeSha256(cert);
            return byte2hex(sha256);
        } catch (NameNotFoundException e) {
            return null;
        }
    }

    private static byte[] computeSha256(byte[] data) {
        try {
            return MessageDigest.getInstance("SHA-256").digest(data);
        } catch (NoSuchAlgorithmException e) {
            return null;
        }
    }

    private static String byte2hex(byte[] data) {
        if (data == null) return null;
        final StringBuilder hexadecimal = new StringBuilder();
        for (final byte b : data) {
            hexadecimal.append(String.format("%02X", b));
        }
        return hexadecimal.toString();
    }
}
5.3.2.规则手册
实现 Authenticator 应用程序时,请遵循以下规则。
- 提供 Authenticator 的服务必须为私有(必需)
- 登录屏幕活动必须由 Authenticator 应用程序实现(必需)
- 登录屏幕活动必须作为公共活动执行,并假设存在其它应用程序的攻击性访问(必需)
- 为 KEY_INTENT 提供具有登录屏幕活动的指定类名称的显式意图(必需)
- 不能将敏感信息(如帐户信息和身份验证令牌)输出到日志(必需)
- 不应将密码保存在 Account Manager 中(推荐)
- HTTPS 应用于 Authenticator 与在线服务之间的通信(必需)
实现用户应用程序时,请遵循以下规则。
5.3.2.1.提供 Authenticator 的服务必须为私有(必需)
预先假定,Account Manager 使用随 Authenticator 一起提供的服务,而其它应用程序不应访问该服务。因此,通过将其设为“私有服务”,可以排除其它应用程序的访问。另外,Account Manager 使用系统权限运行,因此,即使是私有服务,Account Manager 也可以访问。
5.3.2.2.登录屏幕活动必须由 Authenticator 应用程序实现(必需)
用于添加新帐户和获取身份验证令牌的登录屏幕应由 Authenticator 应用程序实现。不应在用户应用程序端准备自己的登录屏幕。如本文开头所述,[AccountManager 的优势在于,应用程序不必处理极其敏感的信息/密码]。如果登录屏幕在用户应用程序端准备,则密码由用户应用程序处理,其设计将超出 Account Manager 的策略范畴。
通过 Authenticator 应用程序准备登录屏幕,即可将能够操作登录屏幕的人仅限于设备用户。这意味着恶意应用程序无法通过尝试直接登录或创建帐户来攻击帐户。
5.3.2.3.登录屏幕活动必须作为公共活动执行,并假设存在其它应用程序的攻击性访问(必需)
登录屏幕活动是由用户应用程序启动的系统。为保证即使用户应用程序与 Authenticator 应用程序的签名密钥不同时,依然显示登录屏幕活动,登录屏幕活动应实现为公共活动。
登录屏幕活动是公共活动,这意味着,其可能会被恶意应用程序启动。绝不要信任任何输入数据。因此,务必采取“3.2. —谨慎且安全地处理输入数据”中的相关应对措施。
5.3.2.4.为 KEY_INTENT 提供具有登录屏幕活动的指定类名称的显式意图(必需)
当 Authenticator 需要打开登录屏幕活动时,启动登录屏幕活动的意图将在由 KEY_INTENT 返回给 Account Manager 的 Bundle 中提供。要提供的意图应该是指定登录屏幕活动类名称的显式意图。如果提供了隐式意图,框架可能会尝试启动非由 Authenticator 应用程序为登录窗口准备的其它活动。在 Android 4.4(API 级别 19)及更高版本中,这可能会导致应用程序崩溃;对于较早版本,这可能会导致异常启动由其它应用程序准备的活动。
在 Android 4.4(API 级别 19)及更高版本中,如果由框架通过 KEY_INTENT 提供的意图启动的应用程序的签名与 Authenticator 应用程序的签名不匹配,则会生成 SecurityException;在这种情况下,将不会出现启动伪造登录屏幕的风险;但存在这样一种可能性:普通屏幕可以正常启动,而用户无法正常使用该应用程序。对于 Android 4.4(API 级别 19)之前的版本,存在启动恶意应用程序准备的伪造登录屏幕的风险,导致用户可能会将密码和其它身份验证信息输入恶意应用程序。
5.3.2.5.不能将敏感信息(如帐户信息和身份验证令牌)输出到日志(必需)
访问在线服务的应用程序有时会遇到诸如无法成功访问在线服务之类的问题。无法成功访问的原因有很多,例如网络环境布置欠缺、通信协议实现错误、权限缺失、身份验证错误等。常见的一种实现方法是程序将详细信息输出到日志中,以便开发人员可以在稍后分析问题的原因。
不应将密码或身份验证令牌等敏感信息输出到日志。由于可以从其它应用程序读取日志信息,因此可能导致信息泄露。此外,如果帐户名称可能导致泄露,则不应将其输出到日志中。
5.3.2.6.不应将密码保存在 Account Manager 中(推荐)
可以将密码和身份验证令牌这两种身份验证信息保存在要注册到 AccountManager 的帐户中。此信息将以纯文本格式(即不加密)存储在以下目录下的 account.db 中。
- Android 4.1 或更早版本
- /data/system/accounts.db
- Android 4.2 到 Android 6.0
- /data/system/0/accounts.db or /data/system/<UserId>/accounts.db
- Android 7.0 或更高版本
- /data/system_ce/0/accounts_ce.db
注意:Android 4.2 及更高版本支持多用户功能,因此,已更改为将内容保存到特定于用户的目录中。此外,由于 Android 7.0 和更高版本支持直接启动,因此,数据库文件分为两部分:一个文件在锁定时处理数据 (/data/system_de/0/accounts_de_db),另有一个文件在解锁时处理数据 (/data/system_ce/0/accounts_ce.db)。在一般环境中,身份验证信息存储在第二个数据库文件中。
需要 root 权限或系统权限才能读取这些数据库文件的内容,因此,不能在 Android 商用终端上读取这些文件。如果 Android OS 包含任何允许攻击者获取 root 权限或系统权限的漏洞,则会使 account.db 中存储的身份验证信息面临风险。
要读取 account.db 的内容,需要 root 权限或系统权限,因此通过市面上销售的 Android 设备无法读取此类内容。但如果 Android OS 中存在任何漏洞,攻击者可能接管 root 权限或系统权限,account.db 中保存的身份验证信息将处于风险边缘。
本文中介绍的身份验证应用程序旨在将身份验证令牌保存在 AccountManager 中,而不保存用户密码。在特定时间段内连续访问在线服务时,通常会延长身份验证令牌的到期时限,因此在大多数情况下,仅凭不保存密码的设计就足够保证安全。
一般情况下,身份验证令牌的有效期比密码短,并且随时可以禁用。如果身份验证令牌泄露,可以将其禁用,因此与密码相比,身份验证令牌相对更安全。在禁用身份验证令牌的情况下,用户可以再次输入密码以获取新的身份验证令牌。
如果在密码泄露后禁用密码,用户将无法再使用在线服务。在这种情况下,需要呼叫中心支持等,并且需要付出高昂的成本。因此,最好避免使用在 AccountManager 中保存密码的设计。如果无法避免保存密码的设计,则应采取高级别的应对措施,避免反向工程,此类应对措施的示例包括对密码进行加密以及对加密密钥进行混淆处理。
5.3.2.7.HTTPS 应用于 Authenticator 与在线服务之间的通信(必需)
密码或身份验证令牌称为身份验证信息,如果被第三方接管,则此类第三方可伪装为有效用户。Authenticator 使用在线服务发送/接收这些类型的身份验证信息,因此,应使用 HTTPS 等可靠的加密通信方法。
5.3.2.8.验证 Authenticator 是否常规 Authenticator 后,应执行帐户流程(必需)
如果多个 Authenticator 在一台设备中定义了相同帐户类型,则先安装的 Authenticator 生效。因此,用户后续安装的 Authenticator 时将不会得到使用。
如果先前安装的 Authenticator 是由恶意软件伪装的,用户输入的帐户信息可能会被恶意软件接管。在执行帐户操作之前,用户应用程序应验证执行帐户操作的帐户类型,确定是否向其分配了常规 Authenticator。
要验证分配给一种帐户类型的 Authenticator 是否属于常规类型,可以检查 Authenticator 软件包的证书哈希值是否与预先确认的有效证书哈希值匹配。如果发现证书哈希值不匹配,最好提示用户卸载包含分配给该帐户类型的异常 Authenticator 的软件包。
5.3.3.高级主题
5.3.3.1.Account Manager 和权限的使用
要使用 AccountManager 类的每种方法,必须在应用程序的 AndroidManifest.xml 中分别声明使用相应的权限。在 Android 5.1(API 级别 22)和更早版本中,需要 AUTHENTICATE_ACCOUNTS、GET_ACCOUNTS 或 MANAGE_ACCOUNTS 等权限;对应于各种方法的权限请见表 5.3.1。
| Account Manager 提供的功能 | ||
| 权限 | 方法 | 说明 |
| AUTHENTICATE_ACCOUNTS(只有 Authenticator 软件包才能使用。) | getPassword() | 获取密码 |
| getUserData() | 获取用户信息 | |
| addAccountExplicitly() | 将帐户添加到数据库 | |
| peekAuthToken() | 获取缓存的令牌 | |
| setAuthToken() | 注册身份验证令牌 | |
| setPassword() | 更改密码 | |
| setUserData() | 设置用户信息 | |
| renameAccount() | 为帐户重命名 | |
| GET_ACCOUNTS | getAccounts() | 获取所有帐户的列表 |
| getAccountsByType() | 获取帐户类型相同的所有帐户的列表 | |
| getAccountsByTypeAndFeatures() | 获取具有指定功能的所有帐户的列表 | |
| addOnAccountsUpdatedListener() | 注册事件侦听器 | |
| hasFeatures() | 确定其是否具有指定功能 | |
| MANAGE_ACCOUNTS | getAuthTokenByFeatures() | 获取具有指定功能的帐户的身份验证令牌 |
| addAccount() | 请求用户添加帐户 | |
| removeAccount() | 删除帐户 | |
| clearPassword() | 初始化密码 | |
| updateCredentials() | 请求用户更改密码 | |
| editProperties() | 更改 Authenticator 设置 | |
| confirmCredentials() | 请求用户再次输入密码 | |
| USE_CREDENTIALS | getAuthToken() | 获取身份验证令牌 |
| blockingGetAuthToken() | 获取身份验证令牌 | |
| MANAGE_ACCOUNTS 或 USE_CREDENTIALS | invalidateAuthToken() | 删除缓存的令牌 |
如果使用需要 AUTHENTICATE_ACCOUNTS 权限的方法组,则存在与软件包签名密钥及其权限相关的限制。具体而言,提供 Authenticator 的软件包的签名密钥与使用方法的应用程序中的软件包签名密钥应相同。因此,在分发一个应用程序时,如果它使用需要 Authenticator 之外的 AUTHENTICATE_ACCOUNTS 权限的方法组,则应通过与 Authenticator 相同的密钥对其进行签名。
在 Android 6.0(API 级别 23)及更高版本中,不使用 GET_ACCOUNTS 以外的权限,无论是否声明,可以执行的操作都不会改变。对于在 Android 5.1(API 级别 22)和更早版本中请求 AUTHENTICATE_ACCOUNTS 的方法,请注意,即使您希望请求权限,也只能在签名匹配时进行调用(如果签名不匹配,则生成 SecurityException)。
此外,需要 GET_ACCOUNTS 的访问控制在 Android 8.0(API 级别 26)中已更改。在此版本和更高版本中,使用帐户信息一端的应用程序的 targetSdkVersion 为 26 或更高级别时,如果签名与 Authenticator 应用程序的签名不匹配,即使已被授予 GET_ACCOUNTS 权限,通常也无法获取帐户信息。但是,如果 Authenticator 应用程序调用 setAccountVisibility 方法来指定软件包名称,则即使对具有不匹配签名的应用程序,也可以提供帐户信息。
在 Android Studio 的开发阶段,某些 Android Studio 项目可能共享固定调试密钥库,因此,开发人员在实现和测试 Account Manager 时可能会仅考虑权限而不考虑签名。对于为每个应用程序使用不同签名密钥的人员,尤其是开发人员,在选择用于应用程序的密钥时务必格外谨慎,须考虑到这一限制。此外,由于 AccountManager 获取的数据包括敏感信息,因此,需要小心处理,以降低信息泄露或未经授权使用等风险。
5.3.3.2.在 Android 4.0.x 中,当用户应用程序和 Authenticator 应用程序的签名密钥不同时出现异常
用户应用程序需要身份验证令牌获取功能、而此应用程序通过不同于 Authenticator 应用程序(包含 Authenticator)签名密钥的开发人员密钥签署时,AccountManager 通过显示身份验证令牌许可证屏幕验证用户是否已经授予了身份验证令牌的使用 (GrantCredentialsPermissionActivity)。但是,在 Android 4.0.x 的 Android Framework 中存在一个错误,只要 AccountManager 打开此屏幕,就会出现异常,应用程序将被强制关闭。(图 5.3.3)。有关此 bug 的详细信息,请参阅 https://code.google.com/p/android/issues/detail?id=23421。在 Android 4.1.x. 及更高版本中不存在此 bug。
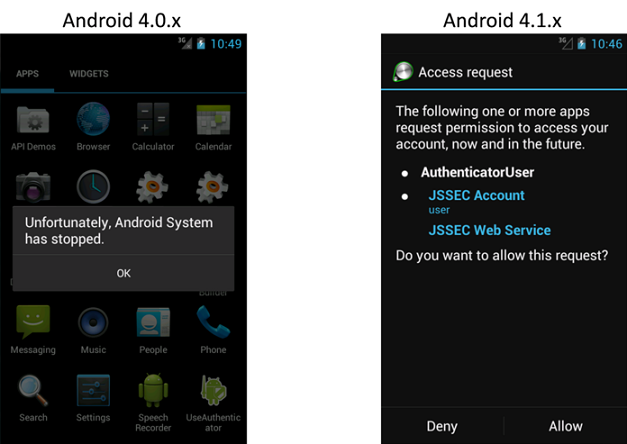
图 5.3.3 显示 Android 标准身份验证令牌许可证屏幕时的效果
5.3.3.3.在 Android 8.0(API 级别 26)或更高级别中可以读取签名不匹配的 Authenticator 帐户的情况
在 Android 8.0(API 级别 26)和更高版本中,在 Android 7.1(API 级别 25)和更早版本中需要 GET_ACCOUNTS 权限的帐户信息获取方法现在可以在没有该权限的情况下被调用。但现在只能在以下情况获取帐户信息:签名匹配或 Authenticator 应用程序端使用 setAccountVisibility 方法指定向其提供帐户信息的应用程序。但是,请注意,框架实现了许多有关此规则的许多例外情况。下面我们将讨论这些例外情况。
首先,使用帐户信息的应用程序的 targetSdkVersion 为 25 (Android 7.1) 或更低时,上述规则不适用;在这种情况下,具有 GET_ACCOUNTS 权限的应用程序可能在终端获取帐户信息,而不管其签名如何。但是,下面我们将讨论此行为如何根据 Authenticator 端的实现更改。
然后,声明使用 WRITE_CONTACTS 权限的 Authenticator 的帐户信息可以由具有 READ_CONTACTS 权限的其它应用程序读取,而不考虑签名。这并非 bug 错误,而是框架的设计方式[8]。再次提醒,此行为可能因 Authenticator 端的实现方式而异。
| [8] | 假定声明使用 WRITE_CONTACTS 权限的 Authenticator 将帐户信息写入 ContactsProvider,并且具有 READ_CONTACTS 权限的应用程序将被授予获取帐户信息的权限。 |
因此,我们发现在某些例外情况下,即使应用程序具有不匹配的签名和尚未调用 setAccountVisibility 方法来指定要向其提供帐户信息的目标,也能读取帐户信息。但是,可以通过在 Authenticator 端调用 setAccountVisibility 方法来修改这些行为,如以下代码片段所示。
不要向第三方应用程序提供帐户信息
accountManager.setAccountVisibility(account, // account for which to change visibility
        AccountManager.PACKAGE_NAME_KEY_LEGACY_VISIBLE,
        AccountManager.VISIBILITY_USER_MANAGED_NOT_VISIBLE);
通过这种方式,我们可以避免框架中有关调用 setAccountVisibility 方法的 Authenticator 的帐户信息的默认行为;上述修改可确保即使在 targetSdkVersion <= 25 或 READ_CONTACTS 权限存在的情况下,也不会提供帐户信息。
5.4.通过 HTTPS 通信
大多数智能手机应用程序会与 Internet 上的 Web 服务器通信。我们在此将重点介绍两种通信方法:HTTP 和 HTTPS。从安全的角度来看,HTTPS 通信是首选项。最近,Google 或 Facebook 等主要 Web 服务开始使用 HTTPS 作为默认方式。但是,在 HTTPS 连接方法中,已知使用 SSLv3 的连接方法容易受到一种漏洞(通常称为 POODLE)的影响,我们强烈建议您不要使用此类方法[9]。
| [9] | 在 Android 8.0(API 级别 26)和更高版本中,平台级别上不支持使用 SSLv3 的连接。 |
自 2012 年起,人们已经在 Android 应用程序中指出了 HTTPS 通信机制实现中的许多缺陷。这些缺陷可能已被实施,用于访问并非由受信任的第三方证书颁发机构颁发的服务器证书(而是由私人颁发的服务器证书,以下称为私有证书)操作的测试 Web 服务器。
此章节将介绍 HTTP 和 HTTPS 通信方法,并将阐述使用 HTTPS 安全地访问由私有证书操作的 Web 服务器的方法。
5.4.1.示例代码 
通过下表,您可以了解自己应该实施的 HTTP/HTTPS 通信类型(图 5.4.1)。
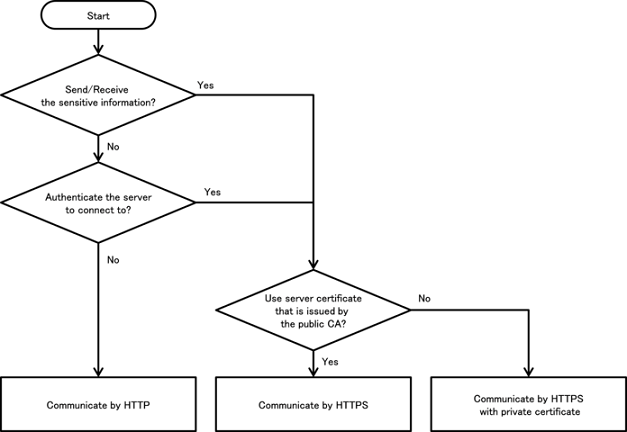
图 5.4.1 选择 HTTP/HTTPS 示例代码的流程图
发送或接收敏感信息时,将使用 HTTPS 通信,因为其通信信道使用 SSL/TLS 进行加密。以下敏感信息需要 HTTPS 通信。
- Web 服务的登录 ID/ 密码。
- 保留身份验证状态的信息(会话 ID 、令牌、Cookie 等)
- 重要/机密信息,具体取决于 Web 服务(个人信息、信用卡信息等)
具有网络通信功能的智能手机应用程序是“系统”和“Web 服务器”的一部分。您必须综合考虑整个“系统”,根据安全设计和编码为每一项通信选择 HTTP 或 HTTPS。表 5.4.1 比较了 HTTP 和 HTTPS。表 5.4.2 介绍示例代码的差异。
| HTTP | HTTPS | ||
| 特点 | URL | 以 http:// 开头 | 以 https:// 开头 |
| 加密内容 | 不可用 | 可用 | |
| 内容篡改检测 | 不可以 | 可以 | |
| 验证服务器 | 不可以 | 可以 | |
| 损坏风险 | 攻击者读取内容 | 高 | 低 |
| 攻击者修改内容 | 高 | 低 | |
| 应用程序访问假冒服务器 | 高 | 低 |
| 示例代码 | 通信 | 发送/接收敏感信息 | 服务器证书 |
| 通过 HTTP 通信 | HTTP | 不适用 | - |
| 通过 HTTP 通信 | HTTPS | OK | 由受信任第三方的证书颁发机构颁发的服务器证书,如 CyberTrust 和 VeriSign 等。 |
| 使用私有证书通过 HTTPS 通信 | HTTPS | OK | 私有证书
|
Android 支持将 java.net.HttpURLConnection/javax.net.ssl.HttpsURLConnection 作为 HTTP/HTTPS 通信 API。Android 6.0(API 级别 23)版本中移除了对于另一个 HTTP 客户端库 Apache HttpClient 的支持。
5.4.1.1.通过 HTTP 通信
这种方法基于两个前提:通过 HTTP 通信发送/接收的所有内容可能被攻击者嗅探和篡改,您的目标服务器可能被攻击者准备的假冒服务器所替代。即使在这些前提下,也只有在未造成损坏或损坏在允许范围内时,才能使用 HTTP 通信。如果应用程序无法接受这些前提,请参阅“5.4.1.2. —通过 HTTPS 通信”和“5.4.1.3. —使用私有证书通过 HTTPS 通信”。以下示例代码显示在 Web 服务器上执行图像搜索、获取并显示结果图像的应用程序。与服务器的 HTTP 通信每次搜索执行两次。第一次通信用于搜索图像数据,第二次通信用于获取图像数据。其中将使用 AsyncTask 创建用于通信进程的工作线程,以免在 UI 线程上执行通信。在这种方法中,与服务器通信时发送/接收的内容不被视为敏感内容(例如,用于搜索的字符串、图像的 URL 或图像数据)。因此,图像的 URL 和图像数据等接收到的数据可能由攻击者提供。为了保持示例代码简单,示例代码中将接收到的攻击数据视为可容忍信息,未采取任何应对措施。此外,示例中也忽略了对于在 JSON 解析或显示图像数据期间可能出现的异常的处理。必须根据应用程序规范正确地处理异常[10]。
| [10] | 在此示例代码中用作图像搜索 API 的 Google Image Search API 已于 2016 年 2 月 15 日正式停止提供服务。因此,要按原样执行示例代码,需要切换到等效服务。 |
要点:
- 发送数据中不得包含敏感信息。
- 假设接收到的数据可能由攻击者发送。
HttpImageSearch.java
package org.jssec.android.https.imagesearch;

import android.os.AsyncTask;

import org.json.JSONException;
import org.json.JSONObject;

import java.io.BufferedInputStream;
import java.io.ByteArrayOutputStream;
import java.io.IOException;
import java.net.HttpURLConnection;
import java.net.URL;

public abstract class HttpImageSearch extends AsyncTask<String, Void, Object> {

    @Override
    protected Object doInBackground(String...params) {
        byte[] responseArray;
        // --------------------------------------------------------
        // Communication 1st time: Execute image search
        // --------------------------------------------------------

        // *** POINT 1 *** Sensitive information must not be contained in send data.
        // Send image search character string
        StringBuilder s = new StringBuilder();
        for (String param : params){
            s.append(param);
            s.append('+');
        }
        s.deleteCharAt(s.length() - 1);

        String search_url = "http://ajax.googleapis.com/ajax/services/search/images?v=1.0&q=" +
                s.toString();

        responseArray = getByteArray(search_url);
        if (responseArray == null) {
            return null;
        }

        // *** POINT 2 *** Suppose that received data may be sent from attackers.
        // This is sample, so omit the process in case of the searching result is the data from an attacker.
        // This is sample, so omit the exception process in case of JSON purse.
        String image_url;
        try {
            String json = new String(responseArray);
            image_url = new JSONObject(json).getJSONObject("responseData")
                    .getJSONArray("results").getJSONObject(0).getString("url");
        } catch(JSONException e) {
            return e;
        }

        // --------------------------------------------------------
        // Communication 2nd time: Get images
        // --------------------------------------------------------
        // *** POINT 1 *** Sensitive information must not be contained in send data.
        if (image_url != null ) {
            responseArray = getByteArray(image_url);
            if (responseArray == null) {
                return null;
            }
        }

        // *** POINT 2 *** Suppose that received data may be sent from attackers.
        return responseArray;
    }

    private byte[] getByteArray(String strUrl) {
        byte[] buff = new byte[1024];
        byte[] result = null;
        HttpURLConnection response;
        BufferedInputStream inputStream = null;
        ByteArrayOutputStream responseArray = null;
        int length;

        try {
            URL url = new URL(strUrl);
            response = (HttpURLConnection) url.openConnection();
            response.setRequestMethod("GET");
            response.connect();
            checkResponse(response);

            inputStream = new BufferedInputStream(response.getInputStream());
            responseArray = new ByteArrayOutputStream();

            while ((length = inputStream.read(buff)) != -1) {
                if (length > 0) {
                    responseArray.write(buff, 0, length);
                }
            }
            result = responseArray.toByteArray();
        } catch (IOException e) {
            e.printStackTrace();
        } finally {
            if (inputStream != null) {
                try {
                    inputStream.close();
                } catch (IOException e) {
                    // This is sample, so omit the exception process
                }
            }
            if (responseArray != null) {
                try {
                    responseArray.close();
                } catch (IOException e) {
                    // This is sample, so omit the exception process
                }
            }
        }
        return result;
    }

    private void checkResponse(HttpURLConnection response) throws IOException {
        int statusCode = response.getResponseCode();
        if (HttpURLConnection.HTTP_OK != statusCode) {
            throw new IOException("HttpStatus: " + statusCode);
        }
    }
}
ImageSearchActivity.java
package org.jssec.android.https.imagesearch;

import android.app.Activity;
import android.graphics.Bitmap;
import android.graphics.BitmapFactory;
import android.os.AsyncTask;
import android.os.Bundle;
import android.view.View;
import android.widget.EditText;
import android.widget.ImageView;
import android.widget.TextView;

public class ImageSearchActivity extends Activity {

    private EditText mQueryBox;
    private TextView mMsgBox;
    private ImageView mImgBox;
    private AsyncTask<String, Void, Object> mAsyncTask ;

    @Override
    public void onCreate(Bundle savedInstanceState) {
        super.onCreate(savedInstanceState);
        setContentView(R.layout.activity_main);

        mQueryBox = (EditText)findViewById(R.id.querybox);
        mMsgBox = (TextView)findViewById(R.id.msgbox);
        mImgBox = (ImageView)findViewById(R.id.imageview);
    }

    @Override
    protected void onPause() {
        // After this, Activity may be deleted, so cancel the asynchronization process in advance.
        if (mAsyncTask != null) mAsyncTask.cancel(true);
        super.onPause();
    }

    public void onHttpSearchClick(View view) {
        String query = mQueryBox.getText().toString();
        mMsgBox.setText("HTTP:"+ query);
        mImgBox.setImageBitmap(null);

        // Cancel, since the last asynchronous process might not have been finished yet.
        if (mAsyncTask != null) mAsyncTask.cancel(true);

        // Since cannot communicate by UI thread, communicate by worker thread by AsynchTask.
        mAsyncTask = new HttpImageSearch() {
            @Override
            protected void onPostExecute(Object result) {
                // Process the communication result by UI thread.
                if (result == null) {
                    mMsgBox.append("\nException occurs\n");
                } else if (result instanceof Exception) {
                    Exception e = (Exception)result;
                    mMsgBox.append("\nException occurs\n" + e.toString());
                } else {
                    // Exception process when image display is omitted here, since it's sample.
                    byte[] data = (byte[])result;
                    Bitmap bmp = BitmapFactory.decodeByteArray(data, 0, data.length);
                    mImgBox.setImageBitmap(bmp);
                }
            }
                }.execute(query);   // pass search character string and start asynchronous process
    }

    public void onHttpsSearchClick(View view) {
        String query = mQueryBox.getText().toString();
        mMsgBox.setText("HTTPS:"+ query);
        mImgBox.setImageBitmap(null);

        // Cancel, since the last asynchronous process might not have been finished yet.
        if (mAsyncTask != null) mAsyncTask.cancel(true);

        // Since cannot communicate by UI thread, communicate by worker thread by AsynchTask.
        mAsyncTask = new HttpsImageSearch() {
            @Override
            protected void onPostExecute(Object result) {
                // Process the communication result by UI thread.
                if (result instanceof Exception) {
                    Exception e = (Exception)result;
                    mMsgBox.append("\nException occurs\n" + e.toString());
                } else {
                    byte[] data = (byte[])result;
                    Bitmap bmp = BitmapFactory.decodeByteArray(data, 0, data.length);
                    mImgBox.setImageBitmap(bmp);
                }
            }
       }.execute(query);    // pass search character string and start asynchronous process
    }
}
AndroidManifest.xml
<manifest xmlns:android="http://schemas.android.com/apk/res/android"
    package="org.jssec.android.https.imagesearch"
    android:versionCode="1"
    android:versionName="1.0">

    <uses-permission android:name="android.permission.INTERNET"/>

    <application
        android:icon="@drawable/ic_launcher"
        android:allowBackup="false"
        android:label="@string/app_name" >
        <activity
            android:name=".ImageSearchActivity"
            android:label="@string/app_name"
            android:theme="@android:style/Theme.Light"
            android:exported="true" >
            <intent-filter>
                <action android:name="android.intent.action.MAIN" />
                <category android:name="android.intent.category.LAUNCHER" />
            </intent-filter>
        </activity>
    </application>
</manifest>
5.4.1.2.通过 HTTPS 通信
在 HTTPS 通信中,系统会检查服务器是否受信任,所传输的数据是否已加密。为了验证服务器,Android HTTPS 库会验证“服务器证书”,该证书在 HTTPS 事务的握手阶段从服务器传输,具有以下要点:
- 服务器证书由受信任的第三方证书颁发机构签名
- 服务器证书的期限和其它属性有效
- 服务器的主机名与服务器证书的“主题”字段中的 CN(通用名称)或 SAN(主题替代名称)匹配
如果上述验证失败,将引发 SSLException(服务器证书验证异常)。这可能意味着中间人攻击或只是服务器证书缺陷。您的应用程序必须根据应用程序规范以适当的顺序处理异常。
接下来是 HTTPS 通信的示例代码,此通信通过受信任的第三方证书颁发机构颁发的服务器证书连接到 Web 服务器。对于使用私下颁发的服务器证书的 HTTPS 通信,请参阅“5.4.1.3. —使用私有证书通过 HTTPS 通信”。
以下示例代码显示在 Web 服务器上执行图像搜索、获取并显示结果图像的应用程序。每次搜索执行两次与服务器的 HTTPS 通信。第一次通信用于搜索图像数据,第二次通信用于获取图像数据。其中将使用 AsyncTask 创建用于通信进程的工作线程,以免在 UI 线程上执行通信。在这种方法中,与服务器通信时发送/接收的所有内容均视为敏感内容(例如,用于搜索的字符串、图像的 URL 或图像数据)。为了保持示例代码简单,未对 SSLException 执行任何特殊处理。必须根据应用程序规范正确地处理异常。[11]。此外,下面的示例代码允许使用 SSLv3 进行通信[12]。一般情况下,我们建议将远程服务器上的设置配置为禁用 SSLv3,以免恶意用户针对 SSLv3 中漏洞(称为 POODLE)发起攻击。
| [11] | 在此示例代码中用作图像搜索 API 的 Google Image Search API 已于 2016 年 2 月 15 日正式停止提供服务。因此,要按原样执行示例代码,需要切换到等效服务。 |
| [12] | 不会出现通过 SSLv3 的连接,因为在 Android 8.0(API 级别 26)和更高版本中,平台级别上禁止此类连接;但是,我们建议在服务器端采取禁用 SSLv3 的步骤。 |
根据服务器证书验证方面的现行惯例 RFC2818 中的信息,不建议使用 CN,强烈建议将 SAN 用于比较域名和证书。因此,Android 9.0(API 级别 28)中作出了调整,仅将 SAN 用于验证,并且服务器必须提供包括 SAN 的证书,如果证书不包括 SAN,则不再可信。
要点:
- URI 以 https:// 开头。
- 发送数据中可以包含敏感信息。
- 即使数据是从通过 HTTPS 连接的服务器发送的,也要小心安全地处理接收的数据。
- 应在应用程序中采用适当的顺序处理 SSLException。
HttpsImageSearch.java
package org.jssec.android.https.imagesearch;

import org.json.JSONException;
import org.json.JSONObject;

import android.os.AsyncTask;

import java.io.BufferedInputStream;
import java.io.ByteArrayOutputStream;
import java.io.IOException;
import java.net.HttpURLConnection;
import java.net.URL;

public abstract class HttpsImageSearch extends AsyncTask<String, Void, Object> {

    @Override
    protected Object doInBackground(String...params) {
        byte[] responseArray;
        // --------------------------------------------------------
        // Communication 1st time : Execute image search
        // --------------------------------------------------------

        // *** POINT 1 *** URI starts with https://.
        // *** POINT 2 *** Sensitive information may be contained in send data.
        StringBuilder s = new StringBuilder();
        for (String param : params){
            s.append(param);
            s.append('+');
        }
        s.deleteCharAt(s.length() - 1);

        String search_url = "https://ajax.googleapis.com/ajax/services/search/images?v=1.0&q=" +
                s.toString();

        responseArray = getByteArray(search_url);
        if (responseArray == null) {
            return null;
        }

        // *** POINT 3 *** Handle the received data carefully and securely,
        // even though the data was sent from the server connected by HTTPS.
        // Omitted, since this is a sample.请参阅“3.2 谨慎且安全地处理输入数据”。
        String image_url;
        try {
            String json = new String(responseArray);
            image_url = new JSONObject(json).getJSONObject("responseData")
                    .getJSONArray("results").getJSONObject(0).getString("url");
        } catch(JSONException e) {
            return e;
        }

        // --------------------------------------------------------
        // Communication 2nd time : Get image
        // --------------------------------------------------------

        // *** POINT 1 *** URI starts with https://.
        // *** POINT 2 *** Sensitive information may be contained in send data.
        if (image_url != null ) {
            responseArray = getByteArray(image_url);
            if (responseArray == null) {
                return null;
            }
        }

        return responseArray;
    }

    private byte[] getByteArray(String strUrl) {
        byte[] buff = new byte[1024];
        byte[] result = null;
        HttpURLConnection response;
        BufferedInputStream inputStream = null;
        ByteArrayOutputStream responseArray = null;
        int length;

        try {
            URL url = new URL(strUrl);
            response = (HttpURLConnection) url.openConnection();
            response.setRequestMethod("GET");
            response.connect();
            checkResponse(response);

            inputStream = new BufferedInputStream(response.getInputStream());
            responseArray = new ByteArrayOutputStream();

            while ((length = inputStream.read(buff)) != -1) {
                if (length > 0) {
                    responseArray.write(buff, 0, length);
                }
            }
            result = responseArray.toByteArray();
        } catch (IOException e) {
            e.printStackTrace();
        } finally {
            if (inputStream != null) {
                try {
                    inputStream.close();
                } catch (IOException e) {
                    // This is sample, so omit the exception process
                }
            }
            if (responseArray != null) {
                try {
                    responseArray.close();
                } catch (IOException e) {
                    // This is sample, so omit the exception process
                }
            }
        }
        return result;
    }

    private void checkResponse(HttpURLConnection response) throws IOException {
        int statusCode = response.getResponseCode();
        if (HttpURLConnection.HTTP_OK != statusCode) {
            throw new IOException("HttpStatus: " + statusCode);
        }
    }
}
其它示例代码文件与“5.4.1.1. —通过 HTTP 通信”中的相同,因此,请参阅“5.4.1.1. —通过 HTTP 通信”
5.4.1.3.使用私有证书通过 HTTPS 通信
此章节显示的示例代码使用私下颁发的服务器证书(私有证书),而非由受信任第三方证书颁发机构颁发的服务器证书。请参阅“5.4.3.1. —如何创建私有证书和配置服务器设置”,了解如何创建私有证书颁发机构的根证书和私有证书以及如何在 Web 服务器中进行 HTTPS 设置。示例程序的资产中有一个 cacert.crt 文件。它是私有证书颁发机构的根证书文件。
以下示例代码显示在 Web 服务器上获取并显示图像的应用程序。HTTPS 用于与服务器通信。其中将使用 AsyncTask 创建用于通信进程的工作线程,以免在 UI 线程上执行通信。在本示例中,与服务器通信时发送/接收的所有内容(图像的 URL 和图像数据)被视为敏感内容。为了保持示例代码简单,未对 SSLException 执行任何特殊处理。必须根据应用程序规范正确地处理异常。
要点:
- 使用私有证书颁发机构的根证书验证服务器证书。
- URI 以 https:// 开头。
- 发送数据中可以包含敏感信息。
- 接收的数据可与服务器同样受信任。
- 应在应用程序中采用适当的顺序处理 SSLException。
PrivateCertificateHttpsGet.java
package org.jssec.android.https.privatecertificate;

import java.io.BufferedInputStream;
import java.io.ByteArrayOutputStream;
import java.io.IOException;
import java.net.HttpURLConnection;
import java.net.URL;
import java.security.KeyStore;
import java.security.SecureRandom;

import javax.net.ssl.HostnameVerifier;
import javax.net.ssl.HttpsURLConnection;
import javax.net.ssl.SSLContext;
import javax.net.ssl.SSLException;
import javax.net.ssl.SSLSession;
import javax.net.ssl.TrustManagerFactory;

import android.content.Context;
import android.os.AsyncTask;

public abstract class PrivateCertificateHttpsGet extends AsyncTask<String, Void, Object> {

    private Context mContext;

    public PrivateCertificateHttpsGet(Context context) {
        mContext = context;
    }

    @Override
    protected Object doInBackground(String...params) {
        TrustManagerFactory trustManager;
        BufferedInputStream inputStream = null;
        ByteArrayOutputStream responseArray = null;
        byte[] buff = new byte[1024];
        int length;

        try {
            URL url = new URL(params[0]);
            // *** POINT 1 *** Verify a server certificate with the root certificate of a private certificate authority.
            // Set keystore which includes only private certificate that is stored in assets, to client.
            KeyStore ks = KeyStoreUtil.getEmptyKeyStore();
            KeyStoreUtil.loadX509Certificate(ks,
                    mContext.getResources().getAssets().open("cacert.crt"));

            // *** POINT 2 *** URI starts with https://.
            // *** POINT 3 *** Sensitive information may be contained in send data.
            trustManager = TrustManagerFactory.getInstance(TrustManagerFactory.getDefaultAlgorithm());
            trustManager.init(ks);
            SSLContext sslCon = SSLContext.getInstance("TLS");
            sslCon.init(null, trustManager.getTrustManagers(), new SecureRandom());

            HttpURLConnection con = (HttpURLConnection)url.openConnection();
            HttpsURLConnection response = (HttpsURLConnection)con;
            response.setDefaultSSLSocketFactory(sslCon.getSocketFactory());

            response.setSSLSocketFactory(sslCon.getSocketFactory());
            checkResponse(response);

            // *** POINT 4 *** Received data can be trusted as same as the server.
            inputStream = new BufferedInputStream(response.getInputStream());
            responseArray = new ByteArrayOutputStream();
            while ((length = inputStream.read(buff)) != -1) {
                if (length > 0) {
                    responseArray.write(buff, 0, length);
                }
            }
            return responseArray.toByteArray();
        } catch(SSLException e) {
            // *** POINT 5 *** SSLException should be handled with an appropriate sequence in an application.
            // Exception process is omitted here since it's sample.
            return e;
        } catch(Exception e) {
            return e;
        } finally {
            if (inputStream != null) {
                try {
                    inputStream.close();
                } catch (Exception e) {
                    // This is sample, so omit the exception process
                }
            }
            if (responseArray != null) {
                try {
                    responseArray.close();
                } catch (Exception e) {
                    // This is sample, so omit the exception process
                }
            }
        }
    }

    private void checkResponse(HttpURLConnection response) throws IOException {
        int statusCode = response.getResponseCode();
        if (HttpURLConnection.HTTP_OK != statusCode) {
            throw new IOException("HttpStatus: " + statusCode);
        }
    }
}
KeyStoreUtil.java
package org.jssec.android.https.privatecertificate;

import java.io.IOException;
import java.io.InputStream;
import java.security.KeyStore;
import java.security.KeyStoreException;
import java.security.NoSuchAlgorithmException;
import java.security.cert.Certificate;
import java.security.cert.CertificateException;
import java.security.cert.CertificateFactory;
import java.security.cert.X509Certificate;
import java.util.Enumeration;

public class KeyStoreUtil {
    public static KeyStore getEmptyKeyStore() throws KeyStoreException,
            NoSuchAlgorithmException, CertificateException, IOException {
        KeyStore ks = KeyStore.getInstance("BKS");
        ks.load(null);
        return ks;
    }

    public static void loadAndroidCAStore(KeyStore ks)
            throws KeyStoreException, NoSuchAlgorithmException,
            CertificateException, IOException {
        KeyStore aks = KeyStore.getInstance("AndroidCAStore");
        aks.load(null);
        Enumeration<String> aliases = aks.aliases();
        while (aliases.hasMoreElements()) {
            String alias = aliases.nextElement();
            Certificate cert = aks.getCertificate(alias);
            ks.setCertificateEntry(alias, cert);
        }
    }

    public static void loadX509Certificate(KeyStore ks, InputStream is)
            throws CertificateException, KeyStoreException {
        try {
            CertificateFactory factory = CertificateFactory.getInstance("X509");
            X509Certificate x509 = (X509Certificate)factory.generateCertificate(is);
            String alias = x509.getSubjectDN().getName();
            ks.setCertificateEntry(alias, x509);
        } finally {
            try { is.close(); } catch (IOException e) { /* This is sample, so omit the exception process */ }
        }
    }
}
PrivateCertificateHttpsActivity.java
package org.jssec.android.https.privatecertificate;

import android.app.Activity;
import android.graphics.Bitmap;
import android.graphics.BitmapFactory;
import android.os.AsyncTask;
import android.os.Bundle;
import android.view.View;
import android.widget.EditText;
import android.widget.ImageView;
import android.widget.TextView;

public class PrivateCertificateHttpsActivity extends Activity {

    private EditText mUrlBox;
    private TextView mMsgBox;
    private ImageView mImgBox;
    private AsyncTask<String, Void, Object> mAsyncTask ;

    @Override
    public void onCreate(Bundle savedInstanceState) {
        super.onCreate(savedInstanceState);
        setContentView(R.layout.activity_main);

        mUrlBox = (EditText)findViewById(R.id.urlbox);
        mMsgBox = (TextView)findViewById(R.id.msgbox);
        mImgBox = (ImageView)findViewById(R.id.imageview);
    }

    @Override
    protected void onPause() {
        // After this, Activity may be discarded, so cancel asynchronous process in advance.
        if (mAsyncTask != null) mAsyncTask.cancel(true);
        super.onPause();
    }

    public void onClick(View view) {
        String url = mUrlBox.getText().toString();
        mMsgBox.setText(url);
        mImgBox.setImageBitmap(null);

        // Cancel, since the last asynchronous process might have not been finished yet.
        if (mAsyncTask != null) mAsyncTask.cancel(true);

        // Since cannot communicate through UI thread, communicate by worker thread by AsynchTask.
        mAsyncTask = new PrivateCertificateHttpsGet(this) {
            @Override
            protected void onPostExecute(Object result) {
                // Process the communication result through UI thread.
                if (result instanceof Exception) {
                    Exception e = (Exception)result;
                    mMsgBox.append("\nException occurs\n" + e.toString());
                } else {
                    byte[] data = (byte[])result;
                    Bitmap bmp = BitmapFactory.decodeByteArray(data, 0, data.length);
                    mImgBox.setImageBitmap(bmp);
                }
            }
        }.execute(url); // Pass URL and start asynchronization process
    }
}
5.4.2.规则手册
与 HTTP/HTTPS 通信时,请遵循以下规则。
- 必须通过 HTTPS 通信发送/接收敏感信息(必需)
- 必须谨慎、安全地处理通过 HTTP 接收的数据(必需)
- 必须适当地处理 SSLException,比如向用户发送通知(必需)
- 不能创建自定义 TrustManager(必需)
- 不能创建自定义 HostnameVerifier(必需)
5.4.2.1.必须通过 HTTPS 通信发送/接收敏感信息(必需)
在 HTTP 事务中,发送和接收的信息可能会被他人所嗅探或篡改,所连接的服务器可能存在伪装的风险。必须通过 HTTPS 通信发送/接收敏感信息。
5.4.2.2.必须谨慎、安全地处理通过 HTTP 接收的数据(必需)
HTTP 通信中收到的数据可能由攻击者生成,意在利用应用程序的漏洞。因此,您必须假设应用程序会接受任何数据值和数据格式,然后在处理接收到的数据时小心地实施数据处理,以免产生任何漏洞。此外,您也不应盲目信任来自 HTTPS 服务器的数据。HTTPS 服务器可能由攻击者建立,或者收到的数据可能在 HTTPS 服务器以外的其它位置制作。请参阅“3.2. —谨慎且安全地处理输入数据”。
5.4.2.3.必须适当地处理 SSLException,比如向用户发送通知(必需)
在 HTTPS 通信中,当服务器证书无效或通信受到中间人攻击时,SSLException 会作为验证错误发生。因此,您必须为 SSLException 实施适当的异常处理。通知用户通信故障、记录故障等可视为异常处理的典型实施。另一方面,在某些情况下,可能不需要向用户发出特别通知。与此类似,处理 SSLException 的方式取决于您在首次全面考虑后需要确定的应用程序规范和特征。
如上所述,当出现 SSLException 时,可能表示应用程序正受到中间人攻击,因此绝对不能采用诸如尝试通过 HTTP 等非安全协议再次发送/接收敏感信息的做法。
5.4.2.4.不能创建自定义 TrustManager(必需)
只需更改用于验证服务器证书的密钥库,就足以使用自签名证书等私有证书通过 HTTPS 通信。但是,正如“5.4.3.3. — 禁用证书验证的风险代码”中所述,Internet 上有许多具有此目的的危险 TrustManager 实施,如同示例代码一样。通过引用这些示例代码实施的应用程序可能存在漏洞。
您需要使用私有证书通过 HTTPS 通信时,请参阅“5.4.1.3. — 使用私有证书通过 HTTPS 通信”。
当然,可以安全地实施自定义 TrustManager,但需要足够的加密处理和加密通信知识,以免实施易受攻击的代码。因此,此规则应该说是(必需)。
5.4.2.5.不能创建自定义 HostnameVerifier(必需)
只需更改用于验证服务器证书的密钥库,就足以使用自签名证书等私有证书通过 HTTPS 通信。但是,正如“5.4.3.3. —禁用证书验证的风险代码”,中所述,Internet 上有许多具有此目的的危险 HostnameVerifier 实施,如同示例代码一样。通过引用这些示例代码实施的应用程序可能存在漏洞。
您需要使用私有证书通过 HTTPS 通信时,请参阅“5.4.1.3. —使用私有证书通过 HTTPS 通信”。
当然,可以安全地实施自定义 HostnameVerifier,但需要足够的加密处理和加密通信知识,以免实施易受攻击的代码。因此,此规则应该说是(必需)。
5.4.3.高级主题
5.4.3.1.如何创建私有证书和配置服务器设置
此章节介绍如何创建私有证书及在 Ubuntu 和 CentOS 等 Linux 中配置服务器设置。私有证书是指私下颁发的服务器证书,与由 Cybertrust 和 VeriSign 等受信任的第三方证书颁发机构颁发的服务器证书不同。
创建私有证书颁发机构
首先,您需要创建私有证书颁发机构以颁发私有证书。私有证书颁发机构是指私下创建的证书(即私有证书)的颁发机构。您可以通过单个私有证书颁发机构颁发多份私有证书。存储私有证书颁发机构的 PC 只能由受信任的人员访问。
要创建私有证书颁发机构,必须创建两个文件,例如下面的 shell 脚本 newca.sh 和设置文件 openssl.cnf,然后加以执行。在 shell 脚本中,CASTART 和 CAEND 代表证书颁发机构的有效期,CASUBJ 代表证书颁发机构的名称。因此,需要根据您创建的证书颁发机构更改这些值。在执行 shell 脚本时,用于访问证书颁发机构的密码总共需要提供 3 次,每次都需要输入此密码。
newca.sh -- Shell Script to create certificate authority
#!/bin/bash

umask 0077

CONFIG=openssl.cnf
CATOP=./CA
CAKEY=cakey.pem
CAREQ=careq.pem
CACERT=cacert.pem
CAX509=cacert.crt
CASTART=130101000000Z   # 2013/01/01 00:00:00 GMT
CAEND=230101000000Z     # 2023/01/01 00:00:00 GMT
CASUBJ="/CN=JSSEC Private CA/O=JSSEC/ST=Tokyo/C=JP"

mkdir -p ${CATOP}
mkdir -p ${CATOP}/certs
mkdir -p ${CATOP}/crl
mkdir -p ${CATOP}/newcerts
mkdir -p ${CATOP}/private
touch ${CATOP}/index.txt

openssl req -new -newkey rsa:2048 -sha256 -subj "${CASUBJ}" \
        -keyout ${CATOP}/private/${CAKEY} -out ${CATOP}/${CAREQ}
openssl ca -selfsign -md sha256 -create_serial -batch \
        -keyfile ${CATOP}/private/${CAKEY} \
        -startdate ${CASTART} -enddate ${CAEND} -extensions v3_ca \
        -in ${CATOP}/${CAREQ} -out ${CATOP}/${CACERT} \
        -config ${CONFIG}
openssl x509 -in ${CATOP}/${CACERT} -outform DER -out ${CATOP}/${CAX509}
openssl.cnf - Setting file of openssl command which 2 shell scripts refers in common
[ ca ]
default_ca      = CA_default             # The default ca section

[ CA_default ]
dir             = ./CA                   # Where everything is kept
certs           = $dir/certs             # Where the issued certs are kept
crl_dir         = $dir/crl               # Where the issued crl are kept
database        = $dir/index.txt         # database index file.
#unique_subject = no                     # Set to 'no' to allow creation of several ctificates with same subject.
new_certs_dir   = $dir/newcerts          # default place for new certs.
certificate     = $dir/cacert.pem        # The CA certificate
serial          = $dir/serial            # The current serial number
crlnumber       = $dir/crlnumber         # the current crl number must be commented out to leave a V1 CRL
crl             = $dir/crl.pem           # The current CRL
private_key     = $dir/private/cakey.pem # The private key
RANDFILE        = $dir/private/.rand     # private random number file
x509_extensions = usr_cert               # The extentions to add to the cert
name_opt        = ca_default             # Subject Name options
cert_opt        = ca_default             # Certificate field options
policy          = policy_match

[ policy_match ]
countryName             = match
stateOrProvinceName     = match
organizationName        = supplied
organizationalUnitName  = optional
commonName              = supplied
emailAddress            = optional

[ usr_cert ]
basicConstraints        = CA:FALSE
nsComment               = "OpenSSL Generated Certificate"
subjectKeyIdentifier    = hash
authorityKeyIdentifier  = keyid,issuer
subjectAltName          = @alt_names

[ v3_ca ]
subjectKeyIdentifier    = hash
authorityKeyIdentifier  = keyid:always,issuer
basicConstraints        = CA:true

[ alt_names ]
DNS.1                   = ${ENV::HOSTNAME}
DNS.2                   = *.${ENV::HOSTNAME}
执行上述 shell 脚本后,会在工作目录下创建一个名为 CA 的目录。此 CA 目录就是一个私有证书颁发机构。CA/cacert.crt 文件是私有证书颁发机构的根证书。它存储在应用程序的资产目录中,如“5.4.1.3. —使用私有证书通过 HTTPS 通信”中所述,或者其安装在 Android 设备中,如“5.4.3.2. —将私有证书颁发机构的根证书安装到 Android OS 的证书存储”中所述。
创建私有证书
要创建私有证书,您必须创建 shell 脚本,例如下面的 newca.sh,并加以执行。在 shell 脚本中,SVSTART 和 SVEND 代表私有证书的有效期限,SVSUBJ 代表 Web 服务器的名称,因此,需要根据目标 Web 服务器更改这些值。特别是,您需要确保不要为 SVSUBJ 的 /CN 设置错误的主机名,此名称将用于指定 Web 服务器的主机名。在执行 shell 脚本时,系统将要求提供用于访问证书颁发机构的密码,因此,您需要输入在创建私有证书颁发机构时设置的密码。然后,系统将总共要求您选择“y/n”(是/否)两次,每次都需要选择“y”(是)。
newsv.sh - Shell script which issues private certificate
#!/bin/bash

umask 0077

CONFIG=openssl.cnf
CATOP=./CA
CAKEY=cakey.pem
CACERT=cacert.pem
SVKEY=svkey.pem
SVREQ=svreq.pem
SVCERT=svcert.pem
SVX509=svcert.crt
SVSTART=130101000000Z   # 2013/01/01 00:00:00 GMT
SVEND=230101000000Z     # 2023/01/01 00:00:00 GMT
HOSTNAME=selfsigned.jssec.org
SVSUBJ="/CN="${HOSTNAME}"/O=JSSEC Secure Coding Group/ST=Tokyo/C=JP"

openssl genrsa -out ${SVKEY} 2048
openssl req -new -key ${SVKEY} -subj "${SVSUBJ}" -out ${SVREQ}
openssl ca -md sha256 \
        -keyfile ${CATOP}/private/${CAKEY} -cert ${CATOP}/${CACERT} \
        -startdate ${SVSTART} -enddate ${SVEND} \
        -in ${SVREQ} -out ${SVCERT} -config ${CONFIG}
openssl x509 -in ${SVCERT} -outform DER -out ${SVX509}
执行上述 shell 脚本后,会直接在工作目录下创建 Web 服务器的私有密钥文件“svkey.pem”和私有证书文件“svcert.pem”。
如果 Web 服务器是 Apache,您要在配置文件中指定 prikey.pem 和 cert.pem,如下所示
SSLCertificateFile "/path/to/svcert.pem"
SSLCertificateKeyFile "/path/to/svkey.pem"
5.4.3.2.将私有证书颁发机构的根证书安装到 Android OS 的证书存储
在“5.4.1.3. —使用私有证书通过 HTTPS 通信的示例代码中,介绍了通过将根证书安装到应用程序中,以使用私有证书从一个应用程序建立与 Web 服务器之间的 HTTPS 会话的方法。本章节将介绍通过将根证书安装到 Android OS 中,以使用私有证书从所有应用程序建立与 Web 服务器之间的 HTTPS 会话的方法。请注意,您安装的所有证书都应该是受信任的证书颁发机构颁发的证书,包括您自己的证书颁发机构。
但是,此处介绍的方法仅适用于 Android 6.0(API 级别 23)之前的版本。从 Android 7.0(API 级别 24)开始,即使已安装私有证书颁发机构的根证书,系统也会忽略它。从 API 级别 24 开始,要使用私有证书,请参阅“5.4.3.7. —网络安全配置”中的“使用私有证书通过 HTTPS 通信”部分。
首先,您需要将根证书文件“cacert.crt”复制到 Android 设备的内部存储。您还可以从 https://www.jssec.org/dl/android_securecoding_sample_cacert.crt 获取示例代码中使用的根证书文件。
然后,您要通过“Android Settings”(Android 设置)打开“Security”(安全)页面,您可以通过执行以下操作在 Android 设备中安装根证书。
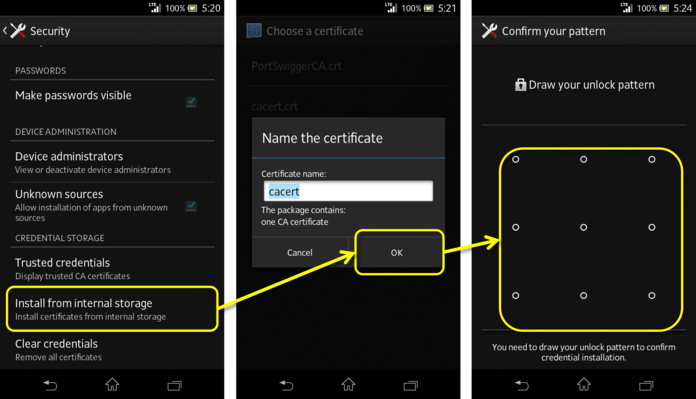
图 5.4.2 安装私有证书颁发机构根证书的步骤
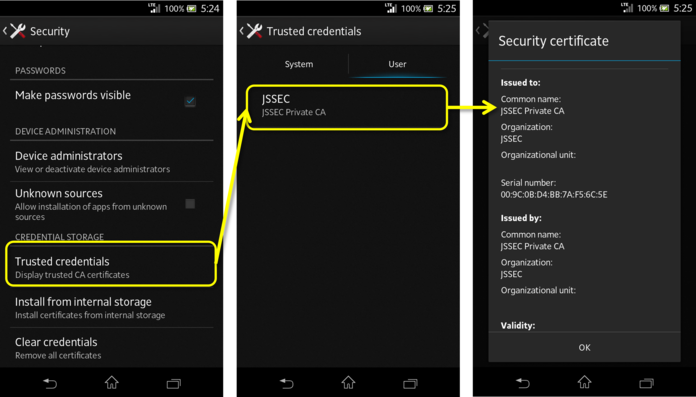
图 5.4.3 检查是否安装了根证书
在 Android OS 中安装根证书后,所有应用程序都可以正确地验证证书颁发机构颁发的每个私有证书。下图显示了在 Chrome 浏览器中显示 https://selfsigned.jssec.org/droid_knight.png 时的示例。
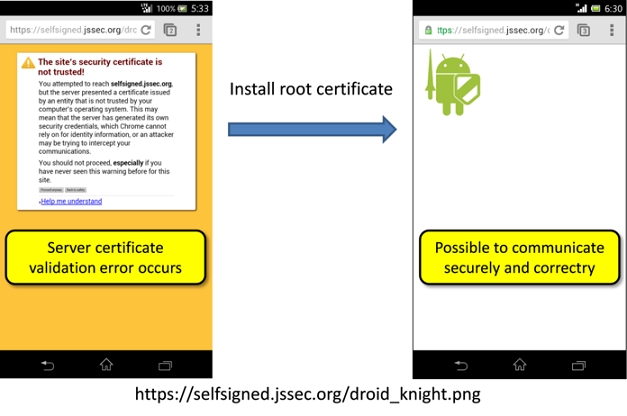
图 5.4.4 安装根证书后,可以正确地验证私有证书
通过以这种方式安装根证书,即使对于使用示例代码的应用程序(“5.4.1.2. —通过 HTTPS 通信”),也能通过 HTTPS 正确地连接到使用私有证书运行的 Web 服务器。
5.4.3.3.禁用证书验证的风险代码
在 Internet 上可以找到许多错误示例(代码片段),即使出现证书验证错误时,这些代码片段也允许应用程序继续通过 HTTPS 与 Web 服务器通信。它们作为使用私有证书通过 HTTPS 与 Web 服务器通信的方式被引入,许多开发人员都通过简单的复制和粘贴方法使用这些示例代码创建了大量应用程序。遗憾的是,其中大多数应用程序都容易受到中间人攻击。正如本文开头所述“2012 年,人们已经在 Android 应用程序中指出了 HTTPS 通信机制实现中的许多缺陷”,已报告的实施了此类易受攻击代码的 Android 应用程序不计其数。
下面显示了导致 HTTPS 通信易受攻击的几个代码片段。在发现此类代码片段时,强烈建议替换为“5.4.1.3. —使用私有证书通过 HTTPS 通信”中的示例代码。
风险:创建空 TrustManager 的情况
        TrustManager tm = new X509TrustManager() {

            @Override
            public void checkClientTrusted(X509Certificate[] chain,
                    String authType) throws CertificateException {
                // Do nothing -> accept any certificates
            }

            @Override
            public void checkServerTrusted(X509Certificate[] chain,
                    String authType) throws CertificateException {
                // Do nothing -> accept any certificates
            }

            @Override
            public X509Certificate[] getAcceptedIssuers() {
                return null;
            }
        };
风险:创建空 HostnameVerifier 的情况
        HostnameVerifier hv = new HostnameVerifier() {
            @Override
            public boolean verify(String hostname, SSLSession session) {
                // Always return true -> Accespt any host names
                return true;
            }
        };
风险:使用了 ALLOW_ALL_HOSTNAME_VERIFIER 的情况。
        SSLSocketFactory sf;
        [...]
        sf.setHostnameVerifier(SSLSocketFactory.ALLOW_ALL_HOSTNAME_VERIFIER);
5.4.3.4.有关 HTTP 请求头配置的说明
如果要为 HTTP 或 HTTPS 通信指定您自己的单个 HTTP 请求头,请使用 URLConnection 类中的 setRequestProperty() 或 addRequestProperty() 方法。如果要将从外部源接收的输入数据用作这些方法的参数,必须实施 HTTP 头注入保护。基于 HTTP 头注入的攻击方法的第一步是在输入数据中包含回车代码,这些回车代码用作 HTTP 头中的分隔符。因此,必须从输入数据中删除所有回车代码。
配置 HTTP 请求头
public byte[] openConnection(String strUrl, String strLanguage, String strCookie) {
        // HttpURLConnection is a class derived from URLConnection
        HttpURLConnection connection;

        try {
            URL url = new URL(strUrl);
            connection = (HttpURLConnection) url.openConnection();
            connection.setRequestMethod("GET");

            // *** POINT *** When using input values in HTTP request headers,
            // check the input data in accordance with the application's requirements(*)
            if (strLanguage.matches("^[a-zA-Z ,-]+$")) {
                connection.addRequestProperty("Accept-Language", strLanguage);
            } else {
                throw new IllegalArgumentException("Invalid Language : " + strLanguage);
            }
            // *** POINT *** Or URL-encode the input data (as appropriate for the purposes of the app in queestion)
            connection.setRequestProperty("Cookie", URLEncoder.encode(strCookie, "UTF-8"));

            connection.connect();

            [...]
* 请参阅“3.2. —谨慎且安全地处理输入数据”。
5.4.3.5.关于固定的说明和实现示例
当应用程序使用 HTTPS 通信时,在通信开始时执行的握手过程中的一个步骤是检查从远程服务器发送的证书是否由第三方证书颁发机构签名。但是,攻击者可能从第三方身份验证代理处获取不正确的证书,或者可能从证书颁发机构获取了签名密钥,并构建了不正确的证书。在这种情况下,应用程序将无法在握手过程中检测到攻击,即使受到攻击者建立的不正当服务器所诱骗或受到中间人攻击时也是如此,因此,可能会造成损害。
固定技术是一种有效的策略,可防止使用来自不正当的第三方证书颁发机构的此类证书发起的中间人攻击。在此方法中,远程服务器的证书和公钥预先存储在应用程序中,此信息用于握手处理及握手处理完成后的重新测试。
如果第三方证书颁发机构的信誉(公钥基础结构的基础)受到负面影响,可以通过固定来恢复通信的安全性。应用程序开发人员应评估自己的应用程序处理的资产级别,并决定是否实现这些测试。
在握手过程中使用存储在应用程序中的证书和公钥
要在握手过程中使用应用程序中存储的远程服务器证书或公钥中包含的信息,应用程序必须创建包含此信息的自己的密钥库,并在通信过程中加以使用。这将允许应用程序在握手过程中检测不正当行为,即使在出现使用来自不正当的第三方证书颁发机构的证书的中间人攻击时也是如此,具体如上所述。请参阅标题为“ 5.4.1.3. —使用私有证书通过 HTTPS 通信”的部分中的示例代码,详细了解如何建立应用程序自己的密钥库以进行 HTTPS 通信。
握手完成后,使用存储在应用程序中的证书和公钥信息执行重新测试
要在握手过程完成后重新测试远程服务器,应用程序首先获取系统在握手过程中测试和信任的证书链,然后将此证书链与在应用程序中预先存储的信息进行比较。如果比较结果表明与应用程序中存储的信息相符,则可以允许继续通信;否则,应中止通信过程。
但是,如果应用程序使用下文列出的方法尝试获取系统在握手期间信任的证书链,应用程序可能无法获取预期的证书链,带来固定可能无法正常发挥作用的风险[13]。
| [13] | 以下文章详细说明了此风险: https://www.cigital.com/blog/ineffective-certificate-pinning-implementations/ |
- javax.net.ssl.SSLSession.getPeerCertificates()
- javax.net.ssl.SSLSession.getPeerCertificateChain()
这些方法返回的内容不是系统在握手期间信任的证书链,而是应用程序通过通信伙伴本身收到的证书链。因此,即使中间人攻击已导致来自不正当证书颁发机构的证书附加到证书链,上述方法也不会返回系统在握手期间信任的证书;相反,应用程序最初尝试连接的服务器的证书也会同时返回。由于采用了固定技术,应用程序最初尝试连接的服务器的证书应等同于预先存储在应用程序中的证书;因此,重新测试时将不会检测到任何不正当行为。出于此原因和其它类似原因,在握手完成后重新测试时,最好避免使用上述方法。
在 Android 版本 4.2(API 级别 17)及更高级别中,使用 net.http.X509TrustManagerExtensions 中的 checkServerTrusted() 方法将允许应用程序仅获取握手期间系统信任的证书链。
使用 X509TrustManagerExtensions 进行固定的示例
// Store the SHA-256 hash value of the public key included in the correct certificate for the remote server (pinning)
private static final Set<String> PINS = new HashSet<>(Arrays.asList(
        new String[] {
                "d9b1a68fceaa460ac492fb8452ce13bd8c78c6013f989b76f186b1cbba1315c1",
                "cd13bb83c426551c67fabcff38d4496e094d50a20c7c15e886c151deb8531cdc"
        }
));

// Communicate using AsyncTask work threads
protected Object doInBackground(String...strings) {

    [...]

   // Obtain the certificate chain that was trusted by the system by testing during the handshake
   X509Certificate[] chain = (X509Certificate[]) connection.getServerCertificates();
   X509TrustManagerExtensions trustManagerExt = new X509TrustManagerExtensions((X509TrustManager) (trustManagerFactory.getTrustManagers()[0]));
   List<X509Certificate> trustedChain = trustManagerExt.checkServerTrusted(chain, "RSA", url.getHost());

   // Use public-key pinning to test
   boolean isValidChain = false;
   for (X509Certificate cert : trustedChain) {
       PublicKey key = cert.getPublicKey();
       MessageDigest md = MessageDigest.getInstance("SHA-256");
       String keyHash = bytesToHex(md.digest(key.getEncoded()));

       // Compare to the hash value stored by pinning
       if(PINS.contains(keyHash)) isValidChain = true;
   }
   if (isValidChain) {
       // Proceed with operation
   } else {
       // Do not proceed with operation
   }

    [...]
}

private String bytesToHex(byte[] bytes) {
    StringBuilder sb = new StringBuilder();
    for (byte b : bytes) {
        String s = String.format("%02x", b);
        sb.append(s);
    }
    return sb.toString();
}
5.4.3.6.使用 Google Play Services 解决 OpenSSL 漏洞的策略
Google Play 服务(版本 5.0 和更高版本)提供称为 Provider Installer 的框架。此框架可用于解决实现了 OpenSSL 及其它加密技术的安全提供程序中的漏洞。有关详情,请参阅“5.6.3.5. 章节 —通过 Google Play 服务解决安全提供程序的漏洞”。
5.4.3.7.网络安全配置
Android 7.0(API 级别 24)引入了一种称为“网络安全配置”的框架,其允许单个应用程序为网络通信配置自己的安全设置。使用此框架使应用程序可以轻松地采用各种技巧来提高应用程序安全性,其中不仅包括使用私有证书和公钥绑定的 HTTPS 通信,还包括预防未加密 (HTTP) 通信以及仅在调试期间允许使用私有证书的技巧[14]。
| [14] | 有关网络安全配置的详细信息,请参阅 https://developer.android.com/training/articles/security-config.html |
网络安全配置提供的各种功能只需通过配置 xml 文件中的设置即可访问,而这些设置可能应用于应用程序的 HTTP 和 HTTPS 通信。这消除了修改应用程序代码或执行任何其它处理的需要,从而简化了实施并有效地预防了错误或漏洞。
使用私有证书通过 HTTPS 通信
“5.4.1.3. 章节 —使用私有证书通过 HTTPS 通信”展示了使用私有证书(例如自签名证书或公司内部证书)执行 HTTPS 通信的示例代码。但是,通过使用 Network Security Configuration,开发人员可以使用私有证书,而无需执行“5.4.1.2. 章节 —通过 HTTPS 通信”中的示例代码中展示的实现。
使用私有证书与特定域通信
    <?xml version="1.0" encoding="utf-8"?>
    <network-security-config>
        <domain-config>
            <domain includeSubdomains="true">jssec.org</domain>
            <trust-anchors>
                <certificates src="@raw/private_ca" />
            </trust-anchors>
        </domain-config>
    </network-security-config>
在上面的示例中,用于通信的私有证书 (private_ca) 可以存储为应用程序中的资源,其使用条件及其适用性范围在 .xml 文件中描述。通过使用 <domain-config> 标记,可以仅将私有证书应用于特定域。要对应用程序执行的所有 HTTPS 通信使用私有证书,使用 <base-config> 标记,如下所示。
为应用程序执行的所有 HTTPS 通信使用私有证书
    <?xml version="1.0" encoding="utf-8"?>
    <network-security-config>
        <base-config>
            <trust-anchors>
                <certificates src="@raw/private_ca" />
            </trust-anchors>
        </base-config>
    </network-security-config>
固定
我们在“5.4.3.5. 章节 —关于固定的说明和实现示例”中提到了公钥固定。通过使用网络安全配置根据以下示例配置设置,您无需在代码中实施身份验证过程;而 xml 文件中的规范就足以确保正确的身份验证。
将公钥固定用于 HTTPS 通信
    <?xml version="1.0" encoding="utf-8"?>
    <network-security-config>
        <domain-config>
            <domain includeSubdomains="true">jssec.org</domain>
            <pin-set expiration="2018-12-31">
                <pin digest="SHA-256">e30Lky+iWK21yHSls5DJoRzNikOdvQUOGXvurPidc2E=</pin>
                <!-- for backup -->
                <pin digest="SHA-256">fwza0LRMXouZHRC8Ei+4PyuldPDcf3UKgO/04cDM1oE=</pin>
            </pin-set>
        </domain-config>
    </network-security-config>
上面 <pin> 标记所述的数量是用于固定的公钥的 base64 编码哈希值。唯一支持的哈希函数是 SHA-256。
防止未加密 (HTTP) 通信
使用网络安全配置允许您阻止来自应用程序的 HTTP 通信(未加密通信)。
限制未加密通信的方法如下所示。
- 基本上,<base-config> 标记用于限制与所有域通信中的未加密通信(HTTP 通信)[15]
- 只有对于因不可避免的原因需要未加密通信的域,才能使用 <domain-config> 标记单独设置允许未加密通信的例外情况。有关确定是否允许未加密通信的详细信息,请参阅“5.4.1.1. —通过 HTTP 通信”。
| [15] | 有关网络安全如何用于非 HTTP 连接的信息,请参阅以下 API 参考。https://developer.android.com/reference/android/security/NetworkSecurityPolicy.html#isCleartextTrafficPermitted |
通过将 cleartextTrafficPermitted 属性设置为 false 可限制未加密通信。下面显示了一个示例。
<?xml version="1.0" encoding="utf-8"?>
<network-security-config>
    <!-- Disallow unencrypted communication by default -->
    <base-config cleartextTrafficPermitted="false">
    </base-config>
    <!-- Only for domains that require unencrypted communications for unavoidable reason,
     use <domain-config> tag to individualy set to "true" -->
    <domain-config cleartextTrafficPermitted="true">
       <domain includeSubdomains="true">www.jssec.org</domain>
    </domain-config>
</network-security-config>
此设置也应用于 Android 8.0(API 级别 26)的 WebView,但是请注意,其不会应用于 Android 7.0(API 级别 25)的 WebView。
在 Android 9.0(API 级别 28)之前,cleartextTrafficPermitted 属性的默认值为 true,但从 Android 9.0 开始,其已更改为 false。因此,如果目标是 API 级别 28 及更高级别,则不需要使用上述示例中的 <base-config> 进行声明。但是,为了明确定义意图并避免不同行为的影响(具体取决于目标 API 级别),建议显式包括上述示例中所示内容。
专用于调试的私有证书
为了在应用程序开发期间进行调试,开发人员可能希望使用私有证书与某些用于应用程序开发目的的 HTTPS 服务器通信。在这种情况下,开发人员必须小心谨慎,以确保应用程序中不会包含任何危险的实现,包括禁用证书身份验证的代码;这将在“ 5.4.3.3. 章节 —禁用证书验证的风险代码”中讨论。在网络安全配置中,可以根据以下示例配置设置,以指定一组仅在调试时使用的证书(仅当 android:debuggable 在文件 AndroidManifest.xml 中设置为“true”时)。这消除了在应用程序的发布版本中无意中保留危险代码的风险,从而提供了防范漏洞的有效方法。
仅在调试时使用私有证书
    <?xml version="1.0" encoding="utf-8"?>
    <network-security-config>
        <debug-overrides>
            <trust-anchors>
                <certificates src="@raw/private_cas" />
            </trust-anchors>
        </debug-overrides>
    </network-security-config>
5.4.3.8.(列):过渡到 TLS1.2 以实现安全连接
美国国家标准与技术研究院 (NIST) [16] 已报告 SSL 和 TLS 1.0 中的一些安全问题,因此这些协议已不再用于服务器。特别是 2014 年和 2015 年宣布了多个漏洞,其中包括 Heartbleed[17](2014 年 4 月)、POODLE[18](2014 年 10 月)和 FREAK[19](2015 年 3 月);其中,在 OpenSSL(用于加密的软件库)中发现的 Heartbleed 漏洞针对日本公司,引起了不当访问,从而导致客户数据泄露及其它不良后果。[20]
鉴于这一历史,严禁美国政府采购部门使用这些技术;但是,它们在商业环境中的影响广度可确保这些技术目前广泛用作 Internet 加密方法(特别是使用应用于 TLS 1.0 的安全修补程序)。但是,由于近年来的安全事件不断爆发以及新 TLS 版本的发布,越来越多的站点和服务不再支持“旧版本的 SSL 或 TLS”,因此目前正过渡到 TLS 1.2。[21]
例如,这种过渡的一个体现就是支付卡行业安全标准委员会 (PCI SSC) 制定了一种新的安全标准,称为支付卡行业数据安全标准 (PCI SSC)。[22]
| [16] | 美国国家标准与技术研究院 (NIST) (https://www.nist.gov/) |
| [17] | Heartbleed(CVE-2014-0160),IPA (https://www.ipa.go.jp/security/ciadr/vul/20140408-openssl.html) |
| [18] | POODLE(CVE-2014-3566),IPA (https://www.ipa.go.jp/security/announce/20141017-ssl.html) |
| [19] | FREAK(CVE-2015-0204),NIST (https://nvd.nist.gov/vuln/detail/CVE-2015-0204) |
| [20] | TLS/SSL 已知漏洞,Wiki (https://ja.wikipedia.org/wiki/Transport_Layer_Security#TLS/SSL%E3%81%AE%E6%97%A2%E7%9F%A5%E3%81%AE%E8%84%86%E5%BC%B1%E6%80%A7) |
| [21] | SSL/TLS 加密设计准则,IPA (https://www.ipa.go.jp/security/vuln/ssl_crypt_config.html) |
| [22] | 支付卡行业数据安全标准 (PCI DSS),PCI SSC,(https://ja.pcisecuritystandards.org/minisite/env2/) |
如今,智能手机和平板电脑广泛用于电子商务,信用卡成为典型的支付工具。实际上,我们预计本文档(“Android 应用程序安全设计/安全编码指南”)的许多用户将提供向服务器端发送信用卡信息和其它数据的服务;在网络环境中使用信用卡时,务必确保数据通路的安全,PCI DSS 是一种标准,管理此类服务中对于成员数据的处理,旨在防止信用卡的不当使用、信息泄露和其它不良后果。在这些安全标准中,不提倡将 TLS 1.0 用于 Internet 上的信用卡处理;应用程序应支持 TLS 1.2 等标准[允许使用更强的加密算法,包括 SHA-2 哈希函数(SSHA-256 或 SHA-384)并支持提供使用身份验证加密的使用模式的加密套件]。
在智能手机与服务器之间的通信中,不仅在处理信用卡信息需要确保数据通路的安全性,而且对于涉及处理私人数据或其它敏感信息的操作,这也极其重要。因此,在服务配置(服务器)端使用 TLS 1.2 过渡到安全连接已经成为一项迫切的需要。
另一方面,在 Android 中(在客户端运行),支持 TLS 1.1 和更高版本的 WebView 功能自 Android 4.4 (Kitkat) 开始提供,而对于直接 HTTP 通信,自 Android 4.1(早期的 Jelly Bean)开始提供,但在这种情况下还需要一些额外的实现工作。
对于服务开发人员,采用 TLS 1.2 意味着无法支持使用 Android 4.3 及更早版本的用户,因此这一步举措似乎会产生重大影响。但是,如下图所示,最新数据[23](截至 2018 年 1 月)显示,Android 版本 4.4 和更高版本占当前使用的所有 Android 系统中的绝大部分 — 94.3%。鉴于这样事实,考虑到保证应用程序所处理资产的安全的重要性,我们建议您在过渡到 TLS 1.2 时要认真考虑。

图 5.4.5 当前使用的 Android 系统中的 OS 版本分布情况(来源:Android 开发人员网站)
| [23] | Android OS 平台版本,Android 开发人员控制面板 (https://developer.android.com/about/dashboards/index.html) |
5.5.处理隐私数据
近年来,“隐私设计”概念提议已成为一种保护隐私数据的全球趋势。根据这一概念,政府部门正在推行隐私保护立法。
在智能手机中使用用户数据的应用程序必须采取相关措施,以确保用户可以安全可靠地使用应用程序,而无需担心隐私和个人数据方面的问题。这些措施包括适当地处理用户数据,要求用户选择应用程序是否可以使用某些数据。为此,每个应用程序都必须准备并显示应用程序隐私政策,指明应用程序将使用哪些信息及其将如何使用这些信息;此外,在获取和使用特定信息时,应用程序必须首先请求用户的权限。请注意,应用程序隐私策略与过去可能存在的其它文档不同,例如“个人数据保护策略”或“使用条款”,并且必须与任何此类文档分开创建。
有关隐私政策创建和执行的详细信息,请参阅日本总务省 (MIC) 发布的文档“智能手机隐私计划”和“智能手机隐私计划 II”(JMIC 的 SPI)。
此部分中使用的术语在文本和“5.5.3.2. 章节 —术语表”中定义。
5.5.1.示例代码 
在准备应用程序隐私政策时,您可以使用“创建应用程序隐私政策的辅助工具”[24]。这些工具以 HTML 格式和 XML 格式输出两个文件,即摘要版本和详细版本的应用程序隐私政策。这些文件的 HTML 和 XML 内容与 MIC 的 SPI 建议相符,包括搜索标记等功能。在下面的示例代码中,我们将演示此工具的使用,展示通过此工具准备的 HTML 文件的应用程序隐私政策。
| [24] | http://www.kddi-research.jp/newsrelease/2013/090401.html |
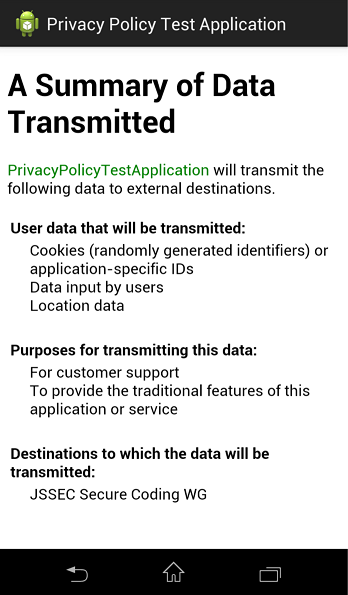
图 5.5.1 应用程序隐私政策摘要示例
更具体地说,您可以使用以下流程图来确定要使用的示例代码。
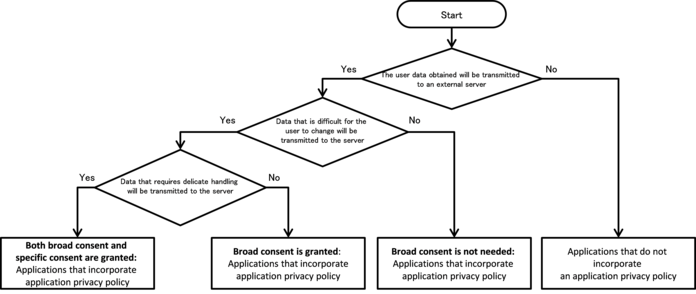
图 5.5.2 选择处理隐私数据的示例代码的流程图
在这里,短语“广泛同意”是指用户在首次启动应用程序时通过显示和查看应用程序隐私政策授予应用程序的广泛权限,使应用程序可以将用户数据传输到服务器。
相反,“具体同意”是指在传输特定用户数据之前即时获得的事先同意。
5.5.1.1.同时授予广泛同意和具体同意:整合了应用程序隐私政策的应用程序
要点:(同时授予广泛同意和具体同意:整合了应用程序隐私政策的应用程序)
- 首次启动(或应用程序更新)时,应获得广泛同意,以传输将由应用程序处理的用户数据。
- 如果用户未给予广泛同意,请勿传输用户数据。
- 在传输需要特别谨慎处理的用户数据之前,先获得具体同意
- 如果用户未授予具体同意,切勿传输相应的数据。
- 提供可供用户查看应用程序隐私政策的方法
- 提供通过用户操作删除已传输数据的方法。
- 提供可通过用户操作停止传输数据的方法。
- 使用 UUID 或 cookie 跟踪用户数据。
- 将应用程序隐私政策的摘要版本放在资产文件夹中。
MainActivity.java
package org.jssec.android.privacypolicy;

import java.io.IOException;
import org.json.JSONException;
import org.json.JSONObject;
import org.jssec.android.privacypolicy.ConfirmFragment.DialogListener;

import com.google.android.gms.common.ConnectionResult;
import com.google.android.gms.common.GooglePlayServicesClient;
import com.google.android.gms.common.GooglePlayServicesUtil;
import com.google.android.gms.location.LocationClient;

import android.location.Location;
import android.os.AsyncTask;
import android.os.Bundle;
import android.content.Intent;
import android.content.IntentSender;
import android.content.SharedPreferences;
import android.content.pm.PackageInfo;
import android.content.pm.PackageManager;
import android.content.pm.PackageManager.NameNotFoundException;
import android.support.v4.app.FragmentActivity;
import android.support.v4.app.FragmentManager;
import android.text.Editable;
import android.text.TextWatcher;
import android.view.Menu;
import android.view.MenuItem;
import android.view.View;
import android.widget.TextView;
import android.widget.Toast;

public class MainActivity extends FragmentActivity implements GooglePlayServicesClient.ConnectionCallbacks, GooglePlayServicesClient.OnConnectionFailedListener, DialogListener {
    private static final String BASE_URL = "https://www.example.com/pp";
    private static final String GET_ID_URI = BASE_URL + "/get_id.php";
    private static final String SEND_DATA_URI = BASE_URL + "/send_data.php";
    private static final String DEL_ID_URI = BASE_URL + "/del_id.php";

    private static final String ID_KEY = "id";
    private static final String LOCATION_KEY = "location";
    private static final String NICK_NAME_KEY = "nickname";

    private static final String PRIVACY_POLICY_COMPREHENSIVE_AGREED_KEY = "privacyPolicyComprehensiveAgreed";
    private static final String PRIVACY_POLICY_DISCRETE_TYPE1_AGREED_KEY = "privacyPolicyDiscreteType1Agreed";

    private static final String PRIVACY_POLICY_PREF_NAME = "privacypolicy_preference";
    private static final int CONNECTION_FAILURE_RESOLUTION_REQUEST = 257;

    private String UserId = "";
    private LocationClient mLocationClient = null;

    private final int DIALOG_TYPE_COMPREHENSIVE_AGREEMENT = 1;
    private final int DIALOG_TYPE_PRE_CONFIRMATION = 2;

    private static final int VERSION_TO_SHOW_COMPREHENSIVE_AGREEMENT_ANEW = 1;

    private TextWatcher watchHandler = new TextWatcher() {

        @Override
        public void beforeTextChanged(CharSequence s, int start, int count, int after) {
        }

        @Override
        public void onTextChanged(CharSequence s, int start, int before, int count) {
            boolean buttonEnable = (s.length() > 0);

            MainActivity.this.findViewById(R.id.buttonStart).setEnabled(buttonEnable);
        }

        @Override
        public void afterTextChanged(Editable s) {
        }
    };

    @Override
    protected void onCreate(Bundle savedInstanceState) {
        super.onCreate(savedInstanceState);
        setContentView(R.layout.activity_main);

        // Fetch user ID from serverFetch user ID from server
        new GetDataAsyncTask().execute();

        findViewById(R.id.buttonStart).setEnabled(false);
        ((TextView) findViewById(R.id.editTextNickname)).addTextChangedListener(watchHandler);

        int resultCode = GooglePlayServicesUtil.isGooglePlayServicesAvailable(this);
        if (resultCode == ConnectionResult.SUCCESS) {
            mLocationClient = new LocationClient(this, this, this);
        }
    }

    @Override
    protected void onStart() {
        super.onStart();

        SharedPreferences pref = getSharedPreferences(PRIVACY_POLICY_PREF_NAME, MODE_PRIVATE);
        int privacyPolicyAgreed = pref.getInt(PRIVACY_POLICY_COMPREHENSIVE_AGREED_KEY, -1);

        if (privacyPolicyAgreed <= VERSION_TO_SHOW_COMPREHENSIVE_AGREEMENT_ANEW) {
            // *** POINT 1 *** On first launch (or application update), obtain broad consent to transmit user data that will be handled by the application.
            // When the application is updated, it is only necessary to renew the user's grant of broad consent if the updated application will handle new types of user data.
            ConfirmFragment dialog = ConfirmFragment.newInstance(R.string.privacyPolicy, R.string.agreePrivacyPolicy, DIALOG_TYPE_COMPREHENSIVE_AGREEMENT);
            dialog.setDialogListener(this);
            FragmentManager fragmentManager = getSupportFragmentManager();
            dialog.show(fragmentManager, "dialog");
        }

        // Used to obtain location data
        if (mLocationClient != null) {
            mLocationClient.connect();
        }
    }

    @Override
    protected void onStop() {
        if (mLocationClient != null) {
            mLocationClient.disconnect();
        }
        super.onStop();
    }

    public void onSendToServer(View view) {
        // Check the status of user consent.
        // Actually, it is necessary to obtain consent for each user data type.
        SharedPreferences pref = getSharedPreferences(PRIVACY_POLICY_PREF_NAME, MODE_PRIVATE);
        int privacyPolicyAgreed = pref.getInt(PRIVACY_POLICY_DISCRETE_TYPE1_AGREED_KEY, -1);
        if (privacyPolicyAgreed <= VERSION_TO_SHOW_COMPREHENSIVE_AGREEMENT_ANEW) {
            // *** POINT 3 *** Obtain specific consent before transmitting user data that requires particularly delicate handling.
            ConfirmFragment dialog = ConfirmFragment.newInstance(R.string.sendLocation, R.string.cofirmSendLocation, DIALOG_TYPE_PRE_CONFIRMATION);
            dialog.setDialogListener(this);
            FragmentManager fragmentManager = getSupportFragmentManager();
            dialog.show(fragmentManager, "dialog");
        } else {
            // Start transmission, since it has the user consent.
            onPositiveButtonClick(DIALOG_TYPE_PRE_CONFIRMATION);
        }
    }

    public void onPositiveButtonClick(int type) {
        if (type == DIALOG_TYPE_COMPREHENSIVE_AGREEMENT) {
            // *** POINT 1 *** On first launch (or application update), obtain broad consent to transmit user data that will be handled by the application.
            SharedPreferences.Editor pref = getSharedPreferences(PRIVACY_POLICY_PREF_NAME, MODE_PRIVATE).edit();
            pref.putInt(PRIVACY_POLICY_COMPREHENSIVE_AGREED_KEY, getVersionCode());
            pref.apply();
        } else if (type == DIALOG_TYPE_PRE_CONFIRMATION) {
            // *** POINT 3 *** Obtain specific consent before transmitting user data that requires particularly delicate handling.
            if (mLocationClient != null && mLocationClient.isConnected()) {
                Location currentLocation = mLocationClient.getLastLocation();
                if (currentLocation != null) {
                    String locationData = "Latitude:"+ currentLocation.getLatitude() + ", Longitude:"+ currentLocation.getLongitude();
                    String nickname = ((TextView) findViewById(R.id.editTextNickname)).getText().toString();

                    Toast.makeText(MainActivity.this, this.getClass().getSimpleName() + "\n - nickname : " + nickname + "\n - location : " + locationData, Toast.LENGTH_SHORT).show();

                    new SendDataAsyncTack().execute(SEND_DATA_URI, UserId, locationData, nickname);
                }
            }
            // Store the status of user consent.
            // Actually, it is necessary to obtain consent for each user data type.
            SharedPreferences.Editor pref = getSharedPreferences(PRIVACY_POLICY_PREF_NAME, MODE_PRIVATE).edit();
            pref.putInt(PRIVACY_POLICY_DISCRETE_TYPE1_AGREED_KEY, getVersionCode());
            pref.apply();
        }
    }

    public void onNegativeButtonClick(int type) {
        if (type == DIALOG_TYPE_COMPREHENSIVE_AGREEMENT) {
            // *** POINT 2 *** If the user does not grant general consent, do not transmit user data.
            // In this sample application we terminate the application in this case.
            finish();
        } else if (type == DIALOG_TYPE_PRE_CONFIRMATION) {
            // *** POINT 4 *** If the user does not grant specific consent, do not transmit the corresponding data.
            // The user did not grant consent, so we do nothing.
        }
    }

    private int getVersionCode() {
        int versionCode = -1;
        PackageManager packageManager = this.getPackageManager();
        try {
            PackageInfo packageInfo = packageManager.getPackageInfo(this.getPackageName(), PackageManager.GET_ACTIVITIES);
            versionCode = packageInfo.versionCode;
        } catch (NameNotFoundException e) {
            // This is sample, so omit the exception process
        }

        return versionCode;
    }

    @Override
    public boolean onCreateOptionsMenu(Menu menu) {
        getMenuInflater().inflate(R.menu.main, menu);
        return true;
    }

    @Override
    public boolean onOptionsItemSelected(MenuItem item) {
        switch (item.getItemId()) {
            case R.id.action_show_pp:
                // *** POINT 5 *** Provide methods by which the user can review the application privacy policy.
                Intent intent = new Intent();
                intent.setClass(this, WebViewAssetsActivity.class);
                startActivity(intent);
                return true;
            case R.id.action_del_id:
                // *** POINT 6 *** Provide methods by which transmitted data can be deleted by user operations.
                new SendDataAsyncTack().execute(DEL_ID_URI, UserId);
                return true;
            case R.id.action_donot_send_id:
                // *** POINT 7 *** Provide methods by which transmitting data can be stopped by user operations.

                // If the user stop sending data, user consent is deemed to have been revoked.
                SharedPreferences.Editor pref = getSharedPreferences(PRIVACY_POLICY_PREF_NAME, MODE_PRIVATE).edit();
                pref.putInt(PRIVACY_POLICY_COMPREHENSIVE_AGREED_KEY, 0);
                pref.apply();

                // In this sample application if the user data cannot be sent by user operations,
                // finish the application because we do nothing.
                String message  = getString(R.string.stopSendUserData);
                Toast.makeText(MainActivity.this, this.getClass().getSimpleName() + " - " + message, Toast.LENGTH_SHORT).show();
                finish();

                return true;
        }

        return false;
    }

    @Override
    public void onConnected(Bundle connectionHint) {
        if (mLocationClient != null && mLocationClient.isConnected()) {
            Location currentLocation = mLocationClient.getLastLocation();
            if (currentLocation != null) {
                String locationData = "Latitude \t: " + currentLocation.getLatitude() + "\n\tLongitude \t: " + currentLocation.getLongitude();

                String text = "\n" + getString(R.string.your_location_title) + "\n\t" + locationData;

                TextView appText = (TextView) findViewById(R.id.appText);
                appText.setText(text);
            }
        }
    }

    @Override
    public void onConnectionFailed(ConnectionResult result) {
        if (result.hasResolution()) {
            try {
                result.startResolutionForResult(this, CONNECTION_FAILURE_RESOLUTION_REQUEST);
            } catch (IntentSender.SendIntentException e) {
                e.printStackTrace();
            }
        }
    }

    @Override
    public void onDisconnected() {
        mLocationClient = null;
    }

    private class GetDataAsyncTask extends AsyncTask<String, Void, String> {
        private String extMessage = "";

        @Override
        protected String doInBackground(String...params) {
            // *** POINT 8 *** Use UUIDs or cookies to keep track of user data
            // In this sample we use an ID generated on the server side
            SharedPreferences sp = getSharedPreferences(PRIVACY_POLICY_PREF_NAME, MODE_PRIVATE);
            UserId = sp.getString(ID_KEY, null);
            if (UserId == null) {
                // No token in SharedPreferences; fetch ID from server
                try {
                    UserId = NetworkUtil.getCookie(GET_ID_URI, "", "id");
                } catch (IOException e) {
                    // Catch exceptions such as certification errors
                    extMessage = e.toString();
                }

                // Store the fetched ID in SharedPreferences
                sp.edit().putString(ID_KEY, UserId).commit();
            }
            return UserId;
        }

        @Override
        protected void onPostExecute(final String data) {
            String status = (data != null) ? "success" : "error";
            Toast.makeText(MainActivity.this, this.getClass().getSimpleName() + " - " + status + " : " + extMessage, Toast.LENGTH_SHORT).show();
        }
    }

    private class SendDataAsyncTack extends AsyncTask<String, Void, Boolean> {
        private String extMessage = "";

        @Override
        protected Boolean doInBackground(String...params) {
            String url = params[0];
            String id = params[1];
            String location = params.length > 2 ? params[2] : null;
            String nickname = params.length > 3 ? params[3] : null;

            Boolean result = false;
            try {
                JSONObject jsonData = new JSONObject();
                jsonData.put(ID_KEY, id);
                if (location != null)
                    jsonData.put(LOCATION_KEY, location);

                if (nickname != null)
                    jsonData.put(NICK_NAME_KEY, nickname);

                NetworkUtil.sendJSON(url, "", jsonData.toString());

                result = true;
            } catch (IOException e) {
                // Catch exceptions such as certification errors
                extMessage = e.toString();
            } catch (JSONException e) {
                extMessage = e.toString();
            }
            return result;
        }

        @Override
        protected void onPostExecute(Boolean result) {
            String status = result ? "Success" : "Error";
            Toast.makeText(MainActivity.this, this.getClass().getSimpleName() + " - " + status + " : " + extMessage, Toast.LENGTH_SHORT).show();
        }
    }
}
ConfirmFragment.java
package org.jssec.android.privacypolicy;

import android.app.Activity;
import android.app.AlertDialog;
import android.app.Dialog;
import android.content.Context;
import android.content.DialogInterface;
import android.content.Intent;
import android.os.Bundle;
import android.support.v4.app.DialogFragment;
import android.view.LayoutInflater;
import android.view.View;
import android.view.View.OnClickListener;
import android.widget.TextView;

public class ConfirmFragment extends DialogFragment {

    private DialogListener mListener = null;

    public static interface DialogListener {
        public void onPositiveButtonClick(int type);

        public void onNegativeButtonClick(int type);
    }

    public static ConfirmFragment newInstance(int title, int sentence, int type) {
        ConfirmFragment fragment = new ConfirmFragment();
        Bundle args = new Bundle();
        args.putInt("title", title);
        args.putInt("sentence", sentence);
        args.putInt("type", type);
        fragment.setArguments(args);
        return fragment;
    }

    @Override
    public Dialog onCreateDialog(Bundle args) {
        // *** POINT 1 *** On first launch (or application update), obtain broad consent to transmit user data that will be handled by the application.
        // *** POINT 3 *** Obtain specific consent before transmitting user data that requires particularly delicate handling.
        final int title = getArguments().getInt("title");
        final int sentence = getArguments().getInt("sentence");
        final int type = getArguments().getInt("type");

        LayoutInflater inflater = (LayoutInflater) getActivity().getSystemService(Context.LAYOUT_INFLATER_SERVICE);
        View content = inflater.inflate(R.layout.fragment_comfirm, null);
        TextView linkPP = (TextView) content.findViewById(R.id.tx_link_pp);
        linkPP.setOnClickListener(new OnClickListener() {
            @Override
            public void onClick(View v) {
                // *** POINT 5 *** Provide methods by which the user can review the application privacy policy.
                Intent intent = new Intent();
                intent.setClass(getActivity(), WebViewAssetsActivity.class);
                startActivity(intent);
            }
        });

        AlertDialog.Builder builder = new AlertDialog.Builder(getActivity());
        builder.setIcon(R.drawable.ic_launcher);
        builder.setTitle(title);
        builder.setMessage(sentence);
        builder.setView(content);

        builder.setPositiveButton(R.string.buttonConsent, new DialogInterface.OnClickListener() {
            public void onClick(DialogInterface dialog, int whichButton) {
                if (mListener != null) {
                    mListener.onPositiveButtonClick(type);
                }
            }
        });
        builder.setNegativeButton(R.string.buttonDonotConsent, new DialogInterface.OnClickListener() {
            public void onClick(DialogInterface dialog, int whichButton) {
                if (mListener != null) {
                    mListener.onNegativeButtonClick(type);
                }
            }
        });

        Dialog dialog = builder.create();
        dialog.setCanceledOnTouchOutside(false);

        return dialog;
    }

    @Override
    public void onAttach(Activity activity) {
        super.onAttach(activity);
        if (!(activity instanceof DialogListener)) {
            throw new ClassCastException(activity.toString() + " must implement DialogListener.");
        }
        mListener = (DialogListener) activity;
    }

    public void setDialogListener(DialogListener listener) {
        mListener = listener;
    }
}
WebViewAssetsActivity.java
package org.jssec.android.privacypolicy;

import android.app.Activity;
import android.os.Bundle;
import android.webkit.WebSettings;
import android.webkit.WebView;

public class WebViewAssetsActivity extends Activity {
    // *** POINT 9 *** Place a summary version of the application privacy policy in the assets folder
    private static final String ABST_PP_URL = "file:///android_asset/PrivacyPolicy/app-policy-abst-privacypolicy-1.0.html";

    @Override
    public void onCreate(Bundle savedInstanceState) {
        super.onCreate(savedInstanceState);
        setContentView(R.layout.activity_webview);

        WebView webView = (WebView) findViewById(R.id.webView);
        WebSettings webSettings = webView.getSettings();

        webSettings.setAllowFileAccess(false);

        webView.loadUrl(ABST_PP_URL);
    }
}
5.5.1.2.广泛同意:整合了应用程序隐私政策的应用程序
要点:(授予了广泛同意:整合了应用程序隐私政策的应用程序)
- 首次启动(或应用程序更新)时,应获得广泛同意,以传输将由应用程序处理的用户数据。
- 如果用户未给予广泛同意,请勿传输用户数据。
- 提供可供用户查看应用程序隐私政策的方法
- 提供通过用户操作删除已传输数据的方法。
- 提供可通过用户操作停止传输数据的方法。
- 使用 UUID 或 cookie 跟踪用户数据。
- 将应用程序隐私政策的摘要版本放在资产文件夹中。
MainActivity.java
package org.jssec.android.privacypolicynopreconfirm;

import java.io.IOException;
import org.json.JSONException;
import org.json.JSONObject;
import org.jssec.android.privacypolicynopreconfirm.MainActivity;
import org.jssec.android.privacypolicynopreconfirm.R;
import org.jssec.android.privacypolicynopreconfirm.ConfirmFragment.DialogListener;


import android.os.AsyncTask;
import android.os.Bundle;
import android.content.Intent;
import android.content.SharedPreferences;
import android.content.pm.PackageInfo;
import android.content.pm.PackageManager;
import android.content.pm.PackageManager.NameNotFoundException;
import android.support.v4.app.FragmentActivity;
import android.support.v4.app.FragmentManager;
import android.telephony.TelephonyManager;
import android.text.Editable;
import android.text.TextWatcher;
import android.view.Menu;
import android.view.MenuItem;
import android.view.View;
import android.widget.TextView;
import android.widget.Toast;

public class MainActivity extends FragmentActivity implements DialogListener {
    private final String BASE_URL = "https://www.example.com/pp";
    private final String GET_ID_URI = BASE_URL + "/get_id.php";
    private final String SEND_DATA_URI = BASE_URL + "/send_data.php";
    private final String DEL_ID_URI = BASE_URL + "/del_id.php";

    private final String ID_KEY = "id";
    private final String NICK_NAME_KEY = "nickname";
    private final String IMEI_KEY = "imei";

    private final String PRIVACY_POLICY_AGREED_KEY = "privacyPolicyAgreed";

    private final String PRIVACY_POLICY_PREF_NAME = "privacypolicy_preference";

    private String UserId = "";

    private final int DIALOG_TYPE_COMPREHENSIVE_AGREEMENT = 1;

    private final int VERSION_TO_SHOW_COMPREHENSIVE_AGREEMENT_ANEW = 1;

    private TextWatcher watchHandler = new TextWatcher() {

        @Override
        public void beforeTextChanged(CharSequence s, int start, int count, int after) {
        }

        @Override
        public void onTextChanged(CharSequence s, int start, int before, int count) {
            boolean buttonEnable = (s.length() > 0);

            MainActivity.this.findViewById(R.id.buttonStart).setEnabled(buttonEnable);
        }

        @Override
        public void afterTextChanged(Editable s) {
        }
    };

    @Override
    protected void onCreate(Bundle savedInstanceState) {
        super.onCreate(savedInstanceState);
        setContentView(R.layout.activity_main);

        // Fetch user ID from serverFetch user ID from server
        new GetDataAsyncTask().execute();

        findViewById(R.id.buttonStart).setEnabled(false);
        ((TextView) findViewById(R.id.editTextNickname)).addTextChangedListener(watchHandler);
    }

    @Override
    protected void onStart() {
        super.onStart();

        SharedPreferences pref = getSharedPreferences(PRIVACY_POLICY_PREF_NAME, MODE_PRIVATE);
        int privacyPolicyAgreed = pref.getInt(PRIVACY_POLICY_AGREED_KEY, -1);

        if (privacyPolicyAgreed <= VERSION_TO_SHOW_COMPREHENSIVE_AGREEMENT_ANEW) {
            // *** POINT 1 *** On first launch (or application update), obtain broad consent to transmit user data that will be handled by the application.
            // When the application is updated, it is only necessary to renew the user's grant of broad consent if the updated application will handle new types of user data.
            ConfirmFragment dialog = ConfirmFragment.newInstance(R.string.privacyPolicy, R.string.agreePrivacyPolicy, DIALOG_TYPE_COMPREHENSIVE_AGREEMENT);
            dialog.setDialogListener(this);
            FragmentManager fragmentManager = getSupportFragmentManager();
            dialog.show(fragmentManager, "dialog");
        }
    }

    public void onSendToServer(View view) {
        String nickname = ((TextView) findViewById(R.id.editTextNickname)).getText().toString();
        TelephonyManager tm = (TelephonyManager) getSystemService(TELEPHONY_SERVICE);
        String imei = tm.getDeviceId();
        Toast.makeText(MainActivity.this, this.getClass().getSimpleName() + "\n - nickname : " + nickname + ", imei = " + imei, Toast.LENGTH_SHORT).show();
        new SendDataAsyncTack().execute(SEND_DATA_URI, UserId, nickname, imei);
    }

    public void onPositiveButtonClick(int type) {
        if (type == DIALOG_TYPE_COMPREHENSIVE_AGREEMENT) {
            // *** POINT 1 *** On first launch (or application update), obtain broad consent to transmit user data that will be handled by the application.
            SharedPreferences.Editor pref = getSharedPreferences(PRIVACY_POLICY_PREF_NAME, MODE_PRIVATE).edit();
            pref.putInt(PRIVACY_POLICY_AGREED_KEY, getVersionCode());
            pref.apply();
        }
    }

    public void onNegativeButtonClick(int type) {
        if (type == DIALOG_TYPE_COMPREHENSIVE_AGREEMENT) {
            // *** POINT 2 *** If the user does not grant general consent, do not transmit user data.
            // In this sample application we terminate the application in this case.
            finish();
        }
    }

    private int getVersionCode() {
        int versionCode = -1;
        PackageManager packageManager = this.getPackageManager();
        try {
            PackageInfo packageInfo = packageManager.getPackageInfo(this.getPackageName(), PackageManager.GET_ACTIVITIES);
            versionCode = packageInfo.versionCode;
        } catch (NameNotFoundException e) {
            // This is sample, so omit the exception process
        }

        return versionCode;
    }

    @Override
    public boolean onCreateOptionsMenu(Menu menu) {
        getMenuInflater().inflate(R.menu.main, menu);
        return true;
    }

    @Override
    public boolean onOptionsItemSelected(MenuItem item) {
        switch (item.getItemId()) {
        case R.id.action_show_pp:
            // *** POINT 3 *** Provide methods by which the user can review the application privacy policy.
            Intent intent = new Intent();
            intent.setClass(this, WebViewAssetsActivity.class);
            startActivity(intent);
            return true;
        case R.id.action_del_id:
            // *** POINT 4 *** Provide methods by which transmitted data can be deleted by user operations.
            new SendDataAsyncTack().execute(DEL_ID_URI, UserId);
            return true;
        case R.id.action_donot_send_id:
            // *** POINT 5 *** Provide methods by which transmitting data can be stopped by user operations.

            // If the user stop sending data, user consent is deemed to have been revoked.
            SharedPreferences.Editor pref = getSharedPreferences(PRIVACY_POLICY_PREF_NAME, MODE_PRIVATE).edit();
            pref.putInt(PRIVACY_POLICY_AGREED_KEY, 0);
            pref.apply();

            // In this sample application if the user data cannot be sent by user operations,
            // finish the application because we do nothing.
            String message  = getString(R.string.stopSendUserData);
            Toast.makeText(MainActivity.this, this.getClass().getSimpleName() + " - " + message, Toast.LENGTH_SHORT).show();
            finish();

            return true;        }
        return false;
    }

    private class GetDataAsyncTask extends AsyncTask<String, Void, String> {
        private String extMessage = "";

        @Override
        protected String doInBackground(String...params) {
            // *** POINT 6 *** Use UUIDs or cookies to keep track of user data
            // In this sample we use an ID generated on the server side
            SharedPreferences sp = getSharedPreferences(PRIVACY_POLICY_PREF_NAME, MODE_PRIVATE);
            UserId = sp.getString(ID_KEY, null);
            if (UserId == null) {
                // No token in SharedPreferences; fetch ID from server
                try {
                    UserId = NetworkUtil.getCookie(GET_ID_URI, "", "id");
                } catch (IOException e) {
                    // Catch exceptions such as certification errors
                    extMessage = e.toString();
                }

                // Store the fetched ID in SharedPreferences
                sp.edit().putString(ID_KEY, UserId).commit();
            }
            return UserId;
        }

        @Override
        protected void onPostExecute(final String data) {
            String status = (data != null) ? "success" : "error";
            Toast.makeText(MainActivity.this, this.getClass().getSimpleName() + " - " + status + " : " + extMessage, Toast.LENGTH_SHORT).show();
        }
    }

    private class SendDataAsyncTack extends AsyncTask<String, Void, Boolean> {
        private String extMessage = "";

        @Override
        protected Boolean doInBackground(String...params) {
            String url = params[0];
            String id = params[1];
            String nickname = params.length > 2 ? params[2] : null;
            String imei = params.length > 3 ? params[3] : null;

            Boolean result = false;
            try {
                JSONObject jsonData = new JSONObject();
                jsonData.put(ID_KEY, id);

                if (nickname != null)
                    jsonData.put(NICK_NAME_KEY, nickname);

                if (imei != null)
                    jsonData.put(IMEI_KEY, imei);

                NetworkUtil.sendJSON(url, "", jsonData.toString());

                result = true;
            } catch (IOException e) {
                // Catch exceptions such as certification errors
                extMessage = e.toString();
            } catch (JSONException e) {
                extMessage = e.toString();
            }
            return result;
        }

        @Override
        protected void onPostExecute(Boolean result) {
            String status = result ? "Success" : "Error";
            Toast.makeText(MainActivity.this, this.getClass().getSimpleName() + " - " + status + " : " + extMessage, Toast.LENGTH_SHORT).show();
        }
    }
}
ConfirmFragment.java
package org.jssec.android.privacypolicynopreconfirm;

import android.app.Activity;
import android.app.AlertDialog;
import android.app.Dialog;
import android.content.Context;
import android.content.DialogInterface;
import android.content.Intent;
import android.os.Bundle;
import android.support.v4.app.DialogFragment;
import android.view.LayoutInflater;
import android.view.View;
import android.view.View.OnClickListener;
import android.widget.TextView;

public class ConfirmFragment extends DialogFragment {

    private DialogListener mListener = null;

    public static interface DialogListener {
        public void onPositiveButtonClick(int type);

        public void onNegativeButtonClick(int type);
    }

    public static ConfirmFragment newInstance(int title, int sentence, int type) {
        ConfirmFragment fragment = new ConfirmFragment();
        Bundle args = new Bundle();
        args.putInt("title", title);
        args.putInt("sentence", sentence);
        args.putInt("type", type);
        fragment.setArguments(args);
        return fragment;
    }

    @Override
    public Dialog onCreateDialog(Bundle args) {
        // *** POINT 1 *** On first launch (or application update), obtain broad consent to transmit user data that will be handled by the application.
        final int title = getArguments().getInt("title");
        final int sentence = getArguments().getInt("sentence");
        final int type = getArguments().getInt("type");

        LayoutInflater inflater = (LayoutInflater) getActivity().getSystemService(Context.LAYOUT_INFLATER_SERVICE);
        View content = inflater.inflate(R.layout.fragment_comfirm, null);
        TextView linkPP = (TextView) content.findViewById(R.id.tx_link_pp);
        linkPP.setOnClickListener(new OnClickListener() {
            @Override
            public void onClick(View v) {
                // *** POINT 3 *** Provide methods by which the user can review the application privacy policy.
                Intent intent = new Intent();
                intent.setClass(getActivity(), WebViewAssetsActivity.class);
                startActivity(intent);
            }
        });

        AlertDialog.Builder builder = new AlertDialog.Builder(getActivity());
        builder.setIcon(R.drawable.ic_launcher);
        builder.setTitle(title);
        builder.setMessage(sentence);
        builder.setView(content);

        builder.setPositiveButton(R.string.buttonConsent, new DialogInterface.OnClickListener() {
            public void onClick(DialogInterface dialog, int whichButton) {
                if (mListener != null) {
                    mListener.onPositiveButtonClick(type);
                }
            }
        });
        builder.setNegativeButton(R.string.buttonDonotConsent, new DialogInterface.OnClickListener() {
            public void onClick(DialogInterface dialog, int whichButton) {
                if (mListener != null) {
                    mListener.onNegativeButtonClick(type);
                }
            }
        });

        Dialog dialog = builder.create();
        dialog.setCanceledOnTouchOutside(false);

        return dialog;
    }

    @Override
    public void onAttach(Activity activity) {
        super.onAttach(activity);
        if (!(activity instanceof DialogListener)) {
            throw new ClassCastException(activity.toString() + " must implement DialogListener.");
        }
        mListener = (DialogListener) activity;
    }

    public void setDialogListener(DialogListener listener) {
        mListener = listener;
    }
}
WebViewAssetsActivity.java
package org.jssec.android.privacypolicynopreconfirm;

import org.jssec.android.privacypolicynopreconfirm.R;

import android.app.Activity;
import android.os.Bundle;
import android.webkit.WebSettings;
import android.webkit.WebView;

public class WebViewAssetsActivity extends Activity {
    // *** POINT 7 *** Place a summary version of the application privacy policy in the assets folder
    private final String ABST_PP_URL = "file:///android_asset/PrivacyPolicy/app-policy-abst-privacypolicy-1.0.html";

    @Override
    public void onCreate(Bundle savedInstanceState) {
        super.onCreate(savedInstanceState);
        setContentView(R.layout.activity_webview);

        WebView webView = (WebView) findViewById(R.id.webView);
        WebSettings webSettings = webView.getSettings();

        webSettings.setAllowFileAccess(false);

        webView.loadUrl(ABST_PP_URL);
    }
}
5.5.1.3.无需广泛同意:整合了应用程序隐私政策的应用程序
要点:(无需广泛同意:整合了应用程序隐私政策的应用程序)
- 提供可供用户查看应用程序隐私政策的方法
- 提供通过用户操作删除已传输数据的方法。
- 提供可通过用户操作停止传输数据的方法
- 使用 UUID 或 cookie 跟踪用户数据。
- 将应用程序隐私政策的摘要版本放在资产文件夹中。
MainActivity.java
package org.jssec.android.privacypolicynocomprehensive;

import java.io.IOException;
import org.json.JSONException;
import org.json.JSONObject;

import android.os.AsyncTask;
import android.os.Bundle;
import android.content.Intent;
import android.content.SharedPreferences;
import android.support.v4.app.FragmentActivity;
import android.text.Editable;
import android.text.TextWatcher;
import android.view.Menu;
import android.view.MenuItem;
import android.view.View;
import android.widget.TextView;
import android.widget.Toast;

public class MainActivity extends FragmentActivity {
    private static final String BASE_URL = "https://www.example.com/pp";
    private static final String GET_ID_URI = BASE_URL + "/get_id.php";
    private static final String SEND_DATA_URI = BASE_URL + "/send_data.php";
    private static final String DEL_ID_URI = BASE_URL + "/del_id.php";

    private static final String ID_KEY = "id";
    private static final String NICK_NAME_KEY = "nickname";

    private static final String PRIVACY_POLICY_PREF_NAME = "privacypolicy_preference";

    private String UserId = "";

    private TextWatcher watchHandler = new TextWatcher() {

        @Override
        public void beforeTextChanged(CharSequence s, int start, int count, int after) {
        }

        @Override
        public void onTextChanged(CharSequence s, int start, int before, int count) {
            boolean buttonEnable = (s.length() > 0);

            MainActivity.this.findViewById(R.id.buttonStart).setEnabled(buttonEnable);
        }

        @Override
        public void afterTextChanged(Editable s) {
        }
    };

    @Override
    protected void onCreate(Bundle savedInstanceState) {
        super.onCreate(savedInstanceState);
        setContentView(R.layout.activity_main);

        // Fetch user ID from serverFetch user ID from server
        new GetDataAsyncTask().execute();

        findViewById(R.id.buttonStart).setEnabled(false);
        ((TextView) findViewById(R.id.editTextNickname)).addTextChangedListener(watchHandler);
    }

    public void onSendToServer(View view) {
        String nickname = ((TextView) findViewById(R.id.editTextNickname)).getText().toString();
        Toast.makeText(MainActivity.this, this.getClass().getSimpleName() + "\n - nickname : " + nickname, Toast.LENGTH_SHORT).show();
        new sendDataAsyncTack().execute(SEND_DATA_URI, UserId, nickname);
    }

    @Override
    public boolean onCreateOptionsMenu(Menu menu) {
        getMenuInflater().inflate(R.menu.main, menu);
        return true;
    }

    @Override
    public boolean onOptionsItemSelected(MenuItem item) {
        switch (item.getItemId()) {
        case R.id.action_show_pp:
            // *** POINT 1 *** Provide methods by which the user can review the application privacy policy.
            Intent intent = new Intent();
            intent.setClass(this, WebViewAssetsActivity.class);
            startActivity(intent);
            return true;
        case R.id.action_del_id:
            // *** POINT 2 *** Provide methods by which transmitted data can be deleted by user operations.
            new sendDataAsyncTack().execute(DEL_ID_URI, UserId);
            return true;
        case R.id.action_donot_send_id:
            // *** POINT 3 *** Provide methods by which transmitting data can be stopped by user operations.

            // In this sample application if the user data cannot be sent by user operations,
            // finish the application because we do nothing.
            String message  = getString(R.string.stopSendUserData);
            Toast.makeText(MainActivity.this, this.getClass().getSimpleName() + " - " + message, Toast.LENGTH_SHORT).show();
            finish();

            return true;
        }
        return false;
    }

    private class GetDataAsyncTask extends AsyncTask<String, Void, String> {
        private String extMessage = "";

        @Override
        protected String doInBackground(String...params) {
            // *** POINT 4 *** Use UUIDs or cookies to keep track of user data
            // In this sample we use an ID generated on the server side
            SharedPreferences sp = getSharedPreferences(PRIVACY_POLICY_PREF_NAME, MODE_PRIVATE);
            UserId = sp.getString(ID_KEY, null);
            if (UserId == null) {
                // No token in SharedPreferences; fetch ID from server
                try {
                    UserId = NetworkUtil.getCookie(GET_ID_URI, "", "id");
                } catch (IOException e) {
                    // Catch exceptions such as certification errors
                    extMessage = e.toString();
                }

                // Store the fetched ID in SharedPreferences
                sp.edit().putString(ID_KEY, UserId).commit();
            }
            return UserId;
        }

        @Override
        protected void onPostExecute(final String data) {
            String status = (data != null) ? "success" : "error";
            Toast.makeText(MainActivity.this, this.getClass().getSimpleName() + " - " + status + " : " + extMessage, Toast.LENGTH_SHORT).show();
        }
    }

    private class sendDataAsyncTack extends AsyncTask<String, Void, Boolean> {
        private String extMessage = "";

        @Override
        protected Boolean doInBackground(String...params) {
            String url = params[0];
            String id = params[1];
            String nickname = params.length > 2 ? params[2] : null;

            Boolean result = false;
            try {
                JSONObject jsonData = new JSONObject();
                jsonData.put(ID_KEY, id);

                if (nickname != null)
                    jsonData.put(NICK_NAME_KEY, nickname);

                NetworkUtil.sendJSON(url, "", jsonData.toString());

                result = true;
            } catch (IOException e) {
                // Catch exceptions such as certification errors
                extMessage = e.toString();
            } catch (JSONException e) {
                extMessage = e.toString();
            }
            return result;
        }

        @Override
        protected void onPostExecute(Boolean result) {
            String status = result ? "Success" : "Error";
            Toast.makeText(MainActivity.this, this.getClass().getSimpleName() + " - " + status + " : " + extMessage, Toast.LENGTH_SHORT).show();
        }
    }
}
WebViewAssetsActivity.java
package org.jssec.android.privacypolicynocomprehensive;

import org.jssec.android.privacypolicynocomprehensive.R;

import android.app.Activity;
import android.os.Bundle;
import android.webkit.WebSettings;
import android.webkit.WebView;

public class WebViewAssetsActivity extends Activity {
    // *** POINT 5 *** Place a summary version of the application privacy policy in the assets folder
    private static final String ABST_PP_URL = "file:///android_asset/PrivacyPolicy/app-policy-abst-privacypolicy-1.0.html";

    @Override
    public void onCreate(Bundle savedInstanceState) {
        super.onCreate(savedInstanceState);
        setContentView(R.layout.activity_webview);

        WebView webView = (WebView) findViewById(R.id.webView);
        WebSettings webSettings = webView.getSettings();

        webSettings.setAllowFileAccess(false);

        webView.loadUrl(ABST_PP_URL);
    }
}
5.5.1.4.未整合应用程序隐私政策的应用程序
要点:(未整合应用程序隐私政策的应用程序)
- 如果应用程序只使用自身在设备中获取的信息,则无需显示应用程序隐私政策。
- 在市场应用程序或类似应用程序的文档中,应注明应用程序不会将其获取的信息传输到外部
MainActivity.java
package org.jssec.android.privacypolicynoinfosent;

import com.google.android.gms.common.ConnectionResult;
import com.google.android.gms.common.GooglePlayServicesClient;
import com.google.android.gms.location.LocationClient;

import android.location.Location;
import android.net.Uri;
import android.os.Bundle;
import android.content.Intent;
import android.content.IntentSender;
import android.support.v4.app.FragmentActivity;
import android.view.Menu;
import android.view.View;
import android.widget.TextView;
import android.widget.Toast;

public class MainActivity extends FragmentActivity implements GooglePlayServicesClient.ConnectionCallbacks, GooglePlayServicesClient.OnConnectionFailedListener {
    private LocationClient mLocationClient = null;

    private final int CONNECTION_FAILURE_RESOLUTION_REQUEST = 257;

    @Override
    protected void onCreate(Bundle savedInstanceState) {
        super.onCreate(savedInstanceState);
        setContentView(R.layout.activity_main);

        mLocationClient = new LocationClient(this, this, this);
    }

    @Override
    protected void onStart() {
        super.onStart();

        // Used to obtain location data
        if (mLocationClient != null) {
            mLocationClient.connect();
        }
    }

    @Override
    protected void onStop() {
        if (mLocationClient != null) {
            mLocationClient.disconnect();
        }
        super.onStop();
    }

    @Override
    public boolean onCreateOptionsMenu(Menu menu) {
        getMenuInflater().inflate(R.menu.main, menu);
        return true;
    }

    public void onStartMap(View view) {
        // *** POINT 1 *** You do not need to display an application privacy policy if your application will only use the information it obtains within the device.
        if (mLocationClient != null && mLocationClient.isConnected()) {
            Location currentLocation = mLocationClient.getLastLocation();
            if (currentLocation != null) {
                Intent intent = new Intent(Intent.ACTION_VIEW, Uri.parse("geo:"+ currentLocation.getLatitude() + "," + currentLocation.getLongitude()));
                startActivity(intent);
            }
        }
    }

    @Override
    public void onConnected(Bundle connectionHint) {
        if (mLocationClient != null && mLocationClient.isConnected()) {
            Location currentLocation = mLocationClient.getLastLocation();
            if (currentLocation != null) {
                String locationData = "Latitude \t: " + currentLocation.getLatitude() + "\n\tLongitude \t: " + currentLocation.getLongitude();

                String text = "\n" + getString(R.string.your_location_title) + "\n\t" + locationData;

                Toast.makeText(MainActivity.this, this.getClass().getSimpleName() + text, Toast.LENGTH_SHORT).show();

                TextView appText = (TextView) findViewById(R.id.appText);
                appText.setText(text);
            }
        }
    }

    @Override
    public void onConnectionFailed(ConnectionResult result) {
        if (result.hasResolution()) {
            try {
                result.startResolutionForResult(this, CONNECTION_FAILURE_RESOLUTION_REQUEST);
            } catch (IntentSender.SendIntentException e) {
                e.printStackTrace();
            }
        }
    }

    @Override
    public void onDisconnected() {
        mLocationClient = null;
        Toast.makeText(this, "Disconnected.Please re-connect.", Toast.LENGTH_SHORT).show();
    }
}
下面是市场上的示例说明。
图 5.5.3 市场上的说明
5.5.2.规则手册
使用私有数据时,请遵守以下规则。
- 将用户数据传输限制为最低必需要求(必需)
- 在首次启动(或应用程序更新)时,获得广泛同意,以传输需要特别谨慎处理的或用户可能难以更改的用户数据(必需)
- 在传输需要特别谨慎处理的用户数据之前,先获得具体同意(必需)
- 提供可供用户查看应用程序隐私政策的方法(必需)
- 将应用程序隐私政策的摘要版本置于资产文件夹中(推荐)
- 提供可用于删除已传输数据的方法,以及可通过用户操作停止传输数据的方法(推荐)
- 将特定于设备的 ID 与 UUID 和 cookie 分离开来(建议)
- 如果您只在设备内部使用用户数据,请通知用户数据将不会传输到外部。(推荐)
5.5.2.1.将用户数据传输限制到最低必需要求(必需)
将使用数据传输到外部服务器或其它目标时,应将所传输的数据限制为提供服务所需的最低限度。具体来说,您应该这样设计:应用程序只能访问用户可以根据应用程序描述想象出使用目的的用户数据。
例如,如果用户认定一个应用程序属于闹钟应用程序,则它不应能够访问位置数据。另一方面,如果闹钟应用程序可以根据用户所在位置响闹,并且已在应用程序描述中注明了相应功能,则应用程序或许可以访问位置数据。
如果只需要在应用程序中访问信息,应避免将其传输到外部,并采取其它措施尽量减小用户数据意外泄露的可能性。
5.5.2.2.在首次启动(或应用程序更新)时,获得广泛同意,以传输需要特别谨慎处理的或用户可能难以更改的用户数据(必需)
如果应用程序将向外部服务器传输用户可能难以更改的任何用户数据,或需要特别谨慎处理的任何用户数据,则此应用程序必须在用户开始使用应用程序之前先获得用户的同意(选择加入),并通知用户将发送的信息类型、发送目的、目标服务器及是否涉及任何第三方提供商。更具体地说,首次启动时,应用程序应显示其应用程序隐私政策,并确认用户已查阅并同意该政策。此外,当应用程序更新,以便现在能将新类型的用户数据传输给外部服务器时,其必须再次确认用户已查阅并同意这些更改。如果用户不同意,应用程序应终止或采取相关措施以确保禁用所有需要数据传输的功能。
这些措施用于确保用户在使用应用程序时了解其数据的处理方式,为用户带来安全感并增强他们对应用程序的信任。
MainActivity.java
protected void onStart() {
    super.onStart();

    // (some portions omitted)
    if (privacyPolicyAgreed <= VERSION_TO_SHOW_COMPREHENSIVE_AGREEMENT_ANEW) {
        // *** POINT *** On first launch (or application update), obtain broad consent to transmit user data that will be handled by the application.
        // When the application is updated, it is only necessary to renew the user’s grant of broad consent if the updated application will handle new types of user data.
        ConfirmFragment dialog = ConfirmFragment.newInstance(
            R.string.privacyPolicy, R.string.agreePrivacyPolicy,
            DIALOG_TYPE_COMPREHENSIVE_AGREEMENT);
        dialog.setDialogListener(this);
        FragmentManager fragmentManager = getSupportFragmentManager();
        dialog.show(fragmentManager, "dialog");
    }
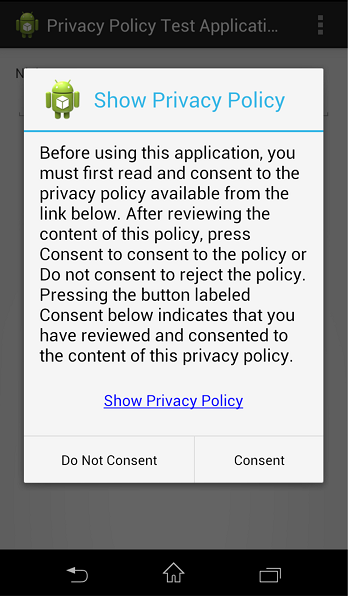
图 5.5.4 广泛同意示例
5.5.2.3.在传输需要特别谨慎处理的用户数据之前,先获得具体同意(必需)
在向外部服务器传输任何需要特别谨慎处理的用户数据时,应用程序必须事先获得用户对每种此类用户数据(或涉及用户数据传输的每个功能)的同意(选择记入);这是获取一般同意的补充。如果用户不同意,则应用程序不能将相应的数据发送到外部服务器。
这可确保用户能够更彻底地了解应用程序功能(及其提供的服务)与用户已授予其一般同意的用户数据的传输之间的关系;同时,应用程序提供商可以根据更精确的决策获得用户同意。
MainActivity.java
public void onSendToServer(View view) {
    // *** POINT *** Obtain specific consent before transmitting user data that requires particularly delicate handling.
    ConfirmFragment dialog = ConfirmFragment.newInstance(R.string.sendLocation, R.string.cofirmSendLocation, DIALOG_TYPE_PRE_CONFIRMATION);
    dialog.setDialogListener(this);
    FragmentManager fragmentManager = getSupportFragmentManager();
    dialog.show(fragmentManager, "dialog");
}
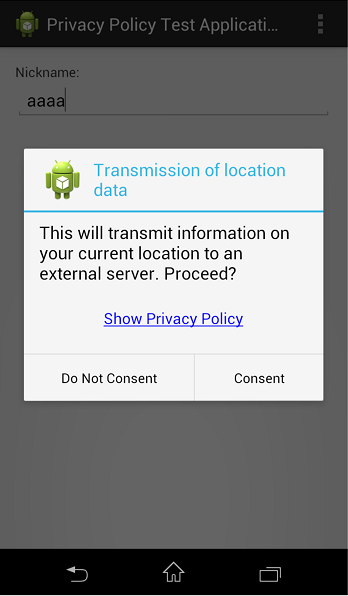
图 5.5.5 具体同意示例
5.5.2.4.提供可供用户查看应用程序隐私政策的方法(必需)
通常,Android 应用程序市场将提供应用程序隐私政策的链接,供用户在选择安装相应应用程序之前查看。除了支持此功能外,应用程序还必须提供相关方法,以便用户在设备上安装应用程序后可以查看应用程序隐私政策。在涉及到同意将用户数据传输到外部服务器以帮助用户做出适当决策的情况中,提供可供用户轻松查看应用程序隐私政策的方法尤其重要。
MainActivity.java
    @Override
    public boolean onOptionsItemSelected(MenuItem item) {
        switch (item.getItemId()) {
        case R.id.action_show_pp:
            // *** POINT *** Provide methods by which the user can review the application privacy policy.
            Intent intent = new Intent();
            intent.setClass(this, WebViewAssetsActivity.class);
            startActivity(intent);
            return true;
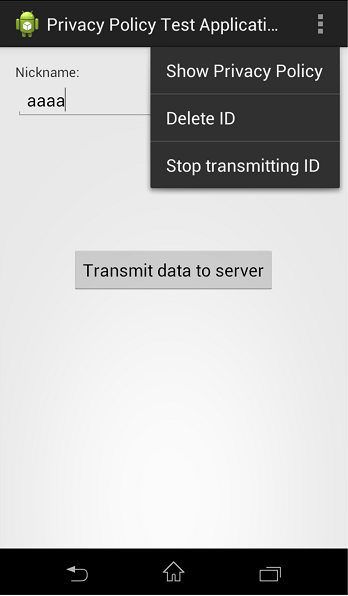
图 5.5.6 显示隐私政策的上下文菜单
5.5.2.5.将应用程序隐私政策的摘要版本置于资产文件夹中(推荐)
最好将应用程序隐私政策的摘要版本置于资产文件夹中,以确保用户可以根据需要进行查看。确保资产文件夹中的应用程序隐私政策不仅使用户可以随时轻松访问,还可以避免用户看到恶意第三方制作的应用程序隐私政策的假冒或损坏版本的风险。
5.5.2.6.提供可用于删除已传输数据的方法,以及可通过用户操作停止传输数据的方法(推荐)
最好提供一种方法,以便根据用户请求删除已传输到外部服务器的用户数据。同样,如果应用程序本身在设备中存储了用户数据(或其副本),最好为用户提供删除此数据的方法。另外,最好提供一种方法,以便根据用户的请求停止传输用户数据。
此规则(推荐)已编入欧盟倡导的“被遗忘权”;更通俗地说,将来,各种提案将要求进一步加强用户保护其数据的权利,因此,在这些准则中,除非有特定原因,否则我们建议提供用于删除用户数据的方法。而且,停止传输数据的定义与主要由浏览器推行的通信的“不跟踪(拒绝跟踪)”定义相同。
MainActivity.java
    @Override
    public boolean onOptionsItemSelected(MenuItem item) {
        switch (item.getItemId()) {
        // (some portions omitted)
        case R.id.action_del_id:
            // *** POINT *** Provide methods by which transmitted data can be deleted by user operations.
            new SendDataAsyncTack().execute(DEL_ID_URI, UserId);
            return true;
        }
5.5.2.7.将特定于设备的 ID 与 UUID 和 cookie 分离开来(建议)
IMEI 和其它特定于设备的 ID 不应以与用户数据绑定的方式进行传输。实际上,如果特定于设备的 ID 和一段用户数据绑定在一起并发布或泄露给公众,即使只是一次,以后也不可能更改该设备特定的 ID,这种情况下将无法(或至少难以)切断 ID 与用户数据之间的关联。在这种情况下,最好使用 UUID 或 cookie,即,与用户数据一起传输时,每次根据随机数字而非设备特定 ID 重新生成的变量 ID。这允许实施上面讨论的“被遗忘权”的概念。
MainActivity.java
    @Override
    protected String doInBackground(String...params) {
        // *** POINT *** Use UUIDs or cookies to keep track of user data
        // In this sample we use an ID generated on the server side
        SharedPreferences sp = getSharedPreferences(PRIVACY_POLICY_PREF_NAME, MODE_PRIVATE);
        UserId = sp.getString(ID_KEY, null);
        if (UserId == null) {
            // No token in SharedPreferences; fetch ID from server
            try {
                UserId = NetworkUtil.getCookie(GET_ID_URI, "", "id");
            } catch (IOException e) {
                // Catch exceptions such as certification errors
                extMessage = e.toString();
            }

            // Store the fetched ID in SharedPreferences
            sp.edit().putString(ID_KEY, UserId).commit();

        return UserId;
    }
5.5.2.8.如果您只在设备内部使用用户数据,请通知用户数据将不会传输到外部。(推荐)
即使用户数据只能在用户设备中临时访问,也最好将此情况告知用户,以确保用户完整而透明地了解应用程序行为。更具体地说,应通知用户,应用程序访问的用户数据将仅在设备中用于特定目的,不会被存储或发送。向用户传达此内容的可行方法包括在应用程序市场上的应用程序描述中指定此内容。应用程序隐私政策中不需要讨论仅在设备中临时使用的信息。
图 5.5.7 市场上的说明
5.5.3.高级主题
5.5.3.1.有关隐私政策的一些背景信息
对于智能手机应用程序将获取用户数据并将此数据传输到外部的情况,需要准备并显示应用程序隐私政策,以通知用户相关详细信息,例如将收集的数据类型和处理数据的方式。应用程序隐私政策中应包括的内容在 JMIC 的 SPI 提倡的“智能手机隐私计划”中详细说明。应用程序隐私政策的主要目标应该是清楚地陈述应用程序将访问的所有类型的用户数据、数据的使用目的、数据的存储位置以及数据要传输到的目标位置。
除了应用程序隐私政策之外,还需要另一个独立的文档:企业隐私政策,该文档详细说明公司从各种应用程序收集的所有用户数据将如何存储、管理和处置。本企业隐私政策与传统上为遵守日本个人信息保护法而编制的隐私政策相对应。
有关准备和显示隐私政策的正确方法的详细说明,以及各种隐私政策所扮演角色的讨论,请访问文档“A Discussion of the Creation and Presentation of Privacy Policies for JSSEC Smartphone Applications”(关于 JSSEC 智能手机应用程序隐私政策的创建和展示的讨论),URL 为:https://www.jssec.org/event/20140206/03-1_app_policy.pdf(仅限日语)。
5.5.3.2.术语表
在下表中,我们定义了这些准则中使用的众多术语;这些定义摘自文档“A Discussion of the Creation and Presentation of Privacy Policies for JSSEC Smartphone Applications”(关于 JSSEC 智能手机应用程序隐私政策的创建和展示的讨论)(https://www.jssec.org/event/20140206/03-1_app_policy.pdf)(仅限日语)。
| 术语 | 说明 |
| 企业隐私政策 | 定义公司关于保护个人数据的政策的隐私政策。根据日本的个人信息保护法创建。 |
| 应用程序隐私政策 | 特定于应用程序的隐私政策。根据日本总务省的智能手机隐私计划 (SPI) 准则创建,详细版本包含有助于理解的解释。 |
| 应用程序隐私政策的摘要版本 | 简明扼要地总结了应用程序将使用哪些用户信息、用于什么目的以及是否将此信息提供给第三方的简要文档。 |
| 应用程序隐私政策的详细版本 | 与日本总务省 (MIC) 的智能手机隐私计划 (SPI) 和智能手机隐私计划 II (SPI II) 规定的 8 项相符的详细文档。 |
| 用户易于更改的用户数据 | Cookie、UUID 等 |
| 用户难以更改的用户数据 | IMEI、IMSI、ICCID、MAC 地址、操作系统生成的 ID 等。 |
| 需要特别谨慎处理的用户数据 | 位置信息、通讯簿、电话号码、电子邮件地址等。 |
5.5.3.3.处理 Android ID 时的版本相关差异
Android ID (Settings.Secure.ANDROID_ID) 是随机生成的 64 位数,表示为十六进制字符串,用作标识单个终端的标识符(尽管在极少情况下可能会出现重复标识符)。因此,使用不当可能会造成与用户跟踪相关的严重风险,所以在使用 Android ID 时必须特别小心。但是,对于运行 Android 7.1(API 级别 25)的终端和运行 Android 8.0(API 级别 26)的终端,管理诸如 ID 生成和可访问范围等方面的规则不同。在下面的内容中,我们将介绍这些差异。
运行 Android 7.1(API 级别 25)或更早级别的终端
对于运行 Android 7.1(API 级别 25)或更早版本的终端,给定终端中只存在一个 Android ID 值;此终端上运行的所有应用程序均可访问该值。但是,请注意,对于具有多用户支持的终端,将为每个用户生成单独的值。Android ID 在终端出厂后首次启动时生成,并在每次后续出厂重置时重新生成。
运行 Android 8.0(API 级别 26)或更高级别的终端
对于运行 Android 8.0(API 级别 26)或更高级别的终端,每个应用程序(开发人员)都有自己独特的值,只有相关应用程序才能访问此值。更具体地说,虽然 Android 7.1(API 级别 25)和更早版本中使用的值特定于用户和终端,但不特定于应用程序,在 Android 8.0(API 级别 26)和更高版本中,应用程序签名会被添加到用于生成唯一值的元素列表中,因此具有不同签名的应用程序现在具有不同的 Android ID 值。(签名相同的应用程序具有相同的 Android ID 值。)
生成或修改的 Android ID 值的情况基本保持不变,但需要注意的几点,如下所述。
- 在卸载/重新安装软件包时:只要应用程序的签名保持不变,其 Android ID 在卸载和重新安装后将保持不变。另一方面,请注意,如果修改了用作签名的密钥,则重新安装后 Android ID 将会有所不同,即使软件包名称未更改。
- 对于运行 Android 8.0(API 级别 26)或更高版本的终端的更新:如果应用程序已安装在运行 Android 7.1(API 级别 25)或更早版本的终端上,则在终端更新为 Android 8.0(API 级别 26)或更高版本后,应用程序获取的 Android ID 值保持不变。但是,这不包括在更新后卸载和重新安装应用程序的情况。
请注意,所有 Android ID 都归类为用户难以交换的用户信息(如“5.5.3.2. 章节 —术语表”中所述),因此,正如本讨论开始时所述,我们建议在使用 Android ID 时同样地当心谨慎。
5.6.使用加密
在安全领域,术语“机密性”、“真实性”和“可用性”用于分析对威胁的响应。这三个术语分别指的是防止第三方查看私有数据的措施、确保用户引用的数据未被修改的保护措施(或用于在伪造数据时进行检测的技术)以及用户随时访问服务和数据的能力。在设计安全保护时,必须考虑所有这三个要素。特别是,加密技术常用于确保机密性和真实性,Android 配备了多种加密功能,使应用程序可以实现机密性和真实性。
在此章节中,我们将使用示例代码说明 Android 应用程序可以安全地实施加密和解密(以确保机密性)以及消息身份验证代码 (MAC) 或数字签名(以确保完整性)的方法。
5.6.1.示例代码 
我们针对特定目的和条件开发了多种加密方法,包括加密和解密数据(以确保机密性)以及检测伪造数据(以确保真实性)等使用情形。下面是根据每种技术的用途分为三大加密技术组的示例代码。在每种情况下,加密技术的功能都应该允许选择适当的加密方法和密钥类型。有关需要更详细考虑的情况,请参阅“5.6.3.1. 章节 —选择加密方法”。
在设计使用加密技术的实施之前,请确保阅读“5.6.3.3. 章节 —防止随机数生成器中出现漏洞的预防措施”。
- 保护数据免遭第三方窃听
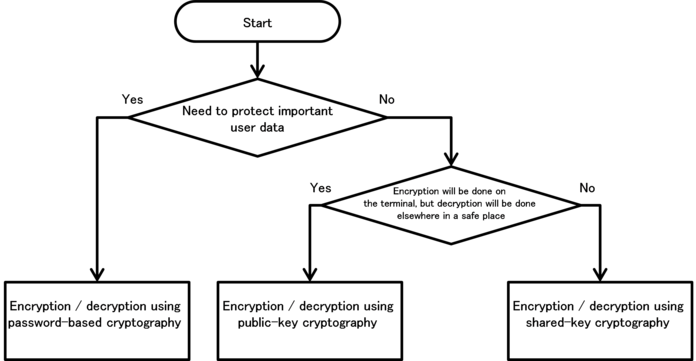
图 5.6.1 用于防止数据被窃听的示例代码的选择流程图
- 检测第三方的数据伪造
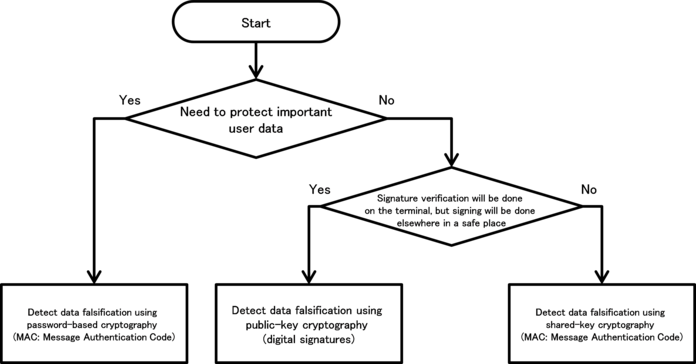
图 5.6.2 用于检测伪造的示例代码的选择流程图
5.6.1.1.使用基于密码的密钥进行加密和解密
您可以使用基于密码的密钥加密来保护用户的机密数据资产。
要点:
- 显式指定加密模式和填充。
- 使用强加密技术(特别是符合相关标准的技术),包括算法、分组密码模式和填充模式。
- 从密码生成密钥时,使用 Salt。
- 从密码生成密钥时,指定适当的哈希迭代计数。
- 使用长度足以保证加密强度的密钥。
AesCryptoPBEKey.java
package org.jssec.android.cryptsymmetricpasswordbasedkey;

import java.security.InvalidAlgorithmParameterException;
import java.security.InvalidKeyException;
import java.security.NoSuchAlgorithmException;
import java.security.SecureRandom;
import java.security.spec.InvalidKeySpecException;
import java.util.Arrays;

import javax.crypto.BadPaddingException;
import javax.crypto.Cipher;
import javax.crypto.IllegalBlockSizeException;
import javax.crypto.NoSuchPaddingException;
import javax.crypto.SecretKey;
import javax.crypto.SecretKeyFactory;
import javax.crypto.spec.IvParameterSpec;
import javax.crypto.spec.PBEKeySpec;

public final class AesCryptoPBEKey {

    // *** POINT 1 *** Explicitly specify the encryption mode and the padding.
    // *** POINT 2 *** Use strong encryption technologies (specifically, technologies that meet the relevant criteria), including algorithms, block cipher modes, and padding modes.
    // Parameters passed to the getInstance method of the Cipher class: Encryption algorithm, block encryption mode, padding rule
    // In this sample, we choose the following parameter values: encryption algorithm=AES, block encryption mode=CBC, padding rule=PKCS7Padding
    private static final String TRANSFORMATION = "AES/CBC/PKCS7Padding";

    //  A string used to fetch an instance of the class that generates the key
    private static final String KEY_GENERATOR_MODE = "PBEWITHSHA256AND128BITAES-CBC-BC";

    // *** POINT 3 *** When generating a key from a password, use Salt.
    // Salt length in bytes
    public static final int SALT_LENGTH_BYTES = 20;

    // *** POINT 4 *** When generating a key from a password, specify an appropriate hash iteration count.
    // Set the number of mixing repetitions used when generating keys via PBE
    private static final int KEY_GEN_ITERATION_COUNT = 1024;

    // *** POINT 5 *** Use a key of length sufficient to guarantee the strength of encryption.
    // Key length in bits
    private static final int KEY_LENGTH_BITS = 128;

    private byte[] mIV = null;
    private byte[] mSalt = null;

    public byte[] getIV() {
        return mIV;
    }

    public byte[] getSalt() {
        return mSalt;
    }

    AesCryptoPBEKey(final byte[] iv, final byte[] salt) {
        mIV = iv;
        mSalt = salt;
    }

    AesCryptoPBEKey() {
        mIV = null;
        initSalt();
    }

    private void initSalt() {
        mSalt = new byte[SALT_LENGTH_BYTES];
        SecureRandom sr = new SecureRandom();
        sr.nextBytes(mSalt);
    }

    public final byte[] encrypt(final byte[] plain, final char[] password) {
        byte[] encrypted = null;

        try {
            // *** POINT 1 *** Explicitly specify the encryption mode and the padding.
            // *** POINT 2 *** Use strong encryption technologies (specifically, technologies that meet the relevant criteria), including algorithms, modes, and padding.
            Cipher cipher = Cipher.getInstance(TRANSFORMATION);

            // *** POINT 3 *** When generating keys from passwords, use Salt.
            SecretKey secretKey = generateKey(password, mSalt);
            cipher.init(Cipher.ENCRYPT_MODE, secretKey);
            mIV = cipher.getIV();

            encrypted = cipher.doFinal(plain);
        } catch (NoSuchAlgorithmException e) {
        } catch (NoSuchPaddingException e) {
        } catch (InvalidKeyException e) {
        } catch (IllegalBlockSizeException e) {
        } catch (BadPaddingException e) {
        } finally {
        }

        return encrypted;
    }

    public final byte[] decrypt(final byte[] encrypted, final char[] password) {
        byte[] plain = null;

        try {
            // *** POINT 1 *** Explicitly specify the encryption mode and the padding.
            // *** POINT 2 *** Use strong encryption technologies (specifically, technologies that meet the relevant criteria), including algorithms, block cipher modes, and padding modes.
            Cipher cipher = Cipher.getInstance(TRANSFORMATION);

            // *** POINT 3 *** When generating a key from a password, use Salt.
            SecretKey secretKey = generateKey(password, mSalt);
            IvParameterSpec ivParameterSpec = new IvParameterSpec(mIV);
            cipher.init(Cipher.DECRYPT_MODE, secretKey, ivParameterSpec);

            plain = cipher.doFinal(encrypted);
        } catch (NoSuchAlgorithmException e) {
        } catch (NoSuchPaddingException e) {
        } catch (InvalidKeyException e) {
        } catch (InvalidAlgorithmParameterException e) {
        } catch (IllegalBlockSizeException e) {
        } catch (BadPaddingException e) {
        } finally {
        }

        return plain;
    }

    private static final SecretKey generateKey(final char[] password, final byte[] salt) {
        SecretKey secretKey = null;
        PBEKeySpec keySpec = null;

        try {
            // *** POINT 2 *** Use strong encryption technologies (specifically, technologies that meet the relevant criteria), including algorithms, block cipher modes, and padding modes.
            // Fetch an instance of the class that generates the key
            // In this example, we use a KeyFactory that uses SHA256 to generate AES-CBC 128-bit keys.
            SecretKeyFactory secretKeyFactory = SecretKeyFactory.getInstance(KEY_GENERATOR_MODE);

            // *** POINT 3 *** When generating a key from a password, use Salt.
            // *** POINT 4 *** When generating a key from a password, specify an appropriate hash iteration count.
            // *** POINT 5 *** Use a key of length sufficient to guarantee the strength of encryption.
            keySpec = new PBEKeySpec(password, salt, KEY_GEN_ITERATION_COUNT, KEY_LENGTH_BITS);
            // Clear password
            Arrays.fill(password, '?');
            // Generate the key
            secretKey = secretKeyFactory.generateSecret(keySpec);
        } catch (NoSuchAlgorithmException e) {
        } catch (InvalidKeySpecException e) {
        } finally {
            keySpec.clearPassword();
        }

        return secretKey;
    }
}
5.6.1.2.使用公钥加密和解密
在某些情况下,在应用程序端仅会使用存储的公钥执行数据加密,而解密将在私钥下在单独的安全位置(如服务器)执行。此类情况下,可以使用公钥(非对称密钥)加密。
要点:
- 显式指定加密模式和填充
- 使用强加密方法(特别是符合相关标准的技术),包括算法、分组密码模式和填充模式。
- 使用长度足以保证加密强度的密钥。
RsaCryptoAsymmetricKey.java
package org.jssec.android.cryptasymmetrickey;

import java.security.InvalidKeyException;
import java.security.KeyFactory;
import java.security.NoSuchAlgorithmException;
import java.security.PrivateKey;
import java.security.PublicKey;
import java.security.interfaces.RSAPublicKey;
import java.security.spec.InvalidKeySpecException;
import java.security.spec.PKCS8EncodedKeySpec;
import java.security.spec.X509EncodedKeySpec;

import javax.crypto.BadPaddingException;
import javax.crypto.Cipher;
import javax.crypto.IllegalBlockSizeException;
import javax.crypto.NoSuchPaddingException;

public final class RsaCryptoAsymmetricKey {

    // *** POINT 1 *** Explicitly specify the encryption mode and the padding.
    // *** POINT 2 *** Use strong encryption methods (specifically, technologies that meet the relevant criteria), including algorithms, block cipher modes, and padding modes..
    // Parameters passed to getInstance method of the Cipher class: Encryption algorithm, block encryption mode, padding rule
    // In this sample, we choose the following parameter values: encryption algorithm=RSA, block encryption mode=NONE, padding rule=OAEPPADDING.
    private static final String TRANSFORMATION = "RSA/NONE/OAEPPADDING";

    // encryption algorithm
    private static final String KEY_ALGORITHM = "RSA";

    // *** POINT 3 *** Use a key of length sufficient to guarantee the strength of encryption.
    // Check the length of the key
    private static final int MIN_KEY_LENGTH = 2000;

    RsaCryptoAsymmetricKey() {
    }

    public final byte[] encrypt(final byte[] plain, final byte[] keyData) {
        byte[] encrypted = null;

        try {
            // *** POINT 1 *** Explicitly specify the encryption mode and the padding.
            // *** POINT 2 *** Use strong encryption methods (specifically, technologies that meet the relevant criteria), including algorithms, block cipher modes, and padding modes..
            Cipher cipher = Cipher.getInstance(TRANSFORMATION);

            PublicKey publicKey = generatePubKey(keyData);
            if (publicKey != null) {
                cipher.init(Cipher.ENCRYPT_MODE, publicKey);
                encrypted = cipher.doFinal(plain);
            }
        } catch (NoSuchAlgorithmException e) {
        } catch (NoSuchPaddingException e) {
        } catch (InvalidKeyException e) {
        } catch (IllegalBlockSizeException e) {
        } catch (BadPaddingException e) {
        } finally {
        }

        return encrypted;
    }

    public final byte[] decrypt(final byte[] encrypted, final byte[] keyData) {
        // In general, decryption procedures should be implemented on the server side;
        // however, in this sample code we have implemented decryption processing within the application to ensure confirmation of proper execution.
        // When using this sample code in real-world applications, be careful not to retain any private keys within the application.

        byte[] plain = null;

        try {
            // *** POINT 1 *** Explicitly specify the encryption mode and the padding.
            // *** POINT 2 *** Use strong encryption methods (specifically, technologies that meet the relevant criteria), including algorithms, block cipher modes, and padding modes..
            Cipher cipher = Cipher.getInstance(TRANSFORMATION);

            PrivateKey privateKey = generatePriKey(keyData);
            cipher.init(Cipher.DECRYPT_MODE, privateKey);

            plain = cipher.doFinal(encrypted);
        } catch (NoSuchAlgorithmException e) {
        } catch (NoSuchPaddingException e) {
        } catch (InvalidKeyException e) {
        } catch (IllegalBlockSizeException e) {
        } catch (BadPaddingException e) {
        } finally {
        }

        return plain;
    }

    private static final PublicKey generatePubKey(final byte[] keyData) {
        PublicKey publicKey = null;
        KeyFactory keyFactory = null;

        try {
            keyFactory = KeyFactory.getInstance(KEY_ALGORITHM);
            publicKey = keyFactory.generatePublic(new X509EncodedKeySpec(keyData));
        } catch (IllegalArgumentException e) {
        } catch (NoSuchAlgorithmException e) {
        } catch (InvalidKeySpecException e) {
        } finally {
        }

        // *** POINT 3 *** Use a key of length sufficient to guarantee the strength of encryption.
        // Check the length of the key
        if (publicKey instanceof RSAPublicKey) {
            int len = ((RSAPublicKey) publicKey).getModulus().bitLength();
            if (len < MIN_KEY_LENGTH) {
                publicKey = null;
            }
        }

        return publicKey;
    }

    private static final PrivateKey generatePriKey(final byte[] keyData) {
        PrivateKey privateKey = null;
        KeyFactory keyFactory = null;

        try {
            keyFactory = KeyFactory.getInstance(KEY_ALGORITHM);
            privateKey = keyFactory.generatePrivate(new PKCS8EncodedKeySpec(keyData));
        } catch (IllegalArgumentException e) {
        } catch (NoSuchAlgorithmException e) {
        } catch (InvalidKeySpecException e) {
        } finally {
        }

        return privateKey;
    }
}
5.6.1.4.使用基于密码的密钥检测数据伪造
您可以使用基于密码(共享密钥)的加密来验证用户数据的真实性。
要点:
- 显式指定加密模式和填充。
- 使用强加密方法(特别是符合相关标准的技术),包括算法、分组密码模式和填充模式。
- 从密码生成密钥时,使用 Salt。
- 从密码生成密钥时,指定适当的哈希迭代计数。
- 使用长度足以保证 MAC 强度的密钥。
HmacPBEKey.java
package org.jssec.android.signsymmetricpasswordbasedkey;

import java.security.InvalidKeyException;
import java.security.NoSuchAlgorithmException;
import java.security.SecureRandom;
import java.security.spec.InvalidKeySpecException;
import java.util.Arrays;

import javax.crypto.Mac;
import javax.crypto.SecretKey;
import javax.crypto.SecretKeyFactory;
import javax.crypto.spec.PBEKeySpec;

public final class HmacPBEKey {

    // *** POINT 1 *** Explicitly specify the encryption mode and the padding.
    // *** POINT 2 *** Use strong encryption methods (specifically, technologies that meet the relevant criteria), including algorithms, block cipher modes, and padding modes.
    // Parameters passed to the getInstance method of the Mac class: Authentication mode
    private static final String TRANSFORMATION = "PBEWITHHMACSHA1";

    // A string used to fetch an instance of the class that generates the key
    private static final String KEY_GENERATOR_MODE = "PBEWITHHMACSHA1";

    // *** POINT 3 *** When generating a key from a password, use Salt.
    // Salt length in bytes
    public static final int SALT_LENGTH_BYTES = 20;

    // *** POINT 4 *** When generating a key from a password, specify an appropriate hash iteration count.
    // Set the number of mixing repetitions used when generating keys via PBE
    private static final int KEY_GEN_ITERATION_COUNT = 1024;

    // *** POINT 5 *** Use a key of length sufficient to guarantee the MAC strength.
    // Key length in bits
    private static final int KEY_LENGTH_BITS = 160;

    private byte[] mSalt = null;

    public byte[] getSalt() {
        return mSalt;
    }

    HmacPBEKey() {
        initSalt();
    }

    HmacPBEKey(final byte[] salt) {
        mSalt = salt;
    }

    private void initSalt() {
        mSalt = new byte[SALT_LENGTH_BYTES];
        SecureRandom sr = new SecureRandom();
        sr.nextBytes(mSalt);
    }

    public final byte[] sign(final byte[] plain, final char[] password) {
        return calculate(plain, password);
    }

    private final byte[] calculate(final byte[] plain, final char[] password) {
        byte[] hmac = null;

        try {
            // *** POINT 1 *** Explicitly specify the encryption mode and the padding.
            // *** POINT 2 *** Use strong encryption methods (specifically, technologies that meet the relevant criteria), including algorithms, block cipher modes, and padding modes.
            Mac mac = Mac.getInstance(TRANSFORMATION);

            // *** POINT 3 *** When generating a key from a password, use Salt.
            SecretKey secretKey = generateKey(password, mSalt);
            mac.init(secretKey);

            hmac = mac.doFinal(plain);
        } catch (NoSuchAlgorithmException e) {
        } catch (InvalidKeyException e) {
        } finally {
        }

        return hmac;
    }

    public final boolean verify(final byte[] hmac, final byte[] plain, final char[] password) {

        byte[] hmacForPlain = calculate(plain, password);

        if (Arrays.equals(hmac, hmacForPlain)) {
            return true;
        }
        return false;
    }

    private static final SecretKey generateKey(final char[] password, final byte[] salt) {
        SecretKey secretKey = null;
        PBEKeySpec keySpec = null;

        try {
            // *** POINT 2 *** Use strong encryption methods (specifically, technologies that meet the relevant criteria), including algorithms, block cipher modes, and padding modes.
            // Fetch an instance of the class that generates the key
            // In this example, we use a KeyFactory that uses SHA1 to generate AES-CBC 128-bit keys.
            SecretKeyFactory secretKeyFactory = SecretKeyFactory.getInstance(KEY_GENERATOR_MODE);

            // *** POINT 3 *** When generating a key from a password, use Salt.
            // *** POINT 4 *** When generating a key from a password, specify an appropriate hash iteration count.
            // *** POINT 5 *** Use a key of length sufficient to guarantee the MAC strength.
            keySpec = new PBEKeySpec(password, salt, KEY_GEN_ITERATION_COUNT, KEY_LENGTH_BITS);
            // Clear password
            Arrays.fill(password, '?');
            // Generate the key
            secretKey = secretKeyFactory.generateSecret(keySpec);
        } catch (NoSuchAlgorithmException e) {
        } catch (InvalidKeySpecException e) {
        } finally {
            keySpec.clearPassword();
        }

        return secretKey;
    }

}
5.6.1.5.使用公钥检测数据伪造
当使用通过存储在不同安全位置(如服务器)的私钥来确定其签名的数据时,您可以将公钥(非对称密钥)加密用于涉及在应用程序端存储公钥以仅用于验证数据签名的应用程序。
要点:
- 显式指定加密模式和填充。
- 使用强加密方法(特别是符合相关标准的技术),包括算法、分组密码模式和填充模式。
- 使用长度足以保证签名强度的密钥。
RsaSignAsymmetricKey.java
package org.jssec.android.signasymmetrickey;

import java.security.InvalidKeyException;
import java.security.KeyFactory;
import java.security.NoSuchAlgorithmException;
import java.security.PrivateKey;
import java.security.PublicKey;
import java.security.Signature;
import java.security.SignatureException;
import java.security.interfaces.RSAPublicKey;
import java.security.spec.InvalidKeySpecException;
import java.security.spec.PKCS8EncodedKeySpec;
import java.security.spec.X509EncodedKeySpec;

public final class RsaSignAsymmetricKey {

    // *** POINT 1 *** Explicitly specify the encryption mode and the padding.
    // *** POINT 2 *** Use strong encryption methods (specifically, technologies that meet the relevant criteria), including algorithms, block cipher modes, and padding modes.
    // Parameters passed to the getInstance method of the Cipher class: Encryption algorithm, block encryption mode, padding rule
    // In this sample, we choose the following parameter values: encryption algorithm=RSA, block encryption mode=NONE, padding rule=OAEPPADDING.
    private static final String TRANSFORMATION = "SHA256withRSA";

    // encryption algorithm
    private static final String KEY_ALGORITHM = "RSA";

    // *** POINT 3 *** Use a key of length sufficient to guarantee the signature strength.
    // Check the length of the key
    private static final int MIN_KEY_LENGTH = 2000;

    RsaSignAsymmetricKey() {
    }

    public final byte[] sign(final byte[] plain, final byte[] keyData) {
        // In general, signature procedures should be implemented on the server side;
        // however, in this sample code we have implemented signature processing within the application to ensure confirmation of proper execution.
        // When using this sample code in real-world applications, be careful not to retain any private keys within the application.

        byte[] sign = null;

        try {
            // *** POINT 1 *** Explicitly specify the encryption mode and the padding.
            // *** POINT 2 *** Use strong encryption methods (specifically, technologies that meet the relevant criteria), including algorithms, block cipher modes, and padding modes.
            Signature signature = Signature.getInstance(TRANSFORMATION);

            PrivateKey privateKey = generatePriKey(keyData);
            signature.initSign(privateKey);
            signature.update(plain);

            sign = signature.sign();
        } catch (NoSuchAlgorithmException e) {
        } catch (InvalidKeyException e) {
        } catch (SignatureException e) {
        } finally {
        }

        return sign;
    }

    public final boolean verify(final byte[] sign, final byte[] plain, final byte[] keyData) {

        boolean ret = false;

        try {
            // *** POINT 1 *** Explicitly specify the encryption mode and the padding.
            // *** POINT 2 *** Use strong encryption methods (specifically, technologies that meet the relevant criteria), including algorithms, block cipher modes, and padding modes.
            Signature signature = Signature.getInstance(TRANSFORMATION);

            PublicKey publicKey = generatePubKey(keyData);
            signature.initVerify(publicKey);
            signature.update(plain);

            ret = signature.verify(sign);

        } catch (NoSuchAlgorithmException e) {
        } catch (InvalidKeyException e) {
        } catch (SignatureException e) {
        } finally {
        }

        return ret;
    }

    private static final PublicKey generatePubKey(final byte[] keyData) {
        PublicKey publicKey = null;
        KeyFactory keyFactory = null;

        try {
            keyFactory = KeyFactory.getInstance(KEY_ALGORITHM);
            publicKey = keyFactory.generatePublic(new X509EncodedKeySpec(keyData));
        } catch (IllegalArgumentException e) {
        } catch (NoSuchAlgorithmException e) {
        } catch (InvalidKeySpecException e) {
        } finally {
        }

        // *** POINT 3 *** Use a key of length sufficient to guarantee the signature strength.
        // Check the length of the key
        if (publicKey instanceof RSAPublicKey) {
            int len = ((RSAPublicKey) publicKey).getModulus().bitLength();
            if (len < MIN_KEY_LENGTH) {
                publicKey = null;
            }
        }

        return publicKey;
    }

    private static final PrivateKey generatePriKey(final byte[] keyData) {
        PrivateKey privateKey = null;
        KeyFactory keyFactory = null;

        try {
            keyFactory = KeyFactory.getInstance(KEY_ALGORITHM);
            privateKey = keyFactory.generatePrivate(new PKCS8EncodedKeySpec(keyData));
        } catch (IllegalArgumentException e) {
        } catch (NoSuchAlgorithmException e) {
        } catch (InvalidKeySpecException e) {
        } finally {
        }

        return privateKey;
    }
}
5.6.2.规则手册
使用加密技术时,请务必遵守以下规则。
- 指定加密算法时,显式指定加密模式和填充(必需)
- 使用强算法(尤其是符合相关标准的算法)(必需)
- 使用基于密码的加密时,请勿在设备上存储密码(必需)
- 从密码生成密钥时,使用 Salt(必需)
- 从密码生成密钥时,指定适当的哈希迭代计数(必需)
- 设法提高密码强度(推荐)
5.6.2.1.指定加密算法时,显式指定加密模式和填充(必需)
在使用加密和数据验证等加密技术时,必须明确指定加密模式和填充。在 Android 应用程序开发中使用加密时,您将主要使用 java.crypto 中的 Cipher 类。要使用 Cipher 类,您将首先通过指定要使用的加密类型来创建 Cipher 类对象的实例。此规范称为“转换”,可以用两种格式指定转换:
- “算法/模式/填充”
- “算法”
在后一种情况下,加密模式和填充将隐式设置为 Android 可访问的加密服务提供商的相应默认值。选择这些默认值可排列便利性和兼容性的优先级,在某些情况下可能不属于特别安全的选择。因此,为了确保正确的安全保护,必须使用两种格式中的第一种,即显式指定了加密模式和填充的格式。
5.6.2.2.使用强算法(尤其是符合相关标准的算法)(必需)
使用加密技术时,选择符合特定标准的强算法非常重要。此外,如果算法允许有多个密钥长度,则必须考虑应用程序的整个产品寿命并选择长度足以保证安全性的密钥。此外,对于某些加密模式和填充模式,存在已知的攻击策略;务必针对此类威胁强劲可靠的选择。
实际上,选择弱加密方法可能会造成灾难性的后果;例如,原本为防止第三方窃听而被加密的文件实际上可能只会受到无效保护,并且可能允许第三方窃听。IT 的持续进步为加密分析技术带来了不断改进,因此,考虑和选择可在您期望应用程序保持运行的整个期间内保证安全性的算法至关重要。
实际加密技术的标准因国家/地区而异,详见下表。
| 算法生命周期 | 对称密钥加密 | 非对称密钥加密 | 椭圆曲线加密 | 哈希(数字签名,HASH) | 哈希(HMA 、KD、随机数生成) |
| ~2010 | 80 | 1024 | 160 | 160 | 160 |
| ~2030 | 112 | 2048 | 224 | 224 | 160 |
| 2030~ | 128 | 3072 | 256 | 256 | 160 |
单位:位
| 算法生命周期 | 对称密钥加密 | 非对称密钥加密 | 椭圆曲线加密 | 哈希 |
| 2009~2012 | 80 | 1248 | 160 | 160 |
| 2009~2020 | 96 | 1776 | 192 | 192 |
| 2009~2030 | 112 | 2432 | 224 | 224 |
| 2009~2040 | 128 | 3248 | 256 | 256 |
| 2009~ | 256 | 15424 | 512 | 512 |
单位:位
| 技术系列 | 名称 | |
| 公钥加密 | 签名 | DSA、ECDSA、RSA=PSS、RSASSA=PKCS1=V1_5 |
| 机密性 | RSA-OAEP | |
| 密钥共享 | DH、ECDH | |
| 共享密钥加密 | 64 位数据块加密 | 3 密钥 Triple DES |
| 128 位数据块加密 | AES、Camellia | |
| 流加密 | KCipher-2 | |
| 哈希函数 | SHA-256、SHA-384、SHA-512 | |
| 加密使用模式 | 密码模式 | CBC、CFB、CTR、OFB |
| 已验证的密码模式 | CCM、GCM | |
| 消息身份验证代码 | CMAC、HMAC | |
| 实体身份验证 | ISO/IEC 9798-2、ISO/IEC 9798-3 | |
5.6.2.3.使用基于密码的加密时,请勿在设备上存储密码(必需)
在基于密码的加密中,当根据用户输入的密码生成加密密钥时,请勿将密码存储在设备中。基于密码的加密的优势在于无需管理加密密钥;在设备上存储密码将消除此优势。毋庸置疑,将密码存储在设备上会带来其它应用程序窃听的风险,因此,出于安全原因,将密码存储在设备上也是不可接受的。
5.6.2.4.从密码生成密钥时,使用 Salt(必需)
在基于密码的加密中,当根据用户输入的密码生成加密密钥时,请始终使用 Salt。此外,如果您要为同一设备中的不同用户提供功能,请为每个用户使用不同的 Salt。这样做的原因是,如果您仅使用简单的哈希函数生成加密密钥而不使用 Salt,则可以使用称为“彩虹表”的技术轻松恢复密码。应用 Salt 时,从相同密码生成的密钥将不同(不同的哈希值),从而防止使用彩虹表搜索密钥。
(示例)从密码生成密钥时,使用 salt
    public final byte[] encrypt(final byte[] plain, final char[] password) {
        byte[] encrypted = null;

        try {
            // *** POINT *** Explicitly specify the encryption mode and the padding.

            // *** POINT *** Use strong encryption methods (specifically, technologies that meet the relevant criteria), including algorithms, block cipher modes, and padding modes.
            Cipher cipher = Cipher.getInstance(TRANSFORMATION);

            // *** POINT *** When generating keys from passwords, use Salt.
            SecretKey secretKey = generateKey(password, mSalt);
5.6.2.5.从密码生成密钥时,指定适当的哈希迭代计数(必需)
在基于密码的加密中,当根据用户输入的密码生成加密密钥时,您将选择哈希过程在密钥生成过程中重复的次数(“伸展”);务必指定将此数字的值设为足够大以确保安全性。通常,迭代计数等于或大于 1,000 便可视为足够。如果您使用密钥保护更重要的资产,将计数指定为 1,000,000 或更大值。哈希函数的单个计算所需的处理时间非常短,因此,攻击者可能容易启动暴力破解攻击。因此,通过采用允许哈希处理重复多次的伸展方法,我们可以有目的地确保此过程花费大量时间,使暴力破解攻击成本更高。请注意,伸展重复的次数还将影响应用程序的处理速度,因此在选择相应值时应注意。
(示例)从密码生成密钥时,设置哈希迭代计数
    private static final SecretKey generateKey(final char[] password, final byte[] salt) {
        SecretKey secretKey = null;
        PBEKeySpec keySpec = null;

            (Omit)

            // *** POINT *** When generating a key from password, use Salt.
            // *** POINT *** When generating a key from password, specify an appropriate hash iteration count.
            // ** POINT *** Use a key of length sufficient to guarantee the strength of encryption.
            keySpec = new PBEKeySpec(password, salt, KEY_GEN_ITERATION_COUNT, KEY_LENGTH_BITS);
5.6.2.6.设法提高密码强度(推荐)
在基于密码的加密中,当根据用户输入的密码生成加密密钥时,生成的密钥的强度会受到用户密码强度的重要影响,因此最好采取措施来加强从用户处收到的密码。例如,您可能要求密码至少包含 8 个字符,并且包含多种类型的字符—可能至少包含一个字母、一个数字和一个符号。
5.6.3.高级主题
5.6.3.1.选择加密方法
在上面的示例代码中,我们展示了涉及三种加密方法的实现示例,这些方法分别用于加密和解密以及检测数据伪造。您可以参考“图 5.6.1 — 用于防止数据被窃听的示例代码的选择流程图”、“图 5.6.2 — 用于检测伪造的示例代码的选择流程图”,以根据您的应用程序大致选择要使用的加密方法。另一方面,对加密方法进行更精细的选择需要更详细地对比各种方法的特点。在下面的内容中,我们将考虑其中一些对比结果。
- 用于加密和解密的加密方法的对比
公钥加密技术的处理成本很高,因此不适合大规模数据处理。但是,由于用于加密和解密的密钥不同,因此在仅在应用程序端处理公钥(即仅执行加密)和在单独(安全)位置执行解密时,管理密钥相对容易。共享密钥加密是一种通用的加密方案,限制很少,但在这种情况下,相同的密钥用于加密和解密,因此必须在应用程序中安全地存储密钥,这加大了密钥管理难度。基于密码的加密(基于密码的共享密钥加密)根据用户指定的密码生成密钥,从而无需在设备中存储密钥相关密码。此方法用于仅保护用户资产而不保护应用程序资产的应用程序。由于加密的强度取决于密码的强度,因此必须选择复杂程度与要保护的资产价值成比例增加的密码。请参阅“5.6.2.6. —采取措施增加密码的强度(推荐)”。
| 公钥 | 共享密钥 | 基于密码 | |
| 处理大规模数据 | 否(处理成本太高) | OK | OK |
| 保护应用程序(或服务)资产 | OK | OK | 否(允许用户窃听) |
| 保护用户资产 | OK | OK | OK |
| 加密强度 | 取决于密钥长度 | 取决于密钥长度 | 取决于密码强度、Salt 和哈希重复次数 |
| 密钥存储 | 简单(仅限公钥) | 困难 | 简单 |
| 由应用程序执行处理 | 加密(解密在服务器或其它位置完成) | 加密和解密 | 加密和解密 |
- 用于检测数据伪造的加密方法的对比
此处的比较与上面讨论的加密和解密类似,但与数据大小对应的表项目不再相关。
| 公钥 | 共享密钥 | 基于密码 | |
| 保护应用程序(或服务)资产 | OK | OK | 否(允许用户伪造) |
| 保护用户资产 | OK | OK | OK |
| 加密强度 | 取决于密钥长度 | 取决于密钥长度 | 取决于密码强度、Salt 和哈希重复次数 |
| 密钥存储 | 简单(仅限公钥) | 困难(请参阅“5.6.3.4. —保护密钥”) | 简单 |
| 由应用程序执行处理 | 加密(解密在服务器或其它位置完成) | MAC 计算,MAC 验证 | MAC 计算,MAC 验证 |
MAC:消息身份验证代码
请注意,这些准则主要与根据“3.1.3. 章节 —资产分类和预防措施”中讨论的分类被视为低等或中等资产的资产保护有关。由于加密的使用涉及到考虑更多的问题(如密钥存储问题),而不是其它预防措施(如访问控制),因此,仅当在 Android OS 安全模式下无法充分保护资产时,才应考虑加密。
5.6.3.2.生成随机数
使用加密技术时,选择强加密算法和加密模式以及足够长的密钥对于确保应用程序和服务处理的数据的安全性非常重要。但是,即使正确地做出了所有这些选择,当构成安全协议关键的密钥被泄露或猜到时,使用中的算法所保证的安全性强度也会骤然跌落至零。
即使是用于 AES 和类似协议下的共享密钥加密的初始向量 (IV) 或用于基于密码的加密的 Salt,偏差过大也可以使第三方轻松发起攻击,从而增加数据泄露或损坏的风险。为防止这种情况,必须生成密钥和 IV,使第三方难以猜测其值,而随机数在确保实现这一规则方面起着极其重要的作用。生成随机数的设备称为随机数生成器。硬件随机数生成器 (RNG) 可能会使用传感器或其它设备通过测量无法预测或重现的自然现象来生成随机数,但是,由软件实现的随机数生成器[称为伪随机数生成器 (PRNG)] 更常见。
在 Android 应用程序中,可通过 SecureRandom 类生成用于加密的足够安全的随机数。SecureRandom 类的功能由称为 Provider 的实现提供。可以在内部存在多个 Provider(实现),如果没有明确指定 Provider,则将选择默认 Provider。因此,也可以在实施中使用 SecureRandom,而无需知道 Provider 是否存在。在下面的内容中,我们提供了演示 SecureRandom 使用的示例。
请注意,根据 Android 版本,SecureRandom 可能会出现许多弱点,需要在实现过程中采取相应的预防措施。请参阅“5.6.3.3. —防止随机数生成器中出现漏洞的预防措施”。
使用 SecureRandom(使用默认实现)
import java.security.SecureRandom;
[...]
    SecureRandom random = new SecureRandom();
    byte[] randomBuf = new byte [128];

    random.nextBytes(randomBuf);
[...]
使用 SecureRandom(显式指定算法)
import java.security.SecureRandom;
[...]
    SecureRandom random = SecureRandom.getInstance("SHA1PRNG");
    byte[] randomBuf = new byte [128];

    random.nextBytes(randomBuf);
[...]
使用 SecureRandom[显式指定实现 (Provider)]
import java.security.SecureRandom;
[...]
    SecureRandom random = SecureRandom.getInstance("SHA1PRNG", "Crypto");
    byte[] randomBuf = new byte [128];

    random.nextBytes(randomBuf);
[...]
诸如 SecureRandom 的程序中的伪随机数生成器通常基于流程运行,如“图 5.6.3 伪随机数生成器的内部流程”中所示。输入随机数种子以初始化内部状态;此后,每次生成随机数时都会更新内部状态,从而允许生成一个随机数序列。
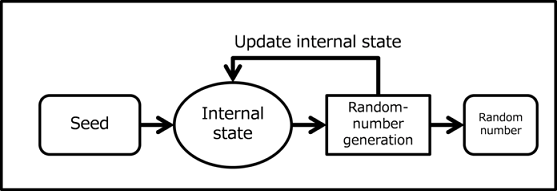
图 5.6.3 伪随机数发生器的内部流程
随机数种子
种子在伪随机数生成器 (PRNG) 中起着极其重要的作用。
如上所述,必须通过指定种子来初始化 PRV。此后,用于生成随机数的过程是一种确定性算法,因此如果指定相同的种子,将获得相同的随机数序列。这意味着,如果第三方可以访问(即窃听)或猜出 PRNG 种子,他可以生成相同的随机数序列,从而破坏随机数提供的机密性和真实性。
因此,随机数生成器的种子本身就是高度机密的信息,必须选择一种不可能预测或猜出的种子。例如,不应使用时间信息或特定于设备的数据(如 MAC 地址、IMEI 或 Android ID)来构建 RNG 种子。在许多 Android 设备上,/dev/urandom 或 /dev/random 都可用,而 Android 提供的 SecureRandom 的默认实施使用这些设备文件来确定随机数生成器的种子。就机密性而言,只要 RNG 种子仅存在于内存中,第三方发现的风险很小,但获取 root 权限的恶意软件工具除外。如果您需要实施在根设备上保持有效的安全措施,咨询安全设计和实施方面的专家。
伪随机数生成器的内部状态
伪随机数生成器的内部状态由种子初始化,然后在每次生成随机数时更新。就像由同一种子初始化的 PRNG 一样,两个具有相同内部状态的 PRNG 随后将生成完全相同的随机数序列。因此,防止内部状态不被第三方窃听也很重要。但是,由于内存中存在内部状态,因此除了涉及获取根访问权限的恶意软件工具的情况外,第三方发现的风险很小。如果您需要实施在根设备上保持有效的安全措施,咨询安全设计和实施方面的专家。
5.6.3.3.防止随机数生成器中出现漏洞的预防措施
Android 4.3.x 及更早版本中的 SecureRandom 的“Crypto”提供程序实施遭遇了内部状态熵不足(随机性)的缺陷。特别是在 Android 版本 4.1.x 和更早版本中,“Crypto”提供程序是唯一可用的 SecureRandom 实施,因此大多数使用 SecureRandom 的应用程序都直接或间接受到此漏洞的影响。同样,“AndroidOpenSSL”提供程序作为 Android 4.2 和更高版本中 SecureRandom 的默认实施提供,展示了 OpenSSL 用作随机数种子的大部分数据项在应用程序之间共享的缺陷(Android 版本 4.2.x—4.3.x),带来了任何应用程序都可以轻松预测其它应用程序生成的随机数的漏洞。下表详细列出了各种 Android OS 版本中存在的漏洞的影响。
| SecureRandom 的“Crypto”提供程序实施中的熵不足 | 可以猜测 OpenSSL 在其它应用程序中使用的随机数种子 | |
| Android 4.1.x 及更早版本 |
|
无影响 |
| Android 4.2 - 4.3.x | 使用显式标识的 Crypto 提供程序 |
|
| Android 4.4 和更高版本 | 无影响 | 无影响 |
自 2013 年 8 月起,Google 已将消除这些 Android OS 漏洞的补丁程序分发给其合作伙伴(设备制造商等)
但是,与 SecureRandom 相关的这些漏洞影响了广泛的应用程序,包括加密功能和 HTTPS 通信功能,而且可能许多设备仍没有修补。因此,在设计面向 Android 4.3.x 及更早版本的应用程序时,我们建议您采用以下网站中讨论的应对措施(实现)。
https://android-developers.blogspot.jp/2013/08/some-securerandom-thoughts.html
5.6.3.4.保护密钥
在使用加密技术来确保敏感数据的安全(机密性和真实性)时,即使是最强大的加密算法和密钥长度,如果密钥本身的数据内容随时可用,也无法保护数据免受第三方攻击。因此,在使用加密时,正确处理密钥是最重要的考虑事项之一。当然,根据您尝试保护的资产级别,正确处理密钥可能需要超出这些准则范围的极其复杂的设计和实施技术。在这里,我们只能提供有关安全处理各种应用程序密钥和密钥存储位置的一些基本意见;我们的讨论不会扩展到特定的实施方法,如果需要,我们建议您咨询 Android 安全设计和实施方面的专家。
首先,“图 5.6.4— 加密密钥的位置和保护策略”说明了 Android 智能手机和平板电脑中用于加密和相关用途的密钥可能存在的各种位置,并概述了用于保护它们的策略。
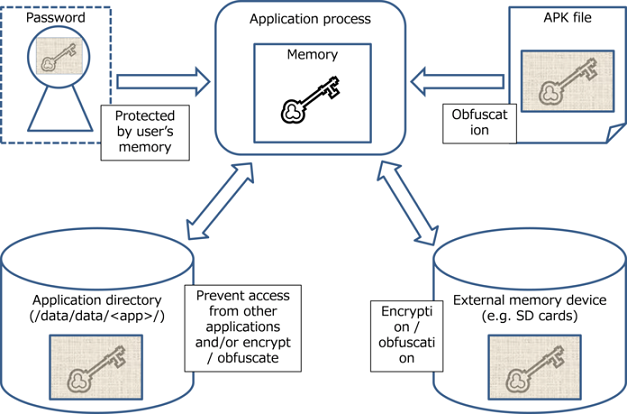
图 5.6.4 加密密钥的位置和保护策略
下表汇总了受密钥保护的资产的资产类别,以及适用于各种资产所有者的保护策略。有关资产类别的详细信息,请参阅“3.1.3. —资产分类和预防措施”。
| 资产所有者 | 设备用户 | 应用程序/服务提供商 | ||
| 资产级别 | 高 | 中/低 | 高 | 中/低 |
| 密钥存储位置 | 保护策略 | |||
| 用户内存 | 提高密码强度 | 禁止使用用户密码 | ||
| 应用程序目录(非公共存储) | 密钥数据的加密或混淆处理 | 禁止从应用程序外部执行读/写操作 | 密钥数据的加密或混淆处理 | 禁止从应用程序外部执行读/写操作 |
如果密钥存储在诸如 APK 文件或 SD 卡等公共存储装置中,则如下所示。
| 密钥存储位置 | 保护策略 |
| APK 文件 |
|
| SD 卡或其它位置(公共存储) | 密钥数据的加密或混淆处理 |
在接下来的内容中,我们将进一步讨论适用于密钥存储位置的保护措施。
存储在用户内存中的密钥
在这里,我们将考虑基于密码的加密。从密码生成密钥时,密钥存储位置是用户的内存,因此不存在因恶意软件而泄露的危险。但是,根据密码强度的不同,复制密钥可能很容易。因此,有必要采取与要求用户指定服务登录密码时类似的步骤,以确保密码的强度;例如,密码可能受 UI 限制,或者可能使用警告消息。请参阅“5.5.2.8. —如果您只在设备内部使用用户数据,请通知用户数据将不会传输到外部。(推荐)。当然,当密码存储在用户的内存中时,必须记住密码可能会被遗忘。要确保在忘记密码的情况下恢复数据,必须将备份数据存储在设备以外的安全位置(例如,服务器上)。
存储在应用程序目录中的密钥
当密钥以私有模式存储在应用程序目录中时,其它应用程序将无法读取密钥数据。此外,如果应用程序已禁用备份功能,用户也将无法访问数据。因此,在将用于保护应用程序资产的密钥存储到应用程序目录中时,应禁用备份。
但是,如果您还需要保护密钥不受应用程序或具有 root 权限用户的影响,则必须对密钥进行加密或混淆处理。对于用于保护用户资产的密钥,您可以使用基于密码的加密。对于用于加密也要防止用户访问的应用程序资产的密钥,您必须将用于密钥加密的密钥存储在 APK 文件中,并且必须混淆密钥数据。
存储在 APK 文件中的密钥
因为可以访问 APK 文件中的数据,所以,一般而言,这不是存储密钥等机密数据的适当位置。将密钥存储在 APK 文件中时,您必须对密钥数据进行混淆处理,并采取措施以确保无法轻易从 APK 文件读取数据。
存储在公共存储位置(例如 SD 卡)的密钥
由于所有应用程序都可以访问公共存储位置,所以,这通常不适合存储密码等机密数据。将密钥存储在公共位置时,必须加密或混淆密钥数据,以确保数据无法被轻松访问。对于还必须防止应用程序和具有 root 权限的用户访问密钥的情形,另请参阅上面的“存储在应用程序目录中的密钥”下的建议保护措施。
进程内存中的密钥处理
当使用 Android 中提供的加密技术时,必须在加密过程开始之前,先将在上图中所示应用程序进程以外的某处加密或混淆的密钥数据解密(或者,对于基于密码的密钥,生成);在这种情况下,密钥数据将以未加密形式驻留在进程内存中。另一方面,应用程序进程的内存通常不会被其它应用程序读取,因此,如果资产类别在这些准则涵盖的范围内,则无需采取特定步骤来确保安全。如果由于相关特定目标或应用程序处理的资产的级别,密钥数据以未加密形式显示是不可接受的(即使它们以进程内存的形式存在),则可能有必要对关键数据和加密逻辑执行混淆处理或其它技术。但是,在 Java 级别很难实现这些方法;相反,您将在 JNI 级别使用混淆工具。此类措施超出了这些准则的范围;请咨询安全设计和实施方面的专家。
5.6.3.5.通过 Google Play 服务解决安全提供程序的漏洞
Google Play 微服务(版本 5.0 和更高版本)提供称为 Provider Installer 的框架,可用于解决安全提供程序中的漏洞。
首先,安全提供程序根据 Java Cryptography Architecture (JCA) 提供各种与加密相关的算法的实施。这些安全提供程序算法可通过密钥、签名和 Mac 等类使用,以在 Android 应用程序中使用加密技术。通常,只要在与加密技术相关的实施中发现漏洞,就需要快速响应。实际上,将此类漏洞用于恶意目的可能会导致重大损害。由于加密技术也与安全提供程序相关,因此最好尽快反映旨在解决漏洞的修订。
反映安全提供程序修订版的最常见方法是使用设备更新。通过设备更新反映修订的过程从设备制造商准备更新开始,之后用户将此更新应用于其设备。因此,有关应用程序是否可以访问安全提供程序的最新版本的问题 — 包括最新版本 — 实际上取决于制造商和用户的合规性。相比之下,使用 Google Play 服务中的 Provider Installer 可确保应用程序能够访问安全提供程序的自动更新版本。
通过 Google Play 服务中的 Provider Installer,从应用程序调用 Provider Installer 可访问 Google Play 服务提供的安全提供程序。Google Play 服务通过 Google Play Store 自动更新,因此 Provider Installer 提供的安全提供程序将自动更新到最新版本,而不依赖于制造商或用户的合规性。
下面显示了调用 Provider Installer 的示例代码。
调用 Provider Installer
import com.google.android.gms.common.GooglePlayServicesUtil;
import com.google.android.gms.security.ProviderInstaller;

public class MainActivity extends Activity
        implements ProviderInstaller.ProviderInstallListener {

    @Override
    protected void onCreate(Bundle savedInstanceState) {
        super.onCreate(savedInstanceState);

        ProviderInstaller.installIfNeededAsync(this, this);
        setContentView(R.layout.activity_main);
    }

    @Override
    public void onProviderInstalled() {
        // Called when Security Provider is the latest version, or when installation completes.
    }

    @Override
    public void onProviderInstallFailed(int errorCode, Intent recoveryIntent) {
        GoogleApiAvailability.getInstance().showErrorNotification(this, errorCode);
    }
}
5.7.使用指纹身份验证功能
目前正在研究和开发多种生物鉴定方法,使用面部信息和声音签名的方法尤为突出。在这些方法中,使用指纹身份验证来识别个人的方法属于自古已有的方法,目前用于签名(通过指纹)和犯罪调查等目的。指纹识别的应用在计算机世界的几个领域也很先进,近年来,这些方法已开始得到广泛认可,被称赞为识别智能手机所有者(主要用于解锁屏幕)等领域中使用的非常方便的技术(提供方便输入等优势)。
Android 6.0(API 级别 23)利用这些趋势,在终端上集成了指纹身份验证框架,允许应用程序利用指纹身份验证功能来识别个人身份。下面我们将讨论一些在使用指纹身份验证时要牢记的安全预防措施。
5.7.1.示例代码 
在指纹身份验证功能中,有两种主要使用情形:当使用链接到用户身份验证信息的密钥时,以及仅在执行用户身份验证时。根据此指纹身份验证的具体应用,根据图 5.7.1 选择示例代码。
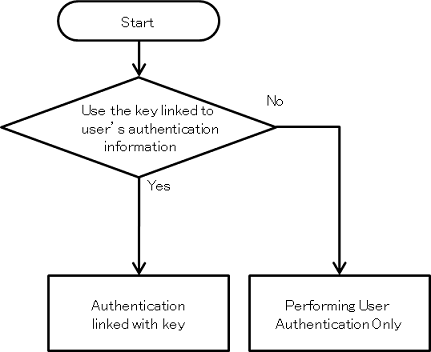
图 5.7.1 使用指纹身份验证的示例代码的选择流程图
目前已不再建议使用提供 Android 9.0(API 级别 28)指纹身份验证功能的 FingerPrintManager,而是改为使用后续推出的 BiometricPrompt API。顾名思义,BiometricPrompt 不仅限于指纹身份验证,而且其开发目的是为生物特征身份验证方法提供未来支持,如面部和虹膜识别。但是,在当前默认设置中,它仅支持指纹身份验证。此外,在身份验证时不再需要应用程序单独准备的 UI,而是使用标准身份验证对话框。
在本文撰写之时(2018 年 8 月),尚无可用的 Android Support Library for BiometricPrompt(但我们认为,在正式发布 Android 9.0 之后不久会提供[25])。因此,在下面显示的示例代码中,首次为使用 FingerPrintManager 的情况提供了使用示例,目前为止已使用过,之后是使用 BiometricPrompt 时的案例。
| [25] | https://android-developers.googleblog.com/2018/06/better-biometrics-in-android-p.html |
5.7.1.1.身份验证与密钥关联
我们在下面提供了允许应用程序使用 Android 指纹验证功能的示例代码。
使用 FingerPrintManager 的示例
要点:
- 声明使用 USE_FINGERPRINT 权限。
- 从“AndroidKeyStore”提供程序中获取实例。
- 通知用户需要注册指纹才能创建密钥。
- 创建(注册)密钥时,使用不易受到攻击的加密算法(符合标准)。
- 创建(注册)密钥时,启用用户(指纹)身份验证请求(不要指定启用身份验证的持续时间)。
- 设计您的应用程序时,假设指纹注册的状态将在创建密钥与使用密钥之间发生变化。
- 将加密数据限制为可通过指纹身份验证以外的方法恢复(替换)的项目。
MainActivity.java
package authentication.fingerprint.android.jssec.org.fingerprintauthentication;

import android.app.AlertDialog;
import android.hardware.fingerprint.FingerprintManager;
import android.os.Bundle;
import android.support.v7.app.AppCompatActivity;
import android.util.Base64;
import android.view.View;
import android.widget.Button;
import android.widget.TextView;

import java.text.SimpleDateFormat;
import java.util.Date;

import javax.crypto.BadPaddingException;
import javax.crypto.Cipher;
import javax.crypto.IllegalBlockSizeException;

public class MainActivity extends AppCompatActivity {

    private FingerprintAuthentication mFingerprintAuthentication;
    private static final String SENSITIVE_DATA = "sensitive data";

    @Override
    protected void onCreate(Bundle savedInstanceState) {
        super.onCreate(savedInstanceState);
        setContentView(R.layout.activity_main);

        mFingerprintAuthentication = new FingerprintAuthentication(this);

        Button button_fingerprint_auth = (Button) findViewById(R.id.button_fingerprint_auth);
        button_fingerprint_auth.setOnClickListener(new View.OnClickListener() {
            @Override
            public void onClick(View v) {
                if (!mFingerprintAuthentication.isAuthenticating()) {
                    if (authenticateByFingerprint()) {
                        showEncryptedData(null);
                        setAuthenticationState(true);
                    }
                } else {
                    mFingerprintAuthentication.cancel();
                }
            }
        });
    }

    private boolean authenticateByFingerprint() {

        if (!mFingerprintAuthentication.isFingerprintHardwareDetected()) {
            // Terminal is not equipped with a fingerprint sensor
            return false;
        }

        if (!mFingerprintAuthentication.isFingerprintAuthAvailable()) {
            // *** POINT 3 *** Notify users that fingerprint registration will be required to create a key
            new AlertDialog.Builder(this)
                    .setTitle(R.string.app_name)
                    .setMessage("No fingerprint information has been registered.\n" +
                            "Click \"Security\" on the Settings menu to register fingerprints.\n" +
                            "Registering fingerprints allows easy authentication.")
                    .setPositiveButton("OK", null)
                    .show();
            return false;
        }

        // Callback that receives the results of fingerprint authentication
        FingerprintManager.AuthenticationCallback callback = new FingerprintManager.AuthenticationCallback() {
            @Override
            public void onAuthenticationError(int errorCode, CharSequence errString) {
                showMessage(errString, R.color.colorError);
                reset();
            }

            @Override
            public void onAuthenticationHelp(int helpCode, CharSequence helpString) {
                showMessage(helpString, R.color.colorHelp);
            }

            @Override
            public void onAuthenticationSucceeded(FingerprintManager.AuthenticationResult result) {

                Cipher cipher = result.getCryptoObject().getCipher();
                try {
                    // *** POINT 7*** Restrict encrypted data to items that can be restored (replaced) by methods other than fingerprint authentication
                    byte[] encrypted = cipher.doFinal(SENSITIVE_DATA.getBytes());
                    showEncryptedData(encrypted);
                } catch (IllegalBlockSizeException | BadPaddingException e) {
                }

                showMessage(getString(R.string.fingerprint_auth_succeeded), R.color.colorAuthenticated);
                reset();
            }

            @Override
            public void onAuthenticationFailed() {
                showMessage(getString(R.string.fingerprint_auth_failed), R.color.colorError);
            }
        };

        if (mFingerprintAuthentication.startAuthentication(callback)) {
            showMessage(getString(R.string.fingerprint_processing), R.color.colorNormal);
            return true;
        }

        return false;
    }


    private void setAuthenticationState(boolean authenticating) {
        Button button = (Button) findViewById(R.id.button_fingerprint_auth);
        button.setText(authenticating ? R.string.cancel : R.string.authenticate);
    }

    private void showEncryptedData(byte[] encrypted) {
        TextView textView = (TextView) findViewById(R.id.encryptedData);
        if (encrypted != null) {
            textView.setText(Base64.encodeToString(encrypted, 0));
        } else {
            textView.setText("");
        }
    }

    private String getCurrentTimeString() {
        long currentTimeMillis = System.currentTimeMillis();
        Date date = new Date(currentTimeMillis);
        SimpleDateFormat simpleDateFormat = new SimpleDateFormat("HH:mm:ss.SSS");

        return simpleDateFormat.format(date);
    }

    private void showMessage(CharSequence msg, int colorId) {
        TextView textView = (TextView) findViewById(R.id.textView);
        textView.setText(getCurrentTimeString() + " :\n" + msg);
        textView.setTextColor(getResources().getColor(colorId, null));
    }

    private void reset() {
        setAuthenticationState(false);
    }
}
FingerprintAuthentication.java
package authentication.fingerprint.android.jssec.org.fingerprintauthentication;

import android.app.KeyguardManager;
import android.content.Context;
import android.hardware.fingerprint.FingerprintManager;
import android.os.CancellationSignal;
import android.security.keystore.KeyGenParameterSpec;
import android.security.keystore.KeyInfo;
import android.security.keystore.KeyPermanentlyInvalidatedException;
import android.security.keystore.KeyProperties;

import java.io.IOException;
import java.security.InvalidAlgorithmParameterException;
import java.security.InvalidKeyException;
import java.security.KeyStore;
import java.security.KeyStoreException;
import java.security.NoSuchAlgorithmException;
import java.security.NoSuchProviderException;
import java.security.UnrecoverableKeyException;
import java.security.cert.CertificateException;
import java.security.spec.InvalidKeySpecException;

import javax.crypto.Cipher;
import javax.crypto.KeyGenerator;
import javax.crypto.NoSuchPaddingException;
import javax.crypto.SecretKey;
import javax.crypto.SecretKeyFactory;

public class FingerprintAuthentication {
    private static final String KEY_NAME = "KeyForFingerprintAuthentication";
    private static final String PROVIDER_NAME = "AndroidKeyStore";

    private KeyguardManager mKeyguardManager;
    private FingerprintManager mFingerprintManager;
    private CancellationSignal mCancellationSignal;
    private KeyStore mKeyStore;
    private KeyGenerator mKeyGenerator;
    private Cipher mCipher;

    public FingerprintAuthentication(Context context) {
        mKeyguardManager = (KeyguardManager) context.getSystemService(Context.KEYGUARD_SERVICE);
        mFingerprintManager = (FingerprintManager) context.getSystemService(Context.FINGERPRINT_SERVICE);
        reset();
    }

    public boolean startAuthentication(final FingerprintManager.AuthenticationCallback callback) {
        if (!generateAndStoreKey())
            return false;

        if (!initializeCipherObject())
            return false;

        FingerprintManager.CryptoObject cryptoObject = new FingerprintManager.CryptoObject(mCipher);

        mCancellationSignal = new CancellationSignal();

        // Callback to receive the results of fingerprint authentication
        FingerprintManager.AuthenticationCallback hook = new FingerprintManager.AuthenticationCallback() {
            @Override
            public void onAuthenticationError(int errorCode, CharSequence errString) {
                if (callback != null) callback.onAuthenticationError(errorCode, errString);
                reset();
            }

            @Override
            public void onAuthenticationHelp(int helpCode, CharSequence helpString) {
                if (callback != null) callback.onAuthenticationHelp(helpCode, helpString);
            }

            @Override
            public void onAuthenticationSucceeded(FingerprintManager.AuthenticationResult result) {
                if (callback != null) callback.onAuthenticationSucceeded(result);
                reset();
            }

            @Override
            public void onAuthenticationFailed() {
                if (callback != null) callback.onAuthenticationFailed();
            }
        };

        // Execute fingerprint authentication
        mFingerprintManager.authenticate(cryptoObject, mCancellationSignal, 0, hook, null);

        return true;
    }

    public boolean isAuthenticating() {
        return mCancellationSignal != null && !mCancellationSignal.isCanceled();
    }

    public void cancel() {
        if (mCancellationSignal != null) {
            if (!mCancellationSignal.isCanceled())
                mCancellationSignal.cancel();
        }
    }

    private void reset() {
        try {
            // *** POINT 2 ***  Obtain an instance from the "AndroidKeyStore" Provider
            mKeyStore = KeyStore.getInstance(PROVIDER_NAME);
            mKeyGenerator = KeyGenerator.getInstance(KeyProperties.KEY_ALGORITHM_AES, PROVIDER_NAME);
            mCipher = Cipher.getInstance(KeyProperties.KEY_ALGORITHM_AES
                    + "/" + KeyProperties.BLOCK_MODE_CBC
                    + "/" + KeyProperties.ENCRYPTION_PADDING_PKCS7);
        } catch (KeyStoreException | NoSuchPaddingException
                | NoSuchAlgorithmException | NoSuchProviderException e) {
            throw new RuntimeException("failed to get cipher instances", e);
        }
        mCancellationSignal = null;
    }

    public boolean isFingerprintAuthAvailable() {
        return (mKeyguardManager.isKeyguardSecure()
                && mFingerprintManager.hasEnrolledFingerprints()) ? true : false;
    }

    public boolean isFingerprintHardwareDetected() {
        return mFingerprintManager.isHardwareDetected();
    }

    private boolean generateAndStoreKey() {
        try {
            mKeyStore.load(null);
            if (mKeyStore.containsAlias(KEY_NAME))
                mKeyStore.deleteEntry(KEY_NAME);
            mKeyGenerator.init(
                    // *** POINT 4 *** When creating (registering) keys, use an encryption algorithm that is not vulnerable (meets standards)
                    new KeyGenParameterSpec.Builder(KEY_NAME, KeyProperties.PURPOSE_ENCRYPT)
                            .setBlockModes(KeyProperties.BLOCK_MODE_CBC)
                            .setEncryptionPaddings(KeyProperties.ENCRYPTION_PADDING_PKCS7)
                            // *** POINT 5 *** When creating (registering) keys, enable requests for user (fingerprint) authentication (do not specify the duration over which authentication is enabled)
                            .setUserAuthenticationRequired(true)
                            .build());
            // Generate a key and store it in Keystore(AndroidKeyStore)
            mKeyGenerator.generateKey();
            return true;
        } catch (IllegalStateException e) {
            return false;
        } catch (NoSuchAlgorithmException | InvalidAlgorithmParameterException
                | CertificateException | KeyStoreException | IOException e) {
            throw new RuntimeException("failed to generate a key", e);
        }
    }

    private boolean initializeCipherObject() {
        try {
            mKeyStore.load(null);
            SecretKey key = (SecretKey) mKeyStore.getKey(KEY_NAME, null);
            SecretKeyFactory factory = SecretKeyFactory.getInstance(KeyProperties.KEY_ALGORITHM_AES, PROVIDER_NAME);
            KeyInfo info = (KeyInfo) factory.getKeySpec(key, KeyInfo.class);

            mCipher.init(Cipher.ENCRYPT_MODE, key);
            return true;
        } catch (KeyPermanentlyInvalidatedException e) {
            // *** POINT 6 *** Design your app on the assumption that the status of fingerprint registration will change between when keys are created and when keys are used
            return false;
        } catch (KeyStoreException | CertificateException | UnrecoverableKeyException | IOException
                | NoSuchAlgorithmException | InvalidKeySpecException | NoSuchProviderException | InvalidKeyException e) {
            throw new RuntimeException("failed to init Cipher", e);
        }
    }

}
AndroidManifest.xml
<?xml version="1.0" encoding="utf-8"?>
<manifest xmlns:android="http://schemas.android.com/apk/res/android"
    package="authentication.fingerprint.android.jssec.org.fingerprintauthentication" >

    <!-- +++ POINT 1 *** Declare the use of the USE_FINGERPRINT permission -->
    <uses-permission android:name="android.permission.USE_FINGERPRINT" />

    <application
        android:allowBackup="true"
        android:icon="@mipmap/ic_launcher"
        android:label="@string/app_name"
        android:supportsRtl="true"
        android:theme="@style/AppTheme" >
        <activity
            android:name=".MainActivity"
            android:screenOrientation="portrait" >
            <intent-filter>
                <action android:name="android.intent.action.MAIN" />

                <category android:name="android.intent.category.LAUNCHER" />
            </intent-filter>
        </activity>
    </application>

</manifest>
使用 BiometricPrompt 的示例
要点:
- 声明使用USE_BIOMETRIC 权限。
- 从“AndroidKeyStore”提供程序中获取实例。
- 创建(注册)密钥时,使用不易受到攻击的加密算法(符合标准)。
- 创建(注册)密钥时,启用用户(指纹)身份验证请求(不要指定启用身份验证的持续时间)。
- 设计您的应用程序时,假设指纹注册的状态将在创建密钥与使用密钥之间发生变化。
- 将加密数据限制为可通过指纹身份验证以外的方法恢复(替换)的项目。
此示例几乎与上述使用 FingerPrintManager 的示例相同。一个要点是,在激活指纹身份验证功能时,由于可以在 BiometricPrompt#authenticate() 中执行检查,并且这可作为错误由回调处理,检查过程被从示例中删除。
MainActivity.java
package org.jssec.android.biometricprompt.cipher;

import android.app.Activity;
import android.hardware.biometrics.BiometricPrompt;
import android.icu.text.SimpleDateFormat;
import android.os.Bundle;
import android.util.Base64;
import android.view.View;
import android.widget.Button;
import android.widget.TextView;
import java.util.Date;
import javax.crypto.BadPaddingException;
import javax.crypto.Cipher;
import javax.crypto.IllegalBlockSizeException;

public class MainActivity extends Activity {
    private BiometricAuthentication mBiometricAuthentication;
    private static final String SENSITIVE_DATA = "sensitive date";

    @Override
    protected void onCreate(Bundle savedInstanceState) {
        super.onCreate(savedInstanceState);
        setContentView(R.layout.activity_main);

        mBiometricAuthentication = new BiometricAuthentication(this);

        Button button_biometric_auth = findViewById(R.id.button_biometric_auth);
        button_biometric_auth.setOnClickListener(new View.OnClickListener () {
            @Override
            public void onClick(View v) {
                if (!mBiometricAuthentication.isAuthenticating()) {
                    if (authenticateByBiometric()) {
                        showEncryptedData(null);
                    }
                }
            }
        });
    }

    private boolean authenticateByBiometric () {
        // Callback which receives the result of biometric authentication
        BiometricPrompt.AuthenticationCallback callback = new BiometricPrompt.AuthenticationCallback() {
            @Override
            public void onAuthenticationError(int errorCode, CharSequence errString) {
                showMessage(errString, R.color.colorError);
                reset();
            }

            @Override
            public void onAuthenticationHelp(int helpCode, CharSequence helpString) {
                showMessage(helpString, R.color.colorHelp);
            }

            @Override
            public void onAuthenticationSucceeded(BiometricPrompt.AuthenticationResult result) {
                Cipher cipher = result.getCryptoObject().getCipher();
                try {
                    // *** POINT 6 *** Limit encrypted data to items that can be restored (replaced) by methods other than fingerprint authentication
                    byte[] encrypted = cipher.doFinal(SENSITIVE_DATA.getBytes());
                    showEncryptedData(encrypted);
                } catch (IllegalBlockSizeException | BadPaddingException e) {
                }

                showMessage(getString(R.string.biometric_auth_succeeded), R.color.colorAuthenticated);
                reset();
            }

            @Override
            public void onAuthenticationFailed() {
                showMessage(getString(R.string.biometric_auth_failed), R.color.colorError);
            }

        };
        if (mBiometricAuthentication.startAuthentication(callback)) {
            showMessage(getString(R.string.biometric_processing), R.color.colorNormal);
            return true;
        }
        return false;
    }

    private void setAuthenticationState(boolean authenticating) {
        Button button = (Button) findViewById(R.id.button_biometric_auth);
        button.setText(authenticating ? R.string.cancel : R.string.authenticate);
    }

    private void showEncryptedData(byte[] encrypted) {
        TextView textView = (TextView) findViewById(R.id.encryptedData);
        if (encrypted != null) {
            textView.setText(Base64.encodeToString(encrypted, 0));
        } else {
            textView.setText("");
        }
    }

    private String getCurrentTimeString() {
        long currentTimeMillis = System.currentTimeMillis();
        Date date = new Date(currentTimeMillis);
        SimpleDateFormat simpleDateFormat = new SimpleDateFormat("HH:mm:ss.SSS");

        return simpleDateFormat.format(date);
    }

    private void showMessage(CharSequence msg, int colorId) {
        TextView textView = (TextView) findViewById(R.id.textView);
        textView.setText(getCurrentTimeString() + " :\n" + msg);
        textView.setTextColor(getResources().getColor(colorId, null));
    }

    private void reset() {
        setAuthenticationState(false);
    }
BiometricAuthentication.java
package org.jssec.android.biometricprompt.cipher;

import android.app.KeyguardManager;
import android.content.Context;
import android.content.DialogInterface;
import android.hardware.biometrics.BiometricPrompt;
import android.os.CancellationSignal;
import android.security.keystore.KeyGenParameterSpec;
import android.security.keystore.KeyInfo;
import android.security.keystore.KeyPermanentlyInvalidatedException;
import android.security.keystore.KeyProperties;

import java.io.IOException;
import java.security.InvalidAlgorithmParameterException;
import java.security.InvalidKeyException;
import java.security.KeyStore;
import java.security.KeyStoreException;
import java.security.NoSuchAlgorithmException;
import java.security.NoSuchProviderException;
import java.security.UnrecoverableKeyException;
import java.security.cert.CertificateException;
import java.security.spec.InvalidKeySpecException;

import javax.crypto.Cipher;
import javax.crypto.KeyGenerator;
import javax.crypto.NoSuchPaddingException;
import javax.crypto.SecretKey;
import javax.crypto.SecretKeyFactory;

public class BiometricAuthentication {
    private static final String TAG = "BioAuth";

    private static final String KEY_NAME = "KeyForFingerprintAuthentication";
    private static final String PROVIDER_NAME = "AndroidKeyStore";
    private KeyguardManager mKeyguardManager;

    private BiometricPrompt mBiometricPrompt;

    private CancellationSignal mCancellationSignal;
    private KeyStore mKeyStore;
    private KeyGenerator mKeyGenerator;
    private Cipher mCipher;
    private Context mContext;

    // Process for "Cancel" button
    private DialogInterface.OnClickListener cancelListener =
            new DialogInterface.OnClickListener () {
                @Override
                public void onClick(DialogInterface dialog, int which) {
                    android.util.Log.e(TAG, "cancel");
                    if (mCancellationSignal != null) {
                        if (!mCancellationSignal.isCanceled())
                            mCancellationSignal.cancel();
                    }
                }
            };

    public BiometricAuthentication(Context context) {
        mContext = context;
        mKeyguardManager = (KeyguardManager) context.getSystemService(Context.KEYGUARD_SERVICE);
	// Authentication prompt also provides a button for cenceling
	// Cancel is handled by DialogInterface.OnClickListener given to setNegativeButton as the 3rd argument
        BiometricPrompt.Builder builder = new BiometricPrompt.Builder(context);
        mBiometricPrompt = builder
                .setTitle("Please Authenticate")
                .setNegativeButton("Cancel",context.getMainExecutor() ,cancelListener)
                .build();
        reset();
    }

    public boolean startAuthentication(final BiometricPrompt.AuthenticationCallback callback) {
        if (!generateAndStoreKey())
            return false;

        if (!initializeCipherObject())
            return false;

        BiometricPrompt.CryptoObject cryptoObject = new BiometricPrompt.CryptoObject(mCipher);

        mCancellationSignal = new CancellationSignal();

        // Callback receiving biometric authentication
        BiometricPrompt.AuthenticationCallback hook = new BiometricPrompt.AuthenticationCallback() {
            @Override
            public void onAuthenticationError(int errorCode, CharSequence errString) {
                android.util.Log.e(TAG, "onAuthenticationError");
                if (callback != null) callback.onAuthenticationError(errorCode, errString);
                reset();
            }

            @Override
            public void onAuthenticationHelp(int helpCode, CharSequence helpString) {
                android.util.Log.e(TAG, "onAuthenticationHelp");
                if (callback != null) callback.onAuthenticationHelp(helpCode, helpString);
            }

            @Override
            public void onAuthenticationSucceeded(BiometricPrompt.AuthenticationResult result) {
                android.util.Log.e(TAG, "onAuthenticationSuccess");
                if (callback != null) callback.onAuthenticationSucceeded(result);
                reset();
            }

            @Override
            public void onAuthenticationFailed() {
                android.util.Log.e(TAG, "onAuthenticationFailed");
                if (callback != null) callback.onAuthenticationFailed();
            }
        };

        // Process biometric authentication
        android.util.Log.e(TAG, "Starting authentication");
        mBiometricPrompt.authenticate(cryptoObject, mCancellationSignal, mContext.getMainExecutor(), hook);

        return true;
    }

    public boolean isAuthenticating() {
        return mCancellationSignal != null && !mCancellationSignal.isCanceled();
    }


    private void reset() {

        try {
            // *** POINT 2 ** Obtain an instance from the “AndroidKeyStore” Provider.
            mKeyStore = KeyStore.getInstance(PROVIDER_NAME);
            mKeyGenerator = KeyGenerator.getInstance(KeyProperties.KEY_ALGORITHM_AES, PROVIDER_NAME);
            mCipher = Cipher.getInstance(KeyProperties.KEY_ALGORITHM_AES
                    + "/" + KeyProperties.BLOCK_MODE_CBC
                    + "/" + KeyProperties.ENCRYPTION_PADDING_PKCS7);
        } catch (KeyStoreException | NoSuchPaddingException
                | NoSuchAlgorithmException | NoSuchProviderException e) {
            throw new RuntimeException("failed to get cipher instances", e);
        }
        mCancellationSignal = null;
    }

    private boolean generateAndStoreKey() {
        try {
            mKeyStore.load(null);
            if (mKeyStore.containsAlias(KEY_NAME))
                mKeyStore.deleteEntry(KEY_NAME);
            mKeyGenerator.init(
                    // *** POINT 3*** When creating (registering) keys, use an encryption algorithm that is not vulnerable (meets standards)
                    new KeyGenParameterSpec.Builder(KEY_NAME, KeyProperties.PURPOSE_ENCRYPT)
                            .setBlockModes(KeyProperties.BLOCK_MODE_CBC)
                            .setEncryptionPaddings(KeyProperties.ENCRYPTION_PADDING_PKCS7)
                            // *** POINT 4 *** When creating (registering) keys, enable requests for user (fingerprint) authentication
		            //                 (do not specify the duration over which authentication is enabled)
                            .setUserAuthenticationRequired(true)
                            .build());
            // Generate a key and store it to Keystore(AndroidKeyStore)
            mKeyGenerator.generateKey();
            return true;
        } catch (IllegalStateException e) {
            return false;
        } catch (NoSuchAlgorithmException | InvalidAlgorithmParameterException
                | CertificateException | KeyStoreException | IOException e) {
            android.util.Log.e(TAG, "key generation failed: " + e.getMessage());
            throw new RuntimeException("failed to generate a key", e);
        }
    }

    private boolean initializeCipherObject() {
        try {
            mKeyStore.load(null);
            SecretKey key = (SecretKey) mKeyStore.getKey(KEY_NAME, null);
            SecretKeyFactory factory = SecretKeyFactory.getInstance(KeyProperties.KEY_ALGORITHM_AES, PROVIDER_NAME);
            KeyInfo info = (KeyInfo) factory.getKeySpec(key, KeyInfo.class);

            mCipher.init(Cipher.ENCRYPT_MODE, key);
            return true;
        } catch (KeyPermanentlyInvalidatedException e) {
            // *** POINT 5 *** Design your application on the assumption that the status of fingerprint registration will change
	    //                 between when keys are created and when keys are used
            return false;
        } catch (KeyStoreException | CertificateException | UnrecoverableKeyException | IOException
                | NoSuchAlgorithmException | InvalidKeySpecException | NoSuchProviderException | InvalidKeyException e) {
            android.util.Log.e(TAG, "failed to init Cipher: " + e.getMessage());
            throw new RuntimeException("failed to init Cipher", e);
        }
    }
}
AndroidManifest.xml
<?xml version="1.0" encoding="utf-8"?>
<manifest xmlns:android="http://schemas.android.com/apk/res/android"
    package="org.jssec.android.biometricprompt.cipher">

    <!--  *** POINT 1 *** Declare the use of the USE_BIOMETRIC permission -->
    <uses-permission android:name="android.permission.USE_BIOMETRIC" />
    <application
        android:allowBackup="true"
        android:icon="@mipmap/ic_launcher"
        android:label="@string/app_name"
        android:roundIcon="@mipmap/ic_launcher_round"
        android:supportsRtl="true"
        android:theme="@style/AppTheme">
        <activity android:name="org.jssec.android.biometricprompt.cipher.MainActivity">
            <intent-filter>
                <action android:name="android.intent.action.MAIN" />
                <category android:name="android.intent.category.LAUNCHER" />
            </intent-filter>
        </activity>
    </application>
</manifest>
5.7.1.2.仅执行用户身份验证
下面显示了仅执行用户身份验证时使用指纹身份验证的示例代码。在这种情况下,您不需要注意任何特定的安全要点,但下面提供了示例代码供参考。
使用 FingerPrintManager 的示例
要点:
- 声明使用 USE_FINGERPRINT 权限。
MainActivity.java
package org.jssec.android.fingerprint.authentication.nocipher;

import android.hardware.fingerprint.FingerprintManager;
import android.os.Bundle;
import android.support.v7.app.AlertDialog;
import android.support.v7.app.AppCompatActivity;
import android.util.Base64;
import android.view.View;
import android.widget.Button;
import android.widget.TextView;

import java.text.SimpleDateFormat;
import java.util.Date;


public class MainActivity extends AppCompatActivity {

    private FingerprintAuthentication mFingerprintAuthentication;

    @Override
    protected void onCreate(Bundle savedInstanceState) {
        super.onCreate(savedInstanceState);
        setContentView(R.layout.activity_main);

        mFingerprintAuthentication = new FingerprintAuthentication(this);

        Button button_fingerprint_auth = (Button) findViewById(R.id.button_fingerprint_auth);
        button_fingerprint_auth.setOnClickListener(new View.OnClickListener() {
            @Override
            public void onClick(View v) {
                if (!mFingerprintAuthentication.isAuthenticating()) {
                    if (authenticateByFingerprint()) {
                        showEncryptedData(null);
                        setAuthenticationState(true);
                    }
                } else {
                    mFingerprintAuthentication.cancel();
                }
            }
        });
    }

    private boolean authenticateByFingerprint() {

        if (!mFingerprintAuthentication.isFingerprintHardwareDetected()) {
            // Device has no fingerprint censor
            return false;
        }

        if (!mFingerprintAuthentication.isFingerprintAuthAvailable()) {
	    // Notify the user that registered fingerprint is required
            new AlertDialog.Builder(this)
                    .setTitle(R.string.app_name)
                    .setMessage("No fingerprint is registered\n" +
                            "Please register your fingerprint from "Security" of setting menu.\n" +
                            "By registering your fingerprint, authentication will be very eary.")
                    .setPositiveButton("OK", null)
                    .show();
            return false;
        }

        // Callback which accepts the result of fingeprint authentication
        FingerprintManager.AuthenticationCallback callback = new FingerprintManager.AuthenticationCallback() {
            @Override
            public void onAuthenticationError(int errorCode, CharSequence errString) {
                showMessage(errString, R.color.colorError);

                reset();
            }

            @Override
            public void onAuthenticationHelp(int helpCode, CharSequence helpString) {
                showMessage(helpString, R.color.colorHelp);
            }

            @Override
            public void onAuthenticationSucceeded(FingerprintManager.AuthenticationResult result) {
                showMessage(getString(R.string.fingerprint_auth_succeeded), R.color.colorAuthenticated);
                reset();
            }

            @Override
            public void onAuthenticationFailed() {
                showMessage(getString(R.string.fingerprint_auth_failed), R.color.colorError);
            }
        };

        if (mFingerprintAuthentication.startAuthentication(callback)) {
            showMessage(getString(R.string.fingerprint_processing), R.color.colorNormal);
            return true;
        }

        return false;
    }


    private void setAuthenticationState(boolean authenticating) {
        Button button = (Button) findViewById(R.id.button_fingerprint_auth);
        button.setText(authenticating ? R.string.cancel : R.string.authenticate);
    }

    private void showEncryptedData(byte[] encrypted) {
        TextView textView = (TextView) findViewById(R.id.encryptedData);
        if (encrypted != null) {
            textView.setText(Base64.encodeToString(encrypted, 0));
        } else {
            textView.setText("");
        }
    }

    private String getCurrentTimeString() {
        long currentTimeMillis = System.currentTimeMillis();
        Date date = new Date(currentTimeMillis);
        SimpleDateFormat simpleDateFormat = new SimpleDateFormat("HH:mm:ss.SSS");

        return simpleDateFormat.format(date);
    }

    private void showMessage(CharSequence msg, int colorId) {
        TextView textView = (TextView) findViewById(R.id.textView);
        textView.setText(getCurrentTimeString() + " :\n" + msg);
        textView.setTextColor(getResources().getColor(colorId, null));
    }

    private void reset() {
        setAuthenticationState(false);
    }
}
FingerprintAuthentication.java
package org.jssec.android.fingerprint.authentication.nocipher;

import android.content.Context;
import android.hardware.fingerprint.FingerprintManager;
import android.os.CancellationSignal;

public class FingerprintAuthentication {

    private FingerprintManager mFingerprintManager;
    private CancellationSignal mCancellationSignal;


    public FingerprintAuthentication(Context context) {
        mFingerprintManager = (FingerprintManager) context.getSystemService(Context.FINGERPRINT_SERVICE);
        reset();
    }

    public boolean startAuthentication(final FingerprintManager.AuthenticationCallback callback) {

        mCancellationSignal = new CancellationSignal();

        // Callback which accepts the result of fingerprint authentication
        FingerprintManager.AuthenticationCallback hook = new FingerprintManager.AuthenticationCallback() {
            @Override
            public void onAuthenticationError(int errorCode, CharSequence errString) {
                if (callback != null) callback.onAuthenticationError(errorCode, errString);
                reset();
            }

            @Override
            public void onAuthenticationHelp(int helpCode, CharSequence helpString) {
                if (callback != null) callback.onAuthenticationHelp(helpCode, helpString);
            }

            @Override
            public void onAuthenticationSucceeded(FingerprintManager.AuthenticationResult result) {
                if (callback != null) callback.onAuthenticationSucceeded(result);
                reset();
            }

            @Override
            public void onAuthenticationFailed() {
                if (callback != null) callback.onAuthenticationFailed();
            }
        };

        // Perform fingerprint authentication
	// By giving null as the first argument CryptoObject, the authentication is not linked with key
        mFingerprintManager.authenticate(null, mCancellationSignal, 0, hook, null);

        return true;
    }

    public boolean isAuthenticating() {
        return mCancellationSignal != null && !mCancellationSignal.isCanceled();
    }

    public void cancel() {
        if (mCancellationSignal != null) {
            if (!mCancellationSignal.isCanceled())
                mCancellationSignal.cancel();
        }
    }

    private void reset() {
        mCancellationSignal = null;
    }

    public boolean isFingerprintAuthAvailable() {
        return (mFingerprintManager.hasEnrolledFingerprints()) ? true : false;
    }

    public boolean isFingerprintHardwareDetected() {
        return mFingerprintManager.isHardwareDetected();
    }
}
AndroidManifest.xml
<?xml version="1.0" encoding="utf-8"?>
<manifest xmlns:android="http://schemas.android.com/apk/res/android"
    package="authentication.fingerprint.android.jssec.org.fingerprintauthentication" >

    <!-- +++ POINT 1 *** Declare the use of the USE_FINGERPRINT permission -->
    <uses-permission android:name="android.permission.USE_FINGERPRINT" />

    <application
        android:allowBackup="true"
        android:icon="@mipmap/ic_launcher"
        android:label="@string/app_name"
        android:supportsRtl="true"
        android:theme="@style/AppTheme" >
        <activity
            android:name=".MainActivity"
            android:screenOrientation="portrait" >
            <intent-filter>
                <action android:name="android.intent.action.MAIN" />

                <category android:name="android.intent.category.LAUNCHER" />
            </intent-filter>
        </activity>
    </application>

</manifest>
使用 BiometricPrompt 的示例
要点:
- 声明使用 USE_BIOMETRIC_PROMPT 权限。
MainActivity.java
package org.jssec.android.biometricprompt.nocipher;

import android.hardware.biometrics.BiometricPrompt;
import android.icu.text.SimpleDateFormat;
import android.support.v7.app.AppCompatActivity;
import android.os.Bundle;
import android.view.View;
import android.widget.Button;
import android.widget.TextView;
import org.jssec.android.biometric.authentication.nocipher.R;
import java.util.Date;

public class MainActivity extends AppCompatActivity {
    private BiometricAuthentication mBiometricAuthentication;

    @Override
    protected void onCreate(Bundle savedInstanceState) {
        super.onCreate(savedInstanceState);
        setContentView(R.layout.activity_main);

        mBiometricAuthentication = new BiometricAuthentication(this);

        Button button_biometric_auth = findViewById(R.id.button_biometric_auth);
        button_biometric_auth.setOnClickListener(new View.OnClickListener () {
            @Override
            public void onClick(View v) {
                if (!mBiometricAuthentication.isAuthenticating()) {
                    authenticateByBiometric();
                }
            }
        });
    }

    private boolean authenticateByBiometric () {

        BiometricPrompt.AuthenticationCallback callback = new BiometricPrompt.AuthenticationCallback() {
            @Override
            public void onAuthenticationError(int errorCode, CharSequence errString) {
                showMessage(errString, R.color.colorError);
            }

            @Override
            public void onAuthenticationHelp(int helpCode, CharSequence helpString) {
                showMessage(helpString, R.color.colorHelp);
            }

            @Override
            public void onAuthenticationSucceeded(BiometricPrompt.AuthenticationResult result) {
                showMessage(getString(R.string.biometric_auth_succeeded), R.color.colorAuthenticated);
            }

            @Override
            public void onAuthenticationFailed() {
                showMessage(getString(R.string.biometric_auth_failed), R.color.colorError);
            }

        };
        if (mBiometricAuthentication.startAuthentication(callback)) {
            showMessage(getString(R.string.biometric_processing), R.color.colorNormal);
            return true;
        }
        return false;
    }

    private String getCurrentTimeString() {
        long currentTimeMillis = System.currentTimeMillis();
        Date date = new Date(currentTimeMillis);
        SimpleDateFormat simpleDateFormat = new SimpleDateFormat("HH:mm:ss.SSS");

        return simpleDateFormat.format(date);
    }

    private void showMessage(CharSequence msg, int colorId) {
        TextView textView = (TextView) findViewById(R.id.textView);
        textView.setText(getCurrentTimeString() + " :\n" + msg);
        textView.setTextColor(getResources().getColor(colorId, null));
    }
}
BiometricAuthentication.java
package org.jssec.android.biometricprompt.nocipher;

import android.content.Context;
import android.content.DialogInterface;
import android.hardware.biometrics.BiometricPrompt;
import android.os.CancellationSignal;

public class BiometricAuthentication {
    private static final String TAG = "BioAuth";

    private BiometricPrompt mBiometricPrompt;
    private CancellationSignal mCancellationSignal;
    private Context mContext;

    // Process "Cancel" button
    private DialogInterface.OnClickListener cancelListener =
            new DialogInterface.OnClickListener () {
                @Override
                public void onClick(DialogInterface dialog, int which) {
                    android.util.Log.d(TAG, "cancel");
                    if (mCancellationSignal != null) {
                        if (!mCancellationSignal.isCanceled())
                            mCancellationSignal.cancel();
                    }
                }
            };

    public BiometricAuthentication(Context context) {
        mContext = context;
        BiometricPrompt.Builder builder = new BiometricPrompt.Builder(context);
        // Authentication prompt also provides a button for cacelling
	// Cancel is handled by DialogInterface.OnClickListener given to setNegativeButton as the 3rd argument
        mBiometricPrompt = builder
                .setTitle("Please Authenticate")
                .setNegativeButton("Cancel",context.getMainExecutor() ,cancelListener)
                .build();
        reset();
    }

    public boolean startAuthentication(final BiometricPrompt.AuthenticationCallback callback) {

        mCancellationSignal = new CancellationSignal();

        // Callback which accepts the result of biometric authentication
        BiometricPrompt.AuthenticationCallback hook = new BiometricPrompt.AuthenticationCallback() {
            @Override
            public void onAuthenticationError(int errorCode, CharSequence errString) {
                android.util.Log.d(TAG, "onAuthenticationError");
                if (callback != null) callback.onAuthenticationError(errorCode, errString);
                reset();
            }

            @Override
            public void onAuthenticationHelp(int helpCode, CharSequence helpString) {
                android.util.Log.d(TAG, "onAuthenticationHelp");
                if (callback != null) callback.onAuthenticationHelp(helpCode, helpString);
            }

            @Override
            public void onAuthenticationSucceeded(BiometricPrompt.AuthenticationResult result) {
                android.util.Log.d(TAG, "onAuthenticationSuccess");
                if (callback != null) callback.onAuthenticationSucceeded(result);
                reset();
            }

            @Override
            public void onAuthenticationFailed() {
                android.util.Log.d(TAG, "onAuthenticationFailed");
                if (callback != null) callback.onAuthenticationFailed();
            }
        };

        // Perform biomettic authentication
        // BiometricPrompt has a specific API for simple authentication (not linked with key)
        android.util.Log.d(TAG, "Starting authentication");
        mBiometricPrompt.authenticate(mCancellationSignal, mContext.getMainExecutor(), hook);

        return true;
    }

    public boolean isAuthenticating() {
        return mCancellationSignal != null && !mCancellationSignal.isCanceled();
    }

    private void reset() {
        mCancellationSignal = null;
    }

}
AndroidManifest.xml
<?xml version="1.0" encoding="utf-8"?>
<manifest xmlns:android="http://schemas.android.com/apk/res/android"
    package="org.jssec.android.biometricprompt.cipher">

    <!--  *** POINT 1 *** Declare the use of the USE_BIOMETRIC permission -->
    <uses-permission android:name="android.permission.USE_BIOMETRIC" />
    <application
        android:allowBackup="true"
        android:icon="@mipmap/ic_launcher"
        android:label="@string/app_name"
        android:roundIcon="@mipmap/ic_launcher_round"
        android:supportsRtl="true"
        android:theme="@style/AppTheme">
        <activity android:name="org.jssec.android.biometricprompt.cipher.MainActivity">
            <intent-filter>
                <action android:name="android.intent.action.MAIN" />
                <category android:name="android.intent.category.LAUNCHER" />
            </intent-filter>
        </activity>
    </application>
</manifest>
5.7.2.规则手册
使用指纹身份验证时遵守以下规则。将指纹身份验证用于其它应用程序时没有特殊规则。
5.7.2.1.创建(注册)密钥时,使用不易受到攻击的加密算法(符合标准)。(必需)
如同“5.6. 章节 —使用加密”中所述的密码密钥和公钥一样,使用指纹身份验证功能创建密钥时,必须使用不容易受到攻击的加密算法,即,符合特定标准的算法,足以防止第三方窃听。实际上,安全和不容易受到攻击的选择不仅必须用于加密算法,还必须用于加密模式和填充。
有关选择算法的更多信息,请参阅“5.6.2.2. 章节 —使用强算法(尤其是符合相关标准的算法)(必需)”。
5.7.2.2.将加密数据限制为可通过指纹身份验证以外的方法恢复(替换)的项目。(必需)
当应用程序使用指纹身份验证功能加密应用程序中的数据时,应用程序的设计必须允许使用指纹身份验证以外的方法恢复(替换)数据。
通常,使用生物信息会导致各种问题,包括保密问题、修改困难和错误识别—因此,最好避免仅仅依靠生物信息进行鉴定。
例如,假设应用程序内部的数据使用使用通过指纹身份验证功能生成的密钥进行加密,但终端中存储的指纹数据随后被用户删除。用于加密数据的密钥不可供使用,也不能复制数据。如果无法通过指纹身份验证功能以外的其它方式恢复数据,则存在大量数据无用的风险。
此外,删除指纹信息并不是唯一导致使用指纹身份验证功能创建的密钥不可用的情况。在 Nexus5X 中,如果使用指纹验证功能创建密钥,然后将该密钥作为指纹信息的补充进行新注册,则之前创建的密钥将不再可用。[26] 此外,用户无法排除通常允许正确使用的密钥可能由于指纹传感器识别错误而无法使用的可能性。
| [26] | 截至 2016 年 9 月 1 日版本的最新信息。此信息将来可能会有所更改。 |
5.7.2.3.通知用户需要注册指纹才能创建密钥。(推荐)
要使用指纹身份验证创建密钥,必须在终端上注册用户的指纹。设计应用程序以引导用户进入“Setting”(设置)菜单鼓励指纹注册时,开发人员必须记住指纹代表重要的个人数据,并且需要向用户解释应用程序使用指纹信息的必要性和便捷性。
告知用户需要指纹注册。
        if (!mFingerprintAuthentication.isFingerprintAuthAvailable()) {
            // *** Point *** Notify users that fingerprint registration will be required to create a key.
            new AlertDialog.Builder(this)
                    .setTitle(R.string.app_name)
                    .setMessage("No fingerprint information has been registered.\n" +
                            "Click \"Security\" on the Settings menu to register fingerprints.\n" +
                            "Registering fingerprints allows easy authentication.")
                    .setPositiveButton("OK", null)
                    .show();
            return false;
        }
5.7.3.高级主题
5.7.3.1.Android 应用程序使用指纹身份验证功能的前提条件
必须满足以下两个条件,应用程序才能使用指纹身份验证。
- 用户指纹必须已在终端中注册。
- (特定于应用程序的)密钥必须与已注册的指纹关联。
注册用户指纹
用户指纹信息只能通过“设置”菜单中的“安全”选项进行注册;普通应用程序可能无法执行指纹注册过程。因此,如果应用程序尝试使用指纹身份验证功能时未注册指纹,则应用程序必须引导用户进入“Settings”(设置)菜单并鼓励用户注册指纹。此时,应用程序需要向用户提供一些信息,解释使用指纹信息的必要性以及便捷性。
此外,作为指纹注册的必要前提条件,终端必须配置备用的屏幕锁定机制。如果在指纹已在终端中注册的状态下禁用屏幕锁定,则注册的指纹信息将被删除。
创建和注册密钥
要将密钥与在终端中注册的指纹关联,请使用由“AndroidKeyStore”提供程序提供的 KeyStore 实例来创建和注册新密钥或注册现有密钥。
要创建与指纹信息关联的密钥,请在创建 KeyGenerator 时配置参数设置,以启用用户身份验证请求。
创建和注册与指纹信息关联的密钥。
    try {
        // Obtain an instance from the "AndroidKeyStore" Provider.
        KeyGenerator keyGenerator = KeyGenerator.getInstance(KeyProperties.KEY_ALGORITHM_AES, "AndroidKeyStore");
        keyGenerator.init(
            new KeyGenParameterSpec.Builder(KEY_NAME, KeyProperties.PURPOSE_ENCRYPT)
            .setBlockModes(KeyProperties.BLOCK_MODE_CBC)
            .setEncryptionPaddings(KeyProperties.ENCRYPTION_PADDING_PKCS7)
            .setUserAuthenticationRequired(true) // Enable requests for user (fingerprint) authentication.
            .build());
        keyGenerator.generateKey();
    } catch (IllegalStateException e) {
        // no fingerprints have been registered in this terminal.
        throw new RuntimeException("No fingerprint registered", e);
    } catch (NoSuchAlgorithmException | InvalidAlgorithmParameterException
                | CertificateException | KeyStoreException | IOException e) {
        // failed to generate a key.
        throw new RuntimeException("Failed to generate a key", e);
    }
要将指纹信息与现有密钥关联,请使用密钥库条目注册该密钥,该密钥已添加一个启用用户身份验证请求的设置。
将指纹信息与现有密钥关联。
    SecretKey key = existingKey;  // existing key

    KeyStore keyStore = KeyStore.getInstance("AndroidKeyStore");
    keyStore.load(null);
    keyStore.setEntry(
        "alias_for_the_key",
        new KeyStore.SecretKeyEntry(key),
        new KeyProtection.Builder(KeyProperties.PURPOSE_ENCRYPT)
                .setUserAuthenticationRequired(true)  // Enable requests for user
                .build());