5. How to use Security Functions
There are various security functions prepared in Android, like encryption, digital signature and permission etc. If these security functions are not used correctly, security functions don't work efficiently and loophole will be prepared. This chapter will explain how to use the security functions properly.
5.1. Creating Password Input Screens
5.1.1. Sample Code
When creating password input screen, some points to be considered in terms of security, are described here. Only what is related to password input is mentioned, here. Regarding how to save password, another articles is planned to be published is future edition.
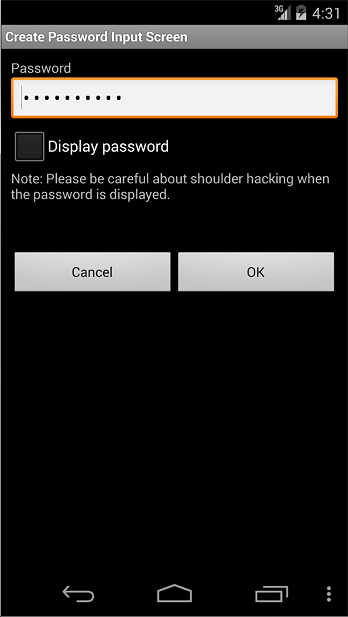
Fig. 5.1.1 Password Input Screen
Points:
The input password should be mask displayed (Display with *)
Provide the option to display the password in a plain text.
Alert a user that displaying password in a plain text has a risk.
Points: When handling the last Input password, pay attention the following points along with the above points.
In the case there is the last input password in an initial display, display the fixed digit numbers of black dot as dummy in order not that the digits number of last password is guessed.
When the dummy password is displayed and the "Show password" button is pressed, clear the last input password and provide the state for new password input.
When last input password is displayed with dummy, in case user tries to input password, clear the last input password and treat new user input as a new password.
password_activity.xml
<?xml version="1.0" encoding="utf-8"?>
<LinearLayout xmlns:android="http://schemas.android.com/apk/res/android"
    android:layout_width="fill_parent"
    android:layout_height="fill_parent"
    android:orientation="vertical"
    android:padding="10dp" >

    <!-- Label for password item -->
    <TextView
        android:layout_width="fill_parent"
        android:layout_height="wrap_content"
        android:text="@string/password" />

    <!-- Label for password item -->
    <!-- *** POINT 1 *** The input password must be masked (Display with black dot) -->
    <EditText
        android:id="@+id/password_edit"
        android:layout_width="fill_parent"
        android:layout_height="wrap_content"
        android:hint="@string/hint_password"
        android:inputType="textPassword" />

    <!-- *** POINT 2 *** Provide the option to display the password in a plain text -->
    <CheckBox
        android:id="@+id/password_display_check"
        android:layout_width="fill_parent"
        android:layout_height="wrap_content"
        android:text="@string/display_password" />

    <!-- *** POINT 3 *** Alert a user that displaying password in a plain text has a risk. -->
    <TextView
        android:layout_width="fill_parent"
        android:layout_height="wrap_content"
        android:text="@string/alert_password" />

    <!-- Cancel/OK button -->
    <LinearLayout
        android:layout_width="fill_parent"
        android:layout_height="wrap_content"
        android:layout_marginTop="50dp"
        android:gravity="center"
        android:orientation="horizontal" >

        <Button
            android:layout_width="0dp"
            android:layout_height="wrap_content"
            android:layout_weight="1"
            android:onClick="onClickCancelButton"
            android:text="@android:string/cancel" />

        <Button
            android:layout_width="0dp"
            android:layout_height="wrap_content"
            android:layout_weight="1"
            android:onClick="onClickOkButton"
            android:text="@android:string/ok" />
    </LinearLayout>
</LinearLayout>
Implementation for 3 methods which are located at the bottom of PasswordActivity.java, should be adjusted depends on the purposes.
private String getPreviousPassword()
private void onClickCancelButton(View view)
private void onClickOkButton(View view)
PasswordActivity.java
/*
 * Copyright (C) 2012-2025 Japan Smartphone Security Association
 *
 * Licensed under the Apache License, Version 2.0 (the "License");
 * you may not use this file except in compliance with the License.
 * You may obtain a copy of the License at
 *
 *      http://www.apache.org/licenses/LICENSE-2.0
 *
 * Unless required by applicable law or agreed to in writing, software
 * distributed under the License is distributed on an "AS IS" BASIS,
 * WITHOUT WARRANTIES OR CONDITIONS OF ANY KIND, either express or implied.
 * See the License for the specific language governing permissions and
 * limitations under the License.
 */

package org.jssec.android.password.passwordinputui;

import android.app.Activity;
import android.os.Bundle;
import android.text.Editable;
import android.text.InputType;
import android.text.TextWatcher;
import android.view.View;
import android.view.WindowManager;
import android.widget.CheckBox;
import android.widget.CompoundButton;
import android.widget.CompoundButton.OnCheckedChangeListener;
import android.widget.EditText;
import android.widget.Toast;

public class PasswordActivity extends Activity {

    // Key to save the state
    private static final String KEY_DUMMY_PASSWORD = "KEY_DUMMY_PASSWORD";

    // View inside Activity
    private EditText mPasswordEdit;
    private CheckBox mPasswordDisplayCheck;

    // Flag to show whether password is dummy display or not
    private boolean mIsDummyPassword;

    @Override
    public void onCreate(Bundle savedInstanceState) {
        super.onCreate(savedInstanceState);
        setContentView(R.layout.password_activity);
        // Set Disabling Screen Capture
        getWindow().addFlags(WindowManager.LayoutParams.FLAG_SECURE);

        // Get View
        mPasswordEdit = (EditText) findViewById(R.id.password_edit);
        mPasswordDisplayCheck =
                (CheckBox) findViewById(R.id.password_display_check);

        // Whether last Input password exist or not.
        if (getPreviousPassword() != null) {
            // *** POINT 4 *** In the case there is the last input password in
            // an initial display, display the fixed digit numbers of black dot
            // as dummy in order not that the digits number of last password
            // is guessed.

            // Display should be dummy password.
            mPasswordEdit.setText("**********");
            // To clear the dummy password when inputting password, set text
            // change listener.
            mPasswordEdit.addTextChangedListener(new PasswordEditTextWatcher());
            // Set dummy password flag
            mIsDummyPassword = true;
        }

        // Set a listner to change check state of password display option.
        mPasswordDisplayCheck.setOnCheckedChangeListener(new OnPasswordDisplayCheckedChangeListener());
    }

    @Override
    public void onSaveInstanceState(Bundle outState) {
        super.onSaveInstanceState(outState);

        // Unnecessary when specifying not to regenerate Activity by the change in
        // screen aspect ratio.
        // Save Activity state
        outState.putBoolean(KEY_DUMMY_PASSWORD, mIsDummyPassword);
    }

    @Override
    public void onRestoreInstanceState(Bundle savedInstanceState) {
        super.onRestoreInstanceState(savedInstanceState);

        // Unnecessary when specifying not to regenerate Activity by the change in
        // screen aspect ratio.
        // Restore Activity state
        mIsDummyPassword = savedInstanceState.getBoolean(KEY_DUMMY_PASSWORD);
    }

    /**
     * Process in case password is input
     */
    private class PasswordEditTextWatcher implements TextWatcher {

        public void beforeTextChanged(CharSequence s, int start, int count,
                                      int after) {
            // Not used
        }

        public void onTextChanged(CharSequence s, int start, int before,
                                  int count) {
            // *** POINT 6 *** When last Input password is displayed as dummy,
            // in the case an user tries to input password, Clear the last
            // input password, and treat new user input as new password.
            if (mIsDummyPassword) {
                // Set dummy password flag
                mIsDummyPassword = false;
                // Trim space
                CharSequence work = s.subSequence(start, start + count);
                mPasswordEdit.setText(work);
                // Cursor position goes back the beginning, so bring it at the end.
                mPasswordEdit.setSelection(work.length());
            }
        }

        public void afterTextChanged(Editable s) {
            // Not used
        }

    }

    /**
     * Process when check of password display option is changed.
     */
    private class OnPasswordDisplayCheckedChangeListener
            implements OnCheckedChangeListener {

        public void onCheckedChanged(CompoundButton buttonView,
                                     boolean isChecked) {
            // *** POINT 5 ***  When the dummy password is displayed and the
            // "Show password" button is pressed, clear the last input
            // password and provide the state for new password input.
            if (mIsDummyPassword && isChecked) {
                // Set dummy password flag
                mIsDummyPassword = false;
                // Set password empty
                mPasswordEdit.setText(null);
            }

            // Cursor position goes back the beginning, so memorize the current
            // cursor position.
            int pos = mPasswordEdit.getSelectionStart();

            // *** POINT 2 *** Provide the option to display the password in a
            // plain text
            // Create InputType
            int type = InputType.TYPE_CLASS_TEXT;
            if (isChecked) {
                // Plain display when check is ON.
                type |= InputType.TYPE_TEXT_VARIATION_VISIBLE_PASSWORD;
            } else {
                // Masked display when check is OFF.
                type |= InputType.TYPE_TEXT_VARIATION_PASSWORD;
            }

            // Set InputType to password EditText
            mPasswordEdit.setInputType(type);

            // Set cursor position
            mPasswordEdit.setSelection(pos);
        }

    }

    // Implement the following method depends on application

    /**
     * Get the last Input password
     *
     * @return Last Input password
     */
    private String getPreviousPassword() {
        // When need to restore the saved password, return password character
        // string
        // For the case password is not saved, return null
        return "hirake5ma";
    }

    /**
     * Process when cancel button is clicked
     *
     * @param view
     */
    public void onClickCancelButton(View view) {
        // Close Activity
        finish();
    }

    /**
     * Process when OK button is clicked
     *
     * @param view
     */
    public void onClickOkButton(View view) {
        // Execute necessary processes like saving password or using for
        // authentication

        String password = null;

        if (mIsDummyPassword) {
            // When dummy password is displayed till the final moment, grant last
            // input password as fixed password.
            password = getPreviousPassword();
        } else {
            // In case of not dummy password display, grant the user input
            // password as fixed password.
            password = mPasswordEdit.getText().toString();
        }

        // Display password by Toast
        Toast.makeText(this, "password is \"" + password + "\"",
                       Toast.LENGTH_SHORT).show();

        // Close Activity
        finish();
    }
}
5.1.2. Rule Book
Follow the below rules when creating password input screen.
Provide the Mask Display Feature, If the Password Is Entered (Required)
Provide the Option to Display Password in a Plain Text (Required)
When Displaying the Last Input Password, Dummy Password Must Be Displayed (Required)
5.1.2.1. Provide the Mask Display Feature, If the Password Is Entered (Required)
Smartphone is often used in crowded places like in a train or in a bus, and the risk that password is peeked by someone. So the function to mask display password is necessary as an application spec.
There are two ways to display the EditText as password: specifying this statically in the layout XML, or specifying this dynamically by switching the display from a program. The former is achieved by specifying “textPassword” for the android:inputType attribute or by using android:password attribute. The latter is achieved by using the setInputType() method of the EditText class to add InputType.TYPE_TEXT_VARIATION_PASSWORD to its input type.
Sample code of each of them is shown below.
Masking password in layout XML.
password_activity.xml
    <!-- Password input item -->
    <!-- Set true for the android:password attribute -->
    <EditText
        android:id="@+id/password_edit"
        android:layout_width="fill_parent"
        android:layout_height="wrap_content"
        android:hint="@string/hint_password"
        android:inputType="textPassword" />
Masking password in Activity.
PasswordActivity.java
    // Set password display type
    // Set TYPE_TEXT_VARIATION_PASSWORD for InputType.
    EditText passwordEdit = (EditText) findViewById(R.id.password_edit);
    int type = InputType.TYPE_CLASS_TEXT
            | InputType.TYPE_TEXT_VARIATION_PASSWORD;
    passwordEdit.setInputType(type);
5.1.2.2. Provide the Option to Display Password in a Plain Text (Required)
Password input in Smartphone is done by touch panel input, so compared with keyboard input in PC, miss input may be easily happened. Because of the inconvenience of inputting, user may use the simple password, and it makes more dangerous. In addition, when there's a policy like account is locked due the several times of password input failure, it's necessary to avoid from miss input as much as possible. As a solution of these problems, by preparing an option to display password in a plain text, user can use the safe password.
However, when displaying password in a plain text, it may be sniffed, so when using this option. It's necessary to call user cautions for sniffing from behind. In addition, in case option to display in a plain text is implemented, it's also necessary to prepare the system to auto cancel the plain text display like setting the time of plain display. The restrictions for password plain text display are published in another article in future edition. So, the restrictions for password plain text display are not included in sample code.
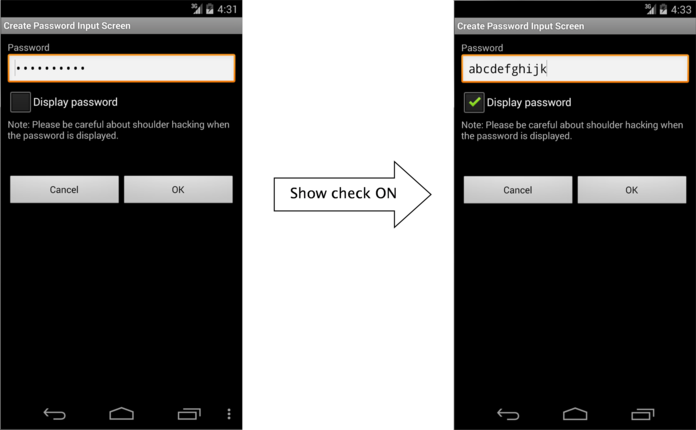
Fig. 5.1.2 Display Password in a Plain Text
By specifying InputType of EditText, mask display and plain text display can be switched.
PasswordActivity.java
    /**
     * Process when check of password display option is changed.
     */
    private class OnPasswordDisplayCheckedChangeListener implements
            OnCheckedChangeListener {

        public void onCheckedChanged(CompoundButton buttonView,
                boolean isChecked) {
            // *** POINT 5 *** When the dummy password is displayed and the
            // "Show password" button is pressed,
            // Clear the last input password and provide the state for new
            // password input.
            if (mIsDummyPassword && isChecked) {
                // Set dummy password flag
                mIsDummyPassword = false;
                // Set password empty
                mPasswordEdit.setText(null);
            }

            // Cursor position goes back the beginning, so memorize the current
            // cursor position.
            int pos = mPasswordEdit.getSelectionStart();

            // *** POINT 2 *** Provide the option to display the password in a
            // plain text
            // Create InputType
            int type = InputType.TYPE_CLASS_TEXT;
            if (isChecked) {
                // Plain display when check is ON.
                type |= InputType.TYPE_TEXT_VARIATION_VISIBLE_PASSWORD;
            } else {
                // Masked display when check is OFF.
                type |= InputType.TYPE_TEXT_VARIATION_PASSWORD;
            }

            // Set InputType to password EditText
            mPasswordEdit.setInputType(type);

            // Set cursor position
            mPasswordEdit.setSelection(pos);
        }

    }
5.1.2.3. Mask the Password when Activity Is Launched (Required)
To prevent it from a password peeping out, the default value of password display option, should be set OFF, when Activity is launched. The default value should be always defined as safer side, basically.
5.1.2.4. When Displaying the Last Input Password, Dummy Password Must Be Displayed (Required)
When specifying the last input password, not to give the third party any hints for password, it should be displayed as dummy with the fixed digits number of mask characters (* etc.). In addition, in the case pressing "Show password" when dummy display, clear password and switch to plain text display mode. It can help to suppress the risk that the last input password is sniffed low, even if the device is passed to a third person like when it's stolen. FYI, In case of dummy display and when a user tries to input password, dummy display should be cancelled, it necessary to turn the normal input state.
When displaying the last Input password, display dummy password.
PasswordActivity.java
    @Override
    public void onCreate(Bundle savedInstanceState) {

        [...]

        // Whether last Input password exist or not.
        if (getPreviousPassword() != null) {
            // *** POINT 4 *** In the case there is the last input password in
            // an initial display, display the fixed digit numbers of black dot
            // as dummy in order not that the digits number of last password is
            // guessed.
            // Display should be dummy password.
            mPasswordEdit.setText("**********");
            // To clear the dummy password when inputting password, set text
            // change listener.
            mPasswordEdit.addTextChangedListener(new PasswordEditTextWatcher());
            // Set dummy password flag
            mIsDummyPassword = true;
        }

        [...]

    }

    /**
     * Get the last input password.
     *
     * @return the last input password
     */
    private String getPreviousPassword() {
        // To restore the saved password, return the password character string.
        // For the case password is not saved, return null.
        return "hirake5ma";
    }
In the case of dummy display, when password display option is turned ON, clear the displayed contents.
PasswordActivity.java
    /**
     * Process when check of password display option is changed.
     */
    private class OnPasswordDisplayCheckedChangeListener implements
            OnCheckedChangeListener {

        public void onCheckedChanged(CompoundButton buttonView,
                boolean isChecked) {
            // *** POINT 5 *** When the dummy password is displayed and the
            // "Show password" button is pressed,
            // Clear the last input password and provide the state for new
            // password input.
            if (mIsDummyPassword && isChecked) {
                // Set dummy password flag
                mIsDummyPassword = false;
                // Set password empty
                mPasswordEdit.setText(null);
            }

            [...]

        }

    }
In case of dummy display, when user tries to input password, clear dummy display.
PasswordActivity.java
    // Key to save the state
    private static final String KEY_DUMMY_PASSWORD = "KEY_DUMMY_PASSWORD";

    [...]

    // Flag to show whether password is dummy display or not.
    private boolean mIsDummyPassword;

    @Override
    public void onCreate(Bundle savedInstanceState) {

        [...]

        // Whether last Input password exist or not.
        if (getPreviousPassword() != null) {
            // *** POINT 4 *** In the case there is the last input password in
            // an initial display, display the fixed digit numbers of black dot
            // as dummy in order not that the digits number of last password is
            // guessed.

            // Display should be dummy password.
            mPasswordEdit.setText("**********");
            // To clear the dummy password when inputting password, set text
            // change listener.
            mPasswordEdit.addTextChangedListener(new PasswordEditTextWatcher());
            // Set dummy password flag
            mIsDummyPassword = true;
        }

        [...]

    }

    @Override
    public void onSaveInstanceState(Bundle outState) {
        super.onSaveInstanceState(outState);

        // Unnecessary when specifying not to regenerate Activity by the change in
        // screen aspect ratio.
        // Save Activity state
        outState.putBoolean(KEY_DUMMY_PASSWORD, mIsDummyPassword);
    }

    @Override
    public void onRestoreInstanceState(Bundle savedInstanceState) {
        super.onRestoreInstanceState(savedInstanceState);

        // Unnecessary when specifying not to regenerate Activity by the change in
        // screen aspect ratio.
        // Restore Activity state
        mIsDummyPassword = savedInstanceState.getBoolean(KEY_DUMMY_PASSWORD);
    }

    /**
     * Process when inputting password.
     */
    private class PasswordEditTextWatcher implements TextWatcher {

        public void beforeTextChanged(CharSequence s, int start, int count,
                int after) {
            // Not used
        }

        public void onTextChanged(CharSequence s, int start, int before,
                int count) {
            // *** POINT 6 *** When last Input password is displayed as dummy,
            // in the case an user tries to input password, Clear the last
            // input password, and treat new user input as new password.
            if (mIsDummyPassword) {
                // Set dummy password flag
                mIsDummyPassword = false;
                // Trim space
                CharSequence work = s.subSequence(start, start + count);
                mPasswordEdit.setText(work);
                // Cursor position goes back the beginning, so bring it at the end.
                mPasswordEdit.setSelection(work.length());
            }
        }

        public void afterTextChanged(Editable s) {
            // Not used
        }

    }
5.1.3. Advanced Topics
5.1.3.1. Login Process
The representative example of where password input is required is login process. Here are some Points that need cautions in Login process.
Error message when login fail
In login process, need to input 2 information which is ID(account) and password. When login failure, there are 2 cases. One is ID doesn't exist. Another is ID exists but password is incorrect. If either of these 2 cases is distinguished and displayed in a login failure message, attackers can guess "whether the specified ID exists or not". To stop this kind of guess, these 2 cases should not be specified in login failure message, and this message should be displayed as per below.
Message example: Login ID or password is incorrect.
Auto Login function
There is a function to perform auto login by omitting login ID/password input in the next time and later, after successful login process has been completed once. Auto login function can omit the complicated input. So the convenience will increase, but on the other hand, when a Smartphone is stolen, the risk which is maliciously being used by the third party, will follow.
Only the use when damages caused by the malicious third party is somehow acceptable, or only in the case enough security measures can be taken, auto login function can be used. For example, in the case of online banking application, when the device is operated by the third party, financial damage may be caused. So in this case, security measures are necessary along with auto login function. There are some possible counter-measures, like "Require re-inputting password just before financial process like payment process occurs", "When setting auto login, call a user for enough attentions and prompt user to secure device lock", etc. When using auto login, it's necessary to investigate carefully considering the convenience and risks along with the assumed counter measures.
5.1.3.2. Changing Password
When changing the password which was once set, following input items should be prepared on the screen.
Current password
New password
New password (confirmation)
When auto login function is introduced, there are possibilities that third party can use an application. In that case, to avoid from changing password unexpectedly, it's necessary to require the current password input. In addition, to decrease the risk of getting into unserviceable state due to miss inputting new password, it's necessary to require new password input 2 times.
5.1.3.3. Regarding "Make passwords visible" Setting
There is a setting in Android's setting menu, called "Make passwords visible." In case of Android 5.0, it's shown as below. Setting > Security > Make passwords visible
There is a setting in Android's setting menu, called "Make passwords visible." In case of Android 5.0, it's shown as below.

Fig. 5.1.3 Security - Make Passwords visible
When turning ON "Make passwords visible" setting, the last input character is displayed in a plain text. After the certain time (about 2 seconds) passed, or after inputting the next character, the characters which was displayed in a plain text is masked. When turning OFF, it's masked right after inputting. This setting affects overall system, and it's applied to all applications which use password display function of EditText.
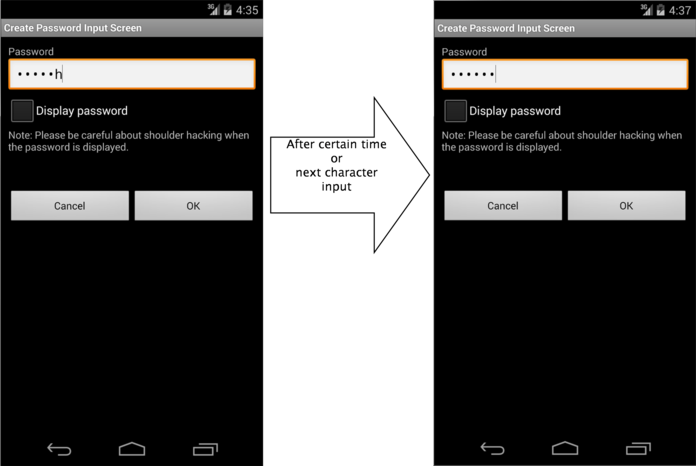
Fig. 5.1.4 Display password
5.1.3.4. Disabling Screen Shot
In password input screens, passwords could be displayed in the clear on the screens. In such screens as handle personal information, they could be leaked from screenshot files stored on external storage if the screenshot function is stayed enable as default. Thus it is recommended to disable the screenshot function for such screens as password input screens. Screen capture can be disabled by using addFlag to set FLAG_SECURE in WindowManager [1].
5.1.3.5. Integrate Credential Manager with Autofill
Android 15 Beta 2 or later, androidx.credentials:1.5.0-alpha01 or later allows developers to link specific Views (e.g., username and password fields) to Credential Manager requests. When the user focuses on these Views, the corresponding requests are sent to the Credential Manager, and the generated authentication information is unified across credential providers and displayed in the autofill UI (e.g., keyboard inline and pull-down suggestions). This feature also serves as a fallback when users accidentally accidentally closes the account selection tool in the Credential Manager。
The Jetpack androidx.credentials library is recommended as a recommended endpoint for the following reasons:
Integration: androidx.credentials is part of Android Jetpack and integrates seamlessly with other Jetpack libraries.
Maintainability: Officially supported by Google, with regular updates and bug fixes, making it highly reliable.
Security: The latest security best practices for managing credentials are implemented to ensure secure credential management.
Simplicity: Designed for easy implementation by developers, reducing code complexity
Implementation procedure
Create a GetCredentialRequest
val getPasswordOption = GetPasswordOption()
val getPublicKeyCredentialOption = GetPublicKeyCredentialOption(
    requestJson = requestJson
)
val getCredRequest = GetCredentialRequest(
    listOf(getPasswordOption, getPublicKeyCredentialOption)
)
Call the getCredential API
coroutineScope.launch {
    try {
        val result = credentialManager.getCredential(
            context = activityContext, // Use an activity-based context
            request = getCredRequest
        )
        handleSignIn(result)
    } catch (GetCredentialException e) {
        handleFailure(e)
    }
}
Set up auto-fill functionality in the view
import androidx.credentials.PendingGetCredentialRequest

usernameEditText.pendingGetCredentialRequest = PendingGetCredentialRequest(
    getCredRequest) { response -> handleSignIn(response)
}
passwordEditText.pendingGetCredentialRequest = PendingGetCredentialRequest(
    getCredRequest) { response -> handleSignIn(response)
}
Precautions
setPendingGetCredentialRequest is an extension API to the androidx.credentials library, and is called differently in Kotlin and Java
Currently, this functionality is only available on View objects
Operation was confirmed with the official version of Android 15 and androidx.credentials:1.5.0-beta01. Because androidx.credentials is a beta version, operation and specifications may change in the official version.
5.2. Permission and Protection Level
There are four types of Protection Level within permission and they consist of normal, dangerous, signature, and signatureOrSystem. In addition, "development", "system", and "appop" exist, but since they are not used in general applications, explanation in this chapter is omitted. Depending on the Protection Level, permission is referred to as normal permission, dangerous permission, signature permission, or signatureOrSystem permission. In the following sections, such names are used.
5.2.1. Sample Code
5.2.1.1. How to Use System Permissions of Android OS
Android OS has a security mechanism called "permission" that protects its user's assets such as contacts and a GPS feature from a malware. When an application seeks access to such information and/or features, which are protected under Android OS, the application needs to explicitly declare a permission in order to access them. When an application, which has declared a permission that needs user's consent to be used, is installed, the following confirmation screen appears [2].
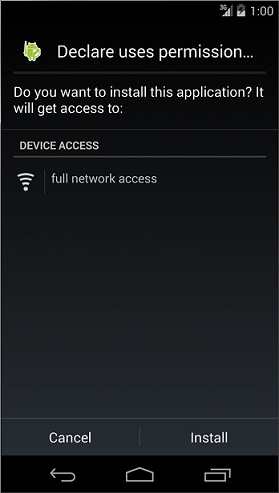
Fig. 5.2.1 Declare uses permission
From this confirmation screen, a user is able to know which types of features and/or information an application is trying to access. If the behavior of an application is trying to access features and/or information that are clearly unnecessary, then there is a high possibility that the application is a malware. Hence, as your application is not suspected to be a malware, declarations of permission to use needs to be minimized.
Points:
Declare a permission used in an application with uses-permission.
Do not declare any unnecessary permissions with uses-permission.
AndroidManifest.xml
<?xml version="1.0" encoding="utf-8"?>
<manifest xmlns:android="http://schemas.android.com/apk/res/android"
           >

  <!-- *** POINT 1 *** Declare a permission used in an application with uses-permission -->
  <!-- Permission to access Internet -->
  <uses-permission android:name="android.permission.INTERNET"/>

  <!-- *** POINT 2 *** Do not declare any unnecessary permissions with uses-permission -->
  <!-- If declaring to use Permission that is unnecessary for application behaviors, it gives users a sense of distrust. -->

  <application
      android:allowBackup="false"
      android:icon="@drawable/ic_launcher"
      android:label="@string/app_name" >
    <activity
        android:name=".MainActivity"
        android:label="@string/app_name"
        android:exported="true" >
      <intent-filter>
        <action android:name="android.intent.action.MAIN" />
        <category android:name="android.intent.category.LAUNCHER" />
      </intent-filter>
    </activity>
  </application>

</manifest>
5.2.1.2. How to Communicate Between In-house Applications with In-house-defined Signature Permission
Besides system permissions defined by Android OS, an application can define its own permissions as well. If using an in-house-defined permission (it is an in-house-defined signature permission to be more precise), you can build a mechanism where only communications between in-house applications is permitted. By providing the composite function based on inter-application communication between multiple in-house applications, the applications get more attractive and your business could get more profitable by selling them as series. It is a case of using in-house-defined signature permission.
The sample application "In-house-defined Signature Permission (UserApp)" launches the sample application "In-house-defined Signature Permission (ProtectedApp)" with Context.startActivity() method. Both applications need to be signed with the same developer key. If keys for signing them are different, the UserApp sends no Intent to the ProtectedApp, and the ProtectedApp processes no Intent received from the UserApp. Furthermore, it prevents malwares from circumventing your own signature permission using the matter related to the installation order as explained in the Advanced Topic section.
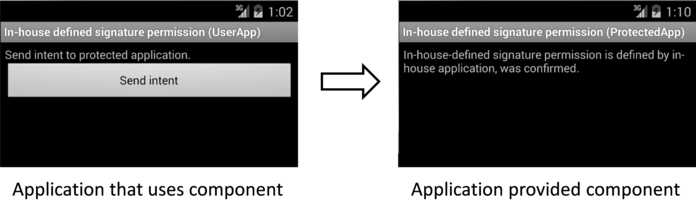
Fig. 5.2.2 Communication Between In-house Applications with In-house-defined Signature Permission
Points: Application Providing Component
Define a permission with protectionLevel="signature".
For a component, enforce the permission with its permission attribute.
If the component is an activity, you must define no intent-filter.
At run time, verify if the signature permission is defined by itself on the program code.
When exporting an APK, sign the APK with the same developer key that applications using the component use.
AndroidManifest.xml
<?xml version="1.0" encoding="utf-8"?>
<manifest xmlns:android="http://schemas.android.com/apk/res/android"
           >

  <!-- *** POINT 1 *** Define a permission with protectionLevel="signature" -->
  <permission
      android:name="org.jssec.android.permission.protectedapp.MY_PERMISSION"
      android:protectionLevel="signature" />

  <application
      android:allowBackup="false"
      android:icon="@drawable/ic_launcher"
      android:label="@string/app_name" >

    <!-- *** POINT 2 *** For a component, enforce the permission with its permission attribute -->
    <activity
        android:name=".ProtectedActivity"
        android:exported="true"
        android:label="@string/app_name"
        android:permission="org.jssec.android.permission.protectedapp.MY_PERMISSION" >

      <!-- *** POINT 3 *** If the component is an activity, you must define no intent-filter -->
    </activity>
  </application>
</manifest>
ProtectedActivity.java
/*
 * Copyright (C) 2012-2025 Japan Smartphone Security Association
 *
 * Licensed under the Apache License, Version 2.0 (the "License");
 * you may not use this file except in compliance with the License.
 * You may obtain a copy of the License at
 *
 *      http://www.apache.org/licenses/LICENSE-2.0
 *
 * Unless required by applicable law or agreed to in writing, software
 * distributed under the License is distributed on an "AS IS" BASIS,
 * WITHOUT WARRANTIES OR CONDITIONS OF ANY KIND, either express or implied.
 * See the License for the specific language governing permissions and
 * limitations under the License.
 */

package org.jssec.android.permission.protectedapp;

import org.jssec.android.shared.SigPerm;
import org.jssec.android.shared.Utils;

import android.app.Activity;
import android.content.Context;
import android.os.Bundle;
import android.widget.TextView;

public class ProtectedActivity extends Activity {

    // In-house Signature Permission
    private static final String MY_PERMISSION =
            "org.jssec.android.permission.protectedapp.MY_PERMISSION";

    // Hash value of in-house certificate
    private static String sMyCertHash = null;
    private static String myCertHash(Context context) {
        if (sMyCertHash == null) {
            if (Utils.isDebuggable(context)) {
                // Certificate hash value of "androiddebugkey" of debug.keystore
                sMyCertHash = "0EFB7236 328348A9 89718BAD DF57F544 D5CCB4AE B9DB34BC 1E29DD26 F77C8255";
            } else {
                // Certificate hash value of "my company key" of keystore
                sMyCertHash = "D397D343 A5CBC10F 4EDDEB7C A10062DE 5690984F 1FB9E88B D7B3A7C2 42E142CA";
            }
        }
        return sMyCertHash;
    }

    private TextView mMessageView;

    @Override
    public void onCreate(Bundle savedInstanceState) {
        super.onCreate(savedInstanceState);
        setContentView(R.layout.main);
        mMessageView = (TextView) findViewById(R.id.messageView);

        // *** POINT 4 *** At run time, verify if the signature permission is
        // defined by itself on the program code
        if (!SigPerm.test(this, MY_PERMISSION, myCertHash(this))) {
            mMessageView.setText("In-house defined signature permission is not defined by in-house application.");
            return;
        }

        // *** POINT 4 *** Continue processing only when the certificate matches
        mMessageView.setText("In-house-defined signature permission is defined by in-house application, was confirmed.");
    }
}
SigPerm.java
/*
 * Copyright (C) 2012-2025 Japan Smartphone Security Association
 *
 * Licensed under the Apache License, Version 2.0 (the "License");
 * you may not use this file except in compliance with the License.
 * You may obtain a copy of the License at
 *
 *      http://www.apache.org/licenses/LICENSE-2.0
 *
 * Unless required by applicable law or agreed to in writing, software
 * distributed under the License is distributed on an "AS IS" BASIS,
 * WITHOUT WARRANTIES OR CONDITIONS OF ANY KIND, either express or implied.
 * See the License for the specific language governing permissions and
 * limitations under the License.
 */

package org.jssec.android.shared;

import android.content.Context;
import android.content.pm.PackageManager;
import android.content.pm.PackageManager.NameNotFoundException;
import android.content.pm.PermissionInfo;
import android.os.Build;

import static android.content.pm.PackageManager.CERT_INPUT_SHA256;

public class SigPerm {

    public static boolean test(Context ctx, String sigPermName,
                               String correctHash) {
        if (correctHash == null) return false;
        correctHash = correctHash.replaceAll(" ", "");
        try {
            // Get the package name of the application which declares a permission
            // named sigPermName.
            PackageManager pm = ctx.getPackageManager();
            PermissionInfo pi =
                pm.getPermissionInfo(sigPermName, PackageManager.GET_META_DATA);
            String pkgname = pi.packageName;
            // Fail if the permission named sigPermName is not a Signature
            // Permission
            if (pi.protectionLevel != PermissionInfo.PROTECTION_SIGNATURE)
                return false;

            // Compare the actual hash value of pkgname with the correct hash
            // value.
            if (Build.VERSION.SDK_INT >= 28) {
                // ** if API Level >= 28, direct check is possible
                return pm.hasSigningCertificate(pkgname,
                                                Utils.hex2Bytes(correctHash),
                                                CERT_INPUT_SHA256);
            } else {
                // else(API Level < 28) use the facility of PkgCert
                return correctHash.equals(PkgCert.hash(ctx, pkgname));
            }

        } catch (NameNotFoundException e) {
            return false;
        }
    }
}
PkgCertWhitelists.java
/*
 * Copyright (C) 2012-2025 Japan Smartphone Security Association
 *
 * Licensed under the Apache License, Version 2.0 (the "License");
 * you may not use this file except in compliance with the License.
 * You may obtain a copy of the License at
 *
 *      http://www.apache.org/licenses/LICENSE-2.0
 *
 * Unless required by applicable law or agreed to in writing, software
 * distributed under the License is distributed on an "AS IS" BASIS,
 * WITHOUT WARRANTIES OR CONDITIONS OF ANY KIND, either express or implied.
 * See the License for the specific language governing permissions and
 * limitations under the License.
 */

package org.jssec.android.shared;

import android.content.pm.PackageManager;
import java.util.HashMap;
import java.util.Map;
import android.content.Context;
import android.os.Build;

import static android.content.pm.PackageManager.CERT_INPUT_SHA256;

public class PkgCertWhitelists {
    private Map<String, String> mWhitelists = new HashMap<String, String>();

    public boolean add(String pkgname, String sha256) {
        if (pkgname == null) return false;
        if (sha256 == null) return false;

        sha256 = sha256.replaceAll(" ", "");
        if (sha256.length() != 64)
            return false;  // SHA-256 -> 32 bytes -> 64 chars
        sha256 = sha256.toUpperCase();
        if (sha256.replaceAll("[0-9A-F]+", "").length() != 0)
            return false;  // found non hex char

        mWhitelists.put(pkgname, sha256);
        return true;
    }

    public boolean test(Context ctx, String pkgname) {
        // Get the correct hash value which corresponds to pkgname.
        String correctHash = mWhitelists.get(pkgname);

        // Compare the actual hash value of pkgname with the correct hash value.
        if (Build.VERSION.SDK_INT >= 28) {
            // ** if API Level >= 28, direct checking is possible
            PackageManager pm = ctx.getPackageManager();
            return pm.hasSigningCertificate(pkgname,
                                            Utils.hex2Bytes(correctHash),
                                            CERT_INPUT_SHA256);
        } else {
            // else use the facility of PkgCert
            return PkgCert.test(ctx, pkgname, correctHash);
        }
    }
}
* Point 5 * When exporting an APK, sign the APK with the same developer key that applications using the component have used.
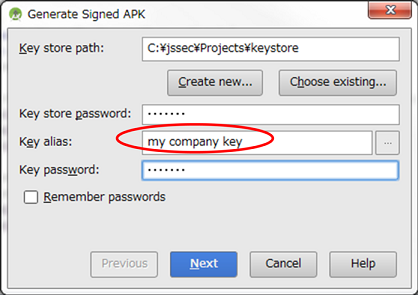
Fig. 5.2.3 Sign the APK with the same developer key that applications using the component have used
Points: Application Using Component
The same signature permission that the application uses must not be defined.
Declare the in-house permission with uses-permission tag.
Verify if the in-house signature permission is defined by the application that provides the component on the program code.
Verify if the destination application is an in-house application.
Use an explicit intent when the destination component is an activity.
When exporting an APK by [Build] -> [Generate Signed APK], sign the APK with the same developer key that the destination application uses.
AndroidManifest.xml
<?xml version="1.0" encoding="utf-8"?>
<manifest xmlns:android="http://schemas.android.com/apk/res/android"
          >

  <queries>
    <package android:name="org.jssec.android.permission.protectedapp" />
  </queries>

  <!-- *** POINT 6 *** The same signature permission that the application uses must not be defined -->

  <!-- *** POINT 7 *** Declare the in-house permission with uses-permission tag -->
  <uses-permission
      android:name="org.jssec.android.permission.protectedapp.MY_PERMISSION" />

  <application
      android:allowBackup="false"
      android:icon="@drawable/ic_launcher"
      android:label="@string/app_name" >
    <activity
        android:name=".UserActivity"
        android:label="@string/app_name"
        android:exported="true" >
      <intent-filter>
        <action android:name="android.intent.action.MAIN" />
        <category android:name="android.intent.category.LAUNCHER" />
      </intent-filter>
    </activity>
  </application>
</manifest>
UserActivity.java
/*
 * Copyright (C) 2012-2025 Japan Smartphone Security Association
 *
 * Licensed under the Apache License, Version 2.0 (the "License");
 * you may not use this file except in compliance with the License.
 * You may obtain a copy of the License at
 *
 *      http://www.apache.org/licenses/LICENSE-2.0
 *
 * Unless required by applicable law or agreed to in writing, software
 * distributed under the License is distributed on an "AS IS" BASIS,
 * WITHOUT WARRANTIES OR CONDITIONS OF ANY KIND, either express or implied.
 * See the License for the specific language governing permissions and
 * limitations under the License.
 */

package org.jssec.android.permission.userapp;

import org.jssec.android.shared.PkgCert;
import org.jssec.android.shared.SigPerm;
import org.jssec.android.shared.Utils;

import android.app.Activity;
import android.content.Context;
import android.content.Intent;
import android.os.Bundle;
import android.view.View;
import android.widget.Toast;

public class UserActivity extends Activity {

    // Requested (Destination) application's Activity information
    private static final String TARGET_PACKAGE =
            "org.jssec.android.permission.protectedapp";
    private static final String TARGET_ACTIVITY =
            "org.jssec.android.permission.protectedapp.ProtectedActivity";

    // In-house Signature Permission
    private static final String MY_PERMISSION =
            "org.jssec.android.permission.protectedapp.MY_PERMISSION";

    // Hash value of in-house certificate
    private static String sMyCertHash = null;
    private static String myCertHash(Context context) {
        if (sMyCertHash == null) {
            if (Utils.isDebuggable(context)) {
                // Certificate hash value of "androiddebugkey" of debug.keystore.
                sMyCertHash = "0EFB7236 328348A9 89718BAD DF57F544 D5CCB4AE B9DB34BC 1E29DD26 F77C8255";
            } else {
                // Certificate hash value of "my company key" of keystore.
                sMyCertHash = "D397D343 A5CBC10F 4EDDEB7C A10062DE 5690984F 1FB9E88B D7B3A7C2 42E142CA";
            }
        }
        return sMyCertHash;
    }

    @Override
    public void onCreate(Bundle savedInstanceState) {
        super.onCreate(savedInstanceState);
        setContentView(R.layout.main);
    }

    public void onSendButtonClicked(View view) {

        // *** POINT 8 *** Verify if the in-house signature permission is defined
        // by the application that provides the component on the program code.

        if (!SigPerm.test(this, MY_PERMISSION, myCertHash(this))) {
            Toast.makeText(this, "In-house-defined signature permission is not defined by In house application.", Toast.LENGTH_LONG).show();
            return;
        }

        // *** POINT 9 *** Verify if the destination application is an in-house
        // application.
        if (!PkgCert.test(this, TARGET_PACKAGE, myCertHash(this))) {
            Toast.makeText(this, "Requested (Destination) application is not in-house application.", Toast.LENGTH_LONG).show();
            return;
        }

        // *** POINT 10 *** Use an explicit intent when the destination component
        // is an activity.
        try {
            Intent intent = new Intent();
            intent.setClassName(TARGET_PACKAGE, TARGET_ACTIVITY);
            startActivity(intent);
        } catch(Exception e) {
            Toast.makeText(this,
                           String.format("Exception occurs:%s", e.getMessage()),
                           Toast.LENGTH_LONG).show();
        }
    }
}
PkgCertWhitelists.java
/*
 * Copyright (C) 2012-2025 Japan Smartphone Security Association
 *
 * Licensed under the Apache License, Version 2.0 (the "License");
 * you may not use this file except in compliance with the License.
 * You may obtain a copy of the License at
 *
 *      http://www.apache.org/licenses/LICENSE-2.0
 *
 * Unless required by applicable law or agreed to in writing, software
 * distributed under the License is distributed on an "AS IS" BASIS,
 * WITHOUT WARRANTIES OR CONDITIONS OF ANY KIND, either express or implied.
 * See the License for the specific language governing permissions and
 * limitations under the License.
 */

package org.jssec.android.shared;

import android.content.pm.PackageManager;
import java.util.HashMap;
import java.util.Map;
import android.content.Context;
import android.os.Build;

import static android.content.pm.PackageManager.CERT_INPUT_SHA256;

public class PkgCertWhitelists {
    private Map<String, String> mWhitelists = new HashMap<String, String>();

    public boolean add(String pkgname, String sha256) {
        if (pkgname == null) return false;
        if (sha256 == null) return false;

        sha256 = sha256.replaceAll(" ", "");
        if (sha256.length() != 64)
            return false;  // SHA-256 -> 32 bytes -> 64 chars
        sha256 = sha256.toUpperCase();
        if (sha256.replaceAll("[0-9A-F]+", "").length() != 0)
            return false;  // found non hex char

        mWhitelists.put(pkgname, sha256);
        return true;
    }

    public boolean test(Context ctx, String pkgname) {
        // Get the correct hash value which corresponds to pkgname.
        String correctHash = mWhitelists.get(pkgname);

        // Compare the actual hash value of pkgname with the correct hash value.
        if (Build.VERSION.SDK_INT >= 28) {
            // ** if API Level >= 28, direct checking is possible
            PackageManager pm = ctx.getPackageManager();
            return pm.hasSigningCertificate(pkgname,
                                            Utils.hex2Bytes(correctHash),
                                            CERT_INPUT_SHA256);
        } else {
            // else use the facility of PkgCert
            return PkgCert.test(ctx, pkgname, correctHash);
        }
    }
}
PkgCert.java
/*
 * Copyright (C) 2012-2025 Japan Smartphone Security Association
 *
 * Licensed under the Apache License, Version 2.0 (the "License");
 * you may not use this file except in compliance with the License.
 * You may obtain a copy of the License at
 *
 *      http://www.apache.org/licenses/LICENSE-2.0
 *
 * Unless required by applicable law or agreed to in writing, software
 * distributed under the License is distributed on an "AS IS" BASIS,
 * WITHOUT WARRANTIES OR CONDITIONS OF ANY KIND, either express or implied.
 * See the License for the specific language governing permissions and
 * limitations under the License.
 */

package org.jssec.android.shared;

import java.security.MessageDigest;
import java.security.NoSuchAlgorithmException;

import android.content.Context;
import android.content.pm.PackageInfo;
import android.content.pm.PackageManager;
import android.content.pm.PackageManager.NameNotFoundException;
import android.content.pm.Signature;

public class PkgCert {

    public static boolean test(Context ctx, String pkgname, String correctHash) {
        if (correctHash == null) return false;
        correctHash = correctHash.replaceAll(" ", "");
        return correctHash.equals(hash(ctx, pkgname));
    }

    public static String hash(Context ctx, String pkgname) {
        if (pkgname == null) return null;
        try {
            PackageManager pm = ctx.getPackageManager();
            PackageInfo pkginfo =
                pm.getPackageInfo(pkgname, PackageManager.GET_SIGNATURES);
            // Will not handle multiple signatures.
            if (pkginfo.signatures.length != 1) return null;
            Signature sig = pkginfo.signatures[0];
            byte[] cert = sig.toByteArray();
            byte[] sha256 = computeSha256(cert);
            return byte2hex(sha256);
        } catch (NameNotFoundException e) {
            return null;
        }
    }

    private static byte[] computeSha256(byte[] data) {
        try {
            return MessageDigest.getInstance("SHA-256").digest(data);
        } catch (NoSuchAlgorithmException e) {
            return null;
        }
    }

    private static String byte2hex(byte[] data) {
        if (data == null) return null;
        final StringBuilder hexadecimal = new StringBuilder();
        for (final byte b : data) {
            hexadecimal.append(String.format("%02X", b));
        }
        return hexadecimal.toString();
    }
}
* Point 11 * When generating an APK by [Build] -> [Generate Signed APK], sign the APK with the same developer key that the destination application uses.
Fig. 5.2.4 Sign the APK with the same developer key that the destination application uses
Signature verification in Android 9.0 (API level 28) and later
APK signature scheme V3 was introduced in Android 9.0 (API level 28) for enabling signature key rotation. At the same time, the package signature-related APIs were also updated [3]. When examining the changes from the standpoint of application signature verification, the hasSigningCertificate() method, which is a new method in thePackageManager class, can now be used for verification. Specifically, this can be substituted for processes such as those where the certificate used for the signature is obtained from the verification target package where the sample code PkgCert class of the Guide was performed and the hash value is calculated. This is applied in the SigPerm and PkgCertWhiteLists in the sample code shown above, and for API level 28 and higher, this new method hasSigningCertificate() is used. Differences in signature schemes and differences in verification as a result of multiple signatures are incorporated into hasSigningCertificate(), and so if targeting API level 28 and higher, use of this is recommended [4].
5.2.1.3. How to Verify the Hash Value of an Application's Certificate
We will provide an explanation on how to verify the hash value of an application's certificate that appears at different points in this Guidebook. Strictly speaking, the hash value means "the SHA256 hash value of the public key certificate for the developer key used to sign the APK."
How to verify it with Keytool
Using a program called keytool that is bundled with JDK, you can get the hash value (also known as certificate fingerprint) of a public key certificate for the developer key. There are various hash methods such as MD5, SHA1, and SHA256 due to the differences in hash algorithm. However, considering the security strength of the encryption bit length, this Guidebook recommends the use of SHA256. Unfortunately, the keytool bundled to JDK6 that is used in Android SDK does not support SHA256 for calculating hash values. Therefore, it is necessary to use the keytool that is bundled to JDK7 or later.
Example of outputting the content of a debugging certicate of an Android through a keytool
> keytool -list -v -keystore <KeystoreFile> -storepass <Password>

Type of keystore: jks
Keystore provider: SUN

One entry is included in a keystore

Other name: androiddebugkey
Date of creation: 2012/05/18
Entry type: PrivateKeyEntry
Length of certificate chain: 1
Certificate[1]:
Owner: CN=Android Debug, O=Android, C=US
Issuer: CN=Android Debug, O=Android, C=US
Serial number: 4fb5d390
Start date of validity period: Fri May 18 13:44:00 JST 2012 End date: Tue Oct 04 13:44:00 JST 2039
Certificate fingerprint:
         MD5:  8A:1A:E5:15:9A:2A:9A:45:C1:7F:30:EF:17:70:37:D1
         SHA1: 25:BC:25:91:02:A4:DD:04:7D:17:70:EC:41:35:21:00:0C:0A:C7:F1
         SHA256: 0E:FB:72:36:32:83:48:A9:89:71:8B:AD:DF:57:F5:44:D5:CC:B4:AE:B9:DB:
                 34:BC:1E:29:DD:26:F7:7C:82:55
     Signatrue algorithm name: SHA1withRSA
     Subject public key algorithm: 1024-bit RSA key
     Version: 3

*******************************************
*******************************************
How to Verify it with JSSEC Certificate Hash Value Checker
Without installing JDK7 or later, you can easily verify the certificate hash value by using JSSEC Certificate Hash Value Checker.
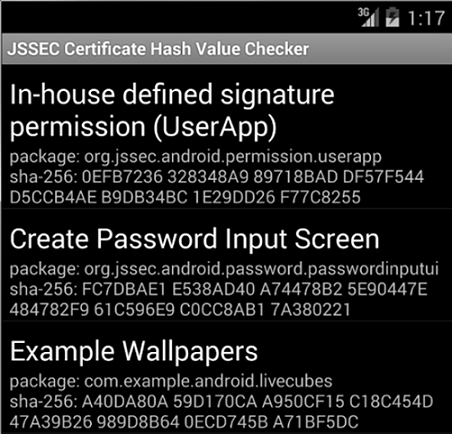
Fig. 5.2.5 JSSEC Certificate Hash Value Checker
This is an Android application that displays a list of certificate hash values of applications which are installed in the device. In the Figure above, the 64-character hexadecimal notation string that is shown on the right of "sha-256" is the certificate hash value. The sample code folder, "JSSEC CertHash Checker" that comes with this Guidebook is the set of source codes. If you would like, you can compile the codes and use it.
5.2.1.4. Methods for using Dangerous Permissions in Android 6.0 and later
Android 6.0 (API Level 23) incorporates modified specifications that are relevant to the implementation of apps---specifically, to the times at which apps are granted permission.
Under the Permission model of Android 5.1 (API Level 22) and earlier versions (See section "5.2.3.6. Modifications to the Permission model specifications in Android versions 6.0 and later", all Permissions declared by an app are granted to that app at the time of installation. However, in Android 6.0 and later versions, app developers must explicitly implement apps in such a way that, for Dangerous Permissions, the app requests Permission at appropriate times. When an app requests a Permission, a confirmation window like that shown below is displayed to the Android OS user, requesting a decision from the user as to whether or not to grant the Permission in question. If the user allows the use of the Permission, the app may execute whatever operations require that Permission.
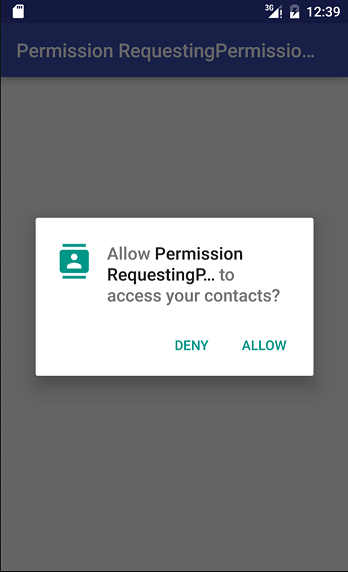
Fig. 5.2.6 Dangerous Permission Confirmation Window
The specifications are also modified regarding the units in which Permissions are granted. Previously, all Permissions were granted simultaneously; in Android 6.0 (API Level 23) and later versions, Permissions are granted by Permission Group. In Android 8.0 (API Level 26) and later versions, Permissions are granted individually. In conjunction with this modification, users are now shown individual confirmation windows for each Permission, allowing users to make more flexible decisions regarding the granting or refusal of Permissions. App developers must revisit the specifications and design of their apps with full consideration paid to the possibility that Permissions may be refused.
For details on the Permission model in Android 6.0 and later, see Section "5.2.3.6. Modifications to the Permission model specifications in Android versions 6.0 and later".
Points:
Apps declare the Permissions they will use
Do not declare the use of unnecessary Permissions
Check whether or not Permissions have been granted to the app
Request Permissions (open a dialog to request permission from users)
Implement appropriate behavior for cases in which the use of a Permission is refused
AndroidManifest.xml
<?xml version="1.0" encoding="utf-8"?>
<manifest xmlns:android="http://schemas.android.com/apk/res/android"
           >

  <!-- *** POINT 1 *** Apps declare the Permissions they will use -->
  <!-- Permission to read information on contacts (Protection Level: dangerous) -->
  <uses-permission android:name="android.permission.READ_CONTACTS" />

  <!-- *** POINT 2 *** Do not declare the use of unnecessary Permissions -->

  <application
      android:allowBackup="true"
      android:icon="@mipmap/ic_launcher"
      android:label="@string/app_name"
      android:supportsRtl="true"
      android:theme="@style/AppTheme" >
    <activity
        android:name=".MainActivity"
        android:exported="true">
      <intent-filter>
        <action android:name="android.intent.action.MAIN" />

        <category android:name="android.intent.category.LAUNCHER" />
      </intent-filter>
    </activity>
    <activity
        android:name=".ContactListActivity"
        android:exported="false">
    </activity>
  </application>

</manifest>
MainActivity.java
/*
 * Copyright (C) 2012-2025 Japan Smartphone Security Association
 *
 * Licensed under the Apache License, Version 2.0 (the "License");
 * you may not use this file except in compliance with the License.
 * You may obtain a copy of the License at
 *
 *      http://www.apache.org/licenses/LICENSE-2.0
 *
 * Unless required by applicable law or agreed to in writing, software
 * distributed under the License is distributed on an "AS IS" BASIS,
 * WITHOUT WARRANTIES OR CONDITIONS OF ANY KIND, either express or implied.
 * See the License for the specific language governing permissions and
 * limitations under the License.
 */

package org.jssec.android.permission.permissionrequestingpermissionatruntime;

import android.Manifest;
import android.content.Intent;
import android.content.pm.PackageManager;
import android.os.Bundle;
import androidx.core.app.ActivityCompat;
import androidx.core.content.ContextCompat;
import androidx.appcompat.app.AppCompatActivity;
import android.view.View;
import android.widget.Button;
import android.widget.Toast;

public class MainActivity extends AppCompatActivity
        implements View.OnClickListener {
    private static final int REQUEST_CODE_READ_CONTACTS = 0;

    @Override
    protected void onCreate(Bundle savedInstanceState) {
        super.onCreate(savedInstanceState);
        setContentView(R.layout.activity_main);

        Button button = (Button)findViewById(R.id.button);
        button.setOnClickListener(this);
    }

    @Override
    public void onClick(View v) {
        readContacts();
    }

    private void readContacts() {
        // *** POINT 3 *** Check whether or not Permissions have been granted to
        // the app
        if (ContextCompat.checkSelfPermission(getApplicationContext(), Manifest.permission.READ_CONTACTS) != PackageManager.PERMISSION_GRANTED) {
            // Permission was not granted
            // *** POINT 4 *** Request Permissions (open a dialog to request
            // permission from users)
            ActivityCompat.requestPermissions(this, new String[]{Manifest.permission.READ_CONTACTS}, REQUEST_CODE_READ_CONTACTS);
        } else {
            // Permission was previously granted
            showContactList();
        }
    }

    // A callback method that receives the result of the user's selection
    @Override
    public void onRequestPermissionsResult(int requestCode, String[] permissions,
                                           int[] grantResults) {
        switch (requestCode) {
        case REQUEST_CODE_READ_CONTACTS:
            if (grantResults.length > 0 &&
                    grantResults[0] == PackageManager.PERMISSION_GRANTED) {
                // Permissions were granted; we may execute operations that use
                // contact information
                showContactList();
            } else {
                // Because the Permission was denied, we may not execute
                // operations that use contact information
                // *** POINT 5 *** Implement appropriate behavior for cases in
                // which the use of a Permission is refused
                Toast.makeText(this,
                               String.format("Use of contact is not allowed."),
                               Toast.LENGTH_LONG).show();
            }
            return;
        }
    }

    // Show contact list
    private void showContactList() {
        // Launch ContactListActivity
        Intent intent = new Intent();
        intent.setClass(getApplicationContext(), ContactListActivity.class);
        startActivity(intent);
    }
}
5.2.2. Rule Book
Be sure to follow the rules below when using in-house permission.
System Dangerous Permissions of Android OS Must Only Be Used for Protecting User Assets (Required)
Your Own Signature Permission Must Only Be Defined on the Provider-side Application (Required)
Verify If the In-house-defined Signature Permission Is Defined by an In-house Application (Required)
5.2.2.1. System Dangerous Permissions of Android OS Must Only Be Used for Protecting User Assets (Required)
Since the use of your own dangerous permission is not recommended (please refer to "5.2.2.2. Your Own Dangerous Permission Must Not Be Used (Required)", we will proceed on the premise of using system dangerous permission of Android OS.
Unlike the other three types of permissions, dangerous permission has a feature that requires the user's consent to the grant of the permission to the application. When installing an application on a device that has declared a dangerous permission to use, the following screen will be displayed. Subsequently, the user is able to know what level of permission (dangerous permission and normal permission) the application is trying to use. When the user taps "install", the application will be granted the permission and then it will be installed.
Fig. 5.2.7 System Dangerous Permissions of Android OS Confirmation Window
An application can handle user assets and assets that the developer wants to protect. We must be aware that dangerous permission can protect only user assets because the user is just who the granting of permission is entrusted to. On the other hand, assets that the developer wants to protect cannot be protected by the method above.
For example, suppose that an application has a Component that communicates only with an In-house application, it doesn't permit the access to the Component from any applications of the other companies, and it is implemented that it's protected by dangerous permission. When a user grants permission to an application of another company based on the user's judgment, in-house assets that need to be protected may be exploited by the application granted. In order to provide protection for in-house assets in such cases, we recommend the usage of in-house-defined signature permission.
5.2.2.2. Your Own Dangerous Permission Must Not Be Used (Required)
Even when in-house-defined Dangerous Permission is used, the screen prompt "Asking for the Allowance of Permission from User" is not displayed in some cases. This means that at times the feature that asks for permission based on the judgment of a user, which is the characteristic of Dangerous Permission, does not function. Accordingly, the Guidebook will make the rule "In-house -defined dangerous permission must not be used".
In order to explain it, we assume two types of applications. The first type of application defines an in-house dangerous permission, and it is an application that makes a Component, which is protected by this permission, public. We call this ProtectedApp. The other is another application which we call AttackerApp and it tries to exploit the Component of ProtectedApp. Also we assume that the AttackerApp not only declares the permission to use it, but also defines the same permission.
AttackerApp can use the Component of a ProtectedApp without the consent of a user in the following cases:
When the user installs the AttackerApp, the installation will be completed without the screen prompt that asks for the user to grant the application the dangerous permission.
Similarly, when the user installs the ProtectedApp, the installation will be completed without any special warnings.
When the user launches the AttackerApp afterwards, the AttackerApp can access the Component of the ProtectedApp without being detected by the user, which can potentially lead to damage.
The cause of this case is explained in the following. When the user tries to install the AttackerApp first, the permission that has been declared for usage with uses-permission is not defined on the particular device yet. Finding no error, Android OS will continue the installation. Since the user consent for dangerous permission is required only at the time of installation, an application that has already been installed will be handled as if it has been granted permission. Accordingly, if the Component of an application which is installed later is protected with the dangerous permission of the same name, the application which was installed beforehand without the user permission will be able to exploit the Component.
Furthermore, since the existence of system dangerous permissions defined by Android OS is guaranteed when an application is installed, the user verification prompt will be displayed every time an application with uses-permission is installed. This problem arises only in the case of self-defined dangerous permission.
At the time of this writing, no viable method to protect the access to the Component in such cases has been developed yet. Therefore, your own dangerous permission must not be used.
5.2.2.3. Your Own Signature Permission Must Only Be Defined on the Provider-side Application (Required)
As demonstrated in, "5.2.1.2. How to Communicate Between In-house Applications with In-house-defined Signature Permission", the security can be assured by checking the signature permission at the time of executing inter-communications between In-house applications. When using this mechanism, the definition of the permission whose Protection Level is signature must be written in AndroidManifest.xml of the provider-side application that has the Component, but the user-side application must not define the signature permission.
This rule is applied to signatureOrSystem Permission as well.
The reason for this is as follows.
We assume that there are multiple user-side applications that have been installed prior to the provider-side application and every user-side application not only has required the signature permission that the provider-side application has defined, but also has defined the same permission. Under these circumstances, all user-side applications will be able to access the provider-side application just after the provider-side application is installed. Subsequently, when the user-side application that was installed first is uninstalled, the definition of the permission also will be deleted and then the permission will turn out to be undefined. As a result, the remaining user-side applications will be unable to access to the provider-side application.
In this manner, when the user-side application defines a self-defined permission, it can unexpectedly turn out the permission to be undefined. Therefore, only the provider-side application providing the Component that needs to be protected should define the permission, and defining the permission on the user-side must be avoided.
By doing as mentioned just above, the self-defined permission will be applied by Android OS at the time of the installation of the provider-side application, and the permission will turn out to be undefined at the time of the uninstallation of the application. Therefore, since the existence of the permission's definition always corresponds to that of the provider-side application, it is possible to provide an appropriate Component and protect it. Please be aware that this argument stands because regarding in-house-defined signature permission the user-side application is granted the permission regardless of the installation order of applications in inter-communication [5].
5.2.2.4. Verify If the In-house-defined Signature Permission Is Defined by an In-house Application (Required)
Actuality, you cannot say to be secure enough only by declaring a signature permission through AnroidManifest.xml and protecting the Component with the permission. For the details of this issue, please refer to, "5.2.3.1. Characteristics of Android OS that Avoids Self-defined Signature Permission and Its Counter-measures" in the Advanced Topics section.
The following are the steps for using in-house-defined signature permission securely and correctly.
First, write as the followings in AndroidManifest.xml:
Define an in-house signature permission in the AndroidManifest.xml of the provider-side application. (definition of permission)<br/> Example: <permission android:name="xxx" android:protectionLevel="signature" />
Enforce the permission with the permission attribute of the Component to be protected in the AndroidManifest.xml of the provider-side application. (enforcement of permission)<br/> Example: <activity android:permission="xxx" ... >...</activity>
Declare the in-house-defined signature permission with the uses-permission tag in the AndroidManifest.xml of every user-side application to access the Component to be protected. (declaration of using permission)<br/> Example: <uses-permission android:name="xxx" />
Next, implement the followings in the source code.
Before processing a request to the Component, first verify that the in-house-defined signature permission has been defined by an in-house application. If not, ignore the request. (protection in the provider-side component)
Before accessing the Component, first verify that the in-house-defined signature permission has been defined by an in-house application. If not, do not access the Component (protection in the user-side component).
Lastly, execute the following with the Signing function of Android Studio.
Sign APKs of all inter-communicating applications with the same developer key.
Here, for specific points on how to implement "Verify that the in-house-defined signature permission has been defined by an In house application", please refer to "5.2.1.2. How to Communicate Between In-house Applications with In-house-defined Signature Permission".
This rule is applied to signatureOrSystem Permission as well.
5.2.2.5. Your Own Normal Permission Should Not Be Used (Recommended)
An application can use a normal permission just by declaring it with uses-permission in AndroidManifest.xml. Therefore, you cannot use a normal permission for the purpose of protecting a Component from a malware installed.
Furthermore, in the case of inter-application communication with self-defined normal permission, whether an application can be granted the permission depends on the order of installation. For example, when you install an application (user-side) that has declared to use a normal permission prior to another application (provider-side) that possesses a Component which has defined the permission, the user-side application will not be able to access the Component protected with the permission even if the provider-side application is installed later.
As a way to prevent the loss of inter-application communication due to the order of installation, you may think of defining the permission in every application in the communication. By this way, even if a user-side application has been installed prior to the provider-side application, all user-side applications will be able to access the provider-side application. However, it will create a situation that the permission is undefined when the user-side application installed first is uninstalled. As a result, even if there are other user-side applications, they will not be able to gain access to the provider-side application.
As stated above, there is a concern of damaging the availability of an application, thus your own normal permission should not be used.
5.2.2.6. The String for Your Own Permission Name Should Be of an Extent of the Package Name of Application (Recommended)
When multiple applications define permissions under the same name, the Protection Level that has been defined by an application installed first will be applied. Protection by signature permission will not be available in the case that the application installed first defines a normal permission and the application installed later defines a signature permission under the same name. Even in the absence of malicious intent, a conflict of permission names among multiple applications could cause behavior s of any applications as an unintended Protection Level. To prevent such accidents, it is recommended that a permission name extends (starts with) the package name of the application defining the permission as below.
(package name).permission.(identifying string)
For example, the following name would be preferred when defining a permission of READ access for the package of org.jssec.android.sample.
org.jssec.android.sample.permission.READ
5.2.3. Advanced Topics
5.2.3.1. Characteristics of Android OS that Avoids Self-defined Signature Permission and Its Counter-measures
Self-defined signature permission is a permission that actualizes inter-application communication between the applications signed with the same developer key. Since a developer key is a private key and must not be public, there is a tendency to use signature permission for protection only in cases where in-house applications communicate with each other.
First, we will describe the basic usage of self-defined signature permission that is explained in the Developer Guide ([https://developer.android.com/guide/topics/security/security.html](https://developer.android.com/guide/topics/security/security.html)) of Android. However, as it will be explained later, there are problems with regard to the avoidance of permission. Consequently, counter-measures that are described in this Guidebook are necessary.
The followings are the basic usage of self-defined Signature Permission.
Define a self-defined signature permission in the AndroidManifest.xml of the provider-side application. (definition of permission)<br/> Example: <permission android:name="xxx" android:protectionLevel="signature" />
Enforce the permission with the permission attribute of the Component to be protected in the AndroidManifest.xml of the provider-side application. (enforcement of permission)<br/> Example: <activity android:permission="xxx" ... >...</activity>
Declare the self-defined signature permission with the uses-permission tag in the AndroidManifest.xml of every user-side application to access the Component to be protected. (declaration of using permission)<br/> Example: <uses-permission android:name="xxx" />
Sign APKs of all inter-communicating applications with the same developer key.
Actually, if the following conditions are fulfilled, this approach will create a loophole to avoid signature permission from being performed.
For the sake of explanation, we call an application that is protected by self-defined signature permission as ProtectedApp, and AttackerApp for an application that has been signed by a different developer key from the ProtectedApp. What a loophole to avoid signature permission from being performed means is, despite the mismatch of the signature for AttackerApp, it is possible to gain access to the Component of ProtectedApp.
An AttackerApp also defines a normal permission (strictly speaking, signature permission is also acceptable) under the same name as the signature permission which has been defined by the ProtectedApp.<br/> Example: <permission android:name=" xxx" android:protectionLevel="normal" />
The AttackerApp declares the self-defined normal permission with uses-permission.<br/> Example: <uses-permission android:name="xxx" />
The AttackerApp has installed on the device prior to the ProtectedApp.
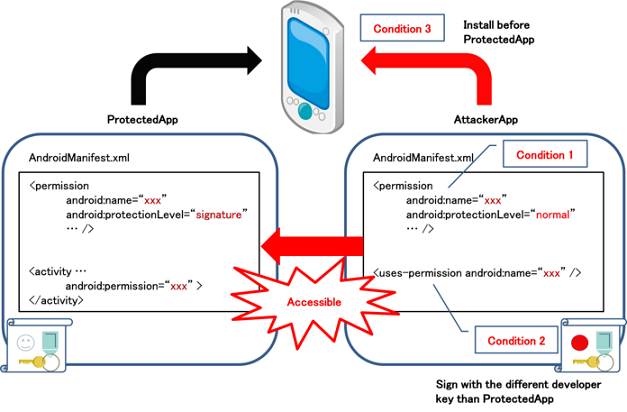
Fig. 5.2.8 A loophole to avoid Signature Permission
The permission name that is necessary to meet Condition 1 and Condition 2 can easily be known by an attacker taking AndroidManifest.xml out from an APK file. The attacker also could satisfy Condition 3 with a certain amount of effort (e.g. deceiving a user).
There is a risk of self-defined signature permission to evade protection if only the basic usage is adopted, and a counter-measure to prevent such loopholes is needed. Specifically, you could find how to solve the above-mentioned issues by using the method described in "5.2.2.4. Verify If the In-house-defined Signature Permission Is Defined by an In-house Application (Required)".
5.2.3.2. Falsification of AndroidManifest.xml by a User
We have already touched on the case that a Protection Level of self-defined permission could be changed as not intended. To prevent malfunctioning due to such cases, it has been needed to implement some sort of counter-measures on the source-code side of Java. From the viewpoint of AndroidManifest.xml falsification, we will talk about the counter-measures to be taken on the source-code side. We will demonstrate a simple case of installation that can detect falsifications. However, please note that these counter-measures are little effective against professional hackers who falsify with criminal intent.
This section is about the falsification of an application and users with malicious intent. Although this is originally outside of the scope of a Guidebook, from the fact that this is related to Permission and the tools for such falsification are provided in public as Android applications, we decided to mention it as "Simple counter-measures against amateur hackers".
It must be remembered that applications that can be installed from market are applications that can be falsified without root privilege. The reason is that applications that can rebuild and sign APK files with altered AndroidManifest.xml are distributed. By using these applications, anyone can delete any permission from applications they have installed.
As an example, there seems to be cases of rebuilding APKs with different signatures altering AndroidManifest.xml with INTERNET permission removed to render advertising modules attached in applications as useless. There are some users who praise these types of tools due to the fact that no personal information is leaked anywhere. As these ads which are attached in applications stop functioning, such actions cause monetary damage for developers who are counting on ad revenue. And it is believed that most of the users don't have any compunction.
In the following code, we show an instance of implementation that an application that has declared INTERNET permission with uses-permission verifies if INTERNET permission is described in the AndroidManifest.xml of itself at run time.
public class CheckPermissionActivity extends Activity {

    @Override
    public void onCreate(Bundle savedInstanceState) {
        super.onCreate(savedInstanceState);
        setContentView(R.layout.main);

        // Acquire Permission defined in AndroidManifest.xml
        List<String> list = getDefinedPermissionList();

        // Detect falsification
        if( checkPermissions(list) ){
            // OK
            Log.d("dbg", "OK.");
        }else{
            Log.d("dbg", "manifest file is stale.");
            finish();
        }
    }

    /**
     * Acquire Permission through list that was defined in AndroidManifest.xml
     * @return
     */
    private List<String> getDefinedPermissionList(){
        List<String> list = new ArrayList<String>();
        list.add("android.permission.INTERNET");
        return list;
    }

    /**
     * Verify that Permission has not been changed Permission
     * @param permissionList
     * @return
     */
    private boolean checkPermissions(List<String> permissionList){
        try {
            PackageInfo packageInfo = getPackageManager().getPackageInfo(
                    getPackageName(), PackageManager.GET_PERMISSIONS);
            String[] permissionArray = packageInfo.requestedPermissions;
            if (permissionArray != null) {
                for (String permission : permissionArray) {
                    if(! permissionList.remove(permission)){
                        // Unintended Permission has been added
                        return false;
                    }
                }
            }

            if(permissionList.size() == 0){
                // OK
                return true;
            }

        } catch (NameNotFoundException e) {
        }

        return false;
    }
}
5.2.3.3. Detection of APK Falsification
We explained about detecting the falsification of permissions by a user in "5.2.3.2. Falsification of AndroidManifest.xml by a User". However, the falsification of applications is not limited to permission only, and there are many other cases where applications are appropriated without any changes in the source code. For example, it is a case where they distribute other developers' applications (falsified) in the market as if they were their own applications just by replacing resources to their own. Here, we will show a more generic method to detect the falsification of an APK file.
In order to falsify an APK, it is needed to decode the APK file into folders and files, modify their contents, and then rebuild them into a new APK file. Since the falsifier does not have the key of the original developer, he would have to sign the new APK file with his own key. As the falsification of an APK inevitably brings with a change in signature (certificate), it is possible to detect whether an APK has been falsified at run time by comparing the certificate in the APK and the developer's certificate embedded in the source code as below.
The following is a sample code. Also, a professional hacker will be able to easily circumvent the detection of falsification if this implementation example is used as it is. Please apply this sample code to your application by being aware that this is a simple implementation example.
Points:
Verify that an application's certificate belongs to the developer before major processing is started.
SignatureCheckActivity.java
/*
 * Copyright (C) 2012-2025 Japan Smartphone Security Association
 *
 * Licensed under the Apache License, Version 2.0 (the "License");
 * you may not use this file except in compliance with the License.
 * You may obtain a copy of the License at
 *
 *      http://www.apache.org/licenses/LICENSE-2.0
 *
 * Unless required by applicable law or agreed to in writing, software
 * distributed under the License is distributed on an "AS IS" BASIS,
 * WITHOUT WARRANTIES OR CONDITIONS OF ANY KIND, either express or implied.
 * See the License for the specific language governing permissions and
 * limitations under the License.
 */

package org.jssec.android.permission.signcheckactivity;

import org.jssec.android.shared.PkgCert;
import org.jssec.android.shared.Utils;

import android.app.Activity;
import android.content.Context;
import android.os.Bundle;
import android.widget.Toast;

public class SignatureCheckActivity extends Activity {
    // Self signed certificate hash value
    private static String sMyCertHash = null;
    private static String myCertHash(Context context) {
        if (sMyCertHash == null) {
            if (Utils.isDebuggable(context)) {
                // Certificate hash value of "androiddebugkey" of
                // debug.keystore
                sMyCertHash = "0EFB7236 328348A9 89718BAD DF57F544 D5CCB4AE B9DB34BC 1E29DD26 F77C8255";
            } else {
                // Certificate hash value of "my company key" of keystore
                sMyCertHash = "D397D343 A5CBC10F 4EDDEB7C A10062DE 5690984F 1FB9E88B D7B3A7C2 42E142CA";
            }
        }
        return sMyCertHash;
    }

    @Override
    public void onCreate(Bundle savedInstanceState) {
        super.onCreate(savedInstanceState);
        setContentView(R.layout.main);

        // *** POINT 1 *** Verify that an application's certificate belongs to the
        // developer before major processing is started
        if (!PkgCert.test(this, this.getPackageName(), myCertHash(this))) {
            Toast.makeText(this, "Self-sign match  NG", Toast.LENGTH_LONG).show();
            finish();
            return;
        }
        Toast.makeText(this, "Self-sign match  OK", Toast.LENGTH_LONG).show();
    }
}
PkgCert.java
/*
 * Copyright (C) 2012-2025 Japan Smartphone Security Association
 *
 * Licensed under the Apache License, Version 2.0 (the "License");
 * you may not use this file except in compliance with the License.
 * You may obtain a copy of the License at
 *
 *      http://www.apache.org/licenses/LICENSE-2.0
 *
 * Unless required by applicable law or agreed to in writing, software
 * distributed under the License is distributed on an "AS IS" BASIS,
 * WITHOUT WARRANTIES OR CONDITIONS OF ANY KIND, either express or implied.
 * See the License for the specific language governing permissions and
 * limitations under the License.
 */

package org.jssec.android.shared;

import java.security.MessageDigest;
import java.security.NoSuchAlgorithmException;

import android.content.Context;
import android.content.pm.PackageInfo;
import android.content.pm.PackageManager;
import android.content.pm.PackageManager.NameNotFoundException;
import android.content.pm.Signature;

public class PkgCert {

    public static boolean test(Context ctx, String pkgname, String correctHash) {
        if (correctHash == null) return false;
        correctHash = correctHash.replaceAll(" ", "");
        return correctHash.equals(hash(ctx, pkgname));
    }

    public static String hash(Context ctx, String pkgname) {
        if (pkgname == null) return null;
        try {
            PackageManager pm = ctx.getPackageManager();
            PackageInfo pkginfo =
                pm.getPackageInfo(pkgname, PackageManager.GET_SIGNATURES);
            // Will not handle multiple signatures.
            if (pkginfo.signatures.length != 1) return null;
            Signature sig = pkginfo.signatures[0];
            byte[] cert = sig.toByteArray();
            byte[] sha256 = computeSha256(cert);
            return byte2hex(sha256);
        } catch (NameNotFoundException e) {
            return null;
        }
    }

    private static byte[] computeSha256(byte[] data) {
        try {
            return MessageDigest.getInstance("SHA-256").digest(data);
        } catch (NoSuchAlgorithmException e) {
            return null;
        }
    }

    private static String byte2hex(byte[] data) {
        if (data == null) return null;
        final StringBuilder hexadecimal = new StringBuilder();
        for (final byte b : data) {
            hexadecimal.append(String.format("%02X", b));
        }
        return hexadecimal.toString();
    }
}
5.2.3.4. Permission Re-delegation Problem
An application must declare to use permission when accessing contacts or GPS with its information and features that are protected by Android OS. When the permission required is granted, the permission is delegated to the application and the application would be able to access the information and features protected with the permission.
Depending on how the program is designed, the application to which has been delegated (granted) the permission is able to acquire data that is protected with the permission. Furthermore, the application can offer another application the protected data without enforcing the same permission. This is nothing less than permission-less application to access data that is protected by permission. This is virtually the same thing as re-delegating the permission, and this is referred to the Permission Re-delegation Problem. Accordingly, the specification of the permission mechanism of Android only is able to manage permission of direct access from an application to protected data.
A specific example is shown in Fig. 5.2.9. The application in the center shows that an application which has declared android.permission.READ_CONTACTS to use it reads contacts and then stores them into its own database. The Permission Re-delegation Problem occurs when information that has been stored is offered to another application without any restriction via Content Provider.
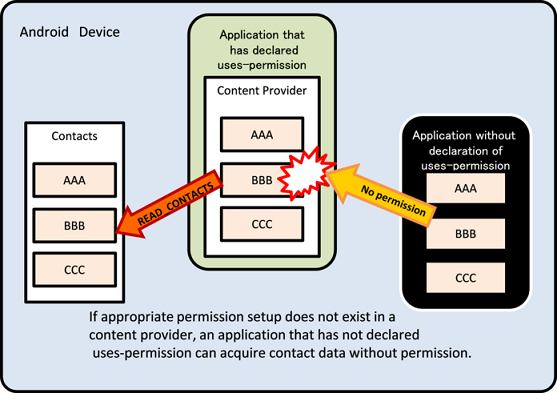
Fig. 5.2.9 An Application without Permission Acquires Contacts
As a similar example, an application that has declared android.permission.CALL_PHONE to use it receives a phone number (maybe input by a user) from another application that has not declared the same permission. If that number is being called without the verification of a user, then also there is the Permission Re-delegation Problem.
There are cases where the secondary provision of another application with nearly-intact information asset or functional asset acquired with the permission is needed. In those cases, the provider-side application must demand the same permission for the provision in order to maintain the original level of protection. Also, in the case of only providing a portion of information asset as well as functional asset in a secondary fashion, an appropriate amount of protection is necessary in accordance with the degree of damage that is incurred when a portion of that information or functional asset is exploited. We can use protective measures such as demanding permission as similar to the former, verifying user consent, and setting up restrictions for target applications by using "4.1.1.1. Creating/Using Private Activities", or "4.1.1.4. Creating/Using In-house Activities" etc.
Such Permission Re-delegation Problem is not only limited to the issue of the Android permission. For an Android application, it is generic that the application acquires necessary information/functions from different applications, networks, and storage media. And in many cases, some permissions as well as restrictions are needed to access them. For example, if the provider source is an Android application, it is the permission, if it is a network, then it is the log-in, and if it is a storage media, there will be access restrictions. Therefore, such measures need to be implemented for an application after carefully considering as information/functions are not used in the contrary manner of the user's intention. This is especially important at the time of providing acquired information/functions to another application in a secondary manner or transferring to networks or storage media. Depending on the necessity, you have to enforce permission or restrict usage like the Android permission. Asking for the user's consent is part of the solution.
In the following code, we demonstrate a case where an application that acquires a list from the contact database by using READ_CONTACTS permission enforces the same READ_CONTACTS permission on the information destination source.
Point
Enforce the same permission that the provider does.
AndroidManifest.xml
<?xml version="1.0" encoding="utf-8"?>
<manifest xmlns:android="http://schemas.android.com/apk/res/android"
          package="org.jssec.android.permission.transferpermission" >

  <uses-permission android:name="android.permission.READ_CONTACTS"/>

  <application
      android:allowBackup="false"
      android:icon="@drawable/ic_launcher"
      android:label="@string/app_name"
      android:theme="@style/AppTheme" >
    <activity
        android:name=".TransferPermissionActivity"
        android:label="@string/title_activity_transfer_permission" >
      <intent-filter>
        <action android:name="android.intent.action.MAIN" />
        <category android:name="android.intent.category.LAUNCHER" />
      </intent-filter>
    </activity>

    <!-- *** Point1 *** Enforce the same permission that the rovider does. -->
    <provider
        android:name=".TransferPermissionContentProvider"
        android:authorities="org.jssec.android.permission.transferpermission"
        android:enabled="true"
        android:exported="true"
        android:readPermission="android.permission.READ_CONTACTS" >
    </provider>
  </application>

</manifest>
When an application enforces multiple permissions, the above method will not solve it. By using Context#checkCallingPermission() or PackageManager#checkPermission() from the source code, verify whether the invoker application has declared all permissions with uses-permission in the Manifest.
In the case of an Activity
public void onCreate(Bundle savedInstanceState) {
    [...]
    if (checkCallingPermission("android.permission.READ_CONTACTS") ==
        PackageManager.PERMISSION_GRANTED
     && checkCallingPermission("android.permission.WRITE_CONTACTS") ==
        PackageManager.PERMISSION_GRANTED) {
            // Processing during the time when an invoker is correctly
        // declaring to use
            return;
    }
    finish();
}
5.2.3.5. Signature check mechanism for custom permissions (Android 5.0 and later)
In versions of Android 5.0 (API Level 21) and later, the application which defines its own custom permissions cannot be installed if the following conditions are met.
Another application which defines its own permission with the same name has already installed on the device.
The applications are signed with different keys
When both an application with the protected function (Component) and an application using the function define their own permission with the same name and are signed with the same key, the above mechanism will protect against installation of other company's applications which define their own custom permission with the same name. However, as mentioned in "5.2.2.3. Your Own Signature Permission Must Only Be Defined on the Provider-side Application (Required)", that mechanism won't work well for checking if a custom permission is defined by your own company because the permission could be undefined without your intent by uninstalling applications when plural applications define the same permission.
To sum it up, also in versions of Android 5.0 (API Level 21) and later, you are required to comply with the two rules, "5.2.2.3. Your Own Signature Permission Must Only Be Defined on the Provider-side Application (Required)" and "5.2.2.4. Verify If the In-house-defined Signature Permission Is Defined by an In-house Application (Required)" when your application defines your own Signature Permission.
5.2.3.6. Modifications to the Permission model specifications in Android versions 6.0 and later
Android 6.0 (API Level 23) introduces modified specifications for the Permission model that affect both the design and specifications of apps. In this section we offer an overview of the Permission model in Android 6.0 and later. We also describe modifications made in Android 8.0 and later as well as “one-time permission” of Android 11.0 and later.
The timing of permission grants and refusals
In cases where an app declares use of permissions requiring user confirmation (Dangerous Permissions) [see Section “5.2.2.1. System Dangerous Permissions of Android OS Must Only Be Used for Protecting User Assets (Required)”], the specifications for Android 5.1 (API level 22) and earlier versions called for a list of such permissions to be displayed when the app is installed, and the user must grant all permissions for the installation to proceed. At this point, all permissions declared by the app (including permissions other than Dangerous Permissions) were granted to the app; once these permissions were granted to the app, they remained in effect until the app was uninstalled from the terminal.
However, in the specifications for Android 6.0 and later versions, the granting of permissions takes place when an app is executed. The granting of permissions, and user confirmation of permissions, does not take place when the app is installed. When an app executes a procedure that requires Dangerous Permissions, it is necessary to check whether or not those permissions have been granted to the app in advance; if not, a confirmation window must be displayed in Android OS to request permission from the user [6]. If the user grants permission from the confirmation window, the permissions are granted to the app. However, permissions granted to an app by a user (Dangerous Permissions) may be revoked at any time via the Settings menu (Fig. 5.2.10). For this reason, appropriate procedures must be implemented to ensure that apps cause no irregular behavior even in situations in which they cannot access needed information or functionality because permission has not been granted.
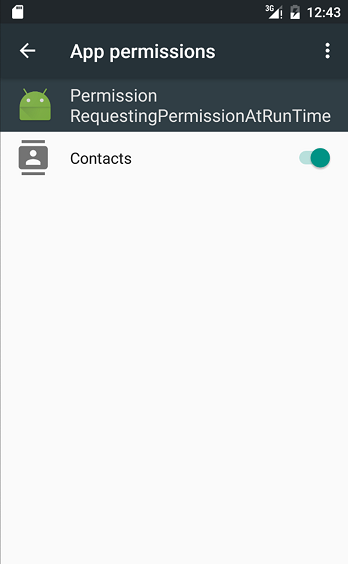
Fig. 5.2.10 App Permissions Window
Also, from Android 11.0, an option “only this time” is available for selection (one-time permission) if granting permission when executing some permissions related to location information, microphone, and camera. This permission is used to enable permissions only while apps are executed and the permission will be invalid when the app is closed or when a certain time [7] passes after moving to the background. Special granting measures are not required if granting of permissions has been implemented on Android 6.0 or later.
android.permission.ACCESS_FINE_LOCATION
android.permission.ACCESS_BACKGROUND_LOCATION
android.permission.RECORD_AUDIO
android.permission.CAMERA
Units of permission grants and refusals
Multiple Permissions may be grouped together into what is known as a Permission Group based on their functions and type of information relevant to them. For example, the Permission android.permission.READ_CALENDAR, which is required to read calendar information, and the Permission android.permission.WRITE_CALENDAR, which is required to write calendar information, are both affiliated with the Permission Group named android.permission-group.CALENDAR.
In the Permission model for Android 6.0 (API Level 23) and later, privileges are granted or denied at the block-unit level of the Permission Group, as shown here. However, developers must be careful to note that the block unit may vary depending on the combination of OS and SDK (see below).
For terminals running Android 6.0 (API Level 23) or later and app targetSdkVersion: 23~25
If android.permission.READ_CALENDAR and android.permission.WRITE_CALENDAR are listed in the Manifest, then when the app is launched a request for android.permission.READ_CALENDAR is issued; if the user grants this permission, Android OS determines that both android.permission.READ_CALENDAR and android.permission.WRITE_CALENDAR are permitted for use and thus grants the permission.
For terminals running Android 8.0 (API Level 26) or later and app targetSdkVersion 26 and above:
Only requested Permissions are granted. Thus, even if android.permission.READ_CALENDAR and android.permission.WRITE_CALENDAR are both listed, if only android.permission.READ_CALENDAR has been requested and granted by the user, then only android.permission.READ_CALENDAR will be granted. Thereafter, if android.permission.WRITE_CALENDAR is requested, the permission will be granted immediately with no dialog box shown to the user [8].
Also, in contrast to the granting of permissions, cancelling of permissions from the settings menu is carried out at the block-unit level of the Permission Group on Android 8.0 or later.
For more information on the classification of Permission Groups, see the Developer Reference ([https://developer.android.com/guide/topics/permissions/overview#perm-groups](https://developer.android.com/guide/topics/permissions/overview#perm-groups)).
The affected range of the revised specifications
Cases in which apps require Permission requests at runtime are restricted to situations in which the terminal is running Android 6.0 or later and the app's targetSDKVersion is 23 or higher. If the terminal is running Android 5.1 or earlier, or if the app's targetSDKVersion was 23 or lower, permissions are requested and granted altogether at the time of installation, as was traditionally the case. However, if the terminal is running Android 6.0 or later, then—even if the app's targetSDKVersion is below 23—permissions that were granted by the user at installation may be revoked by the user at any time. This creates the possibility of unintended irregular app termination. Developers must either comply immediately with the modified specifications or set the maxSDKVersion of their app to 22 or earlier to ensure that the app cannot be installed on terminals running Android 6.0 (API Level 23) or later.
Furthermore, in devices running Android 10 or later, when an app targeting devices running Android 5.1 (API Level 22) or earlier is executed for the first time, a warning is displayed indicating that it may not run properly. Also, for apps that request granting of storage access and other permissions by the user, a permission (Allow/Deny) selection screen appears before this warning [9].
Terminal Android OS Version |
App targetSDKVersion |
Timing at which app is granted permissions | User has control over permissions |
|
>=8.0 |
>=26 |
App execution (granted individually) |
Yes |
<26 |
App execution (granted by Permission Group) |
Yes |
|
<23 |
App installation |
Yes (rapid response required) |
|
>=6.0 |
>=23 |
App execution (granted by Permission Group) |
Yes |
<23 |
App installation |
Yes (rapid response required) |
|
<=5.1 |
>=23 |
App installation |
No |
<23 |
App installation |
No |
|
However, it should be noted that the effect of maxSdkVersion is limited. When the value of maxSdkVersion is set 22 or earlier, Android 6.0 (API Level 23) and later of the devices are no longer listed as an installable device of the target application in Google Play. On the other hand, because the value of maxSdkVersion is not checked in the marketplace other than Google Play, it may be possible to install the target application in the Android 6.0 (API Level 23) or later.
Because the effect of maxSdkVersion is limited, and further Google does not recommend the use of maxSdkVersion, it is recommended that developers comply immediately with the modified specifications.
In Android 6.0 and later versions, permissions for the following network communications have their Protection Level changed from Dangerous to Normal. Thus, even if apps declare the use of these Permissions, there is no need to acquire explicit permission from the user, and hence the modified specification has no impact in this case.
android.permission.BLUETOOTH
android.permission.BLUETOOTH_ADMIN
android.permission.CHANGE_WIFI_MULTICAST_STATE
android.permission.CHANGE_WIFI_STATE
android.permission.CHANGE_WIMAX_STATE
android.permission.DISABLE_KEYGUARD
android.permission.INTERNET
android.permission.NFC
5.2.3.7. Function That Automatically Resets Unused App Permissions in Android 11.0 and Later
A function that resets permissions of apps that have not been used for a certain period of time in Android 11.0 (API Level 30) has been added. The default reset setting varies depending on targetSDKVersion. This function is set by turning on the “Remove permissions if app isn’t used” option on the app permission setting screen.
targetSDKVersion=30: Enabled in the default state
targetSDKVersion<30: Disabled in the default state
The target permissions are those with Protection Levels at Dangerous Permission [10]. However, permissions that enable access once will be set so that confirmations will be required each time if once is selected.
When using functions that require permission, errors do not occur if confirming permissions each time. However, there may be cases where apps that are always running in the background may stop while unnoticed. For this reason, on these apps, it is necessary to request users to disable auto-reset.
Confirm that the auto-reset function is disabled using PackageManager#isAutoRevokeWhitelisted() (returns true if disabled).
If the auto-reset function is enabled, call out the app setting screen, and guide users to the permissions setting screen.
However, isAutoRevokeWhitelisted() is an API added at API Level 30 and cannot be determined by the app with targetSDKVersion lower than 30. For this reason, apps that have targetSDKVersion lower than 30 and that are required to have auto-reset disabled need to have a flow to review the auto-reset setting in the case where the auto-reset setting was changed by users, in addition to demand for application of permission again if the permission is canceled.
5.2.3.8. Auto-hibernation Function for Unused Applications on Android 12
If Android 12 (API Level 31) is the target, the auto-hibernation function is applied to applications that have not been used for a certain period, in addition to the permission auto-reset function introduced in Android 11. Auto-hibernation function has the following characteristics.
All files within the application cache are deleted and optimization is performed not based on the performance, but based on the storage capacity
The application will not be able to run jobs and alerts in the background
The application will not be able to receive push notifications (e.g. high priority messages sent through Firebase Cloud Messaging)
The hibernation state will end when the user performs operations on the application. However, jobs, alerts, and notifications that had been scheduled before the application enters the hibernation state must have their schedules set again.
For applications where inconveniences may occur due to auto-reset of permissions and the auto-hibernation function, such as applications that periodically synchronize data between devices and servers, users can exclude them by turning the “Remove permissions and free up space” option off.
To experimentally switch the application to the hibernation state, perform the following commands. Doing so will simulate the hibernation state.
Enable the hibernation state behavior
$ adb shell device_config put app_hibernation app_hibernation_enabled true
Forcibly set the application to the hibernation state
$ adb shell cmd app_hibernation set-state org.jssec.android.activity.privateactivity true
5.2.3.9. API Return Value Change Following Specification Changes to the Package Access
If Android 12 is installed to the device and if Android 11.0 (API Level 30) or later is specified, the return values of the following methods become filtered values based on the specification changes of the package access. This complies with the minimum permission principle introduced on the package access of Android 11.
getAllPermissionGroups()
getPermissionGroupInfo()
getPermissionInfo()
queryPermissionsByGroup()
To verify the operation capability, a custom permission group is created as shown below, and a comparison was made on how the getAllPermissionGroups() values change.
<permission-group android:name="android.permission-group.JSSEC"
    android:label="@string/perm_label"
    android:icon="@drawable/ic_launcher_foreground"
    android:description="@string/perm_description"
    android:permissionGroupFlags="personalInfo"
    android:priority="360"/>
If Android 11 is installed to the device and if Android 11.0 (API Level 30) is specified
com.google.android.gms.permission.CAR_INFORMATION
android.permission-group.CONTACTS
android.permission-group.PHONE
android.permission-group.CALENDAR
android.permission-group.CALL_LOG
android.permission-group.CAMERA
android.permission-group.UNDEFINED
android.permission-group.ACTIVITY_RECOGNITION
android.permission-group.SENSORS
android.permission-group.LOCATION
android.permission-group.STORAGE
android.permission-group.MICROPHONE
android.permission-group.SMS
android.permission-group.JSSEC
If Android 12 is installed to the device and if Android 11.0 (API Level 30) is specified
com.google.android.gms.permission.CAR_INFORMATION
android.permission-group.CONTACTS
android.permission-group.PHONE
android.permission-group.CALENDAR
android.permission-group.CALL_LOG
android.permission-group.CAMERA
android.permission-group.UNDEFINED
android.permission-group.ACTIVITY_RECOGNITION
android.permission-group.SENSORS
android.permission-group.LOCATION
android.permission-group.STORAGE
android.permission-group.MICROPHONE
android.permission-group.SMS
You can see that the custom permission group could not be acquired if Android 12 is installed to the device and if Android 11.0 (API Level 30) is specified. The list of the packages installed to the device is based on the concept of privacy. If the application needs to access other applications, it is necessary to clearly specify other applications in <queries>. <queries> is also used on various sample codes of this guide.
5.2.3.10. Revoking Runtime Permissions
Starting from Android 13, apps can revoke access to runtime permissions granted by the user by using the following APIs.
revokeSelfPermissionOnKill()
revokeSelfPermissionsOnKill()
To revoke a specific runtime permission, specify the name of that permission using revokeSelfPermissionOnKill(). To specify multiple runtime permissions at once, specify the names of the permissions together in revokeSelfPermissionsOnKill(). If no permission was granted, the APIs will do nothing.
The introduction of these APIs follows the principle of minimal permissions, and it is recommended that runtime permissions be reviewed periodically by the app and unused permissions be revoked.
The sample code is as follows. This shows an example of an app that uses android.permission.CAMERA and android.permission.CALL_PHONE permissions.
First, this is an example of the declaration.
<uses-permission android:name="android.permission.WRITE_EXTERNAL_STORAGE">
<uses-permission android:name="android.permission.CALL_PHONE" />
Next, the following is an example of code for requesting or revoking two permissions when a button is pressed.
private final String[] PERMISSIONS = {
        Manifest.permission.CAMERA,
        Manifest.permission.CALL_PHONE
};
private ActivityResultContracts.RequestMultiplePermissions multiplePermissionsContract;
private ActivityResultLauncher<String[]> multiplePermissionLauncher;

@RequiresApi(api = 33)
@Override
protected void onCreate(Bundle savedInstanceState) {
    super.onCreate(savedInstanceState);
    setContentView(R.layout.activity_main);

    multiplePermissionsContract = new ActivityResultContracts.RequestMultiplePermissions();
    multiplePermissionLauncher = registerForActivityResult(multiplePermissionsContract, isGranted -> {
        updateDesign();
    });

    buttonRequest.setOnClickListener(v -> {
        multiplePermissionLauncher.launch(PERMISSIONS);
    });

    buttonRevoke.setOnClickListener(v -> {
        revokeSelfPermissionsOnKill(Arrays.asList(PERMISSIONS));
    });
In the above example, two permissions are revoked at the same time, but to revoke them individually, use revokeSelfPermissionOnKill as follows.
revokeSelfPermissionOnKill(Manifest.permission.CAMERA);
The sample program contains “@RequiresApi(api = 33)” because apps that use revokeSelfPermissionOnKill or revokeSelfPermissionsOnKill are not buildable with Compile SDK 32 or lower.
The timing of actual revocation of the permission is asynchronous, and revocation occurs when the system determines that it is safe to do so. If revoking immediately, safety can be ensured by prompting the user to restart the app and executing System.exit().
5.2.3.12. Installable Minimum Target API Levels
Android 14 and Android 15 have minimum requirements for targetSdkVersion of installable apps. Since malware often targets older API levels to bypass newer security protections, the goal is to uniformly eliminate such malware.
Android Version |
Installable targetSdkVersion |
|---|---|
Android 7.0~13 |
No restrictions |
Android 14 |
targetSdkVersion 23 or higher |
Android 15 |
targetSdkVersion 24 or higher |
When attempting to install apps targeting unsupported targetSdkVersion, the following message will be displayed and the app will not install.
INSTALL_FAILED_DEPRECATED_SDK_VERSION: App package must target at least SDK version 23, but found 7
To install such an app for testing purposes, use the following ADB command:
adb install --bypass-low-target-sdk-block FILENAME.apk
In addition, when upgrading Android versions, this restriction does not apply to apps that are already installed, and they can be used as is.
5.3. Add In-house Accounts to Account Manager
Account Manager is the Android OS's system which centrally manages account information (account name, password) which is necessary for applications to access to online service and authentication token [11]. A user needs to register the account information to Account Manager in advance, and when an application tries to access to online service, Account Manager will automatically provide application authentication token after getting user's permission. The advantage of Account Manager is that an application doesn't need to handle the extremely sensitive information, password.
The structure of account management function which uses Account Manager is as per below Fig. 5.3.1. "Requesting application" is the application which accesses the online service, by getting authentication token, and this is above mentioned application. On the other hand, "Authenticator application" is function extension of Account Manager, and by providing Account Manager of an object called Authenticator, as a result Account Manager can manage centrally the account information and authentication token of the online service. Requesting application and Authenticator application don't need to be the separate ones, so these can be implemented as a single application.
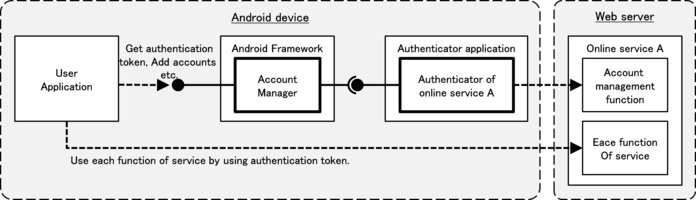
Fig. 5.3.1 Configuration of account management function which uses Account Manager
Originally, the developer's signature key of user application (requesting application) and Authenticator application can be the different ones. However, only in Android 4.0.x devices, there's an Android Framework bug, and when the signature key of user application and Authenticator application are different, exception occurs in user application, and in-house account cannot be used. The following sample code does not implement any workarounds against this defect. Please refer to "5.3.3.2. Exception Occurs When Signature Keys of User Application and Authenticator Application Are Different, in Android 4.0.x" for details.
5.3.1. Sample Code
"5.3.1.1. Creating In-house accounts" is prepared as a sample of Authenticator application, and "5.3.1.2. Using In-house Accounts" is prepared as a sample of requesting application. In sample code set which is distributed in JSSEC's Web site, each of them is corresponded to AccountManager Authenticator and AccountManager User.
5.3.1.1. Creating In-house accounts
Here is the sample code of Authenticator application which enables Account Manager to use the in-house account. There is no Activity which can be launched from home screen in this application. Please pay attention that it's called indirectly via Account Manager from another sample code "5.3.1.2. Using In-house Accounts"
Points:
The service that provides an authenticator must be private.
The login screen activity must be implemented in an authenticator application.
The login screen activity must be made as a public activity.
The explicit intent which the class name of the login screen activity is specified must be set to KEY_INTENT.
Sensitive information (like account information or authentication token) must not be output to the log.
Password should not be saved in Account Manager.
HTTPS should be used for communication between an authenticator and the online services.
Service which gives Account Manager IBinder of Authenticator is defined in AndroidManifest.xml. Specify resource XML file which Authenticator is written, by meta-data.
AccountManager Authenticator/AndroidManifest.xml
<manifest xmlns:android="http://schemas.android.com/apk/res/android"

          xmlns:tools="http://schemas.android.com/tools">

  <!-- Necessary Permission to implement Authenticator -->
  <uses-permission android:name="android.permission.GET_ACCOUNTS" />
  <uses-permission android:name="android.permission.AUTHENTICATE_ACCOUNTS" />

  <application
      android:allowBackup="false"
      android:icon="@drawable/ic_launcher"
      android:label="@string/app_name" >

    <!-- Service which gives IBinder of Authenticator to AccountManager -->
    <!-- *** POINT 1 *** The service that provides an authenticator must be private. -->
    <service
        android:name=".AuthenticationService"
        android:exported="false" >
      <!-- intent-filter and meta-data are usual pattern. -->
      <intent-filter>
        <action android:name="android.accounts.AccountAuthenticator" />
      </intent-filter>
      <meta-data
          android:name="android.accounts.AccountAuthenticator"
          android:resource="@xml/authenticator" />
    </service>

    <!-- Activity for for login screen which is displayed when adding an account -->
    <!-- *** POINT 2 *** The login screen activity must be implemented in an authenticator application. -->
    <!-- *** POINT 3 *** The login screen activity must be made as a public activity. -->
    <activity
        android:name=".LoginActivity"
        android:exported="true"
        android:label="@string/login_activity_title"
        android:theme="@android:style/Theme.Dialog"
        tools:ignore="ExportedActivity" />
  </application>

</manifest>
Define Authenticator by XML file. Specify account type etc. of in-house account.
res/xml/authenticator.xml
<account-authenticator xmlns:android="http://schemas.android.com/apk/res/android"
    android:accountType="org.jssec.android.accountmanager"
    android:icon="@drawable/ic_launcher"
    android:label="@string/label"
    android:smallIcon="@drawable/ic_launcher"
    android:customTokens="true" />
Service which gives Authenticator's Instance to AccountManager. Easy implementation which returns Instance of JssecAuthenticator class that is Authenticator implemented in this sample by onBind(), is enough.
AuthenticationService.java
/*
 * Copyright (C) 2012-2025 Japan Smartphone Security Association
 *
 * Licensed under the Apache License, Version 2.0 (the "License");
 * you may not use this file except in compliance with the License.
 * You may obtain a copy of the License at
 *
 *      http://www.apache.org/licenses/LICENSE-2.0
 *
 * Unless required by applicable law or agreed to in writing, software
 * distributed under the License is distributed on an "AS IS" BASIS,
 * WITHOUT WARRANTIES OR CONDITIONS OF ANY KIND, either express or implied.
 * See the License for the specific language governing permissions and
 * limitations under the License.
 */

package org.jssec.android.accountmanager.authenticator;

import android.app.Service;
import android.content.Intent;
import android.os.IBinder;

public class AuthenticationService extends Service {

    private JssecAuthenticator mAuthenticator;

    @Override
    public void onCreate() {
        mAuthenticator = new JssecAuthenticator(this);
    }

    @Override
    public IBinder onBind(Intent intent) {
        return mAuthenticator.getIBinder();
    }
}
JssecAuthenticator is the Authenticator which is implemented in this sample. It inherits AbstractAccountAuthenticator, and all abstract methods are implemented. These methods are called by Account Manager. At addAccount() and at getAuthToken(), the intent for launching LoginActivity to get authentication token from online service are returned to Account Manager.
JssecAuthenticator.java
/*
 * Copyright (C) 2012-2025 Japan Smartphone Security Association
 *
 * Licensed under the Apache License, Version 2.0 (the "License");
 * you may not use this file except in compliance with the License.
 * You may obtain a copy of the License at
 *
 *      http://www.apache.org/licenses/LICENSE-2.0
 *
 * Unless required by applicable law or agreed to in writing, software
 * distributed under the License is distributed on an "AS IS" BASIS,
 * WITHOUT WARRANTIES OR CONDITIONS OF ANY KIND, either express or implied.
 * See the License for the specific language governing permissions and
 * limitations under the License.
 */

package org.jssec.android.accountmanager.authenticator;

import android.accounts.AbstractAccountAuthenticator;
import android.accounts.Account;
import android.accounts.AccountAuthenticatorResponse;
import android.accounts.AccountManager;
import android.accounts.NetworkErrorException;
import android.content.Context;
import android.content.Intent;
import android.os.Bundle;

public class JssecAuthenticator extends AbstractAccountAuthenticator {

    public static final String JSSEC_ACCOUNT_TYPE =
            "org.jssec.android.accountmanager";
    public static final String JSSEC_AUTHTOKEN_TYPE = "webservice";
    public static final String JSSEC_AUTHTOKEN_LABEL = "JSSEC Web Service";
    public static final String RE_AUTH_NAME = "reauth_name";

    protected final Context mContext;

    public JssecAuthenticator(Context context) {
        super(context);
        mContext = context;
    }

    @Override
    public Bundle addAccount(AccountAuthenticatorResponse response,
                             String accountType, String authTokenType,
                             String[] requiredFeatures, Bundle options)
            throws NetworkErrorException {

        AccountManager am = AccountManager.get(mContext);
        Account[] accounts = am.getAccountsByType(JSSEC_ACCOUNT_TYPE);
        Bundle bundle = new Bundle();
        if (accounts.length > 0) {
            // In this sample code, when an account already exists, consider it
            // as an error.
            bundle.putString(AccountManager.KEY_ERROR_CODE, String.valueOf(-1));
            bundle.putString(AccountManager.KEY_ERROR_MESSAGE,
                             mContext.getString(R.string.error_account_exists));
        } else {
            // *** POINT 2 *** The login screen activity must be implemented in an
            // authenticator application.
            // *** POINT 4 *** The explicit intent which the class name of the
            // login screen activity is specified must be set to KEY_INTENT.
            Intent intent = new Intent(mContext, LoginActivity.class);
            intent.putExtra(AccountManager.KEY_ACCOUNT_AUTHENTICATOR_RESPONSE, response);

            bundle.putParcelable(AccountManager.KEY_INTENT, intent);
        }
        return bundle;
    }

    @Override
    public Bundle getAuthToken(AccountAuthenticatorResponse response,
                               Account account, String authTokenType,
                               Bundle options)
            throws NetworkErrorException {

        Bundle bundle = new Bundle();
        if (accountExist(account)) {
            // *** POINT 4 *** The explicit intent which the class name of the
            // login screen activity is specified must be set to KEY_INTENT.
            Intent intent = new Intent(mContext, LoginActivity.class);
            intent.putExtra(RE_AUTH_NAME, account.name);
            intent.putExtra(AccountManager.KEY_ACCOUNT_AUTHENTICATOR_RESPONSE,
                            response);
            bundle.putParcelable(AccountManager.KEY_INTENT, intent);
        } else {
            // When the specified account doesn't exist, consider it as an error.
            bundle.putString(AccountManager.KEY_ERROR_CODE, String.valueOf(-2));
            bundle.putString(AccountManager.KEY_ERROR_MESSAGE,
                    mContext.getString(R.string.error_account_not_exists));
        }
        return bundle;
    }

    @Override
    public String getAuthTokenLabel(String authTokenType) {
        return JSSEC_AUTHTOKEN_LABEL;
    }

    @Override
    public Bundle confirmCredentials(AccountAuthenticatorResponse response,
                                     Account account, Bundle options)
            throws NetworkErrorException {
        return null;
    }

    @Override
    public Bundle editProperties(AccountAuthenticatorResponse response,
                                 String accountType) {
        return null;
    }

    @Override
    public Bundle updateCredentials(AccountAuthenticatorResponse response,
                                    Account account,
                                    String authTokenType, Bundle options)
            throws NetworkErrorException {
        return null;
    }

    @Override
    public Bundle hasFeatures(AccountAuthenticatorResponse response,
                              Account account, String[] features)
            throws NetworkErrorException {
        Bundle result = new Bundle();
        result.putBoolean(AccountManager.KEY_BOOLEAN_RESULT, false);
        return result;
    }

    private boolean accountExist(Account account) {
        AccountManager am = AccountManager.get(mContext);
        Account[] accounts = am.getAccountsByType(JSSEC_ACCOUNT_TYPE);
        for (Account ac : accounts) {
            if (ac.equals(account)) {
                return true;
            }
        }
        return false;
    }
}
This is Login activity which sends an account name and password to online service, and perform login authentication, and as a result, get an authentication token. It's displayed when adding a new account or when getting authentication token again. It's supposed that the actual access to online service is implemented in WebService class.
LoginActivity.java
/*
 * Copyright (C) 2012-2025 Japan Smartphone Security Association
 *
 * Licensed under the Apache License, Version 2.0 (the "License");
 * you may not use this file except in compliance with the License.
 * You may obtain a copy of the License at
 *
 *      http://www.apache.org/licenses/LICENSE-2.0
 *
 * Unless required by applicable law or agreed to in writing, software
 * distributed under the License is distributed on an "AS IS" BASIS,
 * WITHOUT WARRANTIES OR CONDITIONS OF ANY KIND, either express or implied.
 * See the License for the specific language governing permissions and
 * limitations under the License.
 */

package org.jssec.android.accountmanager.authenticator;

import org.jssec.android.accountmanager.webservice.WebService;

import android.accounts.Account;
import android.accounts.AccountAuthenticatorActivity;
import android.accounts.AccountManager;
import android.content.Intent;
import android.os.Bundle;
import android.text.InputType;
import android.text.TextUtils;
import android.util.Log;
import android.view.View;
import android.view.Window;
import android.widget.EditText;

public class LoginActivity extends AccountAuthenticatorActivity {
    private static final String TAG =
            AccountAuthenticatorActivity.class.getSimpleName();
    private String mReAuthName = null;
    private EditText mNameEdit = null;
    private EditText mPassEdit = null;

    @Override
    public void onCreate(Bundle icicle) {
        super.onCreate(icicle);

        // Display alert icon
        requestWindowFeature(Window.FEATURE_LEFT_ICON);
        setContentView(R.layout.login_activity);
        getWindow().setFeatureDrawableResource(Window.FEATURE_LEFT_ICON,
                                               android.R.drawable.ic_dialog_alert);

        // Find a widget in advance
        mNameEdit = (EditText) findViewById(R.id.username_edit);
        mPassEdit = (EditText) findViewById(R.id.password_edit);

        // *** POINT 3 *** The login screen activity must be made as a public
        // activity, and suppose the attack access from other application.
        // Regarding external input, only RE_AUTH_NAME which is String type of
        // Intent#extras, are handled.
        // This external input String is passed toextEdit#setText(),
        // WebService#login(),new Account(), as a parameter,it's verified that
        // there's no problem if any character string is passed.
        mReAuthName = getIntent().getStringExtra(JssecAuthenticator.RE_AUTH_NAME);
        if (mReAuthName != null) {
            // Since LoginActivity is called with the specified user name,
            // user name should not be editable.
            mNameEdit.setText(mReAuthName);
            mNameEdit.setInputType(InputType.TYPE_NULL);
            mNameEdit.setFocusable(false);
            mNameEdit.setEnabled(false);
        }
    }

    // It's executed when login button is pressed.
    public void handleLogin(View view) {
        String name = mNameEdit.getText().toString();
        String pass = mPassEdit.getText().toString();

        if (TextUtils.isEmpty(name) || TextUtils.isEmpty(pass)) {
            // Process when the inputed value is incorrect
            setResult(RESULT_CANCELED);
            finish();
        }

        // Login to online service based on the inpputted account information.
        WebService web = new WebService();
        String authToken = web.login(name, pass);
        if (TextUtils.isEmpty(authToken)) {
            // Process when authentication failed
            setResult(RESULT_CANCELED);
            finish();
        }

        // Process when login was successful, is as per below.

        // *** POINT 5 *** Sensitive information (like account information or
        // authentication token) must not be output to the log.
        Log.i(TAG, "WebService login succeeded");


        if (mReAuthName == null) {
            // Register accounts which logged in successfully, to aAccountManager
            // *** POINT 6 *** Password should not be saved in Account Manager.
            AccountManager am = AccountManager.get(this);
            Account account =
                    new Account(name, JssecAuthenticator.JSSEC_ACCOUNT_TYPE);
            am.addAccountExplicitly(account, null, null);
            am.setAuthToken(account, JssecAuthenticator.JSSEC_AUTHTOKEN_TYPE,
                            authToken);
            Intent intent = new Intent();
            intent.putExtra(AccountManager.KEY_ACCOUNT_NAME, name);
            intent.putExtra(AccountManager.KEY_ACCOUNT_TYPE,
                            JssecAuthenticator.JSSEC_ACCOUNT_TYPE);
            setAccountAuthenticatorResult(intent.getExtras());
            setResult(RESULT_OK, intent);
        } else {
            // Return authentication token
            Bundle bundle = new Bundle();
            bundle.putString(AccountManager.KEY_ACCOUNT_NAME, name);
            bundle.putString(AccountManager.KEY_ACCOUNT_TYPE,
                             JssecAuthenticator.JSSEC_ACCOUNT_TYPE);
            bundle.putString(AccountManager.KEY_AUTHTOKEN, authToken);
            setAccountAuthenticatorResult(bundle);
            setResult(RESULT_OK);
        }
        finish();
    }
}
Actually, WebService class is dummy implementation here, and this is the sample implementation which supposes authentication is always successful, and fixed character string is returned as an authentication token.
WebService.java
/*
 * Copyright (C) 2012-2025 Japan Smartphone Security Association
 *
 * Licensed under the Apache License, Version 2.0 (the "License");
 * you may not use this file except in compliance with the License.
 * You may obtain a copy of the License at
 *
 *      http://www.apache.org/licenses/LICENSE-2.0
 *
 * Unless required by applicable law or agreed to in writing, software
 * distributed under the License is distributed on an "AS IS" BASIS,
 * WITHOUT WARRANTIES OR CONDITIONS OF ANY KIND, either express or implied.
 * See the License for the specific language governing permissions and
 * limitations under the License.
 */

package org.jssec.android.accountmanager.webservice;

public class WebService {

    /**
     * Suppose to access to account managemnet function of online service.
     *
     * @param username Account name character string
     * @param password password character string
     * @return Return authentication token
     */
    public String login(String username, String password) {
        // *** POINT 7 *** HTTPS should be used for communication between an
        // authenticator and the online services.
        // Actually, communication process with servers is implemented here,
        // but Omit here, since this is a sample.
        return getAuthToken(username, password);
    }

    private String getAuthToken(String username, String password) {
        // In fact, get the value which uniqueness and impossibility of
        // speculation are guaranteed by the server, but the fixed value
        // is returned without communication here, since this is sample.
        return "c2f981bda5f34f90c0419e171f60f45c";
    }
}
5.3.1.2. Using In-house Accounts
Here is the sample code of an application which adds an in-house account and gets an authentication token. When another sample application "5.3.1.1. Creating In-house accounts" is installed in a device, in-house account can be added or authentication token can be got. "Access request" screen is displayed only when the signature keys of both applications are different.
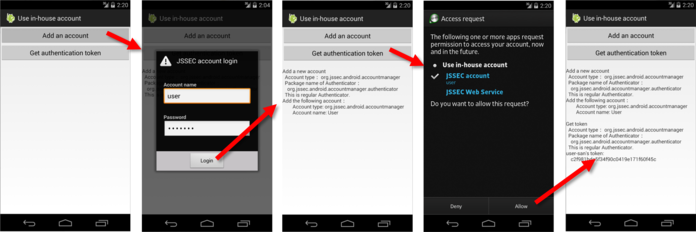
Fig. 5.3.2 Behavior screen of sample application AccountManager User
Point:
Execute the account process after verifying if the authenticator is regular one.
AndroidManifest.xml of AccountManager user application. Declare to use necessary Permission. Refer to "5.3.3.1. Usage of Account Manager and Permission" for the necessary Permission.
AccountManager User/AndroidManifest.xml
<manifest xmlns:android="http://schemas.android.com/apk/res/android"
           >

  <uses-permission android:name="android.permission.GET_ACCOUNTS" />
  <uses-permission android:name="android.permission.MANAGE_ACCOUNTS" />
  <uses-permission android:name="android.permission.USE_CREDENTIALS" />

  <queries>
    <package android:name="org.jssec.android.accountmanager.authenticator" />
  </queries>

  <application
      android:allowBackup="false"
      android:icon="@drawable/ic_launcher"
      android:label="@string/app_name"
      android:theme="@style/AppTheme" >
    <activity
        android:name=".UserActivity"
        android:label="@string/app_name"
        android:exported="true" >
      <intent-filter>
        <action android:name="android.intent.action.MAIN" />
        <category android:name="android.intent.category.LAUNCHER" />
      </intent-filter>
    </activity>
  </application>

</manifest>
Activity of user application. When tapping the button on the screen, either addAccount() or getAuthToken() is to be executed. Authenticator which corresponds to the specific account type may be fake in some cases, so pay attention that the account process is started after verifying that the Authenticator is regular one.
UserActivity.java
/*
 * Copyright (C) 2012-2025 Japan Smartphone Security Association
 *
 * Licensed under the Apache License, Version 2.0 (the "License");
 * you may not use this file except in compliance with the License.
 * You may obtain a copy of the License at
 *
 *      http://www.apache.org/licenses/LICENSE-2.0
 *
 * Unless required by applicable law or agreed to in writing, software
 * distributed under the License is distributed on an "AS IS" BASIS,
 * WITHOUT WARRANTIES OR CONDITIONS OF ANY KIND, either express or implied.
 * See the License for the specific language governing permissions and
 * limitations under the License.
 */

package org.jssec.android.accountmanager.user;

import java.io.IOException;

import org.jssec.android.shared.PkgCert;
import org.jssec.android.shared.Utils;

import android.accounts.Account;
import android.accounts.AccountManager;
import android.accounts.AccountManagerCallback;
import android.accounts.AccountManagerFuture;
import android.accounts.AuthenticatorDescription;
import android.accounts.AuthenticatorException;
import android.accounts.OperationCanceledException;
import android.app.Activity;
import android.content.Context;
import android.os.Bundle;
import android.view.View;
import android.widget.TextView;

public class UserActivity extends Activity {

    // Information of the Authenticator to be used
    private static final String JSSEC_ACCOUNT_TYPE =
            "org.jssec.android.accountmanager";
    private static final String JSSEC_TOKEN_TYPE = "webservice";
    private TextView mLogView;

    @Override
    public void onCreate(Bundle savedInstanceState) {
        super.onCreate(savedInstanceState);
        setContentView(R.layout.user_activity);

        mLogView = (TextView)findViewById(R.id.logview);
    }

    public void addAccount(View view) {
        logLine();
        logLine("Add a new account");

        // *** POINT 1 *** Execute the account process after verifying if the
        // authenticator is regular one.
        if (!checkAuthenticator()) return;

        AccountManager am = AccountManager.get(this);
        am.addAccount(JSSEC_ACCOUNT_TYPE, JSSEC_TOKEN_TYPE, null, null, this,
            new AccountManagerCallback<Bundle>() {
                @Override
                public void run(AccountManagerFuture<Bundle> future) {
                    try {
                        Bundle result = future.getResult();
                        String type =
                            result.getString(AccountManager.KEY_ACCOUNT_TYPE);
                        String name =
                            result.getString(AccountManager.KEY_ACCOUNT_NAME);
                        if (type != null && name != null) {
                            logLine("Add the following accounts:");
                            logLine("  Account type: %s", type);
                            logLine("  Account name: %s", name);
                        } else {
                            String code =
                                result.getString(AccountManager.KEY_ERROR_CODE);
                            String msg =
                                result.getString(AccountManager.KEY_ERROR_MESSAGE);
                            logLine("The account cannot be added");
                            logLine("  Error code %s: %s", code, msg);
                        }
                    } catch (OperationCanceledException e) {
                    } catch (AuthenticatorException e) {
                    } catch (IOException e) {
                    }
                }
            },
        null);
    }

    public void getAuthToken(View view) {
        logLine();
        logLine("Get token");

        // *** POINT 1 *** After checking that the Authenticator is the regular
        // one, execute account process.
        if (!checkAuthenticator()) return;

        AccountManager am = AccountManager.get(this);
        Account[] accounts = am.getAccountsByType(JSSEC_ACCOUNT_TYPE);
        if (accounts.length > 0) {
            Account account = accounts[0];
            am.getAuthToken(account, JSSEC_TOKEN_TYPE, null, this,
                new AccountManagerCallback<Bundle>() {
                    @Override
                    public void run(AccountManagerFuture<Bundle> future) {
                        try {
                            Bundle result = future.getResult();
                            String name =
                                result.getString(AccountManager.KEY_ACCOUNT_NAME);
                            String authtoken =
                                result.getString(AccountManager.KEY_AUTHTOKEN);
                            logLine("%s-san's token:", name);
                            if (authtoken != null) {
                                logLine("    %s", authtoken);
                            } else {
                                logLine("    Couldn't get");
                            }
                        } catch (OperationCanceledException e) {
                            logLine("  Exception: %s",e.getClass().getName());
                        } catch (AuthenticatorException e) {
                            logLine("  Exception: %s",e.getClass().getName());
                        } catch (IOException e) {
                            logLine("  Exception: %s",e.getClass().getName());
                        }
                    }
                },
            null);
        } else {
            logLine("Account is not registered.");
        }
    }

    // *** POINT 1 *** Verify that Authenticator is regular one.
    private boolean checkAuthenticator() {
        AccountManager am = AccountManager.get(this);
        String pkgname = null;
        for (AuthenticatorDescription ad : am.getAuthenticatorTypes()) {
            if (JSSEC_ACCOUNT_TYPE.equals(ad.type)) {
                pkgname = ad.packageName;
                break;
            }
        }

        if (pkgname == null) {
            logLine("Authenticator cannot be found.");
            return false;
        }

        logLine("  Account type: %s", JSSEC_ACCOUNT_TYPE);
        logLine("  Package name of Authenticator: ");
        logLine("    %s", pkgname);

        if (!PkgCert.test(this, pkgname, getTrustedCertificateHash(this))) {
            logLine("  It's not regular Authenticator(certificate is not matched.)");
            return false;
        }

        logLine("  This is regular Authenticator.");
        return true;
    }

    // Certificate hash value of regular Authenticator application
    // Certificate hash value can be checked in sample applciation
    // JSSEC CertHash Checker
    private String getTrustedCertificateHash(Context context) {
        if (Utils.isDebuggable(context)) {
            // Certificate hash value of  debug.keystore "androiddebugkey"
            return "0EFB7236 328348A9 89718BAD DF57F544 D5CCB4AE B9DB34BC 1E29DD26 F77C8255";
        } else {
            // Certificate hash value of  keystore "my company key"
            return "D397D343 A5CBC10F 4EDDEB7C A10062DE 5690984F 1FB9E88B D7B3A7C2 42E142CA";
        }
    }

    private void log(String str) {
        mLogView.append(str);
    }

    private void logLine(String line) {
        log(line + "\n");
    }

    private void logLine(String fmt, Object... args) {
        logLine(String.format(fmt, args));
    }

    private void logLine() {
        log("\n");
    }
}
PkgCert.java
/*
 * Copyright (C) 2012-2025 Japan Smartphone Security Association
 *
 * Licensed under the Apache License, Version 2.0 (the "License");
 * you may not use this file except in compliance with the License.
 * You may obtain a copy of the License at
 *
 *      http://www.apache.org/licenses/LICENSE-2.0
 *
 * Unless required by applicable law or agreed to in writing, software
 * distributed under the License is distributed on an "AS IS" BASIS,
 * WITHOUT WARRANTIES OR CONDITIONS OF ANY KIND, either express or implied.
 * See the License for the specific language governing permissions and
 * limitations under the License.
 */

package org.jssec.android.shared;

import java.security.MessageDigest;
import java.security.NoSuchAlgorithmException;

import android.content.Context;
import android.content.pm.PackageInfo;
import android.content.pm.PackageManager;
import android.content.pm.PackageManager.NameNotFoundException;
import android.content.pm.Signature;

public class PkgCert {

    public static boolean test(Context ctx, String pkgname, String correctHash) {
        if (correctHash == null) return false;
        correctHash = correctHash.replaceAll(" ", "");
        return correctHash.equals(hash(ctx, pkgname));
    }

    public static String hash(Context ctx, String pkgname) {
        if (pkgname == null) return null;
        try {
            PackageManager pm = ctx.getPackageManager();
            PackageInfo pkginfo =
                pm.getPackageInfo(pkgname, PackageManager.GET_SIGNATURES);
            // Will not handle multiple signatures.
            if (pkginfo.signatures.length != 1) return null;
            Signature sig = pkginfo.signatures[0];
            byte[] cert = sig.toByteArray();
            byte[] sha256 = computeSha256(cert);
            return byte2hex(sha256);
        } catch (NameNotFoundException e) {
            return null;
        }
    }

    private static byte[] computeSha256(byte[] data) {
        try {
            return MessageDigest.getInstance("SHA-256").digest(data);
        } catch (NoSuchAlgorithmException e) {
            return null;
        }
    }

    private static String byte2hex(byte[] data) {
        if (data == null) return null;
        final StringBuilder hexadecimal = new StringBuilder();
        for (final byte b : data) {
            hexadecimal.append(String.format("%02X", b));
        }
        return hexadecimal.toString();
    }
}
5.3.2. Rule Book
Follow the rules below when implementing Authenticator application.
Service that Provides Authenticator Must Be Private (Required)
Login Screen Activity Must Be Implemented by Authenticator Application (Required)
Password Should Not Be Saved in Account Manager (Recommended)
HTTPS Should Be Used for Communication Between an Authenticator and the Online Service (Required)
Follow the rules below when implementing user application.
5.3.2.1. Service that Provides Authenticator Must Be Private (Required)
It's presupposed that the Service which provides with Authenticator is used by Account Manager, and it should not be accessed by other applications. So, by making it Private Service, it can exclude accesses by other applications. In addition, Account Manager runs with system privilege, so Account Manager can access even if it's private Service.
5.3.2.2. Login Screen Activity Must Be Implemented by Authenticator Application (Required)
Login screen for adding a new account and getting the authentication token should be implemented by Authenticator application. Own Login screen should not be prepared in user application side. As mentioned at the beginning of this article, "The advantage of AccountManager is that the extremely sensitive information/password is not necessarily to be handled by application.", If login screen is prepared in user application side, password is handled by user application, and its design becomes what is beyond the policy of Account Manager.
By preparing login screen by Authenticator application, who can operate login screen is limited only the device's user. It means that there's no way to attack the account for malicious applications by attempting to login directly, or by creating an account.
5.3.2.3. The Login Screen Activity Must Be Made as a Public Activity and Suppose Attack Accesses by Other Applications (Required)
Login screen Activity is the system launched by the user application's p. In order that the login screen Activity is displayed even when the signature keys of user application and Authenticator application are different, login screen Activity should be implemented as Public Activity.
What login screen Activity is public Activity means, that there's a chance that it may be launched by malicious applications. Never trust on any input data. Hence, it's necessary to take the counter-measures mentioned in "3.2. Handling Input Data Carefully and Securely"
5.3.2.4. Provide KEY_INTENT with Explicit Intent with the Specified Class Name of Login Screen Activity (Required)
When Authenticator needs to open login screen Activity, Intent which launches login screen Activity is to be given in the Bundle that is returned to Account Manager, by KEY_INTENT. The Intent to be given, should be the explicit Intent which specifies class name of login screen Activity. If an implicit Intent is given, the framework may attempt to launch an Activity other than the Activity prepared by the Authenticator app for the login window. On Android 4.4 (API Level 19) and later versions, this may cause the app to crash; on earlier versions it may cause unintended Activities prepared by other apps to be launched.
On Android 4.4(API Level 19) and later versions, if the signature of an app launched by an intent given by the framework via KEY_INTENT does not match the signature of the Authenticator app, a SecurityException is generated; in this case, there is no risk that a false login screen will be launched; however, there is a possibility that the ordinary screen will be able to launch and the user’s normal use of the app will be obstructed. On versions prior to Android 4.4(API Level 19), there is a risk that a false login screen prepared by a malicious app will be launched, and thus that the user may input passwords and other authentication information to the malicious app.
5.3.2.5. Sensitive Information (like Account Information and Authentication Token) Must Not Be Output to the Log (Required)
Applications which access to online service sometimes face a trouble like it cannot access to online service successfully. The causes of unsuccessful access are various, like lack in network environment arrangement, mistakes in implementing communication protocol, lack of Permission, authentication error, etc. A common implementation is that a program outputs the detailed information to log, so that developer can analyze the cause of a problem later.
Sensitive information like password or authentication token should not be output to log. Log information can be read from other applications, so it may become the cause of information leakage. Also, account names should not be output to log, if it could be lead the damage of leakage.
5.3.2.6. Password Should Not Be Saved in Account Manager (Recommended)
Two of authentication information, password and authentication token, can be saved in an account to be register to AccountManager. This information is to be stored in accounts.db under the following directories, in a plain text (i.e. without encryption).
Android 4.1 or earlier<br/> /data/system/accounts.db
Android 4.2 to Android 6.0<br/> /data/system/0/accounts.db or /data/system/<UserId>/accounts.db
Android 7.0 or later<br/> /data/system_ce/0/accounts_ce.db
Note: Because multiuser functionality is supported on Android 4.2 and later versions, this has been changed to save the content to a user-specific directory. Also, because Android 7.0 and later versions support Direct Boot, the database file is divided into two parts: one file that handles data while locked (/data/system_de/0/accounts_de_db) and a separate file that handles data while unlocked (/data/system_ce/0/accounts_ce.db) Under ordinary circumstances, authentication information is stored in the latter database file.
Root privileges or system privileges are required to read the content of these database files, so they cannot be read on commercial Android terminals. If Android OS contains any vulnerabilities that allow attackers to acquire root privileges or system privileges, this would leave the authentication information stored in accounts.db exposed to risk.
To read in the contents of accounts.db, either root privilege or system privilege is required, and it cannot be read from the marketed Android devices. In the case there is any vulnerability in Android OS, which root privilege or system privilege may be taken over by attackers, authentication information which is saved in accounts.db will be on the edge of the risk.
The Authentication application, which is introduced in this article, is designed to save authentication token in AccountManager without saving user password. When accessing to online service continuously in a certain period, generally the expiration period of authentication token is extended, so the design that password is not saved is enough in most cases.
In general, valid date of authentication token is shorter than password, and it's characteristic that it can be disabled anytime. In case, authentication token is leaked, it can be disabled, so authentication token is comparatively safer, compared with password. In the case authentication token is disabled, user can input the password again to get a new authentication token.
If disabling password when it's leaked, user cannot use online service any more. In this case, it requires call center support etc., and it will take huge cost. Hence, it's better to avoid from the design to save password in AccountManager. In case, the design to save password cannot be avoided, high level of reverse engineering counter-measures like encrypting password and obfuscating the key of that encryption, should be taken.
5.3.2.7. HTTPS Should Be Used for Communication Between an Authenticator and the Online Service (Required)
Password or authentication token is so called authentication information, and if it's taken over by the third party, the third party can masquerade as the valid user. Since Authenticator sends/receives these types of authentication information with online service, reliable encrypted communication method like an HTTPS should be used.
5.3.2.8. Account Process Should Be Executed after verifying if the Authenticator is the regular one (Required)
In the case there are several Authenticators which the same account type is defined in a device, Authenticator which was installed earlier becomes valid. So, when the own Authenticator was installed later, it's not to be used.
If the Authenticator which was installed earlier, is the malware's masquerade, account information inputted by user may be taken over by malware. User application should verify the account type which performs account operation, whether the regular Authenticator is allocated to it or not, before executing account operation.
Whether the Authenticator which is allocated to one account type is regular one or not, can be verified by checking whether the certificate hash value of the package of Authenticator matches with pre-confirmed valid certificate hash value. If the certificate hash values are found to be not matched, a measure to prompt user to uninstall the package which includes the unexpected Authenticator allocated to that account type, is preferable.
5.3.3. Advanced Topics
5.3.3.1. Usage of Account Manager and Permission
To use each method of AccountManager class, it's necessary to declare to use the appropriate Permission respectively, in application's AndroidManifest.xml. In Android 5.1 (API Level 22) and earlier versions, privileges such as AUTHENTICATE_ACCOUNTS, GET_ACCOUNTS, or MANAGE_ACCOUNTS are required; the privileges corresponding to various methods are shown in Table 5.3.1.
Functions that Account Manager provides |
||
Permission |
Method |
Explanation |
AUTHENTICATE_ACCOUNTS (Only Packages which are Authenticator, can use.) |
getPassword() |
To get password |
getUserData() |
To get user information |
|
addAccountExplicitly() |
To add accounts to DB |
|
peekAuthToken() |
To get cached token |
|
setAuthToken() |
To register authentication token |
|
setPassword() |
To change password |
|
setUserData() |
To set user information |
|
renameAccount() |
To rename account |
|
GET_ACCOUNTS |
getAccounts() |
To get a list of all accounts |
getAccountsByType() |
To get a list of all accounts which account types are same |
|
getAccountsByTypeAndFeatures() |
To get a list of all accounts which have the specified function |
|
addOnAccountsUpdatedListener() |
To register event listener |
|
hasFeatures() |
Whether it has the specified function or not |
|
MANAGE_ACCOUNTS |
getAuthTokenByFeatures() |
To get authentication token of the accounts which have the specified function |
addAccount() |
To request a user to add accounts |
|
removeAccount() |
To remove an account |
|
clearPassword() |
Initialize password |
|
updateCredentials() |
Request a user to change password |
|
editProperties() |
Change Authenticator setting |
|
confirmCredentials() |
Request a user to input password again |
|
USE_CREDENTIALS |
getAuthToken() |
To get authentication token |
blockingGetAuthToken() |
To get authentication token |
|
MANAGE_ACCOUNTS or USE_CREDENTIALS |
invalidateAuthToken() |
To delete cached token |
In case using methods group which AUTHENTICATE_ACCOUNTS Permission is necessary, there is a restriction related to package signature key along with Permission. Specifically, the key for signature of package that provides Authenticator and the key for signature of package in the application that uses methods, should be the same. So, when distributing an application which uses method group which AUTHENTICATE_ACCOUNTS Permission is necessary other than Authenticator, signature should be signed by the key which is the same as Authenticator.
In Android 6.0 (API Level 23) and later versions, Permissions other than GET_ACCOUNTS are not used, and there is no difference between what may be done whether or not it is declared. For methods that request AUTHENTICATE_ACCOUNTS on Android 5.1 (API Level 22) and earlier versions, note that—even if you wish to request a Permission—the call can only be made if signatures match (if the signatures do not match then a SecurityException is generated).
In addition, access controls for API routines that require GET_ACCOUNTS changed in Android 8.0 (API Level 26). In this and later versions, if the targetSdkVersion of the app on the side using the account information is 26 or higher, account information can generally not be obtained if the signature does not match that of the Authenticator app, even if GET_ACCOUNTS has been granted. However, if the Authenticator app calls the setAccountVisibility method to specify a package name, account information can be provided even to apps with non-matching signatures.
In a development phase by Android Studio, since a fixed debug keystore might be shared by some Android Studio projects, developers might implement and test Account Manager by considering only permissions and no signature. It's necessary for especially developers who use the different signature keys per applications, to be very careful when selecting which key to use for applications, considering this restriction. In addition, since the data which is obtained by AccountManager includes the sensitive information, so need to handle with care in order to decrease the risk like leakage or unauthorized use.
5.3.3.2. Exception Occurs When Signature Keys of User Application and Authenticator Application Are Different, in Android 4.0.x
When authentication token acquisition function, is required by the user application which is signed by the developer key which is different from the signature key of Authenticator application that includes Authenticator, AccountManager verifies users whether to grant the usage of authentication token or not, by displaying the authentication token license screen (GrantCredentialsPermissionActivity.) However, there's a bug in Android Framework of Android 4.0.x, as soon as this screen in opened by AccountManager, exception occurs, and application is force closed. (Fig. 5.3.3). See https://code.google.com/p/android/issues/detail?id=23421 for the details of the bug. This bug cannot be found in Android 4.1.x. and later.
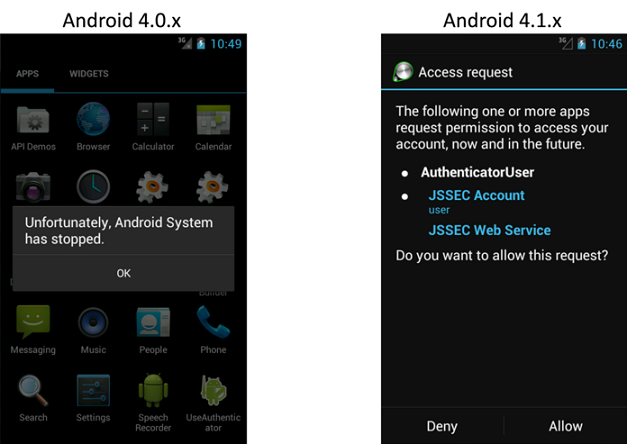
Fig. 5.3.3 When displaying Android standard authentication token license screen
5.3.3.3. Cases in which Authenticator accounts with non-matching signatures may be read in Android 8.0 (API Level 26) or later
In Android 8.0 (API Level 26) and later versions, account-information-fetching methods that required GET_ACCOUNTS Permission in Android 7.1 (API Level 25) and earlier versions may now be called without that permission. Instead, account information may now be obtained only in cases where the signature matches or in which the setAccountVisibility method has been used on the Authenticator app side to specify an app to which account information may be provided However, note carefully that there are a number of exceptions to this rule, implemented by the framework. In what follows we discuss these exceptions.
First, when the targetSdkVersion of the app using the account information is 25 (Android 7.1) or below, the above rule does not apply; in this case apps with the GET_ACCOUNTS permission may obtain account information within the terminal regardless of its signature. However, below we discuss how this behavior may be changed depending on the Authenticator-side implementation. Next, account information for Authenticators that declare the use of WRITE_CONTACTS Permission may be read by other apps with READ_CONTACTS Permission, regardless of signature. This is not a bug, but is rather the way the framework is designed [12]. Note again that this behavior may differ depending on the Authenticator-side implementation.
Thus we see that there are some exceptional cases in which account information may be read even for apps with non-matching signatures and for which the setAccountVisibility method has not been called to specify a destination to which account information is to be provided. However, these behaviors may be modified by calling the setAccountVisibility method on the Authenticator side, as in the following snippet.
Do not provide account information to third-party apps
// account for which to change visibility
accountManager.setAccountVisibility(account,
    AccountManager.PACKAGE_NAME_KEY_LEGACY_VISIBLE,
    AccountManager.VISIBILITY_USER_MANAGED_NOT_VISIBLE);
By proceeding this way, we can avoid the framework’s default behavior regarding account information for Authenticators that have called the setAccountVisibility method; the above modification ensures that account information is not provided even in cases where targetSdkVersion <= 25 or READ_CONTACTS permission is present.
5.4. Communicating via HTTPS
Most of smartphone applications communicate with Web servers on the Internet. As methods of communications, here we focus on the 2 methods of HTTP and HTTPS. From the security point of view, HTTPS communication is preferable. Lately, major Web services like Google or Facebook have been coming to use HTTPS as default. However, among HTTPS connection methods, those that use SSL3.0 / early Transport Layer Security (TLS) protocols are known to be susceptible to a vulnerability (commonly known as POODLE and BEAST), and we strongly recommend against the use of such methods, please refer to "5.4.3.8. (Column): Transitioning to TLS1.2/TLS1.3 for secure connections".
Since 2012, many defects in implementation of HTTPS communication have been pointed out in Android applications. These defects might have been implemented for accessing testing Web servers operated by server certificates that are not issued by trusted third party certificate authorities, but issued privately (hereinafter, called private certificates).
In this section, communication methods of HTTP and HTTPS are explained and the method to access safely with HTTPS to a Web server operated by a private certificate is also described.
5.4.1. Sample Code
You can find out which type of HTTP/HTTPS communication you are supposed to implement through the following chart (Fig. 5.4.1) shown below.
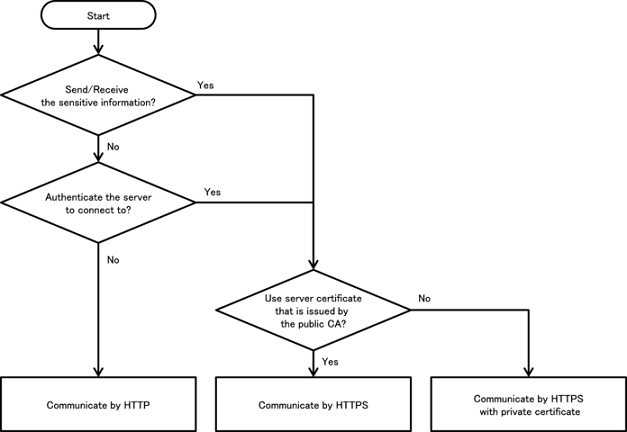
Fig. 5.4.1 Flow Figure to select sample code of HTTP/HTTPS
When sensitive information is sent or received, HTTPS communication is to be used because its communication channel is encrypted with SSL/TLS. HTTPS communication is required for the following sensitive information.
Login ID/Password for Web services.
Information for keeping authentication state (session ID, token, Cookie etc.)
Important/confidential information depending on Web services (personal information, credit card information etc.)
A smartphone application with network communication is a part of "system" as well as a Web server. And you have to select HTTP or HTTPS for each communication based on secure design and coding considering the whole "system". Table 5.4.1 is for a comparison between HTTP and HTTPS. And Table 5.4.2 is for the differences in sample codes.
HTTP |
HTTPS |
||
Characteristics |
URL |
Starting with http:// |
Starting with https:// |
Encrypting contents |
Not available |
Available |
|
Tampering detection of contents |
Impossible |
Possible |
|
Authenticating a server |
Impossible |
Possible |
|
Damage Risk |
Reading contents by attackers |
High |
Low |
Modifying contents by attackers |
High |
Low |
|
Application’s access to a fake server |
High |
Low |
Sample code |
Communication |
Sending/Receiving sensitive information |
Server certificate |
Communicating via HTTP |
HTTP |
Not applicable |
- |
Communicating via HTTP |
HTTPS |
OK |
Server certificates issued by trusted third party’s certificate authorities like Cybertrust and VeriSign etc. |
Communicating via HTTPS with private certificate |
HTTPS |
OK |
Private certificate
|
Android supports java.net.HttpURLConnection/javax.net.ssl.HttpsURLConnection as HTTP/HTTPS communication APIs. Support for the Apache HttpClient, which is another HTTP client library, is removed at the release of the Android 6.0(API Level 23).
5.4.1.1. Communicating via HTTP
It is based on two premises that all contents sent/received through HTTP communications may be sniffed and tampered by attackers and your destination server may be replaced with fake servers prepared by attackers. HTTP communication can be used only if no damage is caused or the damage is within the permissible extent even under the premises. If an application cannot accept the premises, please refer to "5.4.1.2. Communicating via HTTPS<!– 2b8c337d –>" and "5.4.1.3. Communicating via HTTPS with private certificate".
The following sample code shows an application which gets the specific image on a Web server, and shows it. The worker thread for communication process using AsyncTask is created to avoid the communications performing on the UI thread. Contents sent/received in the communications with the server are not considered as sensitive (e.g. the URL of the image, or the image data) here. So, the received data such as the URL of the image and the image data may be provided by attackers [13]. To show the sample code simply, any countermeasures are not taken in the sample code by considering the received attacking data as tolerable. Also, the handlings for possible exceptions during HTTP connections or showing image data are omitted. It is necessary to handle the exceptions properly depending on the application specs.
Because the sample code is HTTP communication, the android:usesCleartextTraffic attribute value in AndroidManifest.xml is set to “true”, which was the default up to Android 8.1 (API level 27). Because “false” became the default setting (in other words, HTTPS communication became the default) starting from Android 9 (API level 28), an error will occur in HTTP communication unless “true” is explicitly set. In this way, when android:usesCleartextTraffic=“true” is set, this permits all HTTP communication [14], but instead, to limit the domains where HTTP communication is allowed, make the setting by referring to “Prevent unencrypted (HTTP) communication” in "5.4.3.7. Network Security Configuration". Starting from Android 7.0 (API level 24), the Network Security Configuration setting has priority over the android:usesCleartextTraffic attribute [15].
Points:
Sensitive information must not be contained in send data.
Suppose that received data may be sent from attackers.
AndroidManifest.xml
<manifest xmlns:android="http://schemas.android.com/apk/res/android"

          android:versionCode="1"
          android:versionName="1.0">

  <uses-permission android:name="android.permission.INTERNET"/>

  <application
      android:icon="@drawable/ic_launcher"
      android:allowBackup="false"
      android:label="@string/app_name"
      android:usesCleartextTraffic="true">
    <activity
        android:name=".ImageSearchActivity"
        android:label="@string/app_name"
        android:theme="@android:style/Theme.Light"
        android:exported="true" >
      <intent-filter>
        <action android:name="android.intent.action.MAIN" />
        <category android:name="android.intent.category.LAUNCHER" />
      </intent-filter>
    </activity>
  </application>
</manifest>
HttpImageSearch.java
/*
 * Copyright (C) 2012-2025 Japan Smartphone Security Association
 *
 * Licensed under the Apache License, Version 2.0 (the "License");
 * you may not use this file except in compliance with the License.
 * You may obtain a copy of the License at
 *
 *      http://www.apache.org/licenses/LICENSE-2.0
 *
 * Unless required by applicable law or agreed to in writing, software
 * distributed under the License is distributed on an "AS IS" BASIS,
 * WITHOUT WARRANTIES OR CONDITIONS OF ANY KIND, either express or implied.
 * See the License for the specific language governing permissions and
 * limitations under the License.
 */

package org.jssec.android.https.imagesearch;

import android.os.AsyncTask;

import org.json.JSONException;
import org.json.JSONObject;

import java.io.BufferedInputStream;
import java.io.ByteArrayOutputStream;
import java.io.IOException;
import java.net.HttpURLConnection;
import java.net.MalformedURLException;
import java.net.ProtocolException;
import java.net.URL;

public abstract class HttpImageSearch extends AsyncTask<String, Void, Object> {

    @Override
    protected Object doInBackground(String... params) {
        HttpURLConnection con;
        byte[] responseArray = null;
        try {
            // --------------------------------------------------------
            // Communication: Obtain a image
            // --------------------------------------------------------
            // *** POINT 1 *** Sensitive information must not be contained in send
            // data.
            // Send image URL (after checking image_url)
            String image_url =
                "http://www.jssec.org/common/images/main_visual_local.jpg";
            con = connectUrl(image_url);
            checkResponse(con);

            // *** POINT 2 *** Suppose that received data may be sent from
            // attackers.
            // This is sample, so omit the process in case of the searching result
            // is the data from an attacker.
            responseArray = getByteArray(con);
            if (responseArray == null) {
                return null;
            }
        } catch (IOException e) {
            // Exception handling is omitted
        }
        return responseArray;
    }

    private HttpURLConnection connectUrl(String strUrl) {
        HttpURLConnection con = null;
        try {
            URL url = new URL(strUrl);
            con = (HttpURLConnection) url.openConnection();
            con.setRequestMethod("GET");
            con.connect();
        } catch (ProtocolException e) {
            // Handle exception (omitted)
        } catch (MalformedURLException e) {
            // Handle exception (omitted)
        } catch (IOException e) {
            // Handle exception (omitted)
        }
        return con;
    }

    private byte[] getByteArray(HttpURLConnection con) {
        byte[] buff = new byte[1024];
        byte[] result = null;
        BufferedInputStream inputStream = null;
        ByteArrayOutputStream responseArray = null;
        int length;

        try {
            inputStream = new BufferedInputStream(con.getInputStream());
            responseArray = new ByteArrayOutputStream();

            while ((length = inputStream.read(buff)) != -1) {
                if (length > 0) {
                    responseArray.write(buff, 0, length);
                }
            }
            result = responseArray.toByteArray();
        } catch (IOException e) {
            e.printStackTrace();
        } finally {
            if (inputStream != null) {
                try {
                    inputStream.close();
                } catch (IOException e) {
                    // Exception handling is omitted
                }
            }
            if (responseArray != null) {
                try {
                    responseArray.close();
                } catch (IOException e) {
                    // Exception handling is omitted
                }
            }
        }
        return result;
    }

    private void checkResponse(HttpURLConnection response) throws IOException {
        int statusCode = response.getResponseCode();
        if (HttpURLConnection.HTTP_OK != statusCode) {
            throw new IOException("HttpStatus: " + statusCode);
        }
    }
}
ImageSearchActivity.java
/*
 * Copyright (C) 2012-2025 Japan Smartphone Security Association
 *
 * Licensed under the Apache License, Version 2.0 (the "License");
 * you may not use this file except in compliance with the License.
 * You may obtain a copy of the License at
 *
 *      http://www.apache.org/licenses/LICENSE-2.0
 *
 * Unless required by applicable law or agreed to in writing, software
 * distributed under the License is distributed on an "AS IS" BASIS,
 * WITHOUT WARRANTIES OR CONDITIONS OF ANY KIND, either express or implied.
 * See the License for the specific language governing permissions and
 * limitations under the License.
 */

package org.jssec.android.https.imagesearch;

import android.app.Activity;
import android.graphics.Bitmap;
import android.graphics.BitmapFactory;
import android.os.AsyncTask;
import android.os.Bundle;
import android.view.View;
import android.widget.EditText;
import android.widget.ImageView;
import android.widget.TextView;

public class ImageSearchActivity extends Activity {

    private EditText mQueryBox;
    private TextView mMsgBox;
    private ImageView mImgBox;
    private AsyncTask<String, Void, Object> mAsyncTask ;

    @Override
    public void onCreate(Bundle savedInstanceState) {
        super.onCreate(savedInstanceState);
        setContentView(R.layout.activity_main);

        mQueryBox = (EditText)findViewById(R.id.querybox);
        mMsgBox = (TextView)findViewById(R.id.msgbox);
        mImgBox = (ImageView)findViewById(R.id.imageview);
    }

    @Override
    protected void onPause() {
        // After this, Activity may be deleted, so cancel the asynchronization
        // process in advance.
        if (mAsyncTask != null) mAsyncTask.cancel(true);
        super.onPause();
    }

    public void onHttpSearchClick(View view) {
        mMsgBox.setText("http://www.jssec.org/common/images/main_visual_local.jpg");
        mImgBox.setImageBitmap(null);

        // Cancel, since the last asynchronous process might not have been
        // finished yet.
        if (mAsyncTask != null) mAsyncTask.cancel(true);

        // Since cannot communicate by UI thread, communicate by worker thread by
        // AsynchTask.
        mAsyncTask = new HttpImageSearch() {
            @Override
            protected void onPostExecute(Object result) {
                // Process the communication result by UI thread.
                if (result == null) {
                    mMsgBox.append("\nException occurs\n");
                } else if (result instanceof Exception) {
                    Exception e = (Exception)result;
                    mMsgBox.append("\nException occurs\n" + e.toString());
                } else {
                    // Exception process when image display is omitted here,
                    // since it's sample.
                    byte[] data = (byte[])result;
                    Bitmap bmp =
                        BitmapFactory.decodeByteArray(data, 0, data.length);
                    mImgBox.setImageBitmap(bmp);
                }
            }
        }.execute();  // pass search character string and start asynchronous
                      // process
    }

    public void onHttpsSearchClick(View view) {
        String query = mQueryBox.getText().toString();
        mMsgBox.setText("HTTPS:" + query);
        mImgBox.setImageBitmap(null);

        // Cancel, since the last asynchronous process might not have been
        // finished yet.
        if (mAsyncTask != null) mAsyncTask.cancel(true);

        // Since cannot communicate by UI thread, communicate by worker thread by
        // AsynchTask.
        mAsyncTask = new HttpsImageSearch() {
            @Override
            protected void onPostExecute(Object result) {
                // Process the communication result by UI thread.
                if (result instanceof Exception) {
                    Exception e = (Exception)result;
                    mMsgBox.append("\nException occurs\n" + e.toString());
                } else {
                    byte[] data = (byte[])result;
                    Bitmap bmp =
                        BitmapFactory.decodeByteArray(data, 0, data.length);
                    mImgBox.setImageBitmap(bmp);
                }
            }
        }.execute(query);  // pass search character string and start asynchronous
                           // process
    }
}
5.4.1.2. Communicating via HTTPS<!– 2b8c337d –>
In HTTPS communication, a server is checked whether it is trusted or not as well as data transferred is encrypted. To authenticate the server, Android HTTPS library verifies "server certificate" which is transmitted from the server in the handshake phase of HTTPS transaction with following points:
The server certificate is signed by a trusted third party certificate authority
The period and other properties of the server certificate are valid
The server's host name matches the CN (Common Name) or SAN (Subject Alternative Names) in the Subject field of the server certificate
SSLException (server certificate verification exception) is raised if the above verification is failed. This possibly means man-in-the-middle attack [16] or just server certificate defects. Your application has to handle the exception with an appropriate sequence based on the application specifications.
The next a sample code is for HTTPS communication which connects to a Web server with a server certificate issued by a trusted third party certificate authority. For HTTPS communication with a server certificate issued privately, please refer to "5.4.1.3. Communicating via HTTPS with private certificate".
The following sample code shows an application which performs an image search on a Web server, gets the result image and shows it. HTTPS communication with the server is performed twice a search. The first communication is for searching image data and the second is for getting it. The worker thread for communication process using AsyncTask is created to avoid the communications performing on the UI thread. All contents sent/received in the communications with the server are considered as sensitive (e.g. the character string for searching, the URL of the image, or the image data) here. To show the sample code simply, no special handling for SSLException is performed. It is necessary to handle the exceptions properly depending on the application specifications. For the HTTPS communication by javax.net.ssl.HttpsUrlConnection that is used in the sample code, in devices running Android 7.1.1(API Level 25) or lower, if the server has not disabled connections by SSL 3.0, vulnerable SSL 3.0 communication could be established. As an example of a corrective measure at the app side, in the sample code, a custom class (NoSSLv3SocketFactory class) was created that inherited the javax.net.ssl.SSLSocketFactory class, and SSL 3.0 was set as an exception from protocol transferred to setEnabledProtocols() [17]. As a corrective measure not on the app side, we recommend configuring settings [18] on remote servers to disable SSL 3.0. Besides SSL 3.0, this also applies in the same way to vulnerable initial versions of TLS, such as TLS 1.0.
Based on the information in RFC2818 [19], the use of CN, which is an existing customary practice in verification of server certificates, is not recommended, and the use of SAN is strongly recommended for comparing domain names and certificates. For this reason, Android 9.0 (API level 28) was changed so that SAN only is used for verifications, and the server must present a certificate including SAN, and if the certificate does not include one, it is no longer trusted.
Points:
URI starts with https://.
Sensitive information may be contained in send data.
Handle the received data carefully and securely, even though the data was sent from the server connected by HTTPS.
SSLException should be handled with an appropriate sequence in an application.
HttpsImageSearch.java
/*
 * Copyright (C) 2012-2025 Japan Smartphone Security Association
 *
 * Licensed under the Apache License, Version 2.0 (the "License");
 * you may not use this file except in compliance with the License.
 * You may obtain a copy of the License at
 *
 *      http://www.apache.org/licenses/LICENSE-2.0
 *
 * Unless required by applicable law or agreed to in writing, software
 * distributed under the License is distributed on an "AS IS" BASIS,
 * WITHOUT WARRANTIES OR CONDITIONS OF ANY KIND, either express or implied.
 * See the License for the specific language governing permissions and
 * limitations under the License.
 */

package org.jssec.android.https.imagesearch;

import org.json.JSONException;
import org.json.JSONObject;

import android.os.AsyncTask;

import java.io.BufferedInputStream;
import java.io.BufferedReader;
import java.io.ByteArrayOutputStream;
import java.io.IOException;
import java.io.InputStreamReader;
import java.net.HttpURLConnection;
import java.net.MalformedURLException;
import java.net.ProtocolException;
import java.net.URL;
import java.security.KeyManagementException;
import java.security.NoSuchAlgorithmException;
import java.security.cert.Certificate;
import java.util.ArrayList;
import java.util.regex.Matcher;
import java.util.regex.Pattern;

import javax.net.ssl.HttpsURLConnection;
import javax.net.ssl.SSLContext;
import javax.net.ssl.SSLException;
import javax.net.ssl.SSLSocketFactory;

public abstract class HttpsImageSearch extends AsyncTask<String, Void, Object> {

    @Override
    protected Object doInBackground(String... params) {
        HttpsURLConnection con1, con2;
        ArrayList<String> imageUrlList = new ArrayList<>();
        byte[] responseArray = null;
        try{
           // --------------------------------------------------------
           // Communication 1st time : Execute image search
           // --------------------------------------------------------
            StringBuilder s = new StringBuilder();
            for (String param : params) {
                s.append(param);
                s.append('+');
            }
            s.deleteCharAt(s.length() - 1);
            // *** POINT 1 *** URI starts with https://.
            // *** POINT 2 *** Sensitive information may be contained in send data.
            // Code for sending image search string is omitted.
            String search_url = "https://www.google.com/search?tbm=isch&q=" +
                    s.toString();

            // *** POINT 3 *** Handle the received data carefully and securely,
            // even though the data was sent from the server connected by HTTPS.
            // Omitted, since this is a sample. Please refer to
            // "3.2 Handling Input Data Carefully and Securely."
            con1 = connectUrl(search_url);
            BufferedReader in = new BufferedReader(
                                    new InputStreamReader(con1.getInputStream()));
           String inputLine;
            StringBuffer sb = new StringBuffer();
            while ((inputLine = in.readLine()) != null) {
               sb.append(inputLine);
            }
            in.close();
            final String regex = "<img.+?src=\"(.+?)\".+?>";
            Pattern pattern = Pattern.compile(regex);
           Matcher matcher = pattern.matcher(sb.toString());
           while (matcher.find()) {
                if (matcher.group(1).startsWith("https://"))
                 imageUrlList.add(matcher.group(1));
            }
           if (imageUrlList == null || imageUrlList.isEmpty()) {
               return null;
            }


            // --------------------------------------------------------
            // Communication 2nd time : Get image
            // --------------------------------------------------------

            // *** POINT 1 *** URI starts with https://.
            // *** POINT 2 *** Sensitive information may be contained in send data.
            String image_url = imageUrlList.get(1);
            con2 = connectUrl(image_url);
            checkResponse(con2);
            responseArray = getByteArray(con2);
            if (responseArray == null) {
                return null;
            }
        } catch (IOException e) {
            e.printStackTrace();
        }
        return responseArray;
    }

    private HttpsURLConnection connectUrl(String strUrl) {
        HttpsURLConnection con = null;
        try {
            SSLContext sc = SSLContext.getInstance("TLS");
            sc.init(null, null, null);
            SSLSocketFactory sf = new NoSSLv3SocketFactory(sc.getSocketFactory());
            HttpsURLConnection.setDefaultSSLSocketFactory(sf);
            URL url = new URL(strUrl);
            con = (HttpsURLConnection) url.openConnection();
            con.setRequestMethod("GET");
            con.connect();
            String cipher_suite = con.getCipherSuite();
            Certificate[] certs = con.getServerCertificates();
        } catch (SSLException e) {
            // *** POINT 4**  Exception handling suitable for the application for
            // SSLException
            e.printStackTrace();// This is sample, so omit the exception process
        } catch (NoSuchAlgorithmException e) {
            e.printStackTrace();// Exception handling is omitted
        } catch (KeyManagementException e) {
            e.printStackTrace();// Exception handling is omitted
        } catch (ProtocolException e) {
            e.printStackTrace();// Exception handling is omitted
        } catch (MalformedURLException e) {
            e.printStackTrace();// Exception handling is omitted
        } catch (IOException e) {
            e.printStackTrace();// Exception handling is omitted
        }
        return con;
    }

    private byte[] getByteArray(HttpsURLConnection con) {
        byte[] buff = new byte[1024];
        byte[] result = null;
        BufferedInputStream inputStream = null;
        ByteArrayOutputStream responseArray = null;
        int length;

        try {
            inputStream = new BufferedInputStream(con.getInputStream());
            responseArray = new ByteArrayOutputStream();

            while ((length = inputStream.read(buff)) != -1) {
                if (length > 0) {
                    responseArray.write(buff, 0, length);
                }
            }
            result = responseArray.toByteArray();
        } catch (IOException e) {
            e.printStackTrace();
        } finally {
            if (inputStream != null) {
                try {
                    inputStream.close();
                } catch (IOException e) {
                    // Exception handling is omitted
                }
            }
            if (responseArray != null) {
                try {
                    responseArray.close();
                } catch (IOException e) {
                    // Exception handling is omitted
                }
            }
        }
        return result;
    }

    private void checkResponse(HttpURLConnection response) throws IOException {
        int statusCode = response.getResponseCode();
        if (HttpURLConnection.HTTP_OK != statusCode) {
            throw new IOException("HttpStatus: " + statusCode);
        }
    }
}
NoSSLv3SocketFactory.java
package org.jssec.android.https.imagesearch;

/*Copyright 2015 Bhavit Singh Sengar
Licensed under the Apache License, Version 2.0 (the "License");
you may not use this file except in compliance with the License.You may obtain a copy of the License at

http://www.apache.org/licenses/LICENSE-2.0
Unless required by applicable law or agreed to in writing, software
distributed under the License is distributed on an "AS IS" BASIS,
WITHOUT WARRANTIES OR CONDITIONS OF ANY KIND, either express or implied.
See the License for the specific language governing permissions and
limitations under the License.*/


import java.io.IOException;
import java.io.InputStream;
import java.io.OutputStream;
import java.net.InetAddress;
import java.net.Socket;
import java.net.SocketAddress;
import java.net.SocketException;
import java.nio.channels.SocketChannel;
import java.util.ArrayList;
import java.util.Arrays;
import java.util.List;
import javax.net.ssl.HandshakeCompletedListener;
import javax.net.ssl.HttpsURLConnection;
import javax.net.ssl.SSLSession;
import javax.net.ssl.SSLSocket;
import javax.net.ssl.SSLSocketFactory;


public class NoSSLv3SocketFactory extends SSLSocketFactory{
    private final SSLSocketFactory delegate;

    public NoSSLv3SocketFactory() {
        this.delegate = HttpsURLConnection.getDefaultSSLSocketFactory();
    }

    public NoSSLv3SocketFactory(SSLSocketFactory delegate) {
        this.delegate = delegate;
    }

    @Override
    public String[] getDefaultCipherSuites() {
        return delegate.getDefaultCipherSuites();
    }

    @Override
    public String[] getSupportedCipherSuites() {
        return delegate.getSupportedCipherSuites();
    }

    private Socket makeSocketSafe(Socket socket) {
        if (socket instanceof SSLSocket) {
            socket = new NoSSLv3SSLSocket((SSLSocket) socket);
        }
        return socket;
    }

    @Override
    public Socket createSocket(Socket s, String host, int port, boolean autoClose) throws IOException {
        return makeSocketSafe(delegate.createSocket(s, host, port, autoClose));
    }

    @Override
    public Socket createSocket(String host, int port) throws IOException {
        return makeSocketSafe(delegate.createSocket(host, port));
    }

    @Override
    public Socket createSocket(String host, int port, InetAddress localHost, int localPort) throws IOException {
        return makeSocketSafe(delegate.createSocket(host, port, localHost, localPort));
    }

    @Override
    public Socket createSocket(InetAddress host, int port) throws IOException {
        return makeSocketSafe(delegate.createSocket(host, port));
    }

    @Override
    public Socket createSocket(InetAddress address, int port, InetAddress localAddress, int localPort) throws IOException {
        return makeSocketSafe(delegate.createSocket(address, port, localAddress, localPort));
    }

    private class NoSSLv3SSLSocket extends DelegateSSLSocket {

        private NoSSLv3SSLSocket(SSLSocket delegate) {
            super(delegate);

        }

        @Override
        public void setEnabledProtocols(String[] protocols) {
            if (protocols != null && protocols.length == 1 && "SSLv3".equals(protocols[0])) {

                List<String> enabledProtocols = new ArrayList<String>(Arrays.asList(delegate.getEnabledProtocols()));
                if (enabledProtocols!= null) {
                    enabledProtocols.remove("SSLv3");
                    System.out.println("Removed weak protocol from enabled protocols");
                } else {
                    System.out.println("SSL stuck with protocol available for " + String.valueOf(enabledProtocols));
                }
                protocols = enabledProtocols.toArray(new String[enabledProtocols.size()]);
            }

            super.setEnabledProtocols(protocols);
        }
    }

    public class DelegateSSLSocket extends SSLSocket {

        protected final SSLSocket delegate;

        DelegateSSLSocket(SSLSocket delegate) {
            this.delegate = delegate;
        }

        @Override
        public String[] getSupportedCipherSuites() {
            return delegate.getSupportedCipherSuites();
        }

        @Override
        public String[] getEnabledCipherSuites() {
            return delegate.getEnabledCipherSuites();
        }

        @Override
        public void setEnabledCipherSuites(String[] suites) {
            delegate.setEnabledCipherSuites(suites);
        }

        @Override
        public String[] getSupportedProtocols() {
            return delegate.getSupportedProtocols();
        }

        @Override
        public String[] getEnabledProtocols() {
            return delegate.getEnabledProtocols();
        }

        @Override
        public void setEnabledProtocols(String[] protocols) {
            delegate.setEnabledProtocols(protocols);
        }

        @Override
        public SSLSession getSession() {
            return delegate.getSession();
        }

        @Override
        public void addHandshakeCompletedListener(HandshakeCompletedListener listener) {
            delegate.addHandshakeCompletedListener(listener);
        }

        @Override
        public void removeHandshakeCompletedListener(HandshakeCompletedListener listener) {
            delegate.removeHandshakeCompletedListener(listener);
        }

        @Override
        public void startHandshake() throws IOException {
            delegate.startHandshake();
        }

        @Override
        public void setUseClientMode(boolean mode) {
            delegate.setUseClientMode(mode);
        }

        @Override
        public boolean getUseClientMode() {
            return delegate.getUseClientMode();
        }

        @Override
        public void setNeedClientAuth(boolean need) {
            delegate.setNeedClientAuth(need);
        }

        @Override
        public void setWantClientAuth(boolean want) {
            delegate.setWantClientAuth(want);
        }

        @Override
        public boolean getNeedClientAuth() {
            return delegate.getNeedClientAuth();
        }

        @Override
        public boolean getWantClientAuth() {
            return delegate.getWantClientAuth();
        }

        @Override
        public void setEnableSessionCreation(boolean flag) {
            delegate.setEnableSessionCreation(flag);
        }

        @Override
        public boolean getEnableSessionCreation() {
            return delegate.getEnableSessionCreation();
        }

        @Override
        public void bind(SocketAddress localAddr) throws IOException {
            delegate.bind(localAddr);
        }

        @Override
        public synchronized void close() throws IOException {
            delegate.close();
        }

        @Override
        public void connect(SocketAddress remoteAddr) throws IOException {
            delegate.connect(remoteAddr);
        }

        @Override
        public void connect(SocketAddress remoteAddr, int timeout) throws IOException {
            delegate.connect(remoteAddr, timeout);
        }

        @Override
        public SocketChannel getChannel() {
            return delegate.getChannel();
        }

        @Override
        public InetAddress getInetAddress() {
            return delegate.getInetAddress();
        }

        @Override
        public InputStream getInputStream() throws IOException {
            return delegate.getInputStream();
        }

        @Override
        public boolean getKeepAlive() throws SocketException {
            return delegate.getKeepAlive();
        }

        @Override
        public InetAddress getLocalAddress() {
            return delegate.getLocalAddress();
        }

        @Override
        public int getLocalPort() {
            return delegate.getLocalPort();
        }

        @Override
        public SocketAddress getLocalSocketAddress() {
            return delegate.getLocalSocketAddress();
        }

        @Override
        public boolean getOOBInline() throws SocketException {
            return delegate.getOOBInline();
        }

        @Override
        public OutputStream getOutputStream() throws IOException {
            return delegate.getOutputStream();
        }

        @Override
        public int getPort() {
            return delegate.getPort();
        }

        @Override
        public synchronized int getReceiveBufferSize() throws SocketException {
            return delegate.getReceiveBufferSize();
        }

        @Override
        public SocketAddress getRemoteSocketAddress() {
            return delegate.getRemoteSocketAddress();
        }

        @Override
        public boolean getReuseAddress() throws SocketException {
            return delegate.getReuseAddress();
        }

        @Override
        public synchronized int getSendBufferSize() throws SocketException {
            return delegate.getSendBufferSize();
        }

        @Override
        public int getSoLinger() throws SocketException {
            return delegate.getSoLinger();
        }

        @Override
        public synchronized int getSoTimeout() throws SocketException {
            return delegate.getSoTimeout();
        }

        @Override
        public boolean getTcpNoDelay() throws SocketException {
            return delegate.getTcpNoDelay();
        }

        @Override
        public int getTrafficClass() throws SocketException {
            return delegate.getTrafficClass();
        }

        @Override
        public boolean isBound() {
            return delegate.isBound();
        }

        @Override
        public boolean isClosed() {
            return delegate.isClosed();
        }

        @Override
        public boolean isConnected() {
            return delegate.isConnected();
        }

        @Override
        public boolean isInputShutdown() {
            return delegate.isInputShutdown();
        }

        @Override
        public boolean isOutputShutdown() {
            return delegate.isOutputShutdown();
        }

        @Override
        public void sendUrgentData(int value) throws IOException {
            delegate.sendUrgentData(value);
        }

        @Override
        public void setKeepAlive(boolean keepAlive) throws SocketException {
            delegate.setKeepAlive(keepAlive);
        }

        @Override
        public void setOOBInline(boolean oobinline) throws SocketException {
            delegate.setOOBInline(oobinline);
        }

        @Override
        public void setPerformancePreferences(int connectionTime, int latency, int bandwidth) {
            delegate.setPerformancePreferences(connectionTime, latency, bandwidth);
        }

        @Override
        public synchronized void setReceiveBufferSize(int size) throws SocketException {
            delegate.setReceiveBufferSize(size);
        }

        @Override
        public void setReuseAddress(boolean reuse) throws SocketException {
            delegate.setReuseAddress(reuse);
        }

        @Override
        public synchronized void setSendBufferSize(int size) throws SocketException {
            delegate.setSendBufferSize(size);
        }

        @Override
        public void setSoLinger(boolean on, int timeout) throws SocketException {
            delegate.setSoLinger(on, timeout);
        }

        @Override
        public synchronized void setSoTimeout(int timeout) throws SocketException {
            delegate.setSoTimeout(timeout);
        }

        @Override
        public void setTcpNoDelay(boolean on) throws SocketException {
            delegate.setTcpNoDelay(on);
        }

        @Override
        public void setTrafficClass(int value) throws SocketException {
            delegate.setTrafficClass(value);
        }

        @Override
        public void shutdownInput() throws IOException {
            delegate.shutdownInput();
        }

        @Override
        public void shutdownOutput() throws IOException {
            delegate.shutdownOutput();
        }

        @Override
        public String toString() {
            return delegate.toString();
        }

        @Override
        public boolean equals(Object o) {
            return delegate.equals(o);
        }
    }
}
Other sample code files (AndroidManifest.xml, ImageSearchActivity.java) are the same as "5.4.1.1. Communicating via HTTP", so please refer to "5.4.1.1. Communicating via HTTP"
5.4.1.3. Communicating via HTTPS with private certificate
This section shows a sample code of HTTPS communication with a server certificate issued privately (private certificate), but not with that issued by a trusted third party authority. Please refer to "5.4.3.1. How to Create Private Certificate and Configure Server Settings" for creating a root certificate of a private certificate authority and private certificates and setting HTTPS settings in a Web server. The sample program has a cacert.crt file in assets. It is a root certificate file of private certificate authority.
The following sample code shows an application which gets an image on a Web server and shows it. HTTPS is used for the communication with the server. The worker thread for communication process using AsyncTask is created to avoid the communications performing on the UI thread. All contents (the URL of the image and the image data) sent/received in the communications with the server are considered as sensitive here. To show the sample code simply, no special handling for SSLException is performed. It is necessary to handle the exceptions properly depending on the application specifications.
Points:
Verify a server certificate with the root certificate of a private certificate authority.
URI starts with https://.
Sensitive information may be contained in send data.
Received data can be trusted as same as the server.
SSLException should be handled with an appropriate sequence in an application.
PrivateCertificateHttpsGet.java
/*
 * Copyright (C) 2012-2025 Japan Smartphone Security Association
 *
 * Licensed under the Apache License, Version 2.0 (the "License");
 * you may not use this file except in compliance with the License.
 * You may obtain a copy of the License at
 *
 *      http://www.apache.org/licenses/LICENSE-2.0
 *
 * Unless required by applicable law or agreed to in writing, software
 * distributed under the License is distributed on an "AS IS" BASIS,
 * WITHOUT WARRANTIES OR CONDITIONS OF ANY KIND, either express or implied.
 * See the License for the specific language governing permissions and
 * limitations under the License.
 */

package org.jssec.android.https.privatecertificate;

import java.io.BufferedInputStream;
import java.io.ByteArrayOutputStream;
import java.io.IOException;
import java.net.HttpURLConnection;
import java.net.URL;
import java.security.KeyStore;
import java.security.SecureRandom;

import javax.net.ssl.HostnameVerifier;
import javax.net.ssl.HttpsURLConnection;
import javax.net.ssl.SSLContext;
import javax.net.ssl.SSLException;
import javax.net.ssl.SSLSession;
import javax.net.ssl.TrustManagerFactory;

import android.content.Context;
import android.os.AsyncTask;

public abstract class PrivateCertificateHttpsGet
        extends AsyncTask<String, Void, Object> {

    private Context mContext;

    public PrivateCertificateHttpsGet(Context context) {
        mContext = context;
    }

    @Override
    protected Object doInBackground(String... params) {
        TrustManagerFactory trustManager;
        BufferedInputStream inputStream = null;
        ByteArrayOutputStream responseArray = null;
        byte[] buff = new byte[1024];
        int length;

        try {
            URL url = new URL(params[0]);
            // *** POINT 1 *** Verify a server certificate with the root
            // certificate of a private certificate authority.
            // Set keystore which includes only private certificate that is stored
            // in assets, to client.
            KeyStore ks = KeyStoreUtil.getEmptyKeyStore();
            KeyStoreUtil.loadX509Certificate(ks,
                    mContext.getResources().getAssets().open("cacert.crt"));

            // Verify host name
            HttpsURLConnection.setDefaultHostnameVerifier(new HostnameVerifier() {
                    @Override
                    public boolean verify(String hostname, SSLSession session) {
                        if (!hostname.equals(session.getPeerHost())) {
                            return false;
                        }
                        return true;
                    }
                });

            // *** POINT 2 *** URI starts with https://.
            // *** POINT 3 *** Sensitive information may be contained in send data.
            trustManager = TrustManagerFactory.getInstance(TrustManagerFactory.getDefaultAlgorithm());
            trustManager.init(ks);
            SSLContext sslCon = SSLContext.getInstance("TLS");
            sslCon.init(null, trustManager.getTrustManagers(), new SecureRandom());

            HttpURLConnection con = (HttpURLConnection)url.openConnection();
            HttpsURLConnection response = (HttpsURLConnection)con;
            response.setDefaultSSLSocketFactory(sslCon.getSocketFactory());

            response.setSSLSocketFactory(sslCon.getSocketFactory());
            checkResponse(response);

            // *** POINT 4 *** Received data can be trusted as same as the server.
            inputStream = new BufferedInputStream(response.getInputStream());
            responseArray = new ByteArrayOutputStream();
            while ((length = inputStream.read(buff)) != -1) {
                if (length > 0) {
                    responseArray.write(buff, 0, length);
                }
            }
            return responseArray.toByteArray();
        } catch(SSLException e) {
            // *** POINT 5 *** SSLException should be handled with an appropriate
            // sequence in an application.
            // Exception process is omitted here since it's sample.
            return e;
        } catch(Exception e) {
            return e;
        } finally {
            if (inputStream != null) {
                try {
                    inputStream.close();
                } catch (Exception e) {
                    // This is sample, so omit the exception process
                }
            }
            if (responseArray != null) {
                try {
                    responseArray.close();
                } catch (Exception e) {
                    // This is sample, so omit the exception process
                }
            }
        }
    }

    private void checkResponse(HttpURLConnection response) throws IOException {
        int statusCode = response.getResponseCode();
        if (HttpURLConnection.HTTP_OK != statusCode) {
            throw new IOException("HttpStatus: " + statusCode);
        }
    }
}
KeyStoreUtil.java
package org.jssec.android.https.privatecertificate;

import java.io.IOException;
import java.io.InputStream;
import java.security.KeyStore;
import java.security.KeyStoreException;
import java.security.NoSuchAlgorithmException;
import java.security.cert.Certificate;
import java.security.cert.CertificateException;
import java.security.cert.CertificateFactory;
import java.security.cert.X509Certificate;
import java.util.Enumeration;

public class KeyStoreUtil {
    public static KeyStore getEmptyKeyStore() throws KeyStoreException,
                                                     NoSuchAlgorithmException,
						     CertificateException,
						     IOException {
        KeyStore ks = KeyStore.getInstance("BKS");
        ks.load(null);
        return ks;
    }

    public static void loadAndroidCAStore(KeyStore ks)
        throws KeyStoreException, NoSuchAlgorithmException,
               CertificateException, IOException {
        KeyStore aks = KeyStore.getInstance("AndroidCAStore");
        aks.load(null);
        Enumeration<String> aliases = aks.aliases();
        while (aliases.hasMoreElements()) {
            String alias = aliases.nextElement();
            Certificate cert = aks.getCertificate(alias);
            ks.setCertificateEntry(alias, cert);
        }
    }

    public static void loadX509Certificate(KeyStore ks, InputStream is)
        throws CertificateException, KeyStoreException {
        try {
            CertificateFactory factory = CertificateFactory.getInstance("X509");
            X509Certificate x509 =
                (X509Certificate)factory.generateCertificate(is);
            String alias = x509.getSubjectDN().getName();
            ks.setCertificateEntry(alias, x509);
        } finally {
            try {
                is.close();
            } catch (IOException e) {
                /* This is sample, so omit the exception process */
            }
        }
    }
}
PrivateCertificateHttpsActivity.java
/*
 * Copyright (C) 2012-2025 Japan Smartphone Security Association
 *
 * Licensed under the Apache License, Version 2.0 (the "License");
 * you may not use this file except in compliance with the License.
 * You may obtain a copy of the License at
 *
 *      http://www.apache.org/licenses/LICENSE-2.0
 *
 * Unless required by applicable law or agreed to in writing, software
 * distributed under the License is distributed on an "AS IS" BASIS,
 * WITHOUT WARRANTIES OR CONDITIONS OF ANY KIND, either express or implied.
 * See the License for the specific language governing permissions and
 * limitations under the License.
 */

package org.jssec.android.https.privatecertificate;

import android.app.Activity;
import android.graphics.Bitmap;
import android.graphics.BitmapFactory;
import android.os.AsyncTask;
import android.os.Bundle;
import android.view.View;
import android.widget.EditText;
import android.widget.ImageView;
import android.widget.TextView;

public class PrivateCertificateHttpsActivity extends Activity {

    private EditText mUrlBox;
    private TextView mMsgBox;
    private ImageView mImgBox;
    private AsyncTask<String, Void, Object> mAsyncTask ;

    @Override
    public void onCreate(Bundle savedInstanceState) {
        super.onCreate(savedInstanceState);
        setContentView(R.layout.activity_main);

        mUrlBox = (EditText)findViewById(R.id.urlbox);
        mMsgBox = (TextView)findViewById(R.id.msgbox);
        mImgBox = (ImageView)findViewById(R.id.imageview);
    }

    @Override
    protected void onPause() {
        // After this, Activity may be discarded, so cancel asynchronous process
        // in advance.
        if (mAsyncTask != null) mAsyncTask.cancel(true);
        super.onPause();
    }

    public void onClick(View view) {
        String url = mUrlBox.getText().toString();
        mMsgBox.setText(url);
        mImgBox.setImageBitmap(null);

        // Cancel, since the last asynchronous process might have not been
        // finished yet.
        if (mAsyncTask != null) mAsyncTask.cancel(true);

        // Since cannot communicate through UI thread, communicate by worker
        // thread by AsynchTask.
        mAsyncTask = new PrivateCertificateHttpsGet(this) {
                @Override
                protected void onPostExecute(Object result) {
                    // Process the communication result through UI thread.
                    if (result instanceof Exception) {
                        Exception e = (Exception)result;
                        mMsgBox.append("\nException occurs\n" + e.toString());
                    } else {
                        byte[] data = (byte[])result;
                        Bitmap bmp =
                            BitmapFactory.decodeByteArray(data, 0, data.length);
                        mImgBox.setImageBitmap(bmp);
                    }
                }
            }.execute(url);  // Pass URL and start asynchronization process
    }
}
5.4.2. Rule Book
Follow the rules below to communicate with HTTP/HTTPS.
Sensitive Information Must Be Sent/Received over HTTPS Communication (Required)
Received Data over HTTP Must be Handled Carefully and Securely (Required)
SSLException Must Be Handled Appropriately like Notification to User (Required)
5.4.2.1. Sensitive Information Must Be Sent/Received over HTTPS Communication (Required)
In HTTP transaction, sent and received information might be sniffed or tampered and the connected server might be masqueraded. Sensitive information must be sent/ received by HTTPS communication.
5.4.2.2. Received Data over HTTP Must be Handled Carefully and Securely (Required)
Received data in HTTP communications might be generated by attackers for exploiting vulnerability of an application. So you have to suppose that the application receives any values and formats of data and then carefully implement data handlings for processing received data so as not to put any vulnerabilities in. Furthermore you should not blindly trust the data from HTTPS server too. Because the HTTPS server may be made by the attacker or the received data may be made in other place from the HTTPS server. Please refer to "3.2. Handling Input Data Carefully and Securely".
5.4.2.3. SSLException Must Be Handled Appropriately like Notification to User (Required)
In HTTPS communication, SSLException occurs as a verification error when a server certificate is not valid or the communication is under the man-in-the-middle attack. So you have to implement an appropriate exception handling for SSLException. Notifying the user of the communication failure, logging the failure and so on can be considered as typical implementations of exception handling. On the other hand, no special notice to the user might be required in some case. Like this, because how to handle SSLException depends on the application specs and characteristics you need to determine it after first considering thoroughly.
As mentioned above, the application may be attacked by man-in-the-middle attack when SSLException occurs, so it must not be implemented like trying to send/receive sensitive information again via non secure protocol such as HTTP.
5.4.2.4. Custom TrustManager Must Not Be Created (Required)
Just Changing KeyStore which is used for verifying server certificates is enough to communicate via HTTPS with a private certificate like self-signed certificate. However, as explained in "5.4.3.3. Risky Code that Disables Certificate Verification", there are so many dangerous TrustManager implementations as sample codes for such purpose on the Internet. An Application implemented by referring to these sample codes may have the vulnerability.
When you need to communicate via HTTPS with a private certificate, refer to the secure sample code in "5.4.1.3. Communicating via HTTPS with private certificate".
Of course, custom TrustManager can be implemented securely, but enough knowledge for encryption processing and encryption communication is required so as not to implement vulnerable codes. So this rule dare be (Required).
5.4.2.5. Custom HostnameVerifier Must Not Be Created (Required)
Just Changing KeyStore which is used for verifying server certificates is enough to communicate via HTTPS with a private certificate like self-signed certificate. However, as explained in "5.4.3.3. Risky Code that Disables Certificate Verification", there are so many dangerous HostnameVerifier implementations as sample codes for such purpose on the Internet. An Application implemented by referring to these sample codes may have the vulnerability.
When you need to communicate via HTTPS with a private certificate, refer to the secure sample code in "5.4.1.3. Communicating via HTTPS with private certificate".
Of course, custom HostnameVerifier can be implemented securely, but enough knowledge for encryption processing and encryption communication is required so as not to implement vulnerable codes. So this rule dare be (Required).
5.4.3. Advanced Topics
5.4.3.1. How to Create Private Certificate and Configure Server Settings
In this section, how to create a private certificate and configure server settings in Linux such as Ubuntu and CentOS is described. Private certificate means a server certificate which is issued privately and is told from server certificates issued by trusted third party certificate authorities like Cybertrust and VeriSign.
Create private certificate authority
First of all, you need to create a private certificate authority to issue a private certificate. Private certificate authority means a certificate authority which is created privately as well as private certificate. You can issue plural private certificates by using the single private certificate authority. PC in which the private certificate authority is stored should be limited strictly to be accessed just by trusted persons.
To create a private certificate authority, you have to create two files such as the following shell script newca.sh and the setting file openssl.cnf and then execute them. In the shell script, CASTART and CAEND stand for the valid period of certificate authority and CASUBJ stands for the name of certificate authority. So these values need to be changed according to a certificate authority you create. While executing the shell script, the password for accessing the certificate authority is asked for 3 times in total, so you need to input it every time.
newca.sh -- Shell Script to create certificate authority
#!/bin/bash

umask 0077

CONFIG=openssl.cnf
CATOP=./CA
CAKEY=cakey.pem
CAREQ=careq.pem
CACERT=cacert.pem
CAX509=cacert.crt
CASTART=130101000000Z   # 2013/01/01 00:00:00 GMT
CAEND=230101000000Z     # 2023/01/01 00:00:00 GMT
CASUBJ="/CN=JSSEC Private CA/O=JSSEC/ST=Tokyo/C=JP"

mkdir -p ${CATOP}
mkdir -p ${CATOP}/certs
mkdir -p ${CATOP}/crl
mkdir -p ${CATOP}/newcerts
mkdir -p ${CATOP}/private
touch ${CATOP}/index.txt

openssl req -new -newkey rsa:2048 -sha256 -subj "${CASUBJ}" \
        -keyout ${CATOP}/private/${CAKEY} -out ${CATOP}/${CAREQ}
openssl ca -selfsign -md sha256 -create_serial -batch \
        -keyfile ${CATOP}/private/${CAKEY} \
        -startdate ${CASTART} -enddate ${CAEND} -extensions v3_ca \
        -in ${CATOP}/${CAREQ} -out ${CATOP}/${CACERT} \
        -config ${CONFIG}
openssl x509 -in ${CATOP}/${CACERT} -outform DER -out ${CATOP}/${CAX509}
openssl.cnf - Setting file of openssl command which 2 shell scripts refers in common
[ ca ]
default_ca      = CA_default             # The default ca section

[ CA_default ]
dir             = ./CA                   # Where everything is kept
certs           = $dir/certs             # Where the issued certs are kept
crl_dir         = $dir/crl               # Where the issued crl are kept
database        = $dir/index.txt         # database index file.
#unique_subject = no                     # Set to 'no' to allow creation of several ctificates with same subject.
new_certs_dir   = $dir/newcerts          # default place for new certs.
certificate     = $dir/cacert.pem        # The CA certificate
serial          = $dir/serial            # The current serial number
crlnumber       = $dir/crlnumber         # the current crl number must be commented out to leave a V1 CRL
crl             = $dir/crl.pem           # The current CRL
private_key     = $dir/private/cakey.pem # The private key
RANDFILE        = $dir/private/.rand     # private random number file
x509_extensions = usr_cert               # The extentions to add to the cert
name_opt        = ca_default             # Subject Name options
cert_opt        = ca_default             # Certificate field options
policy          = policy_match

[ policy_match ]
countryName             = match
stateOrProvinceName     = match
organizationName        = supplied
organizationalUnitName  = optional
commonName              = supplied
emailAddress            = optional

[ usr_cert ]
basicConstraints        = CA:FALSE
nsComment               = "OpenSSL Generated Certificate"
subjectKeyIdentifier    = hash
authorityKeyIdentifier  = keyid,issuer
subjectAltName          = @alt_names

[ v3_ca ]
subjectKeyIdentifier    = hash
authorityKeyIdentifier  = keyid:always,issuer
basicConstraints        = CA:true

[ alt_names ]
DNS.1                   = ${ENV::HOSTNAME}
DNS.2                   = *.${ENV::HOSTNAME}
After executing the above shall script, a directory named CA is created just under the work directory. This CA directory is just a private certificate authority. CA/cacert.crt file is the root certificate of the private certificate authority. And it's stored in assets directory of an application as described in "5.4.1.3. Communicating via HTTPS with private certificate", or it's installed in Android device as described in "5.4.3.2. Install Root Certificate of Private Certificate Authority to Android OS's Certification Store".
Create private certificate
To create a private certificate, you have to create a shell script like the following newca.sh and execute it. In the shell script, SVSTART and SVEND stand for the valid period of private certificate, and SVSUBJ stands for the name of Web server, so these values need to be changed according to the target Web server. Especially, you need to make sure not to set a wrong host name to /CN of SVSUBJ with which the host name of Web server is to be specified. While executing the shell script, the password for accessing the certificate authority is asked, so you need to input the password which you have set when creating the private certificate authority. After that, y/n is asked 2 times in total and you need to input y every time.
newsv.sh - Shell script which issues private certificate
#!/bin/bash

umask 0077

CONFIG=openssl.cnf
CATOP=./CA
CAKEY=cakey.pem
CACERT=cacert.pem
SVKEY=svkey.pem
SVREQ=svreq.pem
SVCERT=svcert.pem
SVX509=svcert.crt
SVSTART=130101000000Z   # 2013/01/01 00:00:00 GMT
SVEND=230101000000Z     # 2023/01/01 00:00:00 GMT
HOSTNAME=selfsigned.jssec.org
SVSUBJ="/CN="${HOSTNAME}"/O=JSSEC Secure Coding Group/ST=Tokyo/C=JP"

openssl genrsa -out ${SVKEY} 2048
openssl req -new -key ${SVKEY} -subj "${SVSUBJ}" -out ${SVREQ}
openssl ca -md sha256 \
        -keyfile ${CATOP}/private/${CAKEY} -cert ${CATOP}/${CACERT} \
        -startdate ${SVSTART} -enddate ${SVEND} \
        -in ${SVREQ} -out ${SVCERT} -config ${CONFIG}
openssl x509 -in ${SVCERT} -outform DER -out ${SVX509}
After executing the above shall script, a private key file for Web server “svkey.pem” and private certificate file “svcert.pem” are created just under the work directory.
If the Web server is Apache, you will specify prikey.pem and cert.pem in the configuration file as follows
SSLCertificateFile "/path/to/svcert.pem"
SSLCertificateKeyFile "/path/to/svkey.pem"
5.4.3.2. Install Root Certificate of Private Certificate Authority to Android OS's Certification Store
In the sample code of "5.4.1.3. Communicating via HTTPS with private certificate", the method to establish HTTPS sessions to a Web server from one application using a private certificate by installing the root certificate into the application is introduced. In this section, the method to establish HTTPS sessions to Web servers from all applications using private certificates by installing the root certificate into Android OS is to be introduced. Note that all you install should be certificates issued by trusted certificate authorities including your own certificate authorities.
However, the method described here can be used in versions prior to Android 6.0 (API level 23) only. Starting from Android 7.0 (API level 24), even if the root certificate of the private certificate authority is installed, the system ignores it. Starting from API level 24, to use a private certificate, refer to the section “Communicating via HTTPS with private certificates” in "5.4.3.7. Network Security Configuration".
First of all, you need to copy the root certificate file "cacert.crt" to the internal storage of an Android device. You can also get the root certificate file used in the sample code from [https://www.jssec.org/dl/android_securecoding_sample_cacert.crt](https://www.jssec.org/dl/android_securecoding_sample_cacert.crt).
And then, you will open Security page from Android Settings and you can install the root certificate in an Android device by doing as follows.
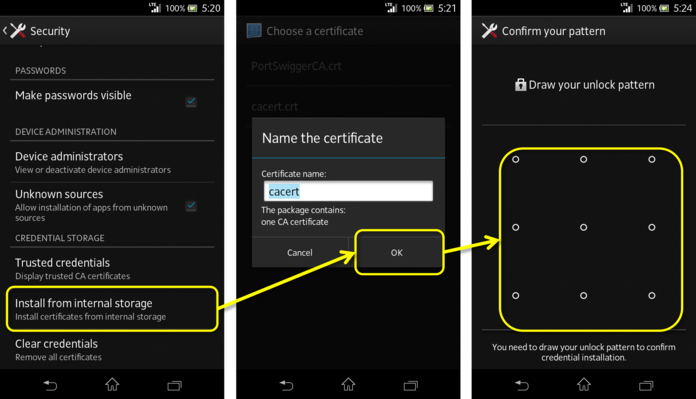
Fig. 5.4.2 Steps to install root certificate of private certificate authority
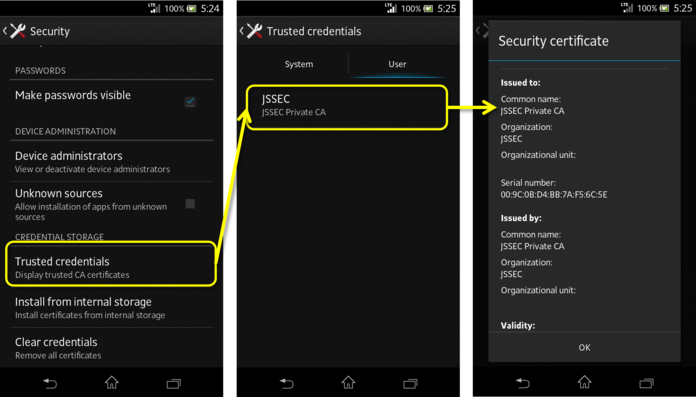
Fig. 5.4.3 Checking if root certificate is installed or not
Android Once the root certificate is installed in Android OS, all applications can correctly verify every private certificate issued by the certificate authority. The following figure shows an example when displaying https://selfsigned.jssec.org/droid_knight.png in Chrome browser.
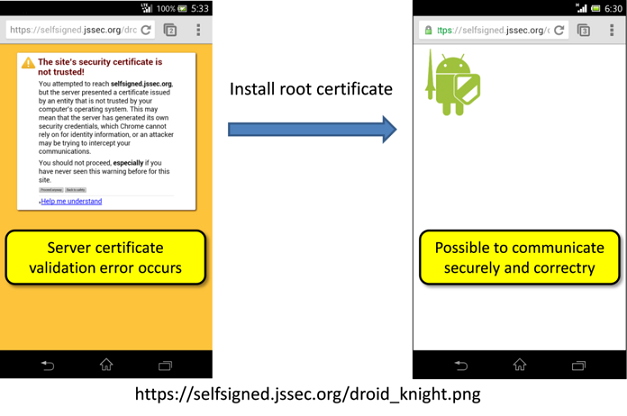
Fig. 5.4.4 Once root certificate installed, private certificates can be verified correctly
By installing the root certificate this way, even applications using the sample code "5.4.1.2. Communicating via HTTPS<!– 2b8c337d –>" can correctly connect via HTTPS to a Web server which is operated with a private certificate.
5.4.3.3. Risky Code that Disables Certificate Verification
A lot of incorrect samples (code snippets), which allow applications to continue to communicate via HTTPS with Web servers even after certificate verification errors occur, are found on the Internet. Since they are introduced as the way to communicate via HTTPS with a Web server using a private certificate, there have been so many applications created by developers who have used those sample codes by copy and paste. Unfortunately, most of them are vulnerable to man-in-the-middle attack. As mentioned in the top of this article, "In 2012, many defects in implementation of HTTPS communication were pointed out in Android applications", many Android applications which would have implemented such vulnerable codes have been reported.
Several code snippets to cause vulnerable HTTPS communication are shown below. When you find this type of code snippets, it's highly recommended to replace the sample code of "5.4.1.3. Communicating via HTTPS with private certificate".
Risk:Case which creates empty TrustManager
TrustManager tm = new X509TrustManager() {

    @Override
    public void checkClientTrusted(X509Certificate[] chain,
            String authType) throws CertificateException {
        // Do nothing -> accept any certificates
    }

    @Override
    public void checkServerTrusted(X509Certificate[] chain,
            String authType) throws CertificateException {
        // Do nothing -> accept any certificates
    }

    @Override
    public X509Certificate[] getAcceptedIssuers() {
        return null;
    }
};
Risk:Case which creates empty HostnameVerifier
HostnameVerifier hv = new HostnameVerifier() {
    @Override
    public boolean verify(String hostname, SSLSession session) {
        // Always return true -> Accespt any host names
        return true;
    }
};
Risk:Case that ALLOW_ALL_HOSTNAME_VERIFIER is used.
SSLSocketFactory sf;
[...]
sf.setHostnameVerifier(SSLSocketFactory.ALLOW_ALL_HOSTNAME_VERIFIER);
5.4.3.4. A note regarding the configuration of HTTP request headers
If you wish to specify your own individual HTTP request header for HTTP or HTTPS communication, use the setRequestProperty() or addRequestProperty() methods in the URLConnection class. If you will be using input data received from external sources as parameters for these methods, you must implement HTTP header-injection protections. The first step in attacks based on HTTP header injection is to include carriage-return codes—which are used as separators in HTTP headers—in input data. For this reason, all carriage-return codes must be eliminated from input data.
Configure HTTP request header
public byte[] openConnection(String strUrl, String strLanguage, String strCookie) {
    // HttpURLConnection is a class derived from URLConnection
    HttpURLConnection connection;

    try {
        URL url = new URL(strUrl);
        connection = (HttpURLConnection) url.openConnection();
        connection.setRequestMethod("GET");

        // *** POINT *** When using input values in HTTP request
        // headers, check the input data in accordance with the
        // application's requirements(*)
        if (strLanguage.matches("^[a-zA-Z ,-]+$")) {
            connection.addRequestProperty("Accept-Language", strLanguage);
        } else {
            throw new IllegalArgumentException("Invalid Language : " +
                                               strLanguage);
        }
        // *** POINT *** Or URL-encode the input data
        // (as appropriate for the purposes of the app in queestion)
        connection.setRequestProperty("Cookie",
                                      URLEncoder.encode(strCookie, "UTF-8"));

        connection.connect();

        [...]
5.4.3.5. Notes and sample implementations for pinning
When an app uses HTTPS communication, one step in the handshake procedure carried out at the start of the communication is to check whether or not the certificate sent from the remote server is signed by a third-party certificate authority. However, attackers may acquire improper certificates from third-party authentication agents, or may acquire signed keys from a certificate authority to construct improper certificates. In such cases, apps will be unable to detect the attack during the handshake process—even in the event of a lure to an improper server established by the attacker, or of an man-in-the-middle attack —and, as a result, there is a possibility that damage may be done.
"The technique of pinning" is an effective strategy for preventing man-in-the-middle attacks using these types of certificates from improper third-party certificate authorities. In this method, certificates and public keys for remote servers are stored in advance within an app, and this information is used for handshake processing and re-testing after handshake processing has completed.
Pinning may be used to restore the security of communications in cases where the credibility of a third-party certificate authority—the foundation of public-key infrastructure—has been tarnished. App developers should assess the asset level handled by their own apps and decide whether or not to implement these tests.
Use certificates and public keys stored within an app during the handshake procedure
To use information contained in remote-server certificates or public keys stored within an app during the handshake procedure, an app must create its own KeyStore containing this information and use it when communicating. This will allow the app to detect improprieties during the handshake procedure even in the event of a man-in-the-middle attack using a certificate from an improper third-party certificate authority, as described above. Consult the sample code presented in the section titled "5.4.1.3. Communicating via HTTPS with private certificate" for detailed methods of establishing your app's own KeyStore to conduct HTTPS communication.
Use certificates and public-key information stored within an app for re-testing after the handshake procedure is complete
To re-test the remote server after the handshake procedure has completed, an app first obtains the certificate chain that was tested and trusted by the system during the handshake, then compares this certificate chain against the information stored in advance within the app. If the result of this comparison indicates agreement with the information stored within the app, the communication may be permitted to proceed; otherwise, the communication procedure should be aborted.
However, if an app uses the methods listed below in an attempt to obtain the certificate chain that the system trusted during the handshake, the app may not obtain the expected certificate chain, posing a risk that the pinning may not function properly [20].
javax.net.ssl.SSLSession.getPeerCertificates()
javax.net.ssl.SSLSession.getPeerCertificateChain()
What these methods return is not the certificate chain that was trusted by the system during the handshake, but rather the very certificate chain that the app received from the communication partner itself. For this reason, even if an man-in-the-middle attack has resulted in a certificate from an improper certificate authority being appended to the certificate chain, the above methods will not return the certificate that was trusted by the system during the handshake; instead, the certificate of the server to which the app was originally attempting to connect will also be returned at the same time. This certificate—"the certificate of the server to which the app was originally attempting to connect"—will, because of pinning, be equivalent to the certificate pre-stored within the app; thus re-testing it will not detect any improprieties. For this and other similar reasons, it is best to avoid using the above methods when implementing re-testing after the handshake.
On Android versions 4.2 (API Level 17) and later, using the checkServerTrusted() method within net.http.X509TrustManagerExtensions will allow the app to obtain only the certificate chain that was trusted by the system during the handshake.
An example illustrating pinning using X509TrustManagerExtensions
// Store the SHA-256 hash value of the public key included in the correct
// certificate for the remote server (pinning)
private static final Set<String> PINS = new HashSet<>(Arrays.asList(
    new String[] {
            "d9b1a68fceaa460ac492fb8452ce13bd8c78c6013f989b76f186b1cbba1315c1",
            "cd13bb83c426551c67fabcff38d4496e094d50a20c7c15e886c151deb8531cdc"
    }
));

// Communicate using AsyncTask work threads
protected Object doInBackground(String... strings) {

    [...]

    // Obtain the certificate chain that was trusted by the system by
    // testing during the handshake
    X509Certificate[] chain =
        (X509Certificate[]) connection.getServerCertificates();
    X509TrustManagerExtensions trustManagerExt =
        new X509TrustManagerExtensions(
            (X509TrustManager) (trustManagerFactory.getTrustManagers()[0]));
    List<X509Certificate> trustedChain =
        trustManagerExt.checkServerTrusted(chain, "RSA", url.getHost());

    // Use public-key pinning to test
    boolean isValidChain = false;
    for (X509Certificate cert : trustedChain) {
        PublicKey key = cert.getPublicKey();
        MessageDigest md = MessageDigest.getInstance("SHA-256");
        String keyHash = bytesToHex(md.digest(key.getEncoded()));

        // Compare to the hash value stored by pinning
        if(PINS.contains(keyHash)) isValidChain = true;
    }
    if (isValidChain) {
        // Proceed with operation
    } else {
        // Do not proceed with operation
    }

    [...]
}

private String bytesToHex(byte[] bytes) {
    StringBuilder sb = new StringBuilder();
    for (byte b : bytes) {
        String s = String.format("%02x", b);
        sb.append(s);
    }
    return sb.toString();
}
5.4.3.6. Strategies for addressing OpenSSL vulnerabilities using Google Play Services
Google Play Services (version 5.0 and later) provides a framework known as Provider Installer. This may be used to address vulnerabilities in Security Provider, an implementation of OpenSSL and other encryption-related technologies. For details, see Section "5.6.3.5. Addressing Vulnerabilities with Security Provider from Google Play Services".
5.4.3.7. Network Security Configuration
Android 7.0 (API Level 24) introduced a framework known as Network Security Configuration that allows individual apps to configure their own security settings for network communication. Using this framework makes it easy for apps to incorporate a variety of techniques for improving app security, including not only HTTPS communication with private certificates and public key pinning but also prevention of unencrypted (HTTP) communication and the use of private certificates enabled only during debugging [21].
The various types of functionality offered by Network Security Configuration may be accessed simply by configuring settings in xml files, which may be applied to the entirety of an app's HTTP and HTTPS communications. This eliminates the need for modifying an app's code or carrying out any additional processing, simplifying implementation and providing an effective protection against Incorporating bugs or vulnerabilities.
Communicating via HTTPS with private certificates
Section "5.4.1.3. Communicating via HTTPS with private certificate" presents sample code that performs HTTPS communication with private certificates (e.g. self-signed certificates or intra-company certificates). However, by using Network Security Configuration, developers may use private certificates without implementation presented in the sample code of Section "5.4.1.2. Communicating via HTTPS<!– 2b8c337d –>".
Use private certificates to communicate with specific domains
<?xml version="1.0" encoding="utf-8"?>
<network-security-config>
    <domain-config>
        <domain includeSubdomains="true">jssec.org</domain>
        <trust-anchors>
            <certificates src="@raw/private_ca" />
        </trust-anchors>
    </domain-config>
</network-security-config>
In the example above, the private certificates (private_ca) used for communication may be stored as resources within the app, with the conditions for their use and their range of applicability described in .xml files. By using the <domain-config> tag, it is possible to apply private certificates to specific domains only. To use private certificates for all HTTPS communications performed by the app, use the <base-config> tag, as shown below.
Use private certificates for all HTTPS communications performed by the app
<?xml version="1.0" encoding="utf-8"?>
<network-security-config>
    <base-config>
        <trust-anchors>
            <certificates src="@raw/private_ca" />
        </trust-anchors>
    </base-config>
</network-security-config>
Pinning
We mentioned public key pinning in Section "5.4.3.5. Notes and sample implementations for pinning" By using Network Security Configuration to configure settings as in the example below, you eliminate the need to implement the authentication process in your code; instead, the specifications in the xml file suffice to ensure proper authentication.
Use public key pinning for HTTPS communication
<?xml version="1.0" encoding="utf-8"?>
<network-security-config>
    <domain-config>
        <domain includeSubdomains="true">jssec.org</domain>
        <pin-set expiration="2018-12-31">
            <pin digest="SHA-256">e30Lky+iWK21yHSls5DJoRzNikOdvQUOGXvurPidc2E=</pin>
            <!-- for backup -->
            <pin digest="SHA-256">fwza0LRMXouZHRC8Ei+4PyuldPDcf3UKgO/04cDM1oE=</pin>
        </pin-set>
    </domain-config>
</network-security-config>
The quantity described by the <pin> tag above is the base64-encoded hash value of the public key used for pinning. The only supported hash function is SHA-256.
Prevent unencrypted (HTTP) communication
Using Network Security Configuration allows you to prevent HTTP communication (unencrypted communication) from apps.
The methods of restricting unencrypted communications are as follows.
Basically, the <base-config> tag is used to restrict unencrypted communications (HTTP communication) in communication with all domains [22]
Only for domains that require unencrypted communications for unavoidable reasons, the <domain-config> tag can be used to individually set exceptions that allow unencrypted communications. For details on determining whether unencrypted communications should be permitted, refer to "5.4.1.1. Communicating via HTTP".
Unencrypted communications are restricted by setting the cleartextTrafficPermitted attribute to false. An example of this is shown below.
<?xml version="1.0" encoding="utf-8"?>
<network-security-config>
    <!-- Disallow unencrypted communication by default -->
    <base-config cleartextTrafficPermitted="false">
    </base-config>
    <!-- Only for domains that require unencrypted communications for unavoidable reason,
         use <domain-config> tag to individualy set to "true" -->
    <domain-config cleartextTrafficPermitted="true">
       <domain includeSubdomains="true">www.jssec.org</domain>
    </domain-config>
</network-security-config>
This setting is also applied in the WebView from Android 8.0 (API level 26), but be aware that it is not applied to WebView for Android 7.1 (API level 25) and earlier.
Prior to Android 9.0 (API level 28), the default value of the attribute cleartextTrafficPermitted was true, but from Android 9.0, it was changed to false. For this reason, if targeting API level 28 and higher, declaration using <base-config> in the above example is not needed. However, to clearly define the intention and to avoid the effect of different behavior depending on the target API level, explicitly including as shown in the example above is recommended.
Private certificates exclusively for debugging purposes
For purposes of debugging during app development, developers may wish to use private certificates to communicate with certain HTTPS servers that exist for app-development purposes. In this case, developers must be careful to ensure that no dangerous implementations—including code that disables certificate authentication—are incorporated into the app; this is discussed in Section "5.4.3.3. Risky Code that Disables Certificate Verification". In Network Security Configuration, settings may be configured as in the example below to specify a set of certificates to be used only when debugging (only if android:debuggable is set to "true” in the file AndroidManifest.xml). This eliminates the risk that dangerous code may inadvertently be retained in the release version of an app, thus constituting a useful means of preventing vulnerabilities.
Use private certificates only when debugging
<?xml version="1.0" encoding="utf-8"?>
<network-security-config>
    <debug-overrides>
        <trust-anchors>
            <certificates src="@raw/private_cas" />
        </trust-anchors>
    </debug-overrides>
</network-security-config>
5.4.3.8. (Column): Transitioning to TLS1.2/TLS1.3 for secure connections
The 1994 release of SSL 2, which was its first public release, had a major vulnerability in security protocol, and so SSL 3.0 (RFC 6101) was completely redesigned from the ground up and was released in the second half of 1995. However, due to a vulnerability known as POODLE [23] announced by the Google Security Team in 2014, it was found that the padding for SSL 3.0 was not safe. In TLS 1.0 (RFC 2246), which was released in 1999, a defect in the padding design was corrected, but an attack method known as BEAST that extracts encrypted data was announced in 2011 by Duong and Rizzo [24]. TLS 1.1 (RFC 4346) was released in 2006 with security fixes (enhanced safety from TLS 1.0), and TLS 1.2 (RFC 5246), which was released in 2008, enables the use of even stronger encryption algorithms, including the use of SHA-2 hash functions (SHA-256 and SHA-384) and supports cipher suites where authenticated encryption with associated data (AEAD) usage modes (GCM, CCM) can be used.
With this as a background, in its guidelines [25] on TLS issued on October 15, 2018, the (U.S.) National Institute of Standards and Technology (NIST) either deprecated or prohibited the use of TLS 1.1 and lower, and it requires not only government agencies, but also the servers that support non-government apps to migrate to TLS 1.2. In line with this move, given the rash of security incidents in recent years and the availability of new TLS versions, an increasing number of sites and services are discontinuing support for “old versions of SSL or TLS”, and the transition to TLS 1.2 is well underway [26].
For example, one manifestation of this transition is a new security standard known as "the Payment Card Industry Data Security Standard (PCI DSS)", established by the Payment Card Industry Security Standards Council (PCI SSC). The latest version is v3.2.1 released in May 2018 [27]. Smartphones and tablets are also widely used for E-commerce today, with credit cards typically used for payment. Indeed, we expect that many users of this document (Android Application Secure Design / Secure Coding Guide) will offer services that send credit-card information and other data to the server side; when using credit cards in networked environments, it is essential to ensure the security of the data pathway, and PCI DSS is a standard that governs the handling of member data in services of this type, designed with the objective of preventing improper card use, information leaks, and other harmful consequences. Among these security standards, although the exact version numbers are not specified, support for all SSL versions and early TLS versions susceptible to known exploits (attack programs) was discontinued on June 30, 2018, and websites were required to upgrade to a safer version (TLS 1.2 or higher).
In communication between smartphones and servers, the need to ensure the security of data pathways is not restricted to handling of credit-card information, but is also an extremely important aspect of operations involving the handling of private data or other sensitive information. Thus, the need to transition to secure connections using TLS 1.2 on the service-provision (server) side may now be said to be an urgent requirement.
On the other hand, in Android—which runs on the client side—WebView functionality supporting TLS 1.1 and later versions has been available since Android 4.4 (Kitkat), and for direct HTTP communication since Android 4.1 (early Jelly Bean), although some additional implementation is needed in this case.
Among service developers, the adoption of TLS 1.2 means cutting off access to users of Android 4.3 and earlier versions, so it might seem that such a step would have significant repercussions. However, as shown in the figure below, the most recent data [28] (current as of May 2019) show that Android versions 4.4 and later account for the overwhelming majority—96.2%—of all Android systems currently in use. In view of this fact, and considering the importance of guaranteeing the security of assets handled by apps, we recommend that serious consideration be paid to transitioning to TLS 1.2.
Fig. 5.4.5 Distribution of OS versions among Android systems in current use(Source: Android Developers site)
TLS 1.3 (RFC 8446), which was released in August 2018, was a complete redesign of protocols and encryption algorithms for the purpose of providing fixes for new vulnerabilities and exploits discovered since the issuing of TLS 1.2 and for providing performance enhancements [29]. Starting from Android 10, platform TLS implementation supports TLS 1.3, and TLS 1.3 is enabled for all TLS connections by default [30]. Also, the following cipher suites with low safety were removed starting from Android 10 (mode: CBC, MAC: SHA2) [31].
TLS_RSA_WITH_AES_128_CBC_SHA256
TLS_RSA_WITH_AES_256_CBC_SHA256
TLS_ECDHE_ECDSA_WITH_AES_128_CBC_SHA256
TLS_ECDHE_ECDSA_WITH_AES_256_CBC_SHA384
TLS_ECDHE_RSA_WITH_AES_128_CBC_SHA256
TLS_ECDHE_RSA_WITH_AES_256_CBC_SHA384
5.5. Handling privacy data
In recent years, "Privacy-by-Design" concept has been proposed as a global trend to protect the privacy data. And based on the concept, governments are promoting legislation for privacy protection.
Applications that make use of user data in smartphones must take steps to ensure that users may use the application safely and securely without fears regarding privacy and personal data. These steps include handling user data appropriately and asking users to choose whether or not an application may use certain data. To this end, each application must prepare and display an application privacy policy indicating which information the application will use and how it will use that information; moreover, when fetching and using certain information, the application must first ask the user’s permission. Note that application privacy policies differ from other documents that may have been present in the past—such as "Personal Data Protection Policies" or "Terms of Use"—and must be created separately from any such documents.
For details on the creation and execution of privacy policies, see the document "Smartphone Privacy Initiative" and "Smartphone Privacy Initiative II" (JMIC’s SPI) released by Japan’s Ministry of Internal Affairs and Communications (MIC).
The terminology used in this section is defined in the text and in Section "5.5.3.2. Glossary of Terms".
5.5.1. Sample Code
When preparing application privacy policy, you may use the "Tools to Assist in Creating Application Privacy Policies" [32]. These tools output two files—a summary version and a detailed version of the application privacy policy —both in HTML format and XML format. The HTML and XML content of these files comports with the recommendations of MIC’s SPI including features such as search tags. In the sample code below, we will demonstrate the use of this tool to present application privacy policy using the HTML files prepared by this tool.
Fig. 5.5.1 Sample of Abstract Application Privacy Policy
More specifically, you may use the following flowchart to determine which sample code to use.
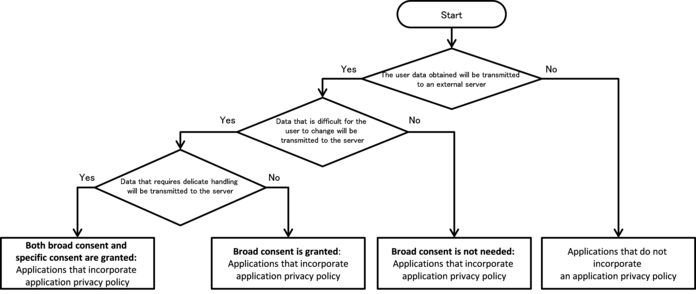
Fig. 5.5.2 Flow Figure to select sample code of handling privacy data
Here the phrase “broad consent” refers to a broad permission, granted by the user to the application upon the first launch of the application through display and review of the application privacy policy, for the application to transmit user data to servers.
In contrast, the phrase “specific consent” refers to pre consent obtained immediately prior to the transmission of specific user data.
5.5.1.1. Both broad consent and specific consent are granted: Applications that incorporate application privacy policy
Points: (Both broad consent and specific consent are granted: Applications that incorporate application privacy policy)
On first launch (or application update), obtain broad consent to transmit user data that will be handled by the application.
If the user does not grant broad consent, do not transmit user data.
- Obtain specific consent before transmitting user data that requires
particularly delicate handling.
- If the user does not grant specific consent, do not transmit the
corresponding data.
- Provide methods by which the user can review the application privacy
policy.
- Provide methods by which transmitted data can be deleted by user
operations.
- Provide methods by which transmitting data can be stopped by user
operations.
Use UUIDs or cookies to keep track of user data.
- Place a summary version of the application privacy policy in the
assets folder.
MainActivity.java
/*
 * Copyright (C) 2012-2025 Japan Smartphone Security Association
 *
 * Licensed under the Apache License, Version 2.0 (the "License");
 * you may not use this file except in compliance with the License.
 * You may obtain a copy of the License at
 *
 *      http://www.apache.org/licenses/LICENSE-2.0
 *
 * Unless required by applicable law or agreed to in writing, software
 * distributed under the License is distributed on an "AS IS" BASIS,
 * WITHOUT WARRANTIES OR CONDITIONS OF ANY KIND, either express or implied.
 * See the License for the specific language governing permissions and
 * limitations under the License.
 */

package org.jssec.android.privacypolicy;

import java.io.IOException;
import org.json.JSONException;
import org.json.JSONObject;
import org.jssec.android.privacypolicy.ConfirmFragment.DialogListener;

import com.google.android.gms.common.ConnectionResult;
import com.google.android.gms.common.GoogleApiAvailability;
import com.google.android.gms.location.FusedLocationProviderClient;
import com.google.android.gms.location.LocationServices;
import com.google.android.gms.tasks.OnSuccessListener;

import android.Manifest;
import android.location.Location;
import android.os.AsyncTask;
import android.os.Build;
import android.os.Bundle;
import android.content.Intent;
import android.content.SharedPreferences;
import android.content.pm.PackageInfo;
import android.content.pm.PackageManager;
import android.content.pm.PackageManager.NameNotFoundException;
import androidx.core.app.ActivityCompat;
import androidx.fragment.app.FragmentActivity;
import androidx.fragment.app.FragmentManager;
import androidx.core.content.ContextCompat;
import android.text.Editable;
import android.text.TextWatcher;
import android.view.Menu;
import android.view.MenuItem;
import android.view.View;
import android.widget.TextView;
import android.widget.Toast;

public class MainActivity extends FragmentActivity implements  DialogListener {
    private static final String BASE_URL = "https://www.example.com/pp";
    private static final String GET_ID_URI = BASE_URL + "/get_id.php";
    private static final String SEND_DATA_URI = BASE_URL + "/send_data.php";
    private static final String DEL_ID_URI = BASE_URL + "/del_id.php";

    private static final String ID_KEY = "id";
    private static final String LOCATION_KEY = "location";
    private static final String NICK_NAME_KEY = "nickname";

    private static final String PRIVACY_POLICY_COMPREHENSIVE_AGREED_KEY =
            "privacyPolicyComprehensiveAgreed";
    private static final String PRIVACY_POLICY_DISCRETE_TYPE1_AGREED_KEY =
            "privacyPolicyDiscreteType1Agreed";
    private static final String PRIVACY_POLICY_PREF_NAME =
            "privacypolicy_preference";
    private static final int  MY_PERMISSIONS_REQUEST_ACCESS_FINE_LOCATION = 1;

    private String UserId = "";
    private FusedLocationProviderClient mFusedLocationClient;

    private final int DIALOG_TYPE_COMPREHENSIVE_AGREEMENT = 1;
    private final int DIALOG_TYPE_PRE_CONFIRMATION = 2;

    private static final int VERSION_TO_SHOW_COMPREHENSIVE_AGREEMENT_ANEW = 1;

    private TextWatcher watchHandler = new TextWatcher() {

        @Override
        public void beforeTextChanged(CharSequence s,
                                      int start, int count, int after) {
        }

        @Override
        public void onTextChanged(CharSequence s,
                                  int start, int before, int count) {
            boolean buttonEnable = (s.length() > 0);

            MainActivity.this
                    .findViewById(R.id.buttonStart).setEnabled(buttonEnable);
        }

        @Override
        public void afterTextChanged(Editable s) {
        }
    };

    @Override
    protected void onCreate(Bundle savedInstanceState) {
        super.onCreate(savedInstanceState);
        setContentView(R.layout.activity_main);

        mFusedLocationClient =
            LocationServices.getFusedLocationProviderClient(this);

        if (Build.VERSION.SDK_INT >= 23) {
            // API Level 23 or later requires permission for getting location info.
            int permissionCheck =
                ContextCompat.checkSelfPermission(this,
                    Manifest.permission.ACCESS_FINE_LOCATION);
            if (permissionCheck != PackageManager.PERMISSION_GRANTED) {
                // Because we have not permission, request it to user
                ActivityCompat.requestPermissions(this,
                    new String[]{Manifest.permission.ACCESS_FINE_LOCATION},
                    MY_PERMISSIONS_REQUEST_ACCESS_FINE_LOCATION);
            }
        }
    }

    @Override
    public void onRequestPermissionsResult(int requestCode,
                                           String permissions[],
                                           int[] grantResults) {
        switch (requestCode) {
            case MY_PERMISSIONS_REQUEST_ACCESS_FINE_LOCATION: {
                if (grantResults.length > 0
                        && grantResults[0] == PackageManager.PERMISSION_GRANTED) {
                    // Permission is granted
                    // Fetch user ID from server
                    new GetDataAsyncTask().execute();
                    findViewById(R.id.buttonStart).setEnabled(false);
                    ((TextView) findViewById(R.id.editTextNickname))
                        .addTextChangedListener(watchHandler);
                    int resultCode = GoogleApiAvailability
                                    .getInstance()
                                    .isGooglePlayServicesAvailable(this);
                    if (resultCode != ConnectionResult.SUCCESS) {
                        // Googleplay service is unavailable, our sample app will
                        // terminate.
                        finish();
                    }
                } else {
                    // Permission is not granted, sample app will terminate
                    finish();
                }
            }
        }
    }

    @Override
    protected void onStart() {
        super.onStart();

        SharedPreferences pref =
            getSharedPreferences(PRIVACY_POLICY_PREF_NAME, MODE_PRIVATE);
        int privacyPolicyAgreed =
            pref.getInt(PRIVACY_POLICY_COMPREHENSIVE_AGREED_KEY, -1);
        if (privacyPolicyAgreed <= VERSION_TO_SHOW_COMPREHENSIVE_AGREEMENT_ANEW) {
            // *** POINT 1 *** On first launch (or application update),
            // obtain broad consent to transmit user data that will be handled
            // by the application.
            // When the application is updated, it is only necessary to renew
            // the user's grant of broad consent
            // if the updated application will handle new types of user data.
            ConfirmFragment dialog =
                ConfirmFragment.newInstance(R.string.privacyPolicy,
                                            R.string.agreePrivacyPolicy,
                                            DIALOG_TYPE_COMPREHENSIVE_AGREEMENT);
            dialog.setDialogListener(this);
            FragmentManager fragmentManager = getSupportFragmentManager();
            dialog.show(fragmentManager, "dialog");
        }
    }

    public void onSendToServer(View view) {
        // Check the status of user consent.
        // Actually, it is necessary to obtain consent for each user data type.
        SharedPreferences pref =
                getSharedPreferences(PRIVACY_POLICY_PREF_NAME, MODE_PRIVATE);
        int privacyPolicyAgreed =
                pref.getInt(PRIVACY_POLICY_DISCRETE_TYPE1_AGREED_KEY, -1);
        if (privacyPolicyAgreed <= VERSION_TO_SHOW_COMPREHENSIVE_AGREEMENT_ANEW) {
            // *** POINT 3 *** Obtain specific consent before transmitting user
            // data that requires particularly delicate handling.
            ConfirmFragment dialog =
                ConfirmFragment.newInstance(R.string.sendLocation,
                                            R.string.cofirmSendLocation,
                                            DIALOG_TYPE_PRE_CONFIRMATION);
            dialog.setDialogListener(this);
            FragmentManager fragmentManager = getSupportFragmentManager();
            dialog.show(fragmentManager, "dialog");
        } else {
            // Start transmission, since it has the user consent.
            onPositiveButtonClick(DIALOG_TYPE_PRE_CONFIRMATION);
        }
    }

    public void onPositiveButtonClick(int type) {
        if (type == DIALOG_TYPE_COMPREHENSIVE_AGREEMENT) {
            // *** POINT 1 *** On first launch (or application update),
            // obtain broad consent to transmit user data that will be handled by
            // the application.
            SharedPreferences.Editor pref = getSharedPreferences(PRIVACY_POLICY_PREF_NAME, MODE_PRIVATE).edit();
            pref.putInt(PRIVACY_POLICY_COMPREHENSIVE_AGREED_KEY, getVersionCode());
            pref.apply();
        } else if (type == DIALOG_TYPE_PRE_CONFIRMATION) {
            // *** POINT 3 *** Obtain specific consent before transmitting user
            // data that requires particularly delicate handling.
            mFusedLocationClient.getLastLocation()
                .addOnSuccessListener(this, new OnSuccessListener<Location>() {
                @Override
                public void onSuccess(Location location) {
                    String nickname =
                        ((TextView) findViewById(R.id.editTextNickname))
                            .getText().toString();
                    if (location != null) {
                        String locationData =
                            "Latitude:" + location.getLatitude() +
                            ", Longitude:" + location.getLongitude();
                        Toast.makeText(MainActivity.this,
                            this.getClass().getSimpleName() +
                            "\n - nickname : " + nickname +
                            "\n - location : " + locationData,
                            Toast.LENGTH_SHORT).show();
                        new SendDataAsyncTack().execute(SEND_DATA_URI,
                            UserId, locationData, nickname);
                    } else {
                        Toast.makeText(MainActivity.this,
                            this.getClass().getSimpleName() +
                            "\n - nickname : " + nickname +
                            "\n - location : unavailable",
                            Toast.LENGTH_SHORT).show();
                    }
                }
            });
            // Store the status of user consent.
            // Actually, it is necessary to obtain consent for each user data type.
            SharedPreferences.Editor pref =
                getSharedPreferences(PRIVACY_POLICY_PREF_NAME, MODE_PRIVATE)
                .edit();
            pref.putInt(PRIVACY_POLICY_DISCRETE_TYPE1_AGREED_KEY,
                        getVersionCode());
            pref.apply();
        }
    }

    public void onNegativeButtonClick(int type) {
        if (type == DIALOG_TYPE_COMPREHENSIVE_AGREEMENT) {
            // *** POINT 2 *** If the user does not grant general consent, do not
            // transmit user data.
            // In this sample application we terminate the application in this
            // case.
            finish();
        } else if (type == DIALOG_TYPE_PRE_CONFIRMATION) {
            // *** POINT 4 *** If the user does not grant specific consent, do not
            // transmit the corresponding data.
            // The user did not grant consent, so we do nothing.
        }
    }

    private int getVersionCode() {
        int versionCode = -1;
        PackageManager packageManager = this.getPackageManager();
        try {
            PackageInfo packageInfo =
                packageManager.getPackageInfo(this.getPackageName(),
                                              PackageManager.GET_ACTIVITIES);
            versionCode = packageInfo.versionCode;
        } catch (NameNotFoundException e) {
            // This is sample, so omit the exception process
        }

        return versionCode;
    }

    @Override
    public boolean onCreateOptionsMenu(Menu menu) {
        getMenuInflater().inflate(R.menu.main, menu);
        return true;
    }

    @Override
    public boolean onOptionsItemSelected(MenuItem item) {
        switch (item.getItemId()) {
        case R.id.action_show_pp:
            // *** POINT 5 *** Provide methods by which the user can review the
            // application privacy policy.
            Intent intent = new Intent();
            intent.setClass(this, WebViewAssetsActivity.class);
            startActivity(intent);
            return true;
        case R.id.action_del_id:
            // *** POINT 6 *** Provide methods by which transmitted data can be
            // deleted by user operations.
            new SendDataAsyncTack().execute(DEL_ID_URI, UserId);
            return true;
        case R.id.action_donot_send_id:
            // *** POINT 7 *** Provide methods by which transmitting data can be
            // stopped by user operations.

            // If the user stop sending data, user consent is deemed to have been
            // revoked.
            SharedPreferences.Editor pref = getSharedPreferences(PRIVACY_POLICY_PREF_NAME, MODE_PRIVATE).edit();
            pref.putInt(PRIVACY_POLICY_COMPREHENSIVE_AGREED_KEY, 0);
            pref.apply();

            // In this sample application if the user data cannot be sent by user
            // operations, finish the application because we do nothing.
            String message  = getString(R.string.stopSendUserData);
            Toast.makeText(MainActivity.this,
                this.getClass().getSimpleName() + " - " + message,
                Toast.LENGTH_SHORT).show();
            finish();

            return true;
        }

        return false;
    }

    private class GetDataAsyncTask extends AsyncTask<String, Void, String> {
        private String extMessage = "";

        @Override
        protected String doInBackground(String... params) {
            // *** POINT 8 *** Use UUIDs or cookies to keep track of user data
            // In this sample we use an ID generated on the server side
            SharedPreferences sp =
                getSharedPreferences(PRIVACY_POLICY_PREF_NAME, MODE_PRIVATE);
            UserId = sp.getString(ID_KEY, null);
            if (UserId == null) {
                // There is not token in SharedPreferences, obtain ID from server
                try {
                    UserId = NetworkUtil.getCookie(GET_ID_URI, "", "id");
                } catch (IOException e) {
                    // Handle exception such as certificate error
                    extMessage = e.toString();
                }
                // Save obtained ID in SharedPreferences
                sp.edit().putString(ID_KEY, UserId).commit();
            }
            return UserId;
        }

        @Override
        protected void onPostExecute(final String data) {
            String status = (data != null) ? "success" : "error";
            Toast.makeText(MainActivity.this,
                           this.getClass().getSimpleName() +
                           " - " + status + " : " + extMessage,
                           Toast.LENGTH_SHORT).show();
        }
    }

    private class SendDataAsyncTack extends AsyncTask<String, Void, Boolean> {
        private String extMessage = "";

        @Override
        protected Boolean doInBackground(String... params) {
            String url = params[0];
            String id = params[1];
            String location = params.length > 2 ? params[2] : null;
            String nickname = params.length > 3 ? params[3] : null;

            Boolean result = false;
            try {
                JSONObject jsonData = new JSONObject();
                jsonData.put(ID_KEY, id);
                if (location != null)
                    jsonData.put(LOCATION_KEY, location);

                if (nickname != null)
                    jsonData.put(NICK_NAME_KEY, nickname);

                NetworkUtil.sendJSON(url, "", jsonData.toString());

                result = true;
            } catch (IOException e) {
                // Catch exceptions such as certification errors
                extMessage = e.toString();
            } catch (JSONException e) {
                extMessage = e.toString();
            }
            return result;
        }

        @Override
        protected void onPostExecute(Boolean result) {
            String status = result ? "Success" : "Error";
            Toast.makeText(MainActivity.this,
                           this.getClass().getSimpleName() +
                           " - " + status + " : " + extMessage,
                           Toast.LENGTH_SHORT).show();
        }
    }
}
ConfirmFragment.java
/*
 * Copyright (C) 2012-2025 Japan Smartphone Security Association
 *
 * Licensed under the Apache License, Version 2.0 (the "License");
 * you may not use this file except in compliance with the License.
 * You may obtain a copy of the License at
 *
 *      http://www.apache.org/licenses/LICENSE-2.0
 *
 * Unless required by applicable law or agreed to in writing, software
 * distributed under the License is distributed on an "AS IS" BASIS,
 * WITHOUT WARRANTIES OR CONDITIONS OF ANY KIND, either express or implied.
 * See the License for the specific language governing permissions and
 * limitations under the License.
 */

package org.jssec.android.privacypolicy;

import android.app.Activity;
import android.app.AlertDialog;
import android.app.Dialog;
import android.content.Context;
import android.content.DialogInterface;
import android.content.Intent;
import android.os.Bundle;
import androidx.fragment.app.DialogFragment;
import android.view.LayoutInflater;
import android.view.View;
import android.view.View.OnClickListener;
import android.widget.TextView;

public class ConfirmFragment extends DialogFragment {

    private DialogListener mListener = null;

    public static interface DialogListener {
        public void onPositiveButtonClick(int type);

        public void onNegativeButtonClick(int type);
    }

    public static ConfirmFragment newInstance(int title, int sentence, int type) {
        ConfirmFragment fragment = new ConfirmFragment();
        Bundle args = new Bundle();
        args.putInt("title", title);
        args.putInt("sentence", sentence);
        args.putInt("type", type);
        fragment.setArguments(args);
        return fragment;
    }

    @Override
    public Dialog onCreateDialog(Bundle args) {
        // *** POINT 1 *** On first launch (or application update), obtain broad
        // consent to transmit user data that will be handled by the application.
        // *** POINT 3 *** Obtain specific consent before transmitting user data
        // that requires particularly delicate handling.
        final int title = getArguments().getInt("title");
        final int sentence = getArguments().getInt("sentence");
        final int type = getArguments().getInt("type");

        LayoutInflater inflater = (LayoutInflater) getActivity()
                .getSystemService(Context.LAYOUT_INFLATER_SERVICE);
        View content = inflater.inflate(R.layout.fragment_comfirm, null);
        TextView linkPP = (TextView) content.findViewById(R.id.tx_link_pp);
        linkPP.setOnClickListener(new OnClickListener() {
            @Override
            public void onClick(View v) {
                // *** POINT 5 *** Provide methods by which the user can review
                // the application privacy policy.
                Intent intent = new Intent();
                intent.setClass(getActivity(), WebViewAssetsActivity.class);
                startActivity(intent);
            }
        });

        AlertDialog.Builder builder = new AlertDialog.Builder(getActivity());
        builder.setIcon(R.drawable.ic_launcher);
        builder.setTitle(title);
        builder.setMessage(sentence);
        builder.setView(content);

        builder.setPositiveButton(R.string.buttonConsent,
            new DialogInterface.OnClickListener() {
            public void onClick(DialogInterface dialog, int whichButton) {
                if (mListener != null) {
                    mListener.onPositiveButtonClick(type);
                }
            }
        });
        builder.setNegativeButton(R.string.buttonDonotConsent,
            new DialogInterface.OnClickListener() {
            public void onClick(DialogInterface dialog, int whichButton) {
                if (mListener != null) {
                    mListener.onNegativeButtonClick(type);
                }
            }
        });

        Dialog dialog = builder.create();
        dialog.setCanceledOnTouchOutside(false);

        return dialog;
    }

    @Override
    public void onAttach(Activity activity) {
        super.onAttach(activity);
        if (!(activity instanceof DialogListener)) {
            throw new ClassCastException(activity.toString() +
                    " must implement DialogListener.");
        }
        mListener = (DialogListener) activity;
    }

    public void setDialogListener(DialogListener listener) {
        mListener = listener;
    }
}
WebViewAssetsActivity.java
/*
 * Copyright (C) 2012-2025 Japan Smartphone Security Association
 *
 * Licensed under the Apache License, Version 2.0 (the "License");
 * you may not use this file except in compliance with the License.
 * You may obtain a copy of the License at
 *
 *      http://www.apache.org/licenses/LICENSE-2.0
 *
 * Unless required by applicable law or agreed to in writing, software
 * distributed under the License is distributed on an "AS IS" BASIS,
 * WITHOUT WARRANTIES OR CONDITIONS OF ANY KIND, either express or implied.
 * See the License for the specific language governing permissions and
 * limitations under the License.
 */

package org.jssec.android.privacypolicy;

import android.app.Activity;
import android.os.Bundle;
import android.webkit.WebSettings;
import android.webkit.WebView;

public class WebViewAssetsActivity extends Activity {
    // *** POINT 9 *** Place a summary version of the application privacy policy
    // in the assets folder
    private static final String ABST_PP_URL =
        "file:///android_asset/PrivacyPolicy/app-policy-abst-privacypolicy-1.0.html";

    @Override
    public void onCreate(Bundle savedInstanceState) {
        super.onCreate(savedInstanceState);
        setContentView(R.layout.activity_webview);

        WebView webView = (WebView) findViewById(R.id.webView);
        WebSettings webSettings = webView.getSettings();

        webSettings.setAllowFileAccess(false);

        webView.loadUrl(ABST_PP_URL);
    }
}
5.5.1.2. Broad consent is granted: Applications that incorporate application privacy policy
Points: (Broad consent is granted: Applications that incorporate application privacy policy)
On first launch (or application update), obtain broad consent to transmit user data that will be handled by the application.
If the user does not grant broad consent, do not transmit user data.
- Provide methods by which the user can review the application privacy
policy.
- Provide methods by which transmitted data can be deleted by user
operations.
- Provide methods by which transmitting data can be stopped by user
operations.
Use UUIDs or cookies to keep track of user data.
- Place a summary version of the application privacy policy in the
assets folder.
MainActivity.java
/*
 * Copyright (C) 2012-2025 Japan Smartphone Security Association
 *
 * Licensed under the Apache License, Version 2.0 (the "License");
 * you may not use this file except in compliance with the License.
 * You may obtain a copy of the License at
 *
 *      http://www.apache.org/licenses/LICENSE-2.0
 *
 * Unless required by applicable law or agreed to in writing, software
 * distributed under the License is distributed on an "AS IS" BASIS,
 * WITHOUT WARRANTIES OR CONDITIONS OF ANY KIND, either express or implied.
 * See the License for the specific language governing permissions and
 * limitations under the License.
 */

package org.jssec.android.privacypolicynopreconfirm;

import java.io.IOException;
import java.util.UUID;

import org.json.JSONException;
import org.json.JSONObject;
import org.jssec.android.privacypolicynopreconfirm.ConfirmFragment.DialogListener;

import android.os.AsyncTask;
import android.os.Bundle;
import android.content.Intent;
import android.content.SharedPreferences;
import android.content.pm.PackageInfo;
import android.content.pm.PackageManager;
import android.content.pm.PackageManager.NameNotFoundException;

import androidx.fragment.app.FragmentActivity;
import androidx.fragment.app.FragmentManager;
import android.text.Editable;
import android.text.TextWatcher;
import android.view.Menu;
import android.view.MenuItem;
import android.view.View;
import android.widget.TextView;
import android.widget.Toast;

public class MainActivity extends FragmentActivity implements DialogListener {
    private final String BASE_URL = "https://www.example.com/pp";
    private final String GET_ID_URI = BASE_URL + "/get_id.php";
    private final String SEND_DATA_URI = BASE_URL + "/send_data.php";
    private final String DEL_ID_URI = BASE_URL + "/del_id.php";

    private final String ID_KEY = "id";
    private final String NICK_NAME_KEY = "nickname";
    private final String LN_KEY = "lineNumber";

    private final String PRIVACY_POLICY_AGREED_KEY = "privacyPolicyAgreed";

    private final String PRIVACY_POLICY_PREF_NAME = "privacypolicy_preference";

    private String mUUId = "";

    private String UserId = "";

    private final int DIALOG_TYPE_COMPREHENSIVE_AGREEMENT = 1;

    private final int VERSION_TO_SHOW_COMPREHENSIVE_AGREEMENT_ANEW = 1;

    private TextWatcher watchHandler = new TextWatcher() {

        @Override
        public void beforeTextChanged(CharSequence s,
                                      int start, int count, int after) {
        }

        @Override
        public void onTextChanged(CharSequence s,
                                  int start, int before, int count) {
            boolean buttonEnable = (s.length() > 0);

            MainActivity.this.findViewById(R.id.buttonStart)
                             .setEnabled(buttonEnable);
        }

        @Override
        public void afterTextChanged(Editable s) {
        }
    };

    @Override
    protected void onCreate(Bundle savedInstanceState) {
        super.onCreate(savedInstanceState);
        setContentView(R.layout.activity_main);

        // send randomly generated UUID
        mUUId = UUID.randomUUID().toString();

        // Fetch user ID from serverFetch user ID from server
        new GetDataAsyncTask().execute();

        findViewById(R.id.buttonStart).setEnabled(false);
        ((TextView) findViewById(R.id.editTextNickname))
            .addTextChangedListener(watchHandler);
    }

    @Override
    protected void onStart() {
        super.onStart();

        SharedPreferences pref =
                getSharedPreferences(PRIVACY_POLICY_PREF_NAME, MODE_PRIVATE);
        int privacyPolicyAgreed =
                pref.getInt(PRIVACY_POLICY_AGREED_KEY, -1);

        if (privacyPolicyAgreed <= VERSION_TO_SHOW_COMPREHENSIVE_AGREEMENT_ANEW) {
            // *** POINT 1 *** On first launch (or application update), obtain
            // broad consent to transmit user data that will be handled by the
            // application.
            // When the application is updated, it is only necessary to renew
            // the user's grant of broad consent if the updated application
            // will handle new types of user data.
            ConfirmFragment dialog =
                ConfirmFragment.newInstance(R.string.privacyPolicy,
                                            R.string.agreePrivacyPolicy,
                                            DIALOG_TYPE_COMPREHENSIVE_AGREEMENT);
            dialog.setDialogListener(this);
            FragmentManager fragmentManager = getSupportFragmentManager();
            dialog.show(fragmentManager, "dialog");
        }
    }

    public void onSendToServer(View view) {
        String nickname =
            ((TextView) findViewById(R.id.editTextNickname)).getText().toString();
        Toast.makeText(MainActivity.this,
                  this.getClass().getSimpleName()
                       + "\n - nickname : " + nickname + ", UUID = " + mUUId,
            Toast.LENGTH_SHORT).show();
        new SendDataAsyncTack().execute(SEND_DATA_URI, UserId, nickname, mUUId);
    }

    public void onPositiveButtonClick(int type) {
        if (type == DIALOG_TYPE_COMPREHENSIVE_AGREEMENT) {
            // *** POINT 1 *** On first launch (or application update), obtain
            // broad consent to transmit user data that will be handled by the
            // application.
            SharedPreferences.Editor pref =
                getSharedPreferences(PRIVACY_POLICY_PREF_NAME, MODE_PRIVATE)
                .edit();
            pref.putInt(PRIVACY_POLICY_AGREED_KEY, getVersionCode());
            pref.apply();
        }
    }

    public void onNegativeButtonClick(int type) {
        if (type == DIALOG_TYPE_COMPREHENSIVE_AGREEMENT) {
            // *** POINT 2 *** If the user does not grant general consent, do not
            // transmit user data.
            // In this sample application we terminate the application in this
            // case.
            finish();
        }
    }

    private int getVersionCode() {
        int versionCode = -1;
        PackageManager packageManager = this.getPackageManager();
        try {
            PackageInfo packageInfo =
                packageManager.getPackageInfo(this.getPackageName(),
                                              PackageManager.GET_ACTIVITIES);
            versionCode = packageInfo.versionCode;
        } catch (NameNotFoundException e) {
            // This is sample, so omit the exception process
        }

        return versionCode;
    }

    @Override
    public boolean onCreateOptionsMenu(Menu menu) {
        getMenuInflater().inflate(R.menu.main, menu);
        return true;
    }

    @Override
    public boolean onOptionsItemSelected(MenuItem item) {
        switch (item.getItemId()) {
        case R.id.action_show_pp:
            // *** POINT 3 *** Provide methods by which the user can review the
            // application privacy policy.
            Intent intent = new Intent();
            intent.setClass(this, WebViewAssetsActivity.class);
            startActivity(intent);
            return true;
        case R.id.action_del_id:
            // *** POINT 4 *** Provide methods by which transmitted data can be
            // deleted by user operations.
            new SendDataAsyncTack().execute(DEL_ID_URI, UserId);
            return true;
        case R.id.action_donot_send_id:
            // *** POINT 5 *** Provide methods by which transmitting data can be
            // stopped by user operations.

            // If the user stop sending data, user consent is deemed to have been
            // revoked.
            SharedPreferences.Editor pref =
                getSharedPreferences(PRIVACY_POLICY_PREF_NAME, MODE_PRIVATE)
                .edit();
            pref.putInt(PRIVACY_POLICY_AGREED_KEY, 0);
            pref.apply();

            // In this sample application if the user data cannot be sent by user
            // operations, finish the application because we do nothing.
            String message  = getString(R.string.stopSendUserData);
            Toast.makeText(MainActivity.this,
                this.getClass().getSimpleName() + " - " + message,
                Toast.LENGTH_SHORT).show();
            finish();

            return true;                }
        return false;
    }

    private class GetDataAsyncTask extends AsyncTask<String, Void, String> {
        private String extMessage = "";

        @Override
        protected String doInBackground(String... params) {
            // *** POINT 6 *** Use UUIDs or cookies to keep track of user data
            // In this sample we use an ID generated on the server side
            SharedPreferences sp = getSharedPreferences(PRIVACY_POLICY_PREF_NAME,
                                                        MODE_PRIVATE);
            UserId = sp.getString(ID_KEY, null);
            if (UserId == null) {
                // No token in SharedPreferences; fetch ID from server
                try {
                    UserId = NetworkUtil.getCookie(GET_ID_URI, "", "id");
                } catch (IOException e) {
                    // Catch exceptions such as certification errors
                    extMessage = e.toString();
                }

                // Store the fetched ID in SharedPreferences
                sp.edit().putString(ID_KEY, UserId).commit();
            }
            return UserId;
        }

        @Override
        protected void onPostExecute(final String data) {
            String status = (data != null) ? "success" : "error";
            Toast.makeText(MainActivity.this,
                           this.getClass().getSimpleName() +
                           " - " + status + " : " + extMessage,
                           Toast.LENGTH_SHORT).show();
        }
    }

    private class SendDataAsyncTack extends AsyncTask<String, Void, Boolean> {
        private String extMessage = "";

        @Override
        protected Boolean doInBackground(String... params) {
            String url = params[0];
            String id = params[1];
            String nickname = params.length > 2 ? params[2] : null;
            String lineNum = params.length > 3 ? params[3] : null;

            Boolean result = false;
            try {
                JSONObject jsonData = new JSONObject();
                jsonData.put(ID_KEY, id);

                if (nickname != null)
                    jsonData.put(NICK_NAME_KEY, nickname);

                if (lineNum != null)
                    jsonData.put(LN_KEY, lineNum);

                NetworkUtil.sendJSON(url, "", jsonData.toString());

                result = true;
            } catch (IOException e) {
                // Catch exceptions such as certification errors
                extMessage = e.toString();
            } catch (JSONException e) {
                extMessage = e.toString();
            }
            return result;
        }

        @Override
        protected void onPostExecute(Boolean result) {
            String status = result ? "Success" : "Error";
            Toast.makeText(MainActivity.this,
                           this.getClass().getSimpleName() +
                           " - " + status + " : " + extMessage,
                           Toast.LENGTH_SHORT).show();
        }
    }
}
ConfirmFragment.java
/*
 * Copyright (C) 2012-2025 Japan Smartphone Security Association
 *
 * Licensed under the Apache License, Version 2.0 (the "License");
 * you may not use this file except in compliance with the License.
 * You may obtain a copy of the License at
 *
 *      http://www.apache.org/licenses/LICENSE-2.0
 *
 * Unless required by applicable law or agreed to in writing, software
 * distributed under the License is distributed on an "AS IS" BASIS,
 * WITHOUT WARRANTIES OR CONDITIONS OF ANY KIND, either express or implied.
 * See the License for the specific language governing permissions and
 * limitations under the License.
 */

package org.jssec.android.privacypolicynopreconfirm;

import android.app.Activity;
import android.app.AlertDialog;
import android.app.Dialog;
import android.content.Context;
import android.content.DialogInterface;
import android.content.Intent;
import android.os.Bundle;
import androidx.fragment.app.DialogFragment;
import android.view.LayoutInflater;
import android.view.View;
import android.view.View.OnClickListener;
import android.widget.TextView;

public class ConfirmFragment extends DialogFragment {

    private DialogListener mListener = null;

    public static interface DialogListener {
        public void onPositiveButtonClick(int type);

        public void onNegativeButtonClick(int type);
    }

    public static ConfirmFragment newInstance(int title, int sentence, int type) {
        ConfirmFragment fragment = new ConfirmFragment();
        Bundle args = new Bundle();
        args.putInt("title", title);
        args.putInt("sentence", sentence);
        args.putInt("type", type);
        fragment.setArguments(args);
        return fragment;
    }

    @Override
    public Dialog onCreateDialog(Bundle args) {
        // *** POINT 1 *** On first launch (or application update), obtain broad
        // consent to transmit user data that will be handled by the application.
        final int title = getArguments().getInt("title");
        final int sentence = getArguments().getInt("sentence");
        final int type = getArguments().getInt("type");

        LayoutInflater inflater = (LayoutInflater) getActivity()
                .getSystemService(Context.LAYOUT_INFLATER_SERVICE);
        View content = inflater.inflate(R.layout.fragment_comfirm, null);
        TextView linkPP = (TextView) content.findViewById(R.id.tx_link_pp);
        linkPP.setOnClickListener(new OnClickListener() {
            @Override
            public void onClick(View v) {
                // *** POINT 3 *** Provide methods by which the user can review
                // the application privacy policy.
                Intent intent = new Intent();
                intent.setClass(getActivity(), WebViewAssetsActivity.class);
                startActivity(intent);
            }
        });

        AlertDialog.Builder builder = new AlertDialog.Builder(getActivity());
        builder.setIcon(R.drawable.ic_launcher);
        builder.setTitle(title);
        builder.setMessage(sentence);
        builder.setView(content);

        builder.setPositiveButton(R.string.buttonConsent,
                new DialogInterface.OnClickListener() {
                public void onClick(DialogInterface dialog, int whichButton) {
                    if (mListener != null) {
                        mListener.onPositiveButtonClick(type);
                    }
                }
            });
        builder.setNegativeButton(R.string.buttonDonotConsent,
                new DialogInterface.OnClickListener() {
                public void onClick(DialogInterface dialog, int whichButton) {
                    if (mListener != null) {
                        mListener.onNegativeButtonClick(type);
                    }
                }
            });

        Dialog dialog = builder.create();
        dialog.setCanceledOnTouchOutside(false);

        return dialog;
    }

    @Override
    public void onAttach(Activity activity) {
        super.onAttach(activity);
        if (!(activity instanceof DialogListener)) {
            throw new ClassCastException(activity.toString()
                                         + " must implement DialogListener.");
        }
        mListener = (DialogListener) activity;
    }

    public void setDialogListener(DialogListener listener) {
        mListener = listener;
    }
}
WebViewAssetsActivity.java
/*
 * Copyright (C) 2012-2025 Japan Smartphone Security Association
 *
 * Licensed under the Apache License, Version 2.0 (the "License");
 * you may not use this file except in compliance with the License.
 * You may obtain a copy of the License at
 *
 *      http://www.apache.org/licenses/LICENSE-2.0
 *
 * Unless required by applicable law or agreed to in writing, software
 * distributed under the License is distributed on an "AS IS" BASIS,
 * WITHOUT WARRANTIES OR CONDITIONS OF ANY KIND, either express or implied.
 * See the License for the specific language governing permissions and
 * limitations under the License.
 */

package org.jssec.android.privacypolicynopreconfirm;

import org.jssec.android.privacypolicynopreconfirm.R;

import android.app.Activity;
import android.os.Bundle;
import android.webkit.WebSettings;
import android.webkit.WebView;

public class WebViewAssetsActivity extends Activity {
    // *** POINT 7 *** Place a summary version of the application privacy policy
    // in the assets folder
    private final String ABST_PP_URL =
        "file:///android_asset/PrivacyPolicy/app-policy-abst-privacypolicy-1.0.html";

    @Override
    public void onCreate(Bundle savedInstanceState) {
        super.onCreate(savedInstanceState);
        setContentView(R.layout.activity_webview);

        WebView webView = (WebView) findViewById(R.id.webView);
        WebSettings webSettings = webView.getSettings();

        webSettings.setAllowFileAccess(false);

        webView.loadUrl(ABST_PP_URL);
    }
}
5.5.1.3. Broad consent is not needed: Applications that incorporate application privacy policy
Points: (Broad consent is not needed: Applications that incorporate application privacy policy)
Provide methods by which the user can review the application privacy policy.
Provide methods by which transmitted data can be deleted by user operations.
Provide methods by which transmitting data can be stopped by user operations
Use UUIDs or cookies to keep track of user data.
Place a summary version of the application privacy policy in the assets folder.
MainActivity.java
/*
 * Copyright (C) 2012-2025 Japan Smartphone Security Association
 *
 * Licensed under the Apache License, Version 2.0 (the "License");
 * you may not use this file except in compliance with the License.
 * You may obtain a copy of the License at
 *
 *      http://www.apache.org/licenses/LICENSE-2.0
 *
 * Unless required by applicable law or agreed to in writing, software
 * distributed under the License is distributed on an "AS IS" BASIS,
 * WITHOUT WARRANTIES OR CONDITIONS OF ANY KIND, either express or implied.
 * See the License for the specific language governing permissions and
 * limitations under the License.
 */

package org.jssec.android.privacypolicynocomprehensive;

import java.io.IOException;
import org.json.JSONException;
import org.json.JSONObject;

import android.os.AsyncTask;
import android.os.Bundle;
import android.content.Intent;
import android.content.SharedPreferences;
import androidx.fragment.app.FragmentActivity;
import android.text.Editable;
import android.text.TextWatcher;
import android.view.Menu;
import android.view.MenuItem;
import android.view.View;
import android.widget.TextView;
import android.widget.Toast;

public class MainActivity extends FragmentActivity {
    private static final String BASE_URL = "https://www.example.com/pp";
    private static final String GET_ID_URI = BASE_URL + "/get_id.php";
    private static final String SEND_DATA_URI = BASE_URL + "/send_data.php";
    private static final String DEL_ID_URI = BASE_URL + "/del_id.php";

    private static final String ID_KEY = "id";
    private static final String NICK_NAME_KEY = "nickname";

    private static final String PRIVACY_POLICY_PREF_NAME =
            "privacypolicy_preference";

    private String UserId = "";

    private TextWatcher watchHandler = new TextWatcher() {

        @Override
        public void beforeTextChanged(CharSequence s,
                                      int start, int count, int after) {
        }

        @Override
        public void onTextChanged(CharSequence s,
                                  int start, int before, int count) {
            boolean buttonEnable = (s.length() > 0);

            MainActivity.this.findViewById(R.id.buttonStart)
                             .setEnabled(buttonEnable);
        }

        @Override
        public void afterTextChanged(Editable s) {
        }
    };

    @Override
    protected void onCreate(Bundle savedInstanceState) {
        super.onCreate(savedInstanceState);
        setContentView(R.layout.activity_main);

        // Fetch user ID from serverFetch user ID from server
        new GetDataAsyncTask().execute();

        findViewById(R.id.buttonStart).setEnabled(false);
        ((TextView) findViewById(R.id.editTextNickname))
                .addTextChangedListener(watchHandler);
    }

    public void onSendToServer(View view) {
        String nickname =
            ((TextView) findViewById(R.id.editTextNickname))
                    .getText().toString();
        Toast.makeText(MainActivity.this,
                       this.getClass().getSimpleName() +
                       "\n - nickname : " + nickname,
                       Toast.LENGTH_SHORT).show();
        new sendDataAsyncTack().execute(SEND_DATA_URI, UserId, nickname);
    }

    @Override
    public boolean onCreateOptionsMenu(Menu menu) {
        getMenuInflater().inflate(R.menu.main, menu);
        return true;
    }

    @Override
    public boolean onOptionsItemSelected(MenuItem item) {
        switch (item.getItemId()) {
        case R.id.action_show_pp:
            // *** POINT 1 *** Provide methods by which the user can review the
            // application privacy policy.
            Intent intent = new Intent();
            intent.setClass(this, WebViewAssetsActivity.class);
            startActivity(intent);
            return true;
        case R.id.action_del_id:
            // *** POINT 2 *** Provide methods by which transmitted data can be
            // deleted by user operations.
            new sendDataAsyncTack().execute(DEL_ID_URI, UserId);
            return true;
        case R.id.action_donot_send_id:
            // *** POINT 3 *** Provide methods by which transmitting data can be
            // stopped by user operations.

            // In this sample application if the user data cannot be sent by user
            // operations, finish the application because we do nothing.
            String message  = getString(R.string.stopSendUserData);
            Toast.makeText(MainActivity.this,
                this.getClass().getSimpleName() + " - " + message,
                Toast.LENGTH_SHORT).show();
            finish();

            return true;
        }
        return false;
    }

    private class GetDataAsyncTask extends AsyncTask<String, Void, String> {
        private String extMessage = "";

        @Override
        protected String doInBackground(String... params) {
            // *** POINT 4 *** Use UUIDs or cookies to keep track of user data
            // In this sample we use an ID generated on the server side
            SharedPreferences sp =
                getSharedPreferences(PRIVACY_POLICY_PREF_NAME, MODE_PRIVATE);
            UserId = sp.getString(ID_KEY, null);
            if (UserId == null) {
                // No token in SharedPreferences; fetch ID from server
                try {
                    UserId = NetworkUtil.getCookie(GET_ID_URI, "", "id");
                } catch (IOException e) {
                    // Catch exceptions such as certification errors
                    extMessage = e.toString();
                }

                // Store the fetched ID in SharedPreferences
                sp.edit().putString(ID_KEY, UserId).commit();
            }
            return UserId;
        }

        @Override
        protected void onPostExecute(final String data) {
            String status = (data != null) ? "success" : "error";
            Toast.makeText(MainActivity.this,
                           this.getClass().getSimpleName() +
                           " - " + status + " : " + extMessage,
                           Toast.LENGTH_SHORT).show();
        }
    }

    private class sendDataAsyncTack extends AsyncTask<String, Void, Boolean> {
        private String extMessage = "";

        @Override
        protected Boolean doInBackground(String... params) {
            String url = params[0];
            String id = params[1];
            String nickname = params.length > 2 ? params[2] : null;

            Boolean result = false;
            try {
                JSONObject jsonData = new JSONObject();
                jsonData.put(ID_KEY, id);

                if (nickname != null)
                    jsonData.put(NICK_NAME_KEY, nickname);

                NetworkUtil.sendJSON(url, "", jsonData.toString());

                result = true;
            } catch (IOException e) {
                // Catch exceptions such as certification errors
                extMessage = e.toString();
            } catch (JSONException e) {
                extMessage = e.toString();
            }
            return result;
        }

        @Override
        protected void onPostExecute(Boolean result) {
            String status = result ? "Success" : "Error";
            Toast.makeText(MainActivity.this,
                           this.getClass().getSimpleName() +
                           " - " + status + " : " + extMessage,
                           Toast.LENGTH_SHORT).show();
        }
    }
}
WebViewAssetsActivity.java
/*
 * Copyright (C) 2012-2025 Japan Smartphone Security Association
 *
 * Licensed under the Apache License, Version 2.0 (the "License");
 * you may not use this file except in compliance with the License.
 * You may obtain a copy of the License at
 *
 *      http://www.apache.org/licenses/LICENSE-2.0
 *
 * Unless required by applicable law or agreed to in writing, software
 * distributed under the License is distributed on an "AS IS" BASIS,
 * WITHOUT WARRANTIES OR CONDITIONS OF ANY KIND, either express or implied.
 * See the License for the specific language governing permissions and
 * limitations under the License.
 */

package org.jssec.android.privacypolicynocomprehensive;

import org.jssec.android.privacypolicynocomprehensive.R;

import android.app.Activity;
import android.os.Bundle;
import android.webkit.WebSettings;
import android.webkit.WebView;

public class WebViewAssetsActivity extends Activity {
    // *** POINT 5 *** Place a summary version of the application privacy policy
    // in the assets folder
    private static final String ABST_PP_URL =
        "file:///android_asset/PrivacyPolicy/app-policy-abst-privacypolicy-1.0.html";

    @Override
    public void onCreate(Bundle savedInstanceState) {
        super.onCreate(savedInstanceState);
        setContentView(R.layout.activity_webview);

        WebView webView = (WebView) findViewById(R.id.webView);
        WebSettings webSettings = webView.getSettings();

        webSettings.setAllowFileAccess(false);

        webView.loadUrl(ABST_PP_URL);
    }
}
5.5.1.4. Applications that do not incorporate an application privacy policy
Points: (Applications that do not incorporate an application privacy policy)
You do not need to display an application privacy policy if your application will only use the information it obtains within the device.
- In the documentation for marketplace applications or similar
applications, note that the application does not transmit the information it obtains to the outside world
MainActivity.java
/*
 * Copyright (C) 2012-2025 Japan Smartphone Security Association
 *
 * Licensed under the Apache License, Version 2.0 (the "License");
 * you may not use this file except in compliance with the License.
 * You may obtain a copy of the License at
 *
 *      http://www.apache.org/licenses/LICENSE-2.0
 *
 * Unless required by applicable law or agreed to in writing, software
 * distributed under the License is distributed on an "AS IS" BASIS,
 * WITHOUT WARRANTIES OR CONDITIONS OF ANY KIND, either express or implied.
 * See the License for the specific language governing permissions and
 * limitations under the License.
 */

package org.jssec.android.privacypolicynoinfosent;

import com.google.android.gms.common.ConnectionResult;
import com.google.android.gms.common.GoogleApiAvailability;
import com.google.android.gms.location.FusedLocationProviderClient;
import com.google.android.gms.location.LocationServices;
import com.google.android.gms.tasks.OnSuccessListener;

import android.Manifest;
import android.location.Location;
import android.net.Uri;
import android.os.Build;
import android.os.Bundle;
import android.content.Intent;
import android.content.pm.PackageManager;
import androidx.core.app.ActivityCompat;
import androidx.fragment.app.FragmentActivity;
import androidx.core.content.ContextCompat;

import android.util.Log;
import android.view.Menu;
import android.view.View;

public class MainActivity extends FragmentActivity {
    private FusedLocationProviderClient mFusedLocationClient;

    private final int MY_PERMISSIONS_REQUEST_ACCESS_LOCATION = 257;

    @Override
    protected void onCreate(Bundle savedInstanceState) {
        super.onCreate(savedInstanceState);
        setContentView(R.layout.activity_main);

        mFusedLocationClient =
                LocationServices.getFusedLocationProviderClient(this);
        if (Build.VERSION.SDK_INT >= 23) {
            // API level 23 and greater requires permission to get location info.
            Boolean permissionCheck = (ContextCompat.checkSelfPermission(this,
                                       Manifest.permission.ACCESS_FINE_LOCATION)
                                       == PackageManager.PERMISSION_GRANTED);
            if (!permissionCheck) {
                // We have no permission, request to user
                ActivityCompat.requestPermissions(this,
                        new String[]{Manifest.permission.ACCESS_FINE_LOCATION},
                        MY_PERMISSIONS_REQUEST_ACCESS_LOCATION);
            }
        }
    }

    @Override
    public void onRequestPermissionsResult(int requestCode,
                                           String permissions[],
                                           int[] grantResults) {
        switch (requestCode) {
            case MY_PERMISSIONS_REQUEST_ACCESS_LOCATION: {
                if (grantResults.length > 0 && grantResults[0] ==
                    PackageManager.PERMISSION_GRANTED) {
                    // permission is granted
                    int resultCode =
                        GoogleApiAvailability.getInstance()
                                             .isGooglePlayServicesAvailable(this);
                    if (resultCode != ConnectionResult.SUCCESS) {
                        // We cannot use Googleplay service, sample app will
                        // terminate.
                        finish();
                    }
                } else {
                    // permission is not granted, we sample app will terminate.
                    finish();
                }
            }
        }
    }

    @Override
    public boolean onCreateOptionsMenu(Menu menu) {
        getMenuInflater().inflate(R.menu.main, menu);
        return true;
    }

    public void onStartMap(View view) {
        Log.d("onStartMap()"," called");
        // *** POINT 1 *** You do not need to display an application privacy policy
        // if your application will only use the information it obtains within the
        // device.
        mFusedLocationClient.getLastLocation()
            .addOnSuccessListener(this, new OnSuccessListener<Location>() {
            @Override
            public void onSuccess(Location location) {
                if (location != null) {
                    Intent intent =
                        new Intent(Intent.ACTION_VIEW,
                            Uri.parse("geo:" + location.getLatitude() +
                                      "," + location.getLongitude())
                        );
                    startActivity(intent);
                }
            }
        });
    }
}
Sample description on the marketplace is below.
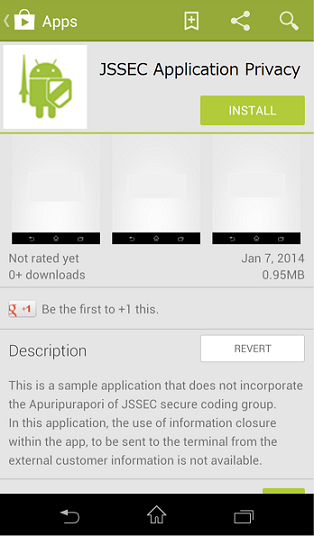
Fig. 5.5.3 Description on the marketplace
5.5.2. Rule Book
When working with private date, obey the following rules.
Restrict transmissions of user data to the minimum necessary (Required)
Provide methods by which the user can review the application privacy policy (Required)
Place a summary version of the application privacy policy in the assets folder (Recommended)
5.5.2.1. Restrict transmissions of user data to the minimum necessary (Required)
When transmitting usage data to external servers or other destinations, restrict transmissions to the bare minimum necessary to provide service. In particular, you should design that applications have access to only user data of which purpose of use the user can imagine on the basis of the application description.
For example, an application that the user can imagine it is an alarm application, must not have access location data. On the other hand, if an alarm application can sound the alarm depending on the location of user and its feature is written on the description of the application, the application may have access to location data.
In cases where information need only be accessed within an application, avoid transmitting it externally and take other steps to minimize the possibility of inadvertent leakage of user data.
5.5.2.2. On first launch (or application update), obtain broad consent to transmit user data that requires particularly delicate handling or that may be difficult for users to change (Required)
If an application will transmit to external servers any user data that may be difficult for users to change, or any user data that requires particularly delicate handling, the application must obtain advance consent (opt-in) from the user—before the user begins using the application—informing the user of what types of information will be sent, for what purposes, to servers, and whether or not any third-party providers will be involved. More specifically, on first launch the application should display its application privacy policy and confirm that the user has reviewed it and consented. Also, whenever an application is updated in such a way that it now transmits new types of user data to external servers, it must again confirm that the user has reviewed and consented to these changes. If the user does not consent, the application should terminate or otherwise take steps to ensure that all functions requiring the transmission of data are disabled.
These steps serve to guarantee that users understand how their data will be handled when they use an application, providing users with a sense of security and enhancing their trust in the application.
MainActivity.java
protected void onStart() {
    super.onStart();

    // (some portions omitted)
    if (privacyPolicyAgreed <= VERSION_TO_SHOW_COMPREHENSIVE_AGREEMENT_ANEW) {
        // *** POINT *** On first launch (or application update),
        // obtain broad consent to transmit user data that will be handled
        // by the application.
        // When the application is updated, it is only necessary to renew
        // the user’s grant of broad consent
        // if the updated application will handle new types of user data.
        ConfirmFragment dialog =
		ConfirmFragment.newInstance(R.string.privacyPolicy,
					    R.string.agreePrivacyPolicy,
					    DIALOG_TYPE_COMPREHENSIVE_AGREEMENT);
        dialog.setDialogListener(this);
        FragmentManager fragmentManager = getSupportFragmentManager();
        dialog.show(fragmentManager, "dialog");
    }
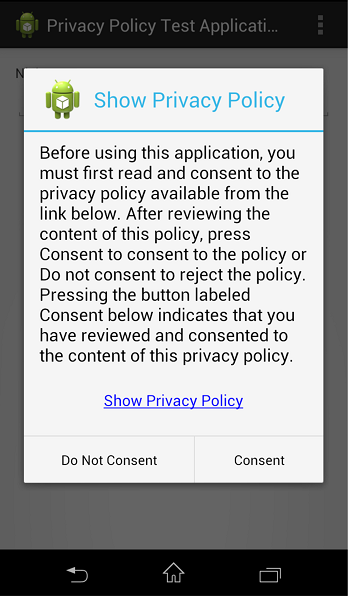
Fig. 5.5.4 Example of broad consent
5.5.2.3. Obtain specific consent before transmitting user data that requires particularly delicate handling (Required)
When transmitting to external servers any user data that requires particularly delicate handling, an application must obtain advance consent (opt-in) from users for each such type of user data (or for each feature that involves the transmission of user data); this is in addition to the need to obtain general consent. If the user does not grant consent, the application must not send the corresponding data to the external server.
This ensures that users can obtain a more thorough understanding of the relationship between an application’s features (and the services it provides) and the transmission of user data for which the user granted general consent; at the same time, application providers can expect to obtain user consent on the basis of more precise decision-making.
MainActivity.java
public void onSendToServer(View view) {
    // *** POINT *** Obtain specific consent before transmitting user data
    // that requires particularly delicate handling.
    ConfirmFragment dialog =
        ConfirmFragment.newInstance(R.string.sendLocation,
                                    R.string.cofirmSendLocation,
                                    DIALOG_TYPE_PRE_CONFIRMATION);
    dialog.setDialogListener(this);
    FragmentManager fragmentManager = getSupportFragmentManager();
    dialog.show(fragmentManager, "dialog");
}
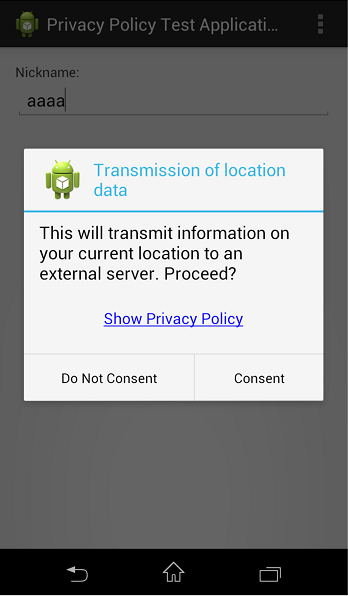
Fig. 5.5.5 Example of specific consent
5.5.2.4. Provide methods by which the user can review the application privacy policy (Required)
In general, the Android application marketplace will provide links to application privacy policies for users to review before choosing to install the corresponding application. In addition to supporting this feature, it is important for applications to provide methods by which users can review application privacy policies after installing applications on their devices. It is particularly important to provide methods by which users can easily review application privacy policies in cases involving consent to transmit user data to external servers to assist users in making appropriate decisions.
MainActivity.java
    @Override
    public boolean onOptionsItemSelected(MenuItem item) {
        switch (item.getItemId()) {
        case R.id.action_show_pp:
            // *** POINT *** Provide methods by which the user can review the
            // application privacy policy.
            Intent intent = new Intent();
            intent.setClass(this, WebViewAssetsActivity.class);
            startActivity(intent);
            return true;
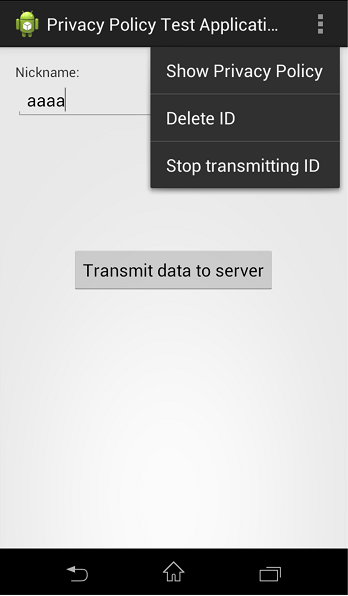
Fig. 5.5.6 Context menu to show privacy policy
5.5.2.6. Place a summary version of the application privacy policy in the assets folder (Recommended)
It is a good idea to place a summary version of the application privacy policy in the assets folder to ensure that users may review it as necessary. Ensuring that the application privacy policy is present in the assets folder not only allows users to access it easily at any time, but also avoids the risk that users may see a counterfeit or corrupted version of the application privacy policy prepared by a malicious third party.
5.5.2.7. Provide methods by which transmitted data can be deleted and transmitting data can be stopped by user operations (Recommended)
It is a good idea to provide methods by which user data that has been transmitted to external servers can be deleted at the user’s request. Similarly, in cases in which the application itself has stored user data (or a copy thereof) within the device, it is a good idea to provide users with methods for deleting this data. And, it is a good idea to provide methods by which transmitting user data can be stopped at the user’s request.
This rule (recommendation) is codified by the “right to be forgotten” promoted in the EU; more generally, in the future it seems clear that various proposals will call for further strengthening the rights of users to have their data protected, and for this reason in these guidelines we recommend the provision of methods for the deletion of user data unless there is some specific reason to do otherwise. And, regarding stop transmitting data, it is the one that is defined by the point of view "Do Not Track (deny track)" of the correspondence by the browser is progressing mainly.
MainActivity.java
    @Override
    public boolean onOptionsItemSelected(MenuItem item) {
        switch (item.getItemId()) {
        // (some portions omitted)
        case R.id.action_del_id:
            // *** POINT *** Provide methods by which transmitted data can be
            // deleted by user operations.
            new SendDataAsyncTack().execute(DEL_ID_URI, UserId);
            return true;
        }
5.5.2.8. If you will only be using user data within the device, notify the user that data will not be transmitted externally. (Recommended)
Even in cases in which user data will only be accessed temporarily within the user’s device, it is a good idea to communicate this fact to the user to ensure that the user’s understanding of the application’s behavior remains full and transparent. More specifically, users should be informed that the user data accessed by an application will only be used within the device for a certain specific purpose and will not be stored or sent. Possible methods for communicating this content to users include specifying it within the description of the application on the application marketplace. Information that is only used temporarily within a device need not be discussed in the application privacy policy.
Fig. 5.5.7 Description on the marketplace
5.5.3. Advanced Topics
5.5.3.1. Some background and context regarding privacy policies
For cases in which a smartphone application will obtain user data and transmit this data externally, it is necessary to prepare and display an application privacy policy to inform users of details such as the types of data will be collected and the ways in which the data will be handled. The content that should be included in an application privacy policy is detailed in the Smartphone Privacy Initiative advocated by JMIC’s SPI. The primary objective of the application privacy policy should be to state clearly all types of user data that will be accessed by an application, the purposes for which the data will be used, where the data will be stored, and to what destinations the data will be transmitted.
A second document, separate from and required in addition to the application privacy policy, is the Enterprise Privacy Policy, which details how all user data gathered by a corporation from its various applications will be stored, managed, and disposed of. This Enterprise Privacy Policy corresponds to the privacy policy that would traditionally have been prepared to comply with Japan’s Personal Information Protection Law.
A detailed description of proper methods for preparing and displaying privacy policies, together with a discussion of the roles played by the various different types of privacy policies, may be found in the document “A Discussion of the Creation and Presentation of Privacy Policies for JSSEC Smartphone Applications”, available at this URL:[https://www.jssec.org/event/20140206/03-1_app_policy.pdf](https://www.jssec.org/event/20140206/03-1_app_policy.pdf) (Japanese only).
5.5.3.2. Glossary of Terms
In the table below we define a number of terms that are used in these guidelines; these definitions are taken from the document “A Discussion of the Creation and Presentation of Privacy Policies for JSSEC Smartphone Applications” ([https://www.jssec.org/event/20140206/03-1_app_policy.pdf](https://www.jssec.org/event/20140206/03-1_app_policy.pdf)) (Japanese only).
Term |
Description |
Enterprise Privacy Policy |
A privacy policy that defines a corporation’s policies for protecting personal data. Created in accordance with Japan’s Personal Information Protection Law. |
Application Privacy Policy |
An application-specific privacy policy. Created in accordance with the guidelines of the Smartphone Privacy Initiative (SPI) of Japan’s Ministry of Internal Affairs and detailed versions containing easily understandable explanations. |
Summary version of the Application Privacy Policy |
A brief document that concisely summarizes what user information an application will use, for what purpose, and whether or not this information will be provided to third parties. |
Detailed version of the Application Privacy Policy |
A detailed document that complies with the 8 items specified by the Smartphone Privacy Initiative (SPI) and the Smartphone Privacy Initiative II (SPI II) of Japan’s Ministry of Internal Affairs and Communications (MIC). |
User data that is easy for users to change |
Cookies, UUIDs, etc. |
User data that is difficulty for users to change |
IMEIs, IMSIs, ICCIDs, MAC addresses, OS-generated IDs, etc. |
User data requiring particularly delicate handling |
Location information, address books, telephone numbers, email addresses, etc. |
5.5.3.3. Version-dependent differences in handling of Android IDs
The Android ID (Settings.Secure.ANDROID_ID) is a randomly-generated 64-bit number expressed as a hexadecimal character string that serves as an identifier to identify individual terminals (although duplicate identifiers are possible in extremely rare cases). For this reason, incorrect usage can create serious risks associated with user tracking, and thus special care must be taken when using Android IDs. However, the rules governing aspects such as ID generation and accessible ranges differ for terminals running Android 7.1 (API Level 25) versus terminals running Android 8.0 (API Level 26). In what follows we describe these differences.
Terminals running Android 7.1(API Level 25) or earlier
For terminals running Android 7.1(API Level 25) or earlier, only one Android ID value exists in a given terminal; this value may be accessed by all apps running on that terminal. However, note that, for terminals with multiuser support, separate values are generated for each user. Android IDs are generated upon the first startup of a terminal after shipping from the factory, and are newly regenerated upon each subsequent factory reset.
Terminals running Android 8.0 (API Level 26) or later
For terminals running Android 8.0 (API Level 26) or later, each app (developer) has its own distinct value, which may only be accessed by the app in question. More specifically, whereas the values used in Android 7.1 (API Level 25) and earlier were user-specific and terminal-specific but not app-specific, in Android 8.0 (API Level 26) and later versions the app signature is added to the list of elements used to generate unique values, so that apps with different signatures now have different Android ID values. (Apps with identical signatures have identical Android ID values.)
The occasions on which Android ID values are generated or modified remain essentially unchanged, but there are a few points to note, as discussed below.
On package uninstallation / reinstallation:
-
As long as the signature of the app remains unchanged, its Android ID will be unchanged after uninstalling and reinstalling. On the other hand, note that, if the key used as the signature is modified, the Android ID will be different after re-installation, even if the package name is unchanged.
On updates to terminals running Android 8.0 (API Level 26) or later:
-
If an app was already installed on a terminal running Android 7.1 (API Level 25) or earlier, the Android ID value that may be obtained by the app remains unchanged after the terminal is updated to Android 8.0 (API Level 26) or later. However, this excludes cases in which apps are uninstalled and reinstalled after the update.
Note that all Android IDs are classified as User information that is difficult for users to exchange (as described in Section "5.5.3.2. Glossary of Terms"), and thus—as noted at the beginning of this discussion—we recommend that similar levels of caution be employed when using Android IDs.
5.5.3.4. Restriction on obtaining non-resettable device identifiers on Android 10
To protect privacy, in Android 10, more restrictions have been placed on the obtaining of non-resettable device identifiers. To obtain device identifiers, the READ_PRIVILEGED_PHONE_STATE permission is required, but this permission is normally not granted to an app. This change affects all apps running in Android 10 regardless of the setting for targetSdkVersion. For this reason, even in apps that ran using the granting of normal permissions, unexpected behavior can still occur due to occurrence of a security exception or returning of null. The types of information that are affected by this and the APIs for obtaining them are as follows. (It is assumed that required permissions such as READ_PHONE_STATE were already granted.)
Build Class
API |
Information to be acquired |
targetSDKVersion=29 |
targetSDKVersion<29 |
(field))BUILD.SERIAL |
Device serial number |
Unknown |
Unknown |
getSerial |
Device serial number |
SecurityException |
Unknown |
TelephonyManager Class
API |
Information to be acquired |
targetSDKVersion=29 |
targetSDKVersion<29 |
getImei |
IMEI |
SecurityException |
null |
getSubscriberId |
IMSI |
SecurityException |
null |
getDeviceId |
IMEI, MEID, ESN |
SecurityException |
null |
getMeid |
MEID |
SecurityException |
null |
getSimSerialNumber |
SIM Serial |
SecurityException |
null |
5.5.3.5. Data Access Auditing
“Data access auditing” was added to make the accessing process to user private data such as location information and contact lists transparent on Android 11. To use this, register the AppOpsManager.OnOpNotedCallback instance and implement the callback logic in the component where data access needs to be audited, such as within the onCreate() method of the activity. This enables easy recording of access to user private data.
Defined attribution tags can be included on access records by defining the callback logic to include the defined attribution tag names on the application’s log.
public class SharePhotoLocationActivity extends AppCompatActivity {
    private Context attributionContext;
    // ~snip~
    @Override
    public void onCreate(@Nullable Bundle savedInstanceState,
                         @Nullable PersistableBundle persistentState) {
        attributionContext = createAttributionContext("sharePhotos");
        // ~snip~
        AppOpsManager.OnOpNotedCallback appOpsCallback =
            new AppOpsManager.OnOpNotedCallback() {
                private void logPrivateDataAccess(String opCode, String attributionTag, String trace) {
                    Log.i(TAG, "Private data accessed. ");
                    Log.i(TAG,"Operation:" + opCode);
                    Log.i(TAG,"Attribution Tag: " + attributionTag);
                    Log.i(TAG, "Stack Trace: " + trace);
                }

                @Override
                public void onNoted(@NonNull SyncNotedAppOp syncNotedAppOp) {
                    logPrivateDataAccess(syncNotedAppOp.getOp(),
                                         syncNotedAppOp.getAttributionTag(),
                                         Arrays.toString(new Throwable().getStackTrace()));
                }

                @Override
                public void onSelfNoted(@NonNull SyncNotedAppOp syncNotedAppOp) {
                    logPrivateDataAccess(syncNotedAppOp.getOp(),
                                         syncNotedAppOp.getAttributionTag(),
                                         Arrays.toString(new Throwable().getStackTrace()));
                }

                @Override
                public void onAsyncNoted(@NonNull AsyncNotedAppOp asyncNotedAppOp) {
                    logPrivateDataAccess(asyncNotedAppOp.getOp(),
                                         asyncNotedAppOp.getAttributionTag(),
                                         asyncNotedAppOp.getMessage());
                }
            };

        AppOpsManager appOpsManager = getSystemService(AppOpsManager.class);
        if (appOpsManager != null) {
            appOpsManager.setNotedAppOpsCollector(appOpsCollector);
        }
    }
Also, for applications that target Android 12, these attribution tags must be declared within the manifest file.
<manifest xmlns:android="http://schemas.android.com/apk/res/android"
    xmlns:tools="http://schemas.android.com/tools"
    package="xxx.xxxx.myapplication">
    ...
    <attribution
        android:tag="sharePhotos"
        android:label="@string/share_photos_attribution_label" />
    ...
</manifest>
If attribution tags that have not been declared are to be used, the attributionTag value is output to LogCat in the null state.
5.5.3.6. Location Information Access
Location information access permission is divided by foreground and background on Android 10 and above. The following shows the permissions for each.
- Foreground
ACCESS_COARSE_LOCATION (Specifies city blocks for location information accuracy)
ACCESS_FINE_LOCATION (Specifies more accurate location information compared to ACCESS_COARSE_LOCATION)
- Background
ACCESS_BACKGROUND_LOCATION
Requests for location information permissions based on its use cases are required for applications with a feature that uses the location information service. The following shows the process to request permission.
Declare use of permission based on the use case in the manifest file
Execute requestPermission and request user permission for location information
Examples of declaration in the manifest file
<uses-permission android:name="android.permission.ACCESS_COARSE_LOCATION" />
<uses-permission android:name="android.permission.ACCESS_FINE_LOCATION" />
<uses-permission android:name="android.permission.ACCESS_BACKGROUND_LOCATION" />
Foreground location information and background location information permissions cannot be requested simultaneously on Android 11. If permissions for both are required, requests for permissions must be made in phases.
The process to request permission in phases is indicated below.
Declare use of permission based on the use case in the manifest file
Execute requestPermissions and request user permission for foreground location information access
Execute requestPermissions and request user permission for background location information access when users try to use a feature that requires background location information access later on
Google Play restricts use of high risk or sensitive permissions, and it is expected that unnecessary access to location information in the background will become prohibited. If it is not essential, it is recommended to either delete it from the app or to implement access to location information in the foreground, such as when the app’s activity is visible to users [33].
If requesting ACCESS_FINE_LOCATION permissions on apps that target Android 12, ACCESS_COARSE_LOCATION permissions must be requested as well.
Also, users can request that the app retrieve only approximate location information even when the app requests an ACCESS_FINE_LOCATION runtime permission.
For user privacy protection, it is recommended to request only ACCESS_COARSE_LOCATION if objectives are accomplished by using approximate location information.
ACCESS_FINE_LOCATION is also required when using the Wi-Fi APIs, but since it is difficult for users to intuitively associate location information with Wi-Fi settings, a new runtime permission, NEARBY_WIFI_DEVICES permission, was introduced in the NEARBY_DEVICES permission group starting from Android 13 (API level 33).
This permission applies to the following Wi-Fi APIs.
Class |
API |
WifiManager |
startLocalOnlyHotspot() |
WifiAwareManager |
attach() |
WifiAwareSession |
publish() |
subscribe() |
|
WifiP2pManager |
addLocalService() |
connect() |
|
createGroup() |
|
discoverPeers() |
|
discoverServices() |
|
requestDeviceInfo() |
|
requestGroupInfo() |
|
requestPeers() |
|
WifiRttManager |
startRanging() |
When using these Wi-Fi APIs in apps targeting Android 13 and the app states that it will not obtain physical location information from Wi-Fi device information, NEARBY_WIFI_DEVICES must be declared in place of ACCESS_FINE_LOCATION.
The sample code is as follows.
First, this is an example of the declaration. The following shows the code for a declaration of NEARBY_WIFI_DEVICES and statement that no physical location information will be obtained. The sample code also declares CHANGE_WIFI_STATE in order to use startLocalOnlyHotspot.
<uses-permission
    android:name="android.permission.NEARBY_WIFI_DEVICES"
    android:usesPermissionFlags="neverForLocation" />

<uses-permission android:name="android.permission.CHANGE_WIFI_STATE" />
Next, the following is an example of code that requests the NEARBY_WIFI_DEVICES permission from the user when the button is pressed.
private ActivityResultLauncher<String> requestPermissionLauncher =
        registerForActivityResult(new ActivityResultContracts.RequestPermission(), isGranted -> {
            if (isGranted) {
                wifiManager = (WifiManager)getSystemService(Context.WIFI_SERVICE);
                MainActivity.this.startLocalOnlyHotspot();
            } else {
                // Explain to the user that the feature is unavailable because the
                // features requires a permission that the user has denied. At the
                // same time, respect the user's decision. Don't link to system
                // settings in an effort to convince the user to change their
                // decision.
            }
        });

@Override
protected void onCreate(Bundle savedInstanceState) {
    // ...
    buttonStart.setOnClickListener( v -> {
        requestPermissionLauncher.launch("android.permission.NEARBY_WIFI_DEVICES");
    });
}

private void startLocalOnlyHotspot() {
    wifiManager.startLocalOnlyHotspot(new WifiManager.LocalOnlyHotspotCallback() {
        @Override
        public void onStarted(WifiManager.LocalOnlyHotspotReservation reservation) {
            super.onStarted(reservation);
            buttonStart.setEnabled(false);
            statusTextView.setText("startLocalOnlyHotspot: onStarted");
        }
The permission dialog that appears when the above code is executed on Android 13 and the button is pressed is shown below.
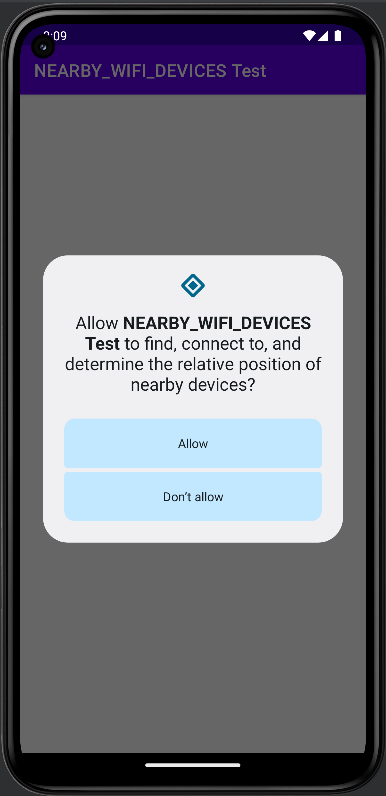
Fig. 5.5.8 Appearance of Permission Dialog
NEARBY_WIFI_DEVICES was introduced from Android 13 and requires a build with targetSDKVersion set to 33 or higher to execute the above code. If targetSDKVersion is set to 32 or lower, the following SecurityException exception occurs when startLocalOnlyHotspot is executed.
Process: com.example.myapplication, PID: 1229
java.lang.SecurityException: UID 10267 does not have Coarse/Fine Location permission
5.5.3.7. Microphones and Cameras For Android 12
Microphones and cameras can be set to on or off from quick settings or the [Privacy] screen of system settings on Android 12. These settings are reflected on all applications on the device.
If users launch the application that accesses microphones and cameras that have been set to off, the system notifies users that these devices are off.
This function is available for use only on supported devices and can be confirmed with the following code.
SensorPrivacyManager sensorPrivacyManager = getApplicationContext().getSystemService(SensorPrivacyManager.class);
boolean supportsMicrophoneToggle = sensorPrivacyManager.supportsSensorToggle(Sensors.MICROPHONE);
boolean supportsCameraToggle = sensorPrivacyManager.supportsSensorToggle(Sensors.CAMERA);
For applications that use microphones and cameras, it is recommended to access them through the following methods based on permissions.
The device camera will not be accessed until the user applies CAMERA permissions to the application.
The device microphone will not be accessed until the user applies RECORD_AUDIO permissions to the application.
When the application accesses the microphone or camera, an icon is displayed in the status bar to indicate that it is being accessed. Users can confirm which application is currently using microphones or cameras by tapping the icon from quick settings.
5.5.3.9. Media Owner Package Names
MediaColumns in the MediaStore stores various information about the file as columns, such as TITLE, DISPLAY_NAME, MIME_TYPE, etc., and it is possible to query media files in the device using this column information as conditions.
Starting with Android 14, OWNER_PACKAGE_NAME, which represents the package name for the application that created the media file, has been removed from this column information and can no longer be specified as a query condition.
This is because information on installed applications is now considered personal and confidential information of the user.
The following is a sample code that queries an audio file stored on a device and displays the OWNER_PACKAGE_NAME of the file.
cursor = contentResolver.query(
        MediaStore.Audio.Media.EXTERNAL_CONTENT_URI,
        null,null,null,null);

if (cursor != null && cursor.moveToFirst()) {

    Log.d(TAG, cursor.getString(cursor.getColumnIndex(MediaStore.Audio.Media.OWNER_PACKAGE_NAME)));
The differences between Android 13 (API Level 33) and Android 14 (API Level 34) when executing this code are as follows.
When executed on Android 13:
D voicerecorder.audiorecorder.voice
When executed on Android 14:
E Unknown message received from debugger! ''
When executed on Android 13, the package name for the application that created the media file is output, while on Android 14, the query using OWNER_PACKAGE_NAME cannot be performed, and an error message is displayed in the Logcat output.
5.5.3.10. Screen Recording Detection
Starting with Android 15, the ability for apps to detect screen recordings has been added.
During the execution of screen recording, a callback is invoked when the app is transitioned to visible or invisible. An app is considered visible when the activity owned by the UID of the registered process is being recorded. Apps can now notify users during sensitive operations when screen recording is detected sensitive operations on the app.
For example, when a screen is being recorded by a user or another application, the user can be warned or prohibited from using the application before the ID and password input screen or the screen displaying personal information appears on the application to prevent unintended recording or distribution of confidential or personal information. It is possible to prevent unintentional recording and distribution of confidential and personal information.
An example implementation is as follows:
AndroidManifest.xml
<uses-permission android:name="android.permission.DETECT_SCREEN_RECORDING" />
MainActivity.kt
private val mCallback = Consumer<Int> { state ->
    if (state == SCREEN_RECORDING_STATE_VISIBLE) {
        Log.i("TAG", "We're being recorded")
    } else {
        Log.i("TAG", "We're not being recorded")
    }
}

override fun onStart() {
    super.onStart()
    val initialState =
        windowManager.addScreenRecordingCallback(mainExecutor, mCallback)
    mCallback.accept(initialState)
}

override fun onStop() {
    super.onStop()
    windowManager.removeScreenRecordingCallback(mCallback)
}
5.5.3.11. Partial Screen Sharing
Android 15 introduces a new partial screen sharing feature, which allows you to share or record only specific app windows. This change aims to address the need for privacy protection and focusing on the content of a specific application. Below are the steps on how to implement it.
Request permission for overlay display
The app needs to obtain permission to display an overlay on top of other apps. The following code requests the user’s permission for overlay display.
private fun checkOverlayPermissionAndRequestMediaProjection() {
    if (Build.VERSION.SDK_INT >= Build.VERSION_CODES.M) {
        if (!Settings.canDrawOverlays(this)) {
            val intent = Intent(Settings.ACTION_MANAGE_OVERLAY_PERMISSION, Uri.parse("package:$packageName"))
            overlayPermissionLauncher.launch(intent)
        } else {
            requestMediaProjectionPermission()
        }
    } else {
        requestMediaProjectionPermission()
    }
}

private val overlayPermissionLauncher = registerForActivityResult(
    ActivityResultContracts.StartActivityForResult()
) { result ->
    if (Build.VERSION.SDK_INT >= Build.VERSION_CODES.M) {
        if (Settings.canDrawOverlays(this)) {
            requestMediaProjectionPermission()
        } else {
            Toast.makeText(this, "Overlay permission denied", Toast.LENGTH_SHORT).show()
        }
    }
}
When the above code is executed, a dialog appears requesting the user’s permission for the application to display an overlay on top of other applications.

Fig. 5.5.9 Permission to display overlays
Request permission to capture the screen and handle the result
Once overlay permission has been granted, use MediaProjectionManager to request permission to capture the screen and handle the result.
private fun requestMediaProjectionPermission() {
    val captureIntent = mediaProjectionManager.createScreenCaptureIntent()
    mediaProjectionLauncher.launch(captureIntent)
}

private val mediaProjectionLauncher = registerForActivityResult(
    ActivityResultContracts.StartActivityForResult()
) { result ->
    if (result.resultCode == Activity.RESULT_OK && result.data != null) {
        val serviceIntent = Intent(this, MediaProjectionService::class.java).apply {
            putExtra("resultCode", result.resultCode)
            putExtra("data", result.data)
        }
        if (Build.VERSION.SDK_INT >= Build.VERSION_CODES.O) {
            startForegroundService(serviceIntent)
        } else {
            startService(serviceIntent)
        }
    } else {
        Toast.makeText(this, "Permission denied", Toast.LENGTH_SHORT).show()
    }
}
When the above code is executed, a dialog will appear asking the user for permission for the application to capture the screen of other apps.
Fig. 5.5.10 Allow recording or casting
Select the app you want to capture
When you click the Start button, a list of apps will be displayed and you can select the app you want to capture. The following is an example of the Android standard Clock app.
Fig. 5.5.11 Apps list
Fig. 5.5.12 Select the Clock app
5.5.3.12. Changes in Global State Management in DND mode
Before Android 14, apps could directly modify DND global states using setInterruptionFilter and setNotificationPolicy.
fun setInterruptionFilter(context: Context, filter: Int) {
    val notificationManager = context.getSystemService(Context.NOTIFICATION_SERVICE) as NotificationManager
    notificationManager.setInterruptionFilter(filter)
}
Starting in Android 15, apps can no longer directly modify DND global states. Instead, they must use AutomaticZenRule, which automatically enables/disables DND mode when specific conditions (time schedules, location triggers, calendar events) are met. The system merges existing rules by prioritizing the most restrictive policy, preventing unauthorized apps from overriding user settings.
AutomaticZenRule is a system-managed rule that enables indirect control of DND mode by activating/deactivating it based on predefined conditions.
Creating Rules
fun createAutomaticZenRule(context: Context) {
    val notificationManager = context.getSystemService(Context.NOTIFICATION_SERVICE) as NotificationManager

    // Define the condition for the rule (e.g., a condition to enable DND at a specific time)
    val conditionId = Uri.parse("content://com.example.myapp/condition")

    // Create the AutomaticZenRule
    val zenRule = AutomaticZenRule(
        "My Automatic Zen Rule",
        ComponentName(context.packageName, MyConditionConfigurationActivity::class.java.name),
        conditionId,
        null, // ZenPolicy is optional, pass null if not needed
        NotificationManager.INTERRUPTION_FILTER_PRIORITY,
        true
    )

    // Add the rule
    val ruleUri = notificationManager.addAutomaticZenRule(zenRule)
    if (ruleUri != null) {
        println("AutomaticZenRule created: $ruleUri")
    } else {
        println("Failed to create AutomaticZenRule")
    }
}
Updating Rules
fun updateAutomaticZenRule(context: Context, ruleId: String) {
    val notificationManager = context.getSystemService(Context.NOTIFICATION_SERVICE) as NotificationManager

    // Change the condition for the rule
    val newConditionId = Uri.parse("content://com.example.myapp/new_condition")

    // Retrieve the existing rule
    val zenRule = notificationManager.getAutomaticZenRule(ruleId)
    if (zenRule != null) {
        // Update the rule
        val updatedZenRule = AutomaticZenRule(
            zenRule.name,
            zenRule.owner,
            zenRule.configurationActivity,
            newConditionId,
            zenRule.zenPolicy,
            zenRule.interruptionFilter,
            zenRule.isEnabled
        )

        notificationManager.updateAutomaticZenRule(ruleId, updatedZenRule)
        println("AutomaticZenRule updated: $ruleId")
    } else {
        println("AutomaticZenRule not found: $ruleId")
    }
}
Calling legacy APIs that previously affected global state (setInterruptionFilter, setNotificationPolicy) now implicitly creates or updates an AutomaticZenRule. This rule toggles on/off based on the API call cycle.
For example, using setInterruptionFilter(NotificationManager.INTERRUPTION_FILTER_ALL) to disable DND mode will also implicitly create an AutomaticZenRule, which the system manages appropriately.
5.6. Using Cryptography
In the security world, the terms "confidentiality", "integrity", and "availability" are used in analyzing responses to threats. These three terms refer, respectively, to measures to prevent the third parties from viewing private data, protections to ensure that the data referenced by users has not been modified (or techniques for detecting when it has been falsified) and the ability of users to access services and data at all times. All three of these elements are important to consider when designing security protections. In particular, encryption techniques are frequently used to ensure confidentiality and integrity, and Android is equipped with a variety of cryptographic features to allow applications to realize confidentiality and integrity.
In this section we will use sample code to illustrate methods by which Android applications can securely implement encryption and decryption (to ensure confidentiality) and message authentication codes (MAC) or digital signatures (to ensure integrity).
5.6.1. Sample Code
A variety of cryptographic methods have been developed for specific purposes and conditions, including use cases such as "encrypting and decrypting data (to ensure confidentiality)" and "detecting falsification of data (to ensure integrity)". Here is sample code that is categorized into three broad groups of cryptography techniques on the basis of the purpose of each technology. The features of the cryptographic technology in each case should make it possible to choose an appropriate encryption method and key type. For cases in which more detailed considerations are necessary, see Section "5.6.3.1. Choosing encryption methods".
Before designing an implementation that uses encryption technology, be sure to read Section "5.6.3.3. Measures to Protect against Vulnerabilities in Random-Number Generators".
Protecting data from third-party eavesdropping
Fig. 5.6.1 Selection flowchart for sample code to protect data from eavesdropping
Detecting falsification of data made by a third party

Fig. 5.6.2 Selection flowchart for sample code to detect falsifications
5.6.1.1. Encrypting and Decrypting With Password-based Keys
You may use password-based key encryption for the purpose of protecting a user’s confidential data assets.
Points:
Explicitly specify the encryption mode and the padding.
Use strong encryption technologies (specifically, technologies that meet the relevant criteria), including algorithms, block cipher modes, and padding modes.
When generating a key from password, use Salt.
When generating a key from password, specify an appropriate hash iteration count.
Use a key of length sufficient to guarantee the strength of encryption.
AesCryptoPBEKey.java
/*
 * Copyright (C) 2012-2025 Japan Smartphone Security Association
 *
 * Licensed under the Apache License, Version 2.0 (the "License");
 * you may not use this file except in compliance with the License.
 * You may obtain a copy of the License at
 *
 *      http://www.apache.org/licenses/LICENSE-2.0
 *
 * Unless required by applicable law or agreed to in writing, software
 * distributed under the License is distributed on an "AS IS" BASIS,
 * WITHOUT WARRANTIES OR CONDITIONS OF ANY KIND, either express or implied.
 * See the License for the specific language governing permissions and
 * limitations under the License.
 */
package org.jssec.android.cryptsymmetricpasswordbasedkey;

import java.security.InvalidAlgorithmParameterException;
import java.security.InvalidKeyException;
import java.security.NoSuchAlgorithmException;
import java.security.SecureRandom;
import java.security.spec.InvalidKeySpecException;
import java.util.Arrays;

import javax.crypto.BadPaddingException;
import javax.crypto.Cipher;
import javax.crypto.IllegalBlockSizeException;
import javax.crypto.NoSuchPaddingException;
import javax.crypto.SecretKey;
import javax.crypto.SecretKeyFactory;
import javax.crypto.spec.IvParameterSpec;
import javax.crypto.spec.PBEKeySpec;

public final class AesCryptoPBEKey {

    // *** POINT 1 *** Explicitly specify the encryption mode and the padding.
    // *** POINT 2 *** Use strong encryption technologies (specifically,
    // technologies that meet the relevant criteria),
    // including algorithms, block cipher modes, and padding modes.
    // Parameters passed to the getInstance method of the Cipher class:
    // Encryption algorithm, block encryption mode, padding rule
    // In this sample, we choose the following parameter values:
    // encryption algorithm=AES, block encryption mode=CBC, padding
    // rule=PKCS7Padding
    private static final String TRANSFORMATION = "AES/CBC/PKCS7Padding";

    //  A string used to fetch an instance of the class that generates the key
    private static final String KEY_GENERATOR_MODE =
            "PBEWITHSHA256AND128BITAES-CBC-BC";

    // *** POINT 3 *** When generating a key from a password, use Salt.
    // Salt length in bytes
    public static final int SALT_LENGTH_BYTES = 20;

    // *** POINT 4 *** When generating a key from a password,
    // specify an appropriate hash iteration count.
    // Set the number of mixing repetitions used when generating keys via PBE
    private static final int KEY_GEN_ITERATION_COUNT = 1024;

    // *** POINT 5 *** Use a key of length sufficient to guarantee
    // the strength of encryption.
    // Key length in bits
    private static final int KEY_LENGTH_BITS = 128;

    private byte[] mIV = null;
    private byte[] mSalt = null;

    public byte[] getIV() {
        return mIV;
    }

    public byte[] getSalt() {
        return mSalt;
    }

    AesCryptoPBEKey(final byte[] iv, final byte[] salt) {
        mIV = iv;
        mSalt = salt;
    }

    AesCryptoPBEKey() {
        mIV = null;
        initSalt();
    }

    private void initSalt() {
        mSalt = new byte[SALT_LENGTH_BYTES];
        SecureRandom sr = new SecureRandom();
        sr.nextBytes(mSalt);
    }

    public final byte[] encrypt(final byte[] plain, final char[] password) {
        byte[] encrypted = null;

        try {
            // *** POINT 1 *** Explicitly specify the encryption mode and the
            // padding.
            // *** POINT 2 *** Use strong encryption technologies (specifically,
            // technologies that meet the relevant criteria),
            // including algorithms, modes, and padding.
            Cipher cipher = Cipher.getInstance(TRANSFORMATION);

            // *** POINT 3 *** When generating keys from passwords, use Salt.
            SecretKey secretKey = generateKey(password, mSalt);
            cipher.init(Cipher.ENCRYPT_MODE, secretKey);
            mIV = cipher.getIV();

            encrypted = cipher.doFinal(plain);
        } catch (NoSuchAlgorithmException e) {
        } catch (NoSuchPaddingException e) {
        } catch (InvalidKeyException e) {
        } catch (IllegalBlockSizeException e) {
        } catch (BadPaddingException e) {
        } finally {
        }

        return encrypted;
    }

    public final byte[] decrypt(final byte[] encrypted, final char[] password) {
        byte[] plain = null;

        try {
            // *** POINT 1 *** Explicitly specify the encryption mode and the
            // padding.
            // *** POINT 2 *** Use strong encryption technologies (specifically,
            // technologies that meet the relevant criteria),
            // including algorithms, block cipher modes, and padding modes.
            Cipher cipher = Cipher.getInstance(TRANSFORMATION);

            // *** POINT 3 *** When generating a key from a password, use Salt.
            SecretKey secretKey = generateKey(password, mSalt);
            IvParameterSpec ivParameterSpec = new IvParameterSpec(mIV);
            cipher.init(Cipher.DECRYPT_MODE, secretKey, ivParameterSpec);

            plain = cipher.doFinal(encrypted);
        } catch (NoSuchAlgorithmException e) {
        } catch (NoSuchPaddingException e) {
        } catch (InvalidKeyException e) {
        } catch (InvalidAlgorithmParameterException e) {
        } catch (IllegalBlockSizeException e) {
        } catch (BadPaddingException e) {
        } finally {
        }

        return plain;
    }

    private static final SecretKey generateKey(final char[] password,
                                               final byte[] salt) {
        SecretKey secretKey = null;
        PBEKeySpec keySpec = null;

        try {
            // *** POINT 2 *** Use strong encryption technologies (specifically,
            // technologies that meet the relevant criteria),
            // including algorithms, block cipher modes, and padding modes.
            // Fetch an instance of the class that generates the key
            // In this example, we use a KeyFactory that uses SHA256
            // to generate AES-CBC 128-bit keys.
            SecretKeyFactory secretKeyFactory =
                    SecretKeyFactory.getInstance(KEY_GENERATOR_MODE);

            // *** POINT 3 *** When generating a key from a password, use Salt.
            // *** POINT 4 *** When generating a key from a password,
            // specify an appropriate hash iteration count.
            // *** POINT 5 *** Use a key of length sufficient to guarantee
            // the strength of encryption.
            keySpec = new PBEKeySpec(password,
                    salt,
                    KEY_GEN_ITERATION_COUNT,
                    KEY_LENGTH_BITS);
            // Clear password
            Arrays.fill(password, '?');
            // Generate the key
            secretKey = secretKeyFactory.generateSecret(keySpec);
        } catch (NoSuchAlgorithmException e) {
        } catch (InvalidKeySpecException e) {
        } finally {
            keySpec.clearPassword();
        }

        return secretKey;
    }
}
5.6.1.2. Encrypting and Decrypting With Public Keys
In some cases, only data encryption will be performed -using a stored public key- on the application side, while decryption is performed in a separate safe location (such as a server) under a private key. In cases such as this, it is possible to use public-key encryption.
Points:
Explicitly specify the encryption mode and the padding
Use strong encryption methods (specifically, technologies that meet the relevant criteria), including algorithms, block cipher modes, and padding modes.
Use a key of length sufficient to guarantee the strength of encryption.
RsaCryptoAsymmetricKey.java
/*
 * Copyright (C) 2012-2025 Japan Smartphone Security Association
 *
 * Licensed under the Apache License, Version 2.0 (the "License");
 * you may not use this file except in compliance with the License.
 * You may obtain a copy of the License at
 *
 *      http://www.apache.org/licenses/LICENSE-2.0
 *
 * Unless required by applicable law or agreed to in writing, software
 * distributed under the License is distributed on an "AS IS" BASIS,
 * WITHOUT WARRANTIES OR CONDITIONS OF ANY KIND, either express or implied.
 * See the License for the specific language governing permissions and
 * limitations under the License.
 */

package org.jssec.android.cryptasymmetrickey;

import java.security.InvalidKeyException;
import java.security.KeyFactory;
import java.security.NoSuchAlgorithmException;
import java.security.PrivateKey;
import java.security.PublicKey;
import java.security.interfaces.RSAPublicKey;
import java.security.spec.InvalidKeySpecException;
import java.security.spec.PKCS8EncodedKeySpec;
import java.security.spec.X509EncodedKeySpec;

import javax.crypto.BadPaddingException;
import javax.crypto.Cipher;
import javax.crypto.IllegalBlockSizeException;
import javax.crypto.NoSuchPaddingException;

public final class RsaCryptoAsymmetricKey {

    // *** POINT 1 *** Explicitly specify the encryption mode and the padding.
    // *** POINT 2 *** Use strong encryption methods (specifically, technologies
    // that meet the relevant criteria), including algorithms, block cipher
    // modes, and padding modes..
    // Parameters passed to getInstance method of the Cipher class: Encryption
    // algorithm, block encryption mode, padding rule.
    // In this sample, we choose the following parameter values: encryption
    // algorithm=RSA, block encryption mode=NONE, padding rule=OAEPPADDING.
    private static final String TRANSFORMATION = "RSA/NONE/OAEPPADDING";

    // encryption algorithm
    private static final String KEY_ALGORITHM = "RSA";

    // *** POINT 3 *** Use a key of length sufficient to guarantee the strength of
    // encryption.
    // Check the length of the key
    private static final int MIN_KEY_LENGTH = 2000;

    RsaCryptoAsymmetricKey() {
    }

    public final byte[] encrypt(final byte[] plain, final byte[] keyData) {
        byte[] encrypted = null;

        try {
            // *** POINT 1 *** Explicitly specify the encryption mode and the
            // padding.
            // *** POINT 2 *** Use strong encryption methods (specifically,
            // technologies that meet the relevant criteria), including
            // algorithms, block cipher modes, and padding modes..
            Cipher cipher = Cipher.getInstance(TRANSFORMATION);

            PublicKey publicKey = generatePubKey(keyData);
            if (publicKey != null) {
                cipher.init(Cipher.ENCRYPT_MODE, publicKey);
                encrypted = cipher.doFinal(plain);
            }
        } catch (NoSuchAlgorithmException e) {
        } catch (NoSuchPaddingException e) {
        } catch (InvalidKeyException e) {
        } catch (IllegalBlockSizeException e) {
        } catch (BadPaddingException e) {
        } finally {
        }

        return encrypted;
    }

    public final byte[] decrypt(final byte[] encrypted, final byte[] keyData) {
        // In general, decryption procedures should be implemented on the server
        // side; however, in this sample code we have implemented decryption
        // processing within the application to ensure confirmation of proper
        // execution.
        // When using this sample code in real-world applications, be careful
        // not to retain any private keys within the application.

        byte[] plain = null;

        try {
            // *** POINT 1 *** Explicitly specify the encryption mode and the
            // padding.
            // *** POINT 2 *** Use strong encryption methods (specifically,
            // technologies that meet the relevant criteria), including
            // algorithms, block cipher modes, and padding modes..
            Cipher cipher = Cipher.getInstance(TRANSFORMATION);

            PrivateKey privateKey = generatePriKey(keyData);
            cipher.init(Cipher.DECRYPT_MODE, privateKey);

            plain = cipher.doFinal(encrypted);
        } catch (NoSuchAlgorithmException e) {
        } catch (NoSuchPaddingException e) {
        } catch (InvalidKeyException e) {
        } catch (IllegalBlockSizeException e) {
        } catch (BadPaddingException e) {
        } finally {
        }

        return plain;
    }

    private static final PublicKey generatePubKey(final byte[] keyData) {
        PublicKey publicKey = null;
        KeyFactory keyFactory = null;

        try {
            keyFactory = KeyFactory.getInstance(KEY_ALGORITHM);
            publicKey = keyFactory.generatePublic(new X509EncodedKeySpec(keyData));
        } catch (IllegalArgumentException e) {
        } catch (NoSuchAlgorithmException e) {
        } catch (InvalidKeySpecException e) {
        } finally {
        }

        // *** POINT 3 *** Use a key of length sufficient to guarantee
        // the strength of encryption.
        // Check the length of the key
        if (publicKey instanceof RSAPublicKey) {
            int len = ((RSAPublicKey) publicKey).getModulus().bitLength();
            if (len < MIN_KEY_LENGTH) {
                publicKey = null;
            }
        }

        return publicKey;
    }

    private static final PrivateKey generatePriKey(final byte[] keyData) {
        PrivateKey privateKey = null;
        KeyFactory keyFactory = null;

        try {
            keyFactory = KeyFactory.getInstance(KEY_ALGORITHM);
            privateKey =
                keyFactory.generatePrivate(new PKCS8EncodedKeySpec(keyData));
        } catch (IllegalArgumentException e) {
        } catch (NoSuchAlgorithmException e) {
        } catch (InvalidKeySpecException e) {
        } finally {
        }

        return privateKey;
    }
}
5.6.1.4. Using Password-based Keys to Detect Data Falsification
You may use password-based (shared-key) encryption to verify the integrity of a user’s data.
Points:
Explicitly specify the encryption mode and the padding.
Use strong encryption methods (specifically, technologies that meet the relevant criteria), including algorithms, block cipher modes, and padding modes.
When generating a key from a password, use Salt.
When generating a key from a password, specify an appropriate hash iteration count.
Use a key of length sufficient to guarantee the MAC strength.
HmacPBEKey.java
/*
 * Copyright (C) 2012-2025 Japan Smartphone Security Association
 *
 * Licensed under the Apache License, Version 2.0 (the "License");
 * you may not use this file except in compliance with the License.
 * You may obtain a copy of the License at
 *
 *      http://www.apache.org/licenses/LICENSE-2.0
 *
 * Unless required by applicable law or agreed to in writing, software
 * distributed under the License is distributed on an "AS IS" BASIS,
 * WITHOUT WARRANTIES OR CONDITIONS OF ANY KIND, either express or implied.
 * See the License for the specific language governing permissions and
 * limitations under the License.
 */

package org.jssec.android.signsymmetricpasswordbasedkey;

import java.security.InvalidKeyException;
import java.security.NoSuchAlgorithmException;
import java.security.SecureRandom;
import java.security.spec.InvalidKeySpecException;
import java.util.Arrays;

import javax.crypto.Mac;
import javax.crypto.SecretKey;
import javax.crypto.SecretKeyFactory;
import javax.crypto.spec.PBEKeySpec;

public final class HmacPBEKey {

    // *** POINT 1 *** Explicitly specify the encryption mode and the padding.
    // *** POINT 2 *** Use strong encryption methods (specifically, technologies
    // that meet the relevant criteria),
    // including algorithms, block cipher modes, and padding modes.
    // Parameters passed to the getInstance method of the Mac class:
    // Authentication mode
    private static final String TRANSFORMATION = "PBEWITHHMACSHA1";

    // A string used to fetch an instance of the class that generates the key
    private static final String KEY_GENERATOR_MODE = "PBEWITHHMACSHA1";

    // *** POINT 3 *** When generating a key from a password, use Salt.
    // Salt length in bytes
    public static final int SALT_LENGTH_BYTES = 20;

    // *** POINT 4 *** When generating a key from a password, specify an
    // appropriate hash iteration count.
    // Set the number of mixing repetitions used when generating keys via PBE
    private static final int KEY_GEN_ITERATION_COUNT = 1024;

    // *** POINT 5 *** Use a key of length sufficient to guarantee the MAC
    // strength.
    // Key length in bits
    private static final int KEY_LENGTH_BITS = 160;

    private byte[] mSalt = null;

    public byte[] getSalt() {
        return mSalt;
    }

    HmacPBEKey() {
        initSalt();
    }

    HmacPBEKey(final byte[] salt) {
        mSalt = salt;
    }

    private void initSalt() {
        mSalt = new byte[SALT_LENGTH_BYTES];
        SecureRandom sr = new SecureRandom();
        sr.nextBytes(mSalt);
    }

    public final byte[] sign(final byte[] plain, final char[] password) {
        return calculate(plain, password);
    }

    private final byte[] calculate(final byte[] plain, final char[] password) {
        byte[] hmac = null;

        try {
            // *** POINT 1 *** Explicitly specify the encryption mode and the
            // padding.
            // *** POINT 2 *** Use strong encryption methods (specifically,
            // technologies that meet the relevant criteria), including
            // algorithms, block cipher modes, and padding modes.
            Mac mac = Mac.getInstance(TRANSFORMATION);

            // *** POINT 3 *** When generating a key from a password, use Salt.
            SecretKey secretKey = generateKey(password, mSalt);
            mac.init(secretKey);

            hmac = mac.doFinal(plain);
        } catch (NoSuchAlgorithmException e) {
        } catch (InvalidKeyException e) {
        } finally {
        }

        return hmac;
    }

    public final boolean verify(final byte[] hmac,
                                final byte[] plain, final char[] password) {

        byte[] hmacForPlain = calculate(plain, password);

        if (Arrays.equals(hmac, hmacForPlain)) {
            return true;
        }
        return false;
    }

    private static final SecretKey generateKey(final char[] password,
                                               final byte[] salt) {
        SecretKey secretKey = null;
        PBEKeySpec keySpec = null;

        try {
            // *** POINT 2 *** Use strong encryption methods (specifically,
            // technologies that meet the relevant criteria), including
            // algorithms, block cipher modes, and padding modes.
            // Fetch an instance of the class that generates the key
            // In this example, we use a KeyFactory that uses SHA1 to
            // generate AES-CBC 128-bit keys.
            SecretKeyFactory secretKeyFactory =
                    SecretKeyFactory.getInstance(KEY_GENERATOR_MODE);

            // *** POINT 3 *** When generating a key from a password, use Salt.
            // *** POINT 4 *** When generating a key from a password, specify an
            // appropriate hash iteration count.
            // *** POINT 5 *** Use a key of length sufficient to guarantee the MAC
            // strength.
            keySpec = new PBEKeySpec(password, salt,
                                     KEY_GEN_ITERATION_COUNT, KEY_LENGTH_BITS);
            // Clear password
            Arrays.fill(password, '?');
            // Generate the key
            secretKey = secretKeyFactory.generateSecret(keySpec);
        } catch (NoSuchAlgorithmException e) {
        } catch (InvalidKeySpecException e) {
        } finally {
            keySpec.clearPassword();
        }

        return secretKey;
    }

}
5.6.1.5. Using Public Keys to Detect Data Falsification
When working with data whose signature is determined using private keys stored in distinct, secure locations (such as servers), you may utilize public-key encryption for applications involving the storage of public keys on the application side solely for the purpose of authenticating data signatures.
Points:
Explicitly specify the encryption mode and the padding.
Use strong encryption methods (specifically, technologies that meet the relevant criteria), including algorithms, block cipher modes, and padding modes.
Use a key of length sufficient to guarantee the signature strength.
RsaSignAsymmetricKey.java
/*
 * Copyright (C) 2012-2025 Japan Smartphone Security Association
 *
 * Licensed under the Apache License, Version 2.0 (the "License");
 * you may not use this file except in compliance with the License.
 * You may obtain a copy of the License at
 *
 *      http://www.apache.org/licenses/LICENSE-2.0
 *
 * Unless required by applicable law or agreed to in writing, software
 * distributed under the License is distributed on an "AS IS" BASIS,
 * WITHOUT WARRANTIES OR CONDITIONS OF ANY KIND, either express or implied.
 * See the License for the specific language governing permissions and
 * limitations under the License.
 */

package org.jssec.android.signasymmetrickey;

import java.security.InvalidKeyException;
import java.security.KeyFactory;
import java.security.NoSuchAlgorithmException;
import java.security.PrivateKey;
import java.security.PublicKey;
import java.security.Signature;
import java.security.SignatureException;
import java.security.interfaces.RSAPublicKey;
import java.security.spec.InvalidKeySpecException;
import java.security.spec.PKCS8EncodedKeySpec;
import java.security.spec.X509EncodedKeySpec;

public final class RsaSignAsymmetricKey {

    // *** POINT 1 *** Explicitly specify the encryption mode and the padding.
    // *** POINT 2 *** Use strong encryption methods (specifically, technologies
    // that meet the relevant criteria), including algorithms, block cipher
    // modes, and padding modes.
    // Parameters passed to the getInstance method of the Cipher class:
    // Encryption algorithm, block encryption mode, padding rule.
    // In this sample, we choose the following parameter values: encryption
    // algorithm=RSA, block encryption mode=NONE, padding rule=OAEPPADDING.
    private static final String TRANSFORMATION = "SHA256withRSA";

    // encryption algorithm
    private static final String KEY_ALGORITHM = "RSA";

    // *** POINT 3 *** Use a key of length sufficient to guarantee the signature
    // strength.
    // Check the length of the key
    private static final int MIN_KEY_LENGTH = 2000;

    RsaSignAsymmetricKey() {
    }

    public final byte[] sign(final byte[] plain, final byte[] keyData) {
        // In general, signature procedures should be implemented on the server
        // side; however, in this sample code we have implemented signature
        // processing within the application to ensure confirmation of proper
        // execution.
        // When using this sample code in real-world applications, be careful
        // not to retain any private keys within the application.

        byte[] sign = null;

        try {
            // *** POINT 1 *** Explicitly specify the encryption mode and the
            // padding.
            // *** POINT 2 *** Use strong encryption methods (specifically,
            // technologies that meet the relevant criteria), including
            // algorithms, block cipher modes, and padding modes.
            Signature signature = Signature.getInstance(TRANSFORMATION);

            PrivateKey privateKey = generatePriKey(keyData);
            signature.initSign(privateKey);
            signature.update(plain);

            sign = signature.sign();
        } catch (NoSuchAlgorithmException e) {
        } catch (InvalidKeyException e) {
        } catch (SignatureException e) {
        } finally {
        }

        return sign;
    }

    public final boolean verify(final byte[] sign,
                                final byte[] plain, final byte[] keyData) {

        boolean ret = false;

        try {
            // *** POINT 1 *** Explicitly specify the encryption mode and the
            // padding.
            // *** POINT 2 *** Use strong encryption methods (specifically,
            // technologies that meet the relevant criteria), including
            // algorithms, block cipher modes, and padding modes.
            Signature signature = Signature.getInstance(TRANSFORMATION);

            PublicKey publicKey = generatePubKey(keyData);
            signature.initVerify(publicKey);
            signature.update(plain);

            ret = signature.verify(sign);

        } catch (NoSuchAlgorithmException e) {
        } catch (InvalidKeyException e) {
        } catch (SignatureException e) {
        } finally {
        }

        return ret;
    }

    private static final PublicKey generatePubKey(final byte[] keyData) {
        PublicKey publicKey = null;
        KeyFactory keyFactory = null;

        try {
            keyFactory = KeyFactory.getInstance(KEY_ALGORITHM);
            publicKey = keyFactory.generatePublic(new X509EncodedKeySpec(keyData));
        } catch (IllegalArgumentException e) {
        } catch (NoSuchAlgorithmException e) {
        } catch (InvalidKeySpecException e) {
        } finally {
        }

        // *** POINT 3 *** Use a key of length sufficient to guarantee the
        // signature strength.
        // Check the length of the key
        if (publicKey instanceof RSAPublicKey) {
            int len = ((RSAPublicKey) publicKey).getModulus().bitLength();
            if (len < MIN_KEY_LENGTH) {
                publicKey = null;
            }
        }

        return publicKey;
    }

    private static final PrivateKey generatePriKey(final byte[] keyData) {
        PrivateKey privateKey = null;
        KeyFactory keyFactory = null;

        try {
            keyFactory = KeyFactory.getInstance(KEY_ALGORITHM);
            privateKey = keyFactory
                         .generatePrivate(new PKCS8EncodedKeySpec(keyData));
        } catch (IllegalArgumentException e) {
        } catch (NoSuchAlgorithmException e) {
        } catch (InvalidKeySpecException e) {
        } finally {
        }

        return privateKey;
    }
}
5.6.2. Rule Book
When using encryption technology, it is important to obey the following rules.
Use Strong Algorithms (Specifically, Algorithms that Meet the Relevant Criteria) (Required)
When Using Password-based Encryption, Do Not Store Passwords on Device (Required)
When Generating Key from Password, Specify Appropriate Hash Iteration Count (Required)
Take Steps to Increase the Strengths of Passwords (Recommended)
5.6.2.1. When Specifying an Encryption Algorithm, Explicitly Specify the Encryption Mode and the Padding (Required)
When using cryptographic technologies such as encryption and data verification, it is important that the encryption mode and the padding be explicitly specified. When using encryption in Android application development, you will primarily use the Cipher class within java.crypto. To use the Cipher class, you will first create an instance of Cipher class object by specifying the type of encryption to use. This specification is called a Transformation, and there are two formats in which Transformations may be specified:
“algorithm/mode/padding”
“algorithm”
In the latter case, the encryption mode and the padding will be implicitly set to the appropriate default values for the encryption service provider that Android may access. These default values are chosen to prioritize convenience and compatibility and in some cases may not be particularly secure choices. For this reason, to ensure proper security protections it is mandatory to use the former of the two formats, in which the encryption mode and padding are explicitly specified.
5.6.2.2. Use Strong Algorithms (Specifically, Algorithms that Meet the Relevant Criteria) (Required)
When using cryptographic technologies it is important to choose strong algorithms which meet certain criteria. In addition, in cases where an algorithm allows multiple key lengths, it is important to consider the application’s full product lifetime and to choose keys of length sufficient to guarantee security. Moreover, for some encryption modes and padding modes there exist known strategies of attack; it is important to make choices that are robust against such threats.
Indeed, choosing weak encryption methods can have disastrous consequences; for example, files which were supposedly encrypted to prevent eavesdropping by a third party may in fact be only ineffectually protected and may allow third-party eavesdropping. Because the continual progress of IT leads to continual improvements in encryption-analysis technologies, it is crucial to consider and select algorithms that can guarantee security throughout the entire period during which you expect an application to remain in operation.
Algorithm Security Lifetime, that are expected to be secure for the entire security life of the protected data and Standards for actual encryption technologies differ from country to country, as detailed in the tables below.
Algorithm Security Lifetimes |
Symmetric Key algorithms |
Asymmetric Key algorithms(e.g., RSA, DSA, DH) |
Elliptic-curve cryptography(e.g., ECDSA) |
Digital Signatures and hash-only applications |
HMAC,Key Derivation Functions, Random Number Generation |
Legacy(max. of 80 bits of strength) |
80 |
1024 |
160 |
160 |
160 |
Through 2030(min. of 112 bits of strength) |
112 |
2048 |
224 |
224 |
160 |
Beyond 2030(min. of 128 bits of strength) |
128 |
3072 |
256 |
256 |
160 |
Unit: bit
Algorithm Security Lifetimes |
Symmetric Key algorithms |
Asymmetric Key algorithms |
Elliptic-curve cryptography |
HASH |
less or equal to 4 years protection |
80 |
1248 |
160 |
160 |
10 years protection |
96 |
1776 |
192 |
192 |
20 years protection |
112 |
2432 |
224 |
224 |
30 years protection |
128 |
3248 |
256 |
256 |
Good protection against quantum computers unless Shor’s algorithm applies. |
256 |
15424 |
512 |
512 |
Unit: bit
Technology family |
Name |
|
Public-key cryptography |
Signature |
DSA, ECDSA, RSA=PSS, RSASSA=PKCS1=V1_5 |
Confidentiality |
RSA-OAEP |
|
Key sharing |
DH, ECDH |
|
Shared-key cryptography |
64 bit block encryption |
3-key Triple DES |
128 bit block encryption |
AES, Camellia |
|
Stream encryption |
KCipher-2 |
|
Hash function |
SHA-256, SHA-384, SHA-512 |
|
Encryption usage mode |
Cipher mode |
CBC, CFB, CTR, OFB |
Authenticated cipher modes |
CCM, GCM |
|
Message authentication codes |
CMAC, HMAC |
|
Entity authentication |
ISO/IEC 9798-2, ISO/IEC 9798-3 |
|
5.6.2.3. When Using Password-based Encryption, Do Not Store Passwords on Device (Required)
In password-based encryption, when generating an encryption key based on a password input by a user, do not store the password within the device. The advantage of password-based encryption is that it eliminates the need to manage encryption keys; storing the password on the device eliminates this advantage. Needless to say, storing passwords on a device invites the risk of eavesdropping by other applications, and thus storing passwords on devices is also unacceptable for security reasons.
5.6.2.4. When Generating Keys from Passwords, Use Salt (Required)
In password-based encryption, when generating an encryption key based on a password input by a user, always use Salt. In addition, if you are providing features to different users within the same device, use a different Salt for each user. The reason for this is that, if you generate encryption keys using only a simple hash function without using Salt, the passwords may be easily recovered using a technique known as a “rainbow table.” When Salt is applied, keys generated from the same password will be distinct (different hash values), preventing the use of a rainbow table to search for keys.
(Sample) When generating keys from passwords, use salt
public final byte[] encrypt(final byte[] plain, final char[] password) {
    byte[] encrypted = null;

    try {
         // *** POINT *** Explicitly specify the encryption mode
         // and the padding.

         // *** POINT *** Use strong encryption methods (specifically,
         // technologies that meet the relevant criteria),
         // including algorithms, block cipher modes, and padding modes.
         Cipher cipher = Cipher.getInstance(TRANSFORMATION);

         // *** POINT *** When generating keys from passwords, use Salt.
         SecretKey secretKey = generateKey(password, mSalt);
5.6.2.5. When Generating Key from Password, Specify Appropriate Hash Iteration Count (Required)
In password-based encryption, when generating an encryption key based on a password input by a user, you will choose a number of times for the hashing procedure to be repeated during the process of key generation (“stretching”); it is important to specify this number large enough to ensure security. In general, the iteration count equal to 1,000 or greater is considered sufficient. If you are using the key to protect even more valuable assets, specify a count equal to 1,000,000 or greater. Because the processing time required for a single computation of the hash function is minuscule, it may be easy for attackers to launch brute-force attacks. Thus, by using the stretching method - in which hash processing is repeated many times - we can purposely ensure that the process consumes significant time and thus that brute-force attacks are more costly. Note that the number of stretching repetitions will also affect your application’s processing speed, so take care in choosing an appropriate value.
(Sample) When generating key from password, Set hash iteration counts
private static final SecretKey generateKey(final char[] password,
                                           final byte[] salt) {
    SecretKey secretKey = null;
    PBEKeySpec keySpec = null;

    (Omit)

    // *** POINT *** When generating a key from password, use Salt.
    // *** POINT *** When generating a key from password, specify
    // an appropriate hash iteration count.
    // ** POINT *** Use a key of length sufficient to guarantee
    // the strength of encryption.
    keySpec = new PBEKeySpec(password,
                             salt,
                             KEY_GEN_ITERATION_COUNT,
                             KEY_LENGTH_BITS);
5.6.2.6. Take Steps to Increase the Strengths of Passwords (Recommended)
In password-based encryption, when generating an encryption key based on a password input by a user, the strength of the generated key is strongly affected by the strength of the user’s password, and thus it is desirable to take steps to strengthen the passwords received from users. For example, you might require that passwords be at least 8 characters long and contain multiple types of characters—perhaps at least one letter, one numeral, and one symbol.
5.6.3. Advanced Topics
5.6.3.1. Choosing encryption methods
In the above "sample codes", we showed implementation examples involving three types of cryptographic methods each for encryption and decryption and for detecting data falsification. You may use "Fig. 5.6.1 Selection flowchart for sample code to protect data from eavesdropping", "Fig. 5.6.2 Selection flowchart for sample code to detect falsifications" to make a coarse-grained choice of which cryptographic method to use based on your application. On the other hand, more fine-tuned choices of cryptographic methods require more detailed comparisons of the features of various methods. In what follows we consider some of these comparisons.
Comparison of cryptographic methods for encryption and decryption
Public-key cryptography has high processing cost and thus is not well suited for large-scale data processing. However, because the keys used for encryption and for decryption are different, it is relatively easy to manage keys in cases where you handle only the public key on the application side (i.e. you only perform encryption) and perform decryption in a separate (secure) location. Shared-key cryptography is an all-purpose encryption scheme with few limitations, but in this case the same key is used for encryption and decryption, and thus it is necessary to store the key securely within the application, making key management difficult. Password-based cryptography (shared-key cryptography based on a password) generates keys from user-specified passwords, obviating the need to store key-related secrets within devices. This method is used for applications protecting only user assets but not application assets. Because the strength of the encryption depends on the strength of the password, it is necessary to choose passwords whose complexity grows in proportion to the value of assets to be protected. Please refer to "5.6.2.6. Take Steps to Increase the Strengths of Passwords (Recommended)".
Public key |
Shared key |
Password-based |
|
Processing of large-scale data |
NO (processing cost too high) |
OK |
OK |
Protecting application (or service) assets |
OK |
OK |
NO (allows eavesdropping by users) |
Protecting user assets |
OK |
OK |
OK |
Strength of encryption |
Depends on key length |
Depends on key length |
Depends on strength of password, on Salt, and on the number of hash repetitions |
Key storage |
Easy (only public keys) |
Difficult |
Easy |
Processing carried out by application |
Encryption (decryption is done on servers or elsewhere) |
Encryption and decryption |
Encryption and decryption |
Comparison of cryptographic methods for detecting data falsification
The comparison here is similar to that discussed above for encryption and decryption, with the exception that that table item corresponding to data size is no longer relevant.
Public key |
Shared key |
Password-based |
|
Protecting application (or service) assets |
OK |
OK |
NO (allows falsification by users) |
Protecting user assets |
OK |
OK |
OK |
Strength of encryption |
Depends on key length |
Depends on key length |
Depends on strength of password, on Salt, and on the number of hash repetitions |
Key storage |
Easy (only public keys) |
Difficult(Refer to “5.6.3.4. Protecting Key”) |
Easy |
Processing carried out by application |
Encryption (decryption is done on servers or elsewhere) |
MAC computation, MAC verification |
MAC computation, MAC verification |
MAC: Message authentication code
Note that these guidelines are primarily concerned with the protection of assets deemed low-level or medium-level assets according to the classification discussed in Section "3.1.3. Asset Classification and Protective Countermeasures". Because the use of encryption involves the consideration of a greater number of issues—such as the problem of key storage—than other preventative measures (such as access controls), encryption should only be considered for cases in which assets cannot be adequately protected within the Android OS security mode.
5.6.3.2. Generation of random numbers
When using cryptographic technologies, it is extremely important to choose strong encryption algorithms and encryption modes and sufficiently long keys in order to ensure the security of the data handled by applications and services. However, even if all of these choices are made appropriately, the strength of the security guaranteed by the algorithms in use plummets immediately to zero when the keys that form the linchpin of the security protocol are leaked or guessed. Even for the initial vector (IV) used for shared-key encryption under AES and similar protocols, or the Salt used for password-based encryption, large biases can make it easy for third parties to launch attacks, heightening the risk of exposure to data leakage or corruption. To prevent such situations, it is necessary to generate keys and IVs in such a way as to make it difficult for third parties to guess their values, and random numbers play an immensely important role in ensuring the realization of this imperative. A device that generates random numbers is called a random-number generator. Whereas hardware random-number generators (RNGs) may use sensors or other devices to produce random numbers by measuring natural phenomena that cannot be predicted or reproduced, it is more common to encounter software-implemented random-number generators, known as pseudorandom-number generators (PRNGS).
In Android applications, random numbers of sufficient security for use in encryption may be generated via the SecureRandom class. The SecureRandom class can internally have multiple implementations, which are called providers and provide the function, and if no provider is explicitly specified, then the default provider will be selected. Crypto Provider, which provides the SHA1PRNG algorithm that is cryptographically unsafe [40], was deprecated in Android 7.0 (API level 24), and it was removed in Android 9.0 (API level 28) [41] [42] [43]. If Crypto Provider is specified and SecureRandom is used, NoSuchProviderException will always occur in devices running Android 9.0 and higher, and NoSuchProviderException will occur even in devices running Android 7.0 and higher if targetSdkVersion>=24. For this reason, generally, the use of SecureRandom without specifying the provider is recommended. In what follows we offer examples to demonstrate the use of SecureRandom.
Note that SecureRandom may exhibit a number of weaknesses depending on the Android version, requiring preventative measures to be put in place in implementations. Please refer to "5.6.3.3. Measures to Protect against Vulnerabilities in Random-Number Generators".
Using SecureRandom (using the default implementation)
import java.security.SecureRandom;
[...]
    SecureRandom random = new SecureRandom();
    byte[] randomBuf = new byte [128];

    random.nextBytes(randomBuf);
[...]
The pseudorandom-number generators found in programs like SecureRandom typically operate on the basis of a process like that illustrated in "Fig. 5.6.3 Inner process of pseudorandom number generator". A random number seed is entered to initialize the internal state; thereafter, the internal state is updated each time a random number is generated, allowing the generation of a sequence of random numbers.
Fig. 5.6.3 Inner process of pseudorandom number generator
Random number seeds
The seed plays an extremely important role in a pseudorandom number generator (PRNG).
As noted above, PRNGs must be initialized by specifying a seed. Thereafter, the process used to generate random numbers is a deterministic algorithm, so if you specify the same seed you will get the same sequence of random numbers. This means that if a third party gains access to (that is, eavesdrops upon) or guesses the seed of a PRNG, he can produce the same sequence of random numbers, thus destroying the properties of confidentiality and integrity that the random numbers provide.
For this reason, the seed of a random number generator is itself a highly confidential piece of information—and one which must be chosen in such a way as to be impossible to predict or guess. For example, time information or device-specific data (such as a MAC address, IMEI, or Android ID) should not be used to construct RNG seeds. On many Android devices, /dev/urandom or /dev/random is available, and the default implementation of SecureRandom provided by Android uses these device files to determine seeds for random number generators. As far as confidentiality is concerned, as long as the RNG seed exists only in memory, there is little risk of discovery by third parties with the exception of malware tools that acquire root privileges. If you need to implement security measures that remain effective even on rooted devices, consult an expert in secure design and implementation.
The internal state of a pseudorandom number generator
The internal state of a pseudorandom number generator is initialized by the seed, then updated each time a random number is generated. Just as for the case of PRNGs initialized by the same seed, two PRNGs with the same internal state will subsequently produce precisely the same sequence of random numbers. Consequently, it is also important to protect the internal state against eavesdropping by third parties. However, because the internal state exists in memory, there is little risk of discovery by third parties except in cases involving malware tools that acquire root access. If you need to implement security measures that remain effective even on rooted devices, consult an expert in secure design and implementation.
5.6.3.3. Measures to Protect against Vulnerabilities in Random-Number Generators
The "Crypto" Provider implementation of SecureRandom, found in Android versions 4.3.x and earlier, suffered from the defect of insufficient entropy (randomness) of the internal state. In particular, in Android versions 4.1.x and earlier, the "Crypto" Provider was the only available implementation of SecureRandom, and thus most applications that use SecureRandom either directly or indirectly were affected by this vulnerability. Similarly, the "AndroidOpenSSL" Provider offered as the default implementation of SecureRandom in Android versions 4.2 and later exhibited the defect that the majority of the data items used by OpenSSL as "random-number seeds" were shared between applications (Android versions 4.2.x—4.3.x), creating a vulnerability in which any one application can easily predict the random numbers generated by other applications. The table below details the impact of the vulnerabilities present in various versions of Android OS.
Insufficient entropy in the “Crypto” Provider implementation of SecureRandom |
Can guess the random number seeds used by OpenSSL in other applications |
|
Android 4.1.x and before |
|
|
Android 4.2 - 4.3.x |
|
|
Android 4.4 - 6.0 |
|
|
Android 7.0 and later |
|
|
Since August 2013, patches that remove these Android OS vulnerabilities have been distributed by Google to its partners (device makers, etc.)
However, these vulnerabilities associated with SecureRandom affected a wide range of applications—including encryption functionality and HTTPS communication functionality—and presumably many devices remain unpatched. For this reason, when designing applications targeted at Android 4.3.x and earlier, we recommend that you incorporate the countermeasures (implementations) discussed in the following site.
5.6.3.4. Protecting Key
When using encryption techniques to ensure the security (confidentiality and integrity) of sensitive data, even the most robust encryption algorithm and key lengths will not protect data from third-party attacks if the data content of the keys themselves are readily available. For this reason, the proper handling of keys is among the most important items to consider when using encryption. Of course, depending on the level of the assets you are attempting to protect, the proper handling of keys may require extremely sophisticated design and implementation techniques which exceed the scope of these guidelines. Here we can only offer some basic ideas regarding the secure handling of keys for various applications and key storage locations; our discussion does not extend to specific implementation methods, and as necessary we recommend that you consult an expert in secure design and implementation for Android.
To begin, "Fig. 5.6.4 Places of encrypt keys and strategies for protecting them" illustrates the various places in which keys used for encryption and related purposes in Android smartphones and tablets may exist, and outlines strategies for protecting them.
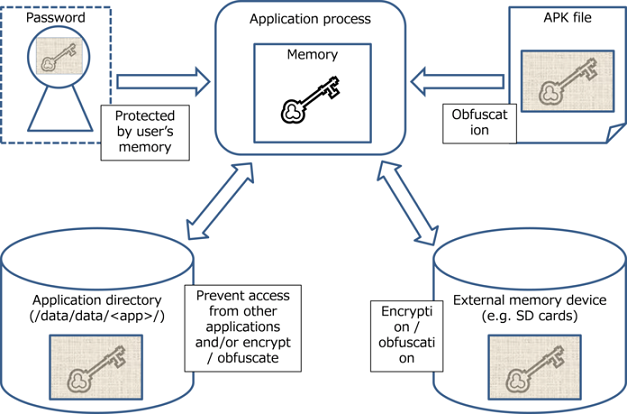
Fig. 5.6.4 Places of encrypt keys and strategies for protecting them
The table below summarizes the asset classes of the assets protected by keys, as well as the protection policies appropriate for various asset owners. For more information on asset classes, please refer to "3.1.3. Asset Classification and Protective Countermeasures".
Asset owner |
Device User |
Application / Service Provider |
||
Asset level |
High |
Medium / Low |
High |
Medium / Low |
Key storage location |
Protection policy |
|||
User’s memory |
Improve password strength |
Disallow the use of user passwords |
||
Application directory (non-public storage) |
Encryption or obfuscation of key data |
Forbid read/write operations from outside the application |
Encryption or obfuscation of key data |
Forbid read/write operations from outside the application |
If keys are stored in public strage such as an APK file or an SD card, it is as follows.
Key storage location |
Protection policy |
APK file |
Obfuscation of key data Note:Be aware that most Java obfuscation tools, such as Proguard, do not obfuscate data (character) strings. |
SD card or elsewhere (public storage) |
Encryption or obfuscation of key data |
In what follows, we will augment the discussion of protective measures appropriate for the various places in which keys may be stored.
Keys stored in a user’s memory
Here we are considering password-based encryption. When keys are generated from passwords, the key storage location is the user’s memory, so there is no danger of leakage due to malware. However, depending on the strength of the password, it may be easy to reproduce keys. For this reason, it is necessary to take steps—similar to those taken when asking users to specify service login passwords—to ensure the strength of passwords; for example, passwords may be restricted by the UI, or warning messages may be used. Please refer to "5.5.2.6. Place a summary version of the application privacy policy in the assets folder (Recommended)". Of course, when passwords are stored in a user’s memory one must keep in mind the possibility that the password will be forgotten. To ensure that data may be recovered in the event of a forgotten password, it is necessary to store backup data in a secure location other than the device (for example, on a server).
Keys stored in application directories
When keys are stored in Private mode in application directories, the key data cannot be read by other applications. In addition, if the application has disabled backup functionality, users will also be unable to access the data. Thus, when storing keys used to protect application assets in application directories, you should disable backups.
However, if you also need to protect keys from applications or users with root privileges, you must encrypt or obfuscate the keys. For keys used to protect user assets, you may use password-based encryption. For keys used to encrypt application assets that you wish to keep private from users as well, you must store the key used for key encryption in an APK file, and the key data must be obfuscated.
Keys stored in APK Files
Because data in APK files may be accessed, in general this is not an appropriate place to store confidential data such as keys. When storing keys in APK files, you must obfuscate the key data and take steps to ensure that the data may not be easily read from the APK file.
Keys stored in public storage locations (such as SD cards)
Because public storage can be accessed by all applications, in general it is not an appropriate place to store confidential data such as passwords. When storing keys in public locations, it is necessary to encrypt or obfuscate the key data to ensure that the data cannot be easily accessed. See also the protections suggested above under "Keys stored in application directories" for cases in which keys must also be protected from applications or users with root privileges.
Handling of keys within process memory
When using the cryptographic technologies available in Android, key data that have been encrypted or obfuscated somewhere other than the application process shown in the figure above must be decrypted (or, for password-based keys, generated) in advance of the encryption procedure; in this case, key data will reside in process memory in unencrypted form. On the other hand, the memory of an application process may not generally be read by other applications, so if the asset class falls within the range covered by these guidelines there is no particular need to take specific steps to ensure security. In cases where—due to the specific objective in question or to the level of the assets handled by an application—it is unacceptable for key data to appear in unencrypted form (even though they are present that way in process memory), it may be necessary to resort to obfuscation or other techniques for key data and encryption logic. However, these methods are difficult to realize at the Java level; instead, you will use obfuscation tools at the JNI level. Such measures fall outside the scope of these guidelines; consult an expert in secure design and implementation.
5.6.3.5. Addressing Vulnerabilities with Security Provider from Google Play Services
Google Play Services (Version 5.0 and later) provides a framework known as Provider Installer that may be used to address vulnerabilities in Security Provider.
First, Security Provider provides implementations of various encryption-related algorithms based on Java Cryptography Architecture (JCA). These Security Provider algorithms may be used via classes such as Cipher, Signature, and Mac to make use of encryption technology in Android apps. In general, rapid response is required whenever vulnerabilities are discovered in encryption-technology-related implementations. Indeed, the exploitation of such vulnerabilities for malicious purposes could result in major damage. Because encryption technologies are also relevant for Security Provider, it is desirable that revisions designed to address vulnerabilities be reflected as quickly as possible.
The most common method of reflecting Security Provider revisions is to use device updates. The process of reflecting revisions via device updates begins with the device manufacturer preparing an update, after which users apply this update to their devices. Thus, the question of whether or not an app has access to an up-to-date version of Security Provider—including the most recent revisions—depends in practice on compliance from both manufacturers and users. In contrast, using Provider Installer from Google Play Services ensures that apps have access to automatically-updated versions of Security Provider.
With Provider Installer from Google Play Services, calling Provider Installer from an app allows access to Security Provider as provided by Google Play Services. Google Play Services is automatically updated via the Google Play Store, and thus the Security Provider provided by Provider Installer will be automatically updated to the latest version, with no dependence on compliance from manufacturers or users.
Sample code that calls Provider Installer is shown below.
Call Provider Installer
import com.google.android.gms.common.GooglePlayServicesUtil;
import com.google.android.gms.security.ProviderInstaller;

public class MainActivity extends Activity
        implements ProviderInstaller.ProviderInstallListener {

    @Override
    protected void onCreate(Bundle savedInstanceState) {
        super.onCreate(savedInstanceState);

        ProviderInstaller.installIfNeededAsync(this, this);
        setContentView(R.layout.activity_main);
    }

    @Override
    public void onProviderInstalled() {
        // Called when Security Provider is the latest version,
        // or when installation completes.
    }

    @Override
    public void onProviderInstallFailed(int errorCode, Intent recoveryIntent) {
        GoogleApiAvailability.getInstance().showErrorNotification(this, errorCode);
    }
}
5.6.3.6. Conscrypt Module
The Conscrypt module is an APEX file that is used to correct vulnerabilities that become clear through implementation of technologies related to cryptography without relying on OTA updates prepared by manufacturers.
Android specific public API for Conscrypt is not included on Android 9. However, a small number of public API methods are added in android.net.ssl on Android 10, enabling access to the Conscrypt function that is not exposed by the classes under javax.net.ssl.
The Conscrypt module uses the native library BoringSSL that was forked by Google from OpenSSL, and is applied to encryption and TLS on many Google products.
Originally, clearly requesting specific providers as shown below was not recommended. And BouncyCastle provider implementations of encryption algorithms were deleted from Android 12 [44].
Cipher.getInstance("AES/CBC/PKCS7PADDING", "BC");
// OR
Cipher.getInstance("AES/CBC/PKCS7PADDING", Security.getProvider("BC"));
Applications that are affected by this change include the following.
Application that uses invalid key sizes with KeyGenerator
Application that has initialized the Galois/Counter Mode (GCM) encryption using a size other than 12 bytes for the initial vector byte size
Concerning 1, the key sizes supported by Conscrypt are 128 bits, 192 bits, and 256 bits. If a key size other than these is specified, an exception occurs while the KeyGenerator.init() method is running. In this case, it is necessary to correct the key size to an appropriate supported size.
keygen.init(512, random); // // Exception occurs. Caused by: java.security.InvalidParameterException: Key size must be either 128, 192, or 256 bits
Concerning 2, if using a GCM encryption, the byte size for the initial vector must be 12 bytes. If other size, for example 16 bytes, is specified, an exception occurs when running the Cipher.init() method. In this case, it is necessary to correct the initial vector byte size to an appropriate supported size.
SecureRandom random = SecureRandom.getInstance("SHA1PRNG");
byte[] INITIALV = new byte[16]; // // Specify initial vector byte size to 16
random.nextBytes(INITIALV);
~
byte[] iv = INITIALV;
SecretKeySpec skey = new SecretKeySpec(key, CIPHER);
IvParameterSpec ivp = new IvParameterSpec(iv);
Cipher cipher = Cipher.getInstance("AES_256/GCM/NOPADDING"); // // GCM encryption algorithm
cipher.init(Cipher.ENCRYPT_MODE, skey, ivp); // Exception occurs. java.security.InvalidAlgorithmParameterException: Expected IV length of 12 but was 16
5.6.3.7. Countermeasures against backup data leaks
If an attacker gains access to backup files, unencrypted data backed up by the app may be retrieved. To prevent backups when unnecessary, add this to your manifest:
<application android:name="com.example.foo" android:allowBackup="false">
...
</application>
In Android 12 and later, setting allowBackup to false restricts cloud and ADB backups but allows device-to-device migration.
If backup is required as a specification of the application, specify the type of data to be backed up as follows (Android 12 or later).
<application android:name="com.example.foo"
  android:dataExtractionRules="backup_rules.xml">
 --
</application>
<application android:name="com.example.foo"
  android:fullBackupContent="@xml/backup_rules">
 --
</application>
For more information, see the Android Developer Guide:[45]
5.6.3.8. Hard-coded Cryptographic Secrets
Developers can use cryptography to protect data confidentiality and integrity, but often do not properly leverage key storage and instead hardcode cryptographic secrets into application code or asset files, which poses serious security issues.
Hardcoded credentials and cryptographic secrets can be easily obtained using reverse engineering tools, which allows attackers to access sensitive data and creates significant security risks.
Therefore, when system-level authentication information is required, it is recommended to use the KeyChain API, and to store app-specific authentication information using the Android Keystore provider. In particular, from Android 16 onwards, StrongBox support is becoming mandatory for devices equipped with Secure Elements, and it is expected that storing credentials in KeyChain or KeyStore will become a common practice in the future. By utilizing these features, the risks associated with hardcoding can be effectively reduced. For more information, see the Android Developer Guide. [46]
Implementation Procedure
Use Android Keystore provider to store app-specific authentication information
Generate and store AES symmetric keys using Android Keystore.
companion object {
    private const val ANDROID_KEY_STORE_PROVIDER = "AndroidKeyStore"
    private const val ANDROID_KEY_STORE_ALIAS = "AES_KEY_DEMO"
}

@Throws(
    KeyStoreException::class,
    NoSuchAlgorithmException::class,
    NoSuchProviderException::class,
    InvalidAlgorithmParameterException::class
)
private fun createAndStoreSecretKey() {
    val builder: KeyGenParameterSpec.Builder = KeyGenParameterSpec.Builder(
        ANDROID_KEY_STORE_ALIAS,
        KeyProperties.PURPOSE_ENCRYPT or KeyProperties.PURPOSE_DECRYPT
    )
    val keySpec: KeyGenParameterSpec = builder
        .setKeySize(256)
        .setBlockModes(KeyProperties.BLOCK_MODE_GCM)
        .setEncryptionPaddings(KeyProperties.ENCRYPTION_PADDING_NONE)
        .setRandomizedEncryptionRequired(true)
        .build()
    val aesKeyGenerator: KeyGenerator =
        KeyGenerator.getInstance(KeyProperties.KEY_ALGORITHM_AES, ANDROID_KEY_STORE_PROVIDER)
    aesKeyGenerator.init(keySpec)
    aesKeyGenerator.generateKey()
}

@Throws(
    KeyStoreException::class,
    UnrecoverableEntryException::class,
    NoSuchAlgorithmException::class,
    CertificateException::class,
    IOException::class,
    NoSuchPaddingException::class,
    InvalidKeyException::class,
    IllegalBlockSizeException::class,
    BadPaddingException::class
)
private fun encryptWithKeyStore(plainText: String): ByteArray? {
    // Initialize KeyStore
    val keyStore: KeyStore = KeyStore.getInstance(ANDROID_KEY_STORE_PROVIDER)
    keyStore.load(null)
    // Retrieve the key with alias created before
    val keyEntry: KeyStore.SecretKeyEntry =
        keyStore.getEntry(ANDROID_KEY_STORE_ALIAS, null) as KeyStore.SecretKeyEntry
    val key: SecretKey = keyEntry.secretKey
    // Use the secret key at your convenience
    val cipher: Cipher = Cipher.getInstance("AES/GCM/NoPadding")
    cipher.init(Cipher.ENCRYPT_MODE, key)
    return cipher.doFinal(plainText.toByteArray())
}
Use the KeyChain API to manage system-level credentials
Use the KeyChain API to manage certificates and private keys shared across the system
private fun selectCertificate() {
    KeyChain.choosePrivateKeyAlias(this, object : KeyChainAliasCallback {
        override fun alias(alias: String?) {
            if (alias != null) {
                // Use the alias to retrieve the certificate
                try {
                    val privateKey = KeyChain.getPrivateKey(this@MainActivity, alias)
                    val certificateChain = KeyChain.getCertificateChain(this@MainActivity, alias)
                    println("Selected Certificate Alias: $alias")

                    // Example usage of the private key and certificate chain
                    // Typically, you would use these for SSL/TLS connections or signing operations
                } catch (e: KeyChainException) {
                    e.printStackTrace()
                } catch (e: InterruptedException) {
                    e.printStackTrace()
                }
            }
        }
    }, null, null, null, -1, null)
}
Obtaining and encrypting credentials, selecting a certificate
Obtain an API key from a remote server, encrypt it, and then select a system-level certificate to use.
try {
    createAndStoreSecretKey()
    val apiKey = fetchApiKeyFromServer()
    val encryptedData = encryptWithKeyStore(apiKey)
    // Do something with the encrypted data (e.g., log output)
    println("Encrypted API Key: ${encryptedData?.joinToString(", ")}")

    // Use KeyChain to select and use a system-level certificate
    selectCertificate()
} catch (e: Exception) {
    e.printStackTrace()
}
The increasing adoption of StrongBox-equipped devices is expected to create synergies with the KeyStore and KeyChain APIs. As a hardware-based security module, StrongBox enhances protection for cryptographic keys and credentials managed by these APIs, thereby elevating overall security levels. For devices without StrongBox, the KeyStore and KeyChain APIs still provide significant security improvements through software-based mechanisms like the Trusted Execution Environment (TEE). Given the anticipated migration toward StrongBox-equipped devices, proactive implementation of these APIs is strongly recommended. This approach effectively mitigates security risks associated with hardcoding while enabling robust, future-proof application development.
5.7. Using biometric authentication features
A variety of methods for biological authentication are currently under research and development, with methods using facial information and vocal signatures particularly prominent. Among these methods, methods for using fingerprint authentication to identify individuals have been used since ancient times, and are used today for purposes such as signatures (by thumbprint) and crime investigation. Applications of fingerprinting have also advanced in several areas of the computer world, and in recent years these methods have begun to enjoy wide recognition as highly convenient techniques (offering advantages such as ease of input) for use in areas such as identifying the owner of a smartphone (primarily for unlocking screens).
Capitalizing on these trends, Android 6.0(API Level 23) incorporates a framework for fingerprint authentication on terminals, which allows apps to make use of fingerprint authentication features(FingerprintManager) to identify individuals. Also, in Android 9.0 (API level 28), a BiometricPrompt API was added for providing comprehensive support for face recognition, iris recognition, and other biometric recognition functions beyond just simply fingerprint authentication. Also, the authentication UI that previously had to be provided separately by the app is no longer needed, and a standard authentication dialog box is automatically used instead. Together with this change, the previous fingerprint authentication function (FingerprintManager) was deprecated. In what follows we discuss some security precautions to keep in mind when using BiometricPrompt authentication.
5.7.1. Sample Code
In biometric authentication functions, there are two major use cases: when a key linked to the user’s authentication information is used and when simply performing user authentication only. Based on the application of this biometric authentication, select the sample code based on Fig. 5.7.1.
Fig. 5.7.1 Selection flowchart for sample code using biometric authentication
At the time when Android 9.0 (API level 29) was released, no BiometricPrompt support library was available, and so this meant that usage was limited to devices running Android 9.0 only. However, currently, the support library [androidx.biometric](https://developer.android.com/reference/androidx/biometric/package-summary) is available, and this enables the use of BiometricPrompt in a wide range of models from Android 6.0 and higher. The sample code shown below uses BiometricPrompt, which is provided as a support library.
5.7.1.1. Authentication Linked with Key
We present sample code below that allows an application to use Android’s biometric authentication feature.
Points:
Declare the use of the USE_FINGERPRINT(Android 6.0 - Android 8.1) or USE_BIOMETRIC(Android 9.0 -) permission [47].
Obtain an instance from the “AndroidKeyStore” Provider.
Notify users that biometric registration will be required to create a key.
When creating (registering) keys, use an encryption algorithm that is not vulnerable (meets standards).
When creating (registering) keys, enable requests for user (biometric) authentication (do not specify the duration over which authentication is enabled).
Design your application on the assumption that the status of biometric registration will change between when keys are created and when keys are used.
Restrict encrypted data to items that can be restored (replaced) by methods other than biometric authentication.
MainActivity.java
/*
 * Copyright (C) 2012-2025 Japan Smartphone Security Association
 *
 * Licensed under the Apache License, Version 2.0 (the "License");
 * you may not use this file except in compliance with the License.
 * You may obtain a copy of the License at
 *
 *      http://www.apache.org/licenses/LICENSE-2.0
 *
 * Unless required by applicable law or agreed to in writing, software
 * distributed under the License is distributed on an "AS IS" BASIS,
 * WITHOUT WARRANTIES OR CONDITIONS OF ANY KIND, either express or implied.
 * See the License for the specific language governing permissions and
 * limitations under the License.
 */

package org.jssec.android.biometricprompt.cipher;

import androidx.appcompat.app.AlertDialog;
import androidx.biometric.BiometricPrompt;

import android.app.KeyguardManager;
import android.content.Context;
import android.content.pm.PackageManager;
import android.icu.text.SimpleDateFormat;
import android.os.Build;
import android.os.Bundle;
import android.util.Base64;
import android.view.View;
import android.widget.Button;
import android.widget.TextView;
import androidx.appcompat.app.AppCompatActivity;
import java.util.Date;
import javax.crypto.BadPaddingException;
import javax.crypto.Cipher;
import javax.crypto.IllegalBlockSizeException;

public class MainActivity extends AppCompatActivity {
    private BiometricAuthentication mBiometricAuthentication;
    private static final String SENSITIVE_DATA = "sensitive date";

    @Override
    protected void onCreate(Bundle savedInstanceState) {
        super.onCreate(savedInstanceState);
        setContentView(R.layout.activity_main);

        if (!isBiometricEnabled(this)) {
            // *** POINT 3 *** Notify users that biometric information
            // registration will be required to create a key
            new AlertDialog.Builder(this)
                .setTitle(R.string.app_name)
                .setMessage("No biometric information has been registered. \n" +
                "Click \"Security\" on the Settings menu to register fingerprints. \n" +
                "Registering biometric information allows easy authentication.")
                .setPositiveButton("OK", null)
                .show();
            return;
        }

        // Callback which receives the result of biometric authentication
        BiometricPrompt.AuthenticationCallback callback =
                new BiometricPrompt.AuthenticationCallback() {
            @Override
            public void onAuthenticationError(int errorCode,
                                              CharSequence errString) {
                showMessage(errString, R.color.colorError);
            }

            @Override
            public void onAuthenticationSucceeded(
                        BiometricPrompt.AuthenticationResult result) {
                Cipher cipher = result.getCryptoObject().getCipher();
                try {
                    // *** POINT 7 *** Limit encrypted data to items that can be
                    // restored (replaced) by methods other than fingerprint
                    // authentication
                    byte[] encrypted = cipher.doFinal(SENSITIVE_DATA.getBytes());
                    showEncryptedData(encrypted);
                } catch (IllegalBlockSizeException | BadPaddingException e) {
                }

                showMessage(getString(R.string.biometric_auth_succeeded),
                            R.color.colorAuthenticated);
                reset();
            }

            @Override
            public void onAuthenticationFailed() {
                showMessage(getString(R.string.biometric_auth_failed),
                             R.color.colorError);
            }
        };

        mBiometricAuthentication =
                new BiometricAuthentication(this, callback);

        Button button_biometric_auth = findViewById(R.id.button_biometric_auth);
        button_biometric_auth.setOnClickListener(new View.OnClickListener () {
            @Override
            public void onClick(View v) {
                if (mBiometricAuthentication.startAuthentication()) {
                    showEncryptedData(null);
                }
            }
        });
    }

    private Boolean isBiometricEnabled(Context con) {
        return Build.VERSION.SDK_INT >= Build.VERSION_CODES.M &&
            con.getSystemService(KeyguardManager.class).isKeyguardSecure() &&
            con.getPackageManager()
               .hasSystemFeature(PackageManager.FEATURE_FINGERPRINT);
    }

    private void setAuthenticationState(boolean authenticating) {
        Button button = (Button) findViewById(R.id.button_biometric_auth);
        button.setText(authenticating ? R.string.cancel : R.string.authenticate);
    }

    private void showEncryptedData(byte[] encrypted) {
        TextView textView = (TextView) findViewById(R.id.encryptedData);
        if (encrypted != null) {
            textView.setText(Base64.encodeToString(encrypted, 0));
        } else {
            textView.setText("");
        }
    }

    private String getCurrentTimeString() {
        long currentTimeMillis = System.currentTimeMillis();
        Date date = new Date(currentTimeMillis);
        SimpleDateFormat simpleDateFormat = new SimpleDateFormat("HH:mm:ss.SSS");

        return simpleDateFormat.format(date);
    }

    private void showMessage(CharSequence msg, int colorId) {
        TextView textView = (TextView) findViewById(R.id.textView);
        textView.setText(getCurrentTimeString() + " :\n" + msg);
        textView.setTextColor(getResources().getColor(colorId, null));
    }

    private void reset() {
        setAuthenticationState(false);
    }
}
BiometricAuthentication.java
/*
 * Copyright (C) 2012-2025 Japan Smartphone Security Association
 *
 * Licensed under the Apache License, Version 2.0 (the "License");
 * you may not use this file except in compliance with the License.
 * You may obtain a copy of the License at
 *
 *      http://www.apache.org/licenses/LICENSE-2.0
 *
 * Unless required by applicable law or agreed to in writing, software
 * distributed under the License is distributed on an "AS IS" BASIS,
 * WITHOUT WARRANTIES OR CONDITIONS OF ANY KIND, either express or implied.
 * See the License for the specific language governing permissions and
 * limitations under the License.
 */

package org.jssec.android.biometricprompt.cipher;

import android.app.KeyguardManager;
import android.content.Context;
import android.content.DialogInterface;
import android.os.CancellationSignal;
import android.os.Handler;
import android.security.keystore.KeyGenParameterSpec;
import android.security.keystore.KeyInfo;
import android.security.keystore.KeyPermanentlyInvalidatedException;
import android.security.keystore.KeyProperties;

import androidx.biometric.BiometricPrompt;
import androidx.fragment.app.FragmentActivity;

import java.io.IOException;
import java.security.InvalidAlgorithmParameterException;
import java.security.InvalidKeyException;
import java.security.KeyStore;
import java.security.KeyStoreException;
import java.security.NoSuchAlgorithmException;
import java.security.NoSuchProviderException;
import java.security.UnrecoverableKeyException;
import java.security.cert.CertificateException;
import java.security.spec.InvalidKeySpecException;
import java.util.concurrent.Executor;

import javax.crypto.Cipher;
import javax.crypto.KeyGenerator;
import javax.crypto.NoSuchPaddingException;
import javax.crypto.SecretKey;
import javax.crypto.SecretKeyFactory;

public class BiometricAuthentication {
    private static final String TAG = "BioAuth";

    private static final String KEY_NAME = "KeyForFingerprintAuthentication";
    private static final String PROVIDER_NAME = "AndroidKeyStore";
    private androidx.biometric.BiometricPrompt mBiometricPrompt;
    private androidx.biometric.BiometricPrompt.PromptInfo mPromptInfo;
    private CancellationSignal mCancellationSignal;
    private KeyStore mKeyStore;
    private KeyGenerator mKeyGenerator;
    private Cipher mCipher;


    public BiometricAuthentication(FragmentActivity context, final androidx.biometric.BiometricPrompt.AuthenticationCallback callback) {
        // Callback which receives the result of biometric authentication
        androidx.biometric.BiometricPrompt.AuthenticationCallback hook =
                new androidx.biometric.BiometricPrompt.AuthenticationCallback() {
            @Override
            public void onAuthenticationError(int errorCode,
                                              CharSequence errString) {
                android.util.Log.e(TAG, "onAuthenticationError");
                if (callback != null) {
                    callback.onAuthenticationError(errorCode, errString);
                }
                reset();
            }

            @Override
            public void onAuthenticationSucceeded(androidx.biometric.BiometricPrompt.AuthenticationResult result) {
                android.util.Log.e(TAG, "onAuthenticationSuccess");
                if (callback != null) {
                    callback.onAuthenticationSucceeded(result);
                }
                reset();
            }

            @Override
            public void onAuthenticationFailed() {
                android.util.Log.e(TAG, "onAuthenticationFailed");
                if (callback != null) {
                    callback.onAuthenticationFailed();
                }
            }
        };

        final Handler mHandler = new Handler(context.getMainLooper());
        final Executor mExecutor = new Executor() {
            @Override
            public void execute(Runnable runnable) {
                mHandler.post(runnable);
            }
        };

        mBiometricPrompt =
            new androidx.biometric.BiometricPrompt(context, mExecutor, hook);
        final androidx.biometric.BiometricPrompt.PromptInfo.Builder builder =
            new androidx.biometric.BiometricPrompt.PromptInfo.Builder()
                .setTitle("Please Authenticate")
                .setNegativeButtonText("Cancel");
        mPromptInfo = builder.build();
        reset();
    }

    public boolean startAuthentication() {
        if (!generateAndStoreKey())
            return false;

        if (!initializeCipherObject())
            return false;

        androidx.biometric.BiometricPrompt.CryptoObject cryptoObject =
            new BiometricPrompt.CryptoObject(mCipher);

        //  Process biometric authentication
        android.util.Log.e(TAG, "Starting authentication");
        mBiometricPrompt.authenticate(mPromptInfo, cryptoObject);
        return true;
    }

    private void reset() {
        try {
            // *** POINT 2 ** Obtain an instance from the
            // “AndroidKeyStore” Provider.
            mKeyStore = KeyStore.getInstance(PROVIDER_NAME);
            mKeyGenerator =
                KeyGenerator.getInstance(KeyProperties.KEY_ALGORITHM_AES,
                                         PROVIDER_NAME);
            mCipher =
                Cipher.getInstance(KeyProperties.KEY_ALGORITHM_AES
                                   + "/" + KeyProperties.BLOCK_MODE_CBC
                                   + "/" + KeyProperties.ENCRYPTION_PADDING_PKCS7);
        } catch (KeyStoreException | NoSuchPaddingException
                 | NoSuchAlgorithmException | NoSuchProviderException e) {
            throw new RuntimeException("failed to get cipher instances", e);
        }
        mCancellationSignal = null;
    }

    private boolean generateAndStoreKey() {
        try {
            mKeyStore.load(null);
            if (mKeyStore.containsAlias(KEY_NAME))
                mKeyStore.deleteEntry(KEY_NAME);
            mKeyGenerator.init(
                // *** POINT 4 *** When creating (registering) keys,
                // use an encryption algorithm that is not vulnerable
                // (meets standards)
                new KeyGenParameterSpec.Builder(KEY_NAME, KeyProperties.PURPOSE_ENCRYPT)
                    .setBlockModes(KeyProperties.BLOCK_MODE_CBC)
                    .setEncryptionPaddings(KeyProperties.ENCRYPTION_PADDING_PKCS7)
                    // *** POINT 5 *** When creating (registering) keys, enable
                    // requests for user (fingerprint) authentication (do not
                    // specify the duration over which authentication is enabled)
                    .setUserAuthenticationRequired(true)
                    .build());
            // Generate a key and store it to Keystore(AndroidKeyStore)
            mKeyGenerator.generateKey();
            return true;
        } catch (IllegalStateException e) {
            return false;
        } catch (NoSuchAlgorithmException | InvalidAlgorithmParameterException
                 | CertificateException | KeyStoreException | IOException e) {
            android.util.Log.e(TAG, "key generation failed: " + e.getMessage());
            throw new RuntimeException("failed to generate a key", e);
        }
    }

    private boolean initializeCipherObject() {
        try {
            mKeyStore.load(null);
            SecretKey key = (SecretKey) mKeyStore.getKey(KEY_NAME, null);
            SecretKeyFactory factory =
                SecretKeyFactory.getInstance(KeyProperties.KEY_ALGORITHM_AES,
                                             PROVIDER_NAME);
            KeyInfo info = (KeyInfo) factory.getKeySpec(key, KeyInfo.class);

            mCipher.init(Cipher.ENCRYPT_MODE, key);
            return true;
        } catch (KeyPermanentlyInvalidatedException e) {
            // *** POINT 6 *** Design your application on the assumption that
            // the status of fingerprint registration will change between
            // when keys are created and when keys are used
            return false;
        } catch (KeyStoreException | CertificateException
                 | UnrecoverableKeyException | IOException
                 | NoSuchAlgorithmException | InvalidKeySpecException
                 | NoSuchProviderException | InvalidKeyException e) {
            android.util.Log.e(TAG, "failed to init Cipher: " + e.getMessage());
            throw new RuntimeException("failed to init Cipher", e);
        }
    }
}
AndroidManifest.xml
<?xml version="1.0" encoding="utf-8"?>
<manifest xmlns:android="http://schemas.android.com/apk/res/android"
          >

  <!--  *** POINT 1 *** Declare the use of the USE_BIOMETRIC permission -->
  <uses-permission android:name="android.permission.USE_BIOMETRIC" />

  <application
      android:allowBackup="true"
      android:icon="@mipmap/ic_launcher"
      android:label="@string/app_name"
      android:roundIcon="@mipmap/ic_launcher_round"
      android:supportsRtl="true"
      android:theme="@style/Theme.AppCompat.Light">
    <activity android:name="org.jssec.android.biometricprompt.cipher.MainActivity"
        android:exported="true">
      <intent-filter>
        <action android:name="android.intent.action.MAIN" />

        <category android:name="android.intent.category.LAUNCHER" />
      </intent-filter>
    </activity>
  </application>

</manifest>
5.7.1.2. Performing User Authentication Only
The sample code for using biometric authentication when user authentication only is performed is shown below. In this case, you do not need to pay attention to any particular security points, but the sample code is provided below for reference.
Example using BiometricPrompt
MainActivity.java
/*
 * Copyright (C) 2012-2025 Japan Smartphone Security Association
 *
 * Licensed under the Apache License, Version 2.0 (the "License");
 * you may not use this file except in compliance with the License.
 * You may obtain a copy of the License at
 *
 *      http://www.apache.org/licenses/LICENSE-2.0
 *
 * Unless required by applicable law or agreed to in writing, software
 * distributed under the License is distributed on an "AS IS" BASIS,
 * WITHOUT WARRANTIES OR CONDITIONS OF ANY KIND, either express or implied.
 * See the License for the specific language governing permissions and
 * limitations under the License.
 */

package org.jssec.android.biometricprompt.nocipher;

import android.hardware.biometrics.BiometricPrompt;
import android.icu.text.SimpleDateFormat;
import androidx.appcompat.app.AppCompatActivity;
import android.os.Bundle;
import android.view.View;
import android.widget.Button;
import android.widget.TextView;
import org.jssec.android.biometric.authentication.nocipher.R;
import java.util.Date;


public class MainActivity extends AppCompatActivity {
    private BiometricAuthentication mBiometricAuthentication;

    @Override
    protected void onCreate(Bundle savedInstanceState) {
        super.onCreate(savedInstanceState);
        setContentView(R.layout.activity_main);

        mBiometricAuthentication = new BiometricAuthentication(this);

        Button button_biometric_auth = findViewById(R.id.button_biometric_auth);
        button_biometric_auth.setOnClickListener(new View.OnClickListener () {
            @Override
            public void onClick(View v) {
                if (!mBiometricAuthentication.isAuthenticating()) {
                    authenticateByBiometric();
                }
            }
        });
    }

    private boolean authenticateByBiometric () {

        BiometricPrompt.AuthenticationCallback callback =
                new BiometricPrompt.AuthenticationCallback() {
            @Override
            public void onAuthenticationError(int errorCode,
                                              CharSequence errString) {
                showMessage(errString, R.color.colorError);
            }

            @Override
            public void onAuthenticationHelp(int helpCode,
                                             CharSequence helpString) {
                showMessage(helpString, R.color.colorHelp);
            }

            @Override
            public void onAuthenticationSucceeded(
                    BiometricPrompt.AuthenticationResult result) {
                showMessage(getString(R.string.biometric_auth_succeeded),
                            R.color.colorAuthenticated);
            }

            @Override
            public void onAuthenticationFailed() {
                showMessage(getString(R.string.biometric_auth_failed),
                             R.color.colorError);
            }

        };
        if (mBiometricAuthentication.startAuthentication(callback)) {
            showMessage(getString(R.string.biometric_processing),
                        R.color.colorNormal);
            return true;
        }
        return false;
    }

    private String getCurrentTimeString() {
        long currentTimeMillis = System.currentTimeMillis();
        Date date = new Date(currentTimeMillis);
        SimpleDateFormat simpleDateFormat = new SimpleDateFormat("HH:mm:ss.SSS");

        return simpleDateFormat.format(date);
    }

    private void showMessage(CharSequence msg, int colorId) {
        TextView textView = (TextView) findViewById(R.id.textView);
        textView.setText(getCurrentTimeString() + " :\n" + msg);
        textView.setTextColor(getResources().getColor(colorId, null));
    }
}
BiometricAuthentication.java
/*
 * Copyright (C) 2012-2025 Japan Smartphone Security Association
 *
 * Licensed under the Apache License, Version 2.0 (the "License");
 * you may not use this file except in compliance with the License.
 * You may obtain a copy of the License at
 *
 *      http://www.apache.org/licenses/LICENSE-2.0
 *
 * Unless required by applicable law or agreed to in writing, software
 * distributed under the License is distributed on an "AS IS" BASIS,
 * WITHOUT WARRANTIES OR CONDITIONS OF ANY KIND, either express or implied.
 * See the License for the specific language governing permissions and
 * limitations under the License.
 */

package org.jssec.android.biometricprompt.nocipher;

import android.content.Context;
import android.content.DialogInterface;
import android.hardware.biometrics.BiometricPrompt;
import android.os.CancellationSignal;

public class BiometricAuthentication {
    private static final String TAG = "BioAuth";

    private BiometricPrompt mBiometricPrompt;
    private CancellationSignal mCancellationSignal;
    private Context mContext;

    // Process "Cancel" button
    private DialogInterface.OnClickListener cancelListener =
        new DialogInterface.OnClickListener () {
        @Override
        public void onClick(DialogInterface dialog, int which) {
            android.util.Log.d(TAG, "cancel");
            if (mCancellationSignal != null) {
                if (!mCancellationSignal.isCanceled())
                    mCancellationSignal.cancel();
            }
        }
    };

    public BiometricAuthentication(Context context) {
        mContext = context;
        BiometricPrompt.Builder builder = new BiometricPrompt.Builder(context);
        // Authentication prompt also provides a button for cacelling
        // Cancel is handled by DialogInterface.OnClickListener
        // given to setNegativeButton as the 3rd argument
        mBiometricPrompt = builder
            .setTitle("Please Authenticate")
            .setNegativeButton("Cancel",context.getMainExecutor() ,cancelListener)
            .build();
        reset();
    }

    public boolean startAuthentication(
            final BiometricPrompt.AuthenticationCallback callback) {

        mCancellationSignal = new CancellationSignal();

        // Callback which accepts the result of biometric authentication
        BiometricPrompt.AuthenticationCallback hook =
            new BiometricPrompt.AuthenticationCallback() {
                @Override
                public void onAuthenticationError(int errorCode,
                                                  CharSequence errString) {
                    android.util.Log.d(TAG, "onAuthenticationError");
                    if (callback != null) {
                        callback.onAuthenticationError(errorCode, errString);
                    }
                    reset();
                }

                @Override
                public void onAuthenticationHelp(int helpCode,
                                                 CharSequence helpString) {
                    android.util.Log.d(TAG, "onAuthenticationHelp");
                    if (callback != null) {
                        callback.onAuthenticationHelp(helpCode, helpString);
                    }
                }

                @Override
                public void onAuthenticationSucceeded(
                        BiometricPrompt.AuthenticationResult result) {
                    android.util.Log.d(TAG, "onAuthenticationSuccess");
                    if (callback != null) {
                        callback.onAuthenticationSucceeded(result);
                    }
                    reset();
                }

                @Override
                public void onAuthenticationFailed() {
                    android.util.Log.d(TAG, "onAuthenticationFailed");
                    if (callback != null) {
                        callback.onAuthenticationFailed();
                    }
                }
            };

        // Perform biomettic authentication
        // BiometricPrompt has a specific API for simple authentication
        // (not linked with key)
        android.util.Log.d(TAG, "Starting authentication");
        mBiometricPrompt.authenticate(mCancellationSignal,
                                      mContext.getMainExecutor(),
                                      hook);

        return true;
    }

    public boolean isAuthenticating() {
        return mCancellationSignal != null && !mCancellationSignal.isCanceled();
    }

    private void reset() {
        mCancellationSignal = null;
    }
}
AndroidManifest.xml
<?xml version="1.0" encoding="utf-8"?>
<manifest xmlns:android="http://schemas.android.com/apk/res/android"
          >

  <!--  *** POINT 1 *** Declare the use of the USE_BIOMETRIC permission -->
  <uses-permission android:name="android.permission.USE_BIOMETRIC" />

  <application
      android:allowBackup="true"
      android:icon="@mipmap/ic_launcher"
      android:label="@string/app_name"
      android:roundIcon="@mipmap/ic_launcher_round"
      android:supportsRtl="true"
      android:theme="@style/AppTheme">
    <activity android:name="org.jssec.android.biometricprompt.nocipher.MainActivity"
        android:exported="true">
      <intent-filter>
        <action android:name="android.intent.action.MAIN" />

        <category android:name="android.intent.category.LAUNCHER" />
      </intent-filter>
    </activity>
  </application>

</manifest>
5.7.2. Rule Book
Observe the following rules when using biometric authentication. There are no particular rules when using the fingerprint authentication function for other applications.
Notify users that biometric information registration will be required to create a key. (Recommended)
5.7.2.1. When creating (registering) keys, use an encryption algorithm that is not vulnerable (meets standards). (Required)
Like the password keys and public keys discussed in Section "5.6. Using Cryptography", when using biometric authentication features to create keys it is necessary to use encryption algorithms that are not vulnerable---that is, algorithms that meet certain standards adequate to prevent eavesdropping by third parties. Indeed, safe and non-vulnerable choices must be made not only for encryption algorithms but also for encryption modes and padding.
For more information on selecting algorithms, see Section "5.6.2.2. Use Strong Algorithms (Specifically, Algorithms that Meet the Relevant Criteria) (Required)".
5.7.2.2. Restrict encrypted data to items that can be restored (replaced) by methods other than biometric authentication. (Required)
When an app uses biometric authentication features for the encryption of data within the app, the app must be designed in such a way as to allow the data to be recovered (replaced) by methods other than biometric authentication.
In general, the use of biological information entails various problems---including secrecy, the difficulty of making modifications, and erroneous identifications---and it is thus best to avoid relying solely on biological information for authentication.
For example, suppose that data internal to an app is encrypted with a key generated using biometric authentication features, but that the iometric data stored within the terminal is subsequently deleted by the user. Then the key used to encrypt the data is not available for use, nor is it possible to copy the data. If the data cannot be recovered by some means other than biometric-authentication functionality, there is substantial risk that the data will be made useless.
Moreover, the deletion of biometric information is not the only scenario in which keys created using biometric authentication functions can become unusable. In Nexus5X, if biometric authentication features are used to create a key and this key is then newly registered as an addition to the biometric information, keys created earlier have been observed to become unusable.
5.7.2.3. Notify users that biometric information registration will be required to create a key. (Recommended)
In order to create a key using biometric authentication, it is necessary that a user's biometrics be registered on the terminal. When designing apps to guide users to the Settings menu to encourage biometric registration, developers must keep in mind that biometrics represent important personal data, and it is desirable to explain to users why it is necessary or convenient for the app to use biometric information.
Notify users the fingerprint registration will be required.
if (!mFingerprintAuthentication.isFingerprintAuthAvailable()) {
    // *** Point *** Notify users that biometric registration will be
    // required to create a key.
    new AlertDialog.Builder(this)
        .setTitle(R.string.app_name)
        .setMessage("No biometric information has been registered.\n" +
            "Click \"Security\" on the Settings menu to register biometrics.\n" +
            "Registering biometrics allows easy authentication.")
        .setPositiveButton("OK", null)
        .show();
    return false;
}
5.7.3. Advanced Topics
5.7.3.1. Preconditions for the use of biometric authentication features by Android apps
The following two conditions must be satisfied in order for an app to use biometric authentication.
User biometrics must be registered within the terminal.
An (application-specific) key must be associated with registered biometrics.
Registering user biometrics
User biometric information can only be registered via the "Security" option in the Settings menu; ordinary applications may not perform the biometric registration procedure. For this reason, if no biometrics have been registered when an app attempts to use biometric authentication features, the app must guide the user to the Settings menu and encourage the user to register biometrics. At this time, it is desirable for the app to offer the user some explanation of why it is necessary and convenient to use biometric information.
In addition, as a necessary precondition for biometric registration to be possible, the terminal must be configured with an alternative screen-locking mechanism. If the screen lock is disabled in a state in which biometric have been registered in the terminal, the registered biometric information will be deleted.
Creating and registering keys
To associate a key with biometrics registered in a terminal, use a KeyStore instance provided by an "AndroidKeyStore" Provider to create and register a new key or to register an existing key.
To create a key associated with biometric information, configure the parameter settings when creating a KeyGenerator to enable requests for user authentication.
Creating and registering a key associated with biometric information.
try {
    // Obtain an instance from the "AndroidKeyStore" Provider.
    KeyGenerator keyGenerator =
        KeyGenerator.getInstance(KeyProperties.KEY_ALGORITHM_AES,
                                 "AndroidKeyStore");
    keyGenerator.init(
        new KeyGenParameterSpec.Builder(KEY_NAME,
                                        KeyProperties.PURPOSE_ENCRYPT)
        .setBlockModes(KeyProperties.BLOCK_MODE_CBC)
        .setEncryptionPaddings(KeyProperties.ENCRYPTION_PADDING_PKCS7)
        // Enable requests for user (biometric) authentication.
        .setUserAuthenticationRequired(true)
        .build());
    keyGenerator.generateKey();
} catch (IllegalStateException e) {
    // no biometrics have been registered in this terminal.
    throw new RuntimeException("No biometric registered", e);
} catch (NoSuchAlgorithmException | InvalidAlgorithmParameterException
            | CertificateException | KeyStoreException | IOException e) {
    // failed to generate a key.
    throw new RuntimeException("Failed to generate a key", e);
}
To associate biometric information with an existing key, register the key with a KeyStore entry to which has been added a setting to enable user authentication requests.
Associating biometric information with an existing key.
SecretKey key = existingKey;  // existing key

KeyStore keyStore = KeyStore.getInstance("AndroidKeyStore");
keyStore.load(null);
keyStore.setEntry(
    "alias_for_the_key",
    new KeyStore.SecretKeyEntry(key),
    new KeyProtection.Builder(KeyProperties.PURPOSE_ENCRYPT)
        // Enable requests for user (biometric) authentication.
        .setUserAuthenticationRequired(true)
        .build());
5.7.3.2. Changes to Biometric Authentication on Android 11
The following 3 points have been changed for biometric authentication on Android 11.
Introduction of the BiometricManager.Authenticators interface
Enhancement of data access in BiometricPrompt
Method for end of support
BiometricManager.Authenticators interface
Authentication types supported in the BiometricManager class and BiometricPrompt class are defined on the BiometricManager.Authenticators interface as follows.
Authentication Type |
Description |
BIOMETRIC_STRONG |
Authentication that uses hardware elements that make the strength level Strong |
BIOMETRIC_WEAK |
Authentication that uses hardware elements that make the strength level Weak |
DEVICE_CREDENTIAL |
Authentication that uses authentication information (user PIN, pattern, password) of screen lock |
Pass the above authentication type as an argument to the setAllowedAuthenticators() method and define which authentication type the app accepts. One or more authentication types can be passed. For example, when defining to accept strength level Strong hardware elements and screen lock authentication information, pass BIOMETRIC_STRONG | DEVICE_CREDENTIAL as an argument.
To confirm whether or not authentication elements that apps require can be used, do so through the canAuthenticate() method. At this time, if the PIN, pattern, and password have not been created by the user, call the ACTION_BIOMETRIC_ENROLL intent action. This intent asks the user to register authentication information of the authentication system that the app accepts.
After user authentication, executing the getAuthenticationType() method enables confirmation of the authentication type (device authentication information or biometric authentication information) used by the user.
Enhancement of data access in BiometricPrompt
You can provide support for auth-per-use keys within your instance of BiometricPrompt. Such a key requires the user to present either a biometric credential or a device credential each time your app needs to access data that’s guarded by that key. Auth-per-use keys can be useful for high-value transactions, such as making a large payment or updating a person’s health records.
To associate a BiometricPrompt object with an auth-per-use key, add code similar to the following.
KeyGenParameterSpec authPerOpKeyGenParameterSpec =
        new KeyGenParameterSpec.Builder(KEY_NAME, KeyProperties.PURPOSE_ENCRYPT)
    // Accept either a biometric credential or a device credential.
    .setUserAuthenticationParameters(0, KeyProperties.AUTH_BIOMETRIC_STRONG | KeyProperties.AUTH_DEVICE_CREDENTIAL)
    .build();
Deprecated methods
Android 11 deprecates the following methods:
The setDeviceCredentialAllowed() method.
The setUserAuthenticationValidityDurationSeconds() method.
The overloaded version of canAuthenticate() that takes no arguments.